Mitsubishi Colt Ralliart. Manual — part 105
GENERAL INFORMATION
ENGINE COOLING
14-2
GENERAL INFORMATION
M1141000100906
The cooling system is designed to keep every part of
the engine at appropriate temperature in whatever
condition the engine may be operated. The cooling
method is of the water-cooled, pressure forced circu-
lation type in which the water pump pressurizes cool-
ant and circulates it throughout the engine. If the
coolant temperature exceeds the prescribed temper-
ature, the thermostat opens to circulate the coolant
through the radiator as well so that the heat
absorbed by the coolant may be radiated into the air.
The water pump is of the centrifugal impeller type
and is driven by the drive belt from the crankshaft.
The radiator is the corrugated fin, cross flow type.
Item
4A9
4G1
Radiator
Performance kJ/h
155,200
175,300
SERVICE SPECIFICATIONS
M1141000300609
Item
Standard value
Limit
Valve opening pressure of radiator cap kPa
74
− 103
Minimum 64
Range of coolant antifreeze concentration of radiator %
30
− 60
−
Thermostat
Valve opening temperature of
thermostat
°C
4A9
82
± 2
−
4G1
82
± 1.5
−
Full-opening temperature of thermostat
°C
95
−
Valve lift mm
4A9
8 or more
−
4G1
8.5 or more
−
LUBRICANTS
M1141000400736
Item
Specified coolant
Quantity L
Engine coolant (including
radiator condense tank)
4A9-M/T
DIA QUEEN SUPER LONG LIFE
COOLANT or equivalent
5.3
4A9-CVT
5.4
4G1
6.8
SEALANTS <4G1>
M1141000500562
Item
Specified sealant
Cylinder block drain plug
3M Nut Locking Part No.4171 or equivalent
Engine coolant temperature sensor
Main
Index
Group
TOC
SPECIAL TOOL
ENGINE COOLING
14-3
SPECIAL TOOL
M1141000600644
Tool
Number
Name
Use
MB991870AB
MB991871
LLC changer
Coolant refilling
ON-VEHICLE SERVICE
ENGINE COOLANT LEAK CHECK
M1141001000504
WARNING
When pressure testing the cooling system,
slowly release cooling system pressure to
avoid getting burned by hot coolant.
CAUTION
• Be sure to completely clean away any mois-
ture from the places checked.
• When the tester is taken out, be careful not to
spill any coolant.
•
ACX01844
Cap adapter
Adapter
AC
Be careful when installing and removing the
tester and when testing not to deform the
filler neck of the radiator.
1. Check that the coolant level is up to the filler neck.
Install a radiator tester and apply 160 kPa
pressure, and then check for leakage from the
radiator hose or connections.
2. If there is leakage, repair or replace the
appropriate part.
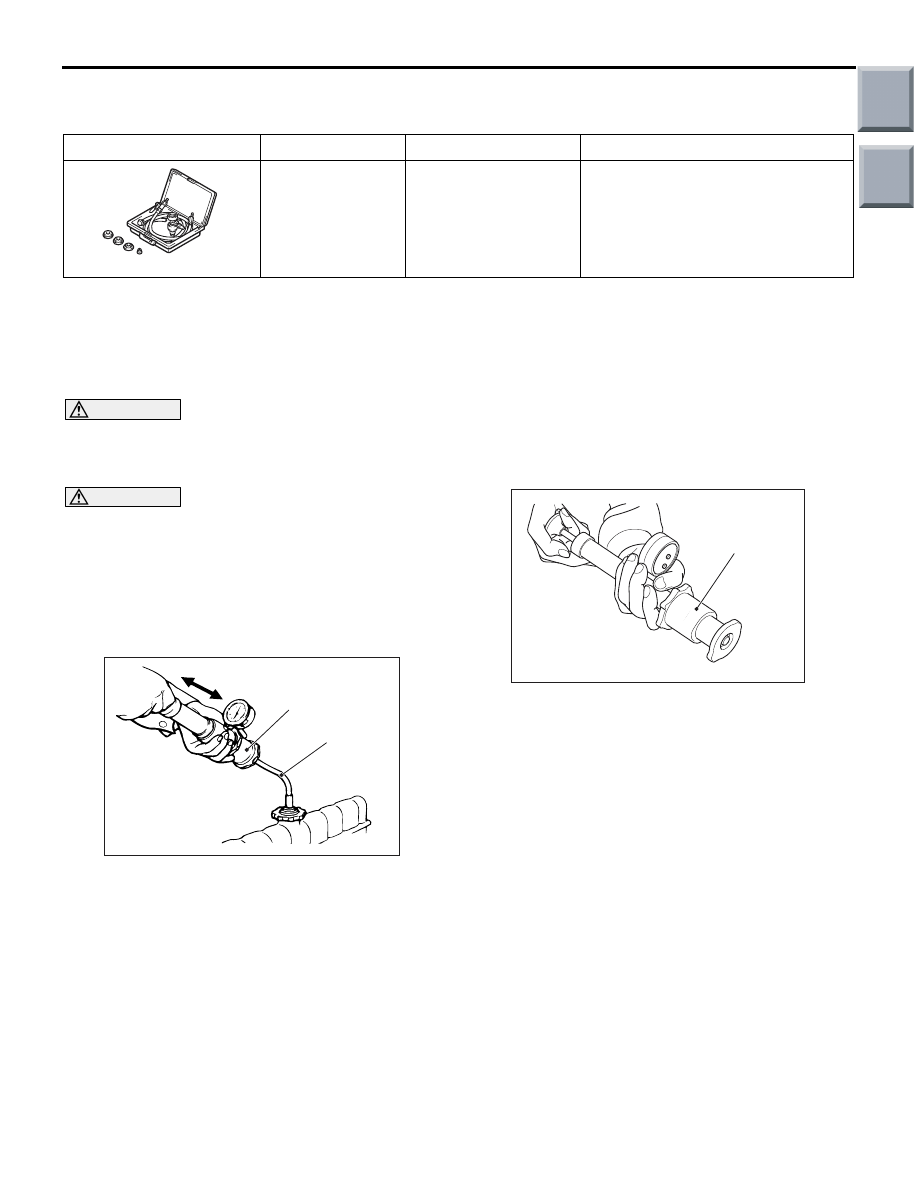
RADIATOR CAP VALVE OPENING
PRESSURE CHECK
M1141001300624
NOTE: Be sure that the cap is clean before test-
ing. Rust or other foreign material on the cap seal
will cause an improper reading.
AC211643 AB
Cap adapter
1. Use a cap adapter to attach the cap to the tester.
2. Increase the pressure until the indicator of the
gauge stops moving.
Minimum limit: 64 kPa
Standard value: 74
− 103 kPa
3. Replace the radiator cap if the reading does not
remain at or above the limit.
Main
Index
Group
TOC

ON-VEHICLE SERVICE
ENGINE COOLING
14-4
ENGINE COOLANT REPLACEMENT
<4A9>
M1141001200984
NOT USING SPECIAL TOOL LLC
CHANGER (MB991871)<CVT>
WARNING
When removing the radiator cap, use care to
avoid contact with hot coolant or steam.
Place a shop towel over the cap and turn the
cap anti-clockwise a little to let the pressure
escape through the vinyl tube. After relieving
the steam pressure, remove the cap by
slowly turning it anti-clockwise.
1. Drain the water from the radiator, heater core and
engine after unplugging the radiator drain plug
and removing the radiator cap.
AC402918AB
Cylinder block
drain plug
Drive shaft
assembly (RH)
2. Drain the water in the water jacket by unplugging
the drain plug of the cylinder block.
3. Remove the radiator condenser tank and drain
the coolant.
4. Drain the coolant then clean the path of the
coolant by injecting water into the radiator from
the radiator cap area.
AC403641AB
Cylinder block
drain plug
Gasket
5. Replace the gasket, and tighten the cylinder block
drain plug to the specified torque.
Tightening torque: 27
± 3 N⋅m
6. Securely tighten the drain plug of the radiator.
7. Reinstall the radiator condenser tank.
AC403211
AB
Breather plug
Thermo valve
Air intake duct
8. Remove the thermo valve breather plug.
CAUTION
Do not use alcohol or methanol anti-freeze or any
engine coolants mixed with alcohol or methanol
anti-freeze. The use of an improper anti-freeze
can cause corrosion of the aluminium compo-
nents.
9. By referring to the section on coolant, select an
appropriate concentration for safe operating
temperature within the range of 30 to 60%. Refill
engine coolant gradually through the radiator cap.
A convenient mixture is a 50% water and 50%
antifreeze solution (freezing point:
−31°C).
Recommended antifreeze: DIA QUEEN SUPER
LONG LIFE COOLANT or equivalent
Quantity: 5.4 L
AC403561AB
Breather
plug
O-ring
10.When no more air bubbles appear from the
thermo valve breather plug, replace the breather
plug and O-ring. Then tighten the breather plug to
the specified torque.
Tightening torque: 1.5
± 0.3 N⋅m
11.Refill the engine coolant up to the top of the
radiator port.
12.Tighten the radiator cap securely.
13.Remove the radiator condenser tank cap, and
add the engine coolant up to the "F" line of the
level gauge.
14.Turn the A/C switch to OFF position to start the
engine and warm up until the cooling fan
operates.
Main
Index
Group
TOC

ON-VEHICLE SERVICE
ENGINE COOLING
14-5
NOTE: This work is to open the thermostat fully.
15.Rev the engine several times and then stop it.
Check that there are no coolant leaks.
16.Remove the radiator cap with the engine cool,
and then refill the engine coolant up to the top of
the radiator port.
17.Tighten the radiator cap securely.
CAUTION
Do not overfill the radiator condenser tank.
18.Remove the radiator condenser tank cap, and
add the engine coolant up to the "F" line of the
level gauge.
USING SPECIAL TOOL LLC CHANGER
(MB991871)
WARNING
When removing the radiator cap, use care to
avoid contact with hot coolant or steam.
Place a shop towel over the cap and turn the
cap anti-clockwise a little to let the pressure
escape through the vinyl tube. After relieving
the steam pressure, remove the cap by
slowly turning it anti-clockwise.
1. Drain the water from the radiator, heater core and
engine after unplugging the radiator drain plug
and removing the radiator cap.
AC402918AB
Cylinder block
drain plug
Drive shaft
assembly (RH)
2. Drain the water in the water jacket by unplugging
the drain plug of the cylinder block.
3. Remove the radiator condenser tank and drain
the coolant.
4. Drain the coolant then clean the path of the
coolant by injecting water into the radiator from
the radiator cap area.
AC403641AB
Cylinder block
drain plug
Gasket
5. Replace the gasket, and tighten the cylinder block
drain plug to the specified torque.
Tightening torque: 27
± 3 N⋅m
6. Securely tighten the drain plug of the radiator.
7. Reinstall the radiator condenser tank.
CAUTION
Do not use alcohol or methanol anti-freeze or any
engine coolants mixed with alcohol or methanol
anti-freeze. The use of an improper anti-freeze
can cause corrosion of the aluminium compo-
nents.
AC402238
MB991871
AB
Air hose
8. By referring to the section on coolant, select an
appropriate concentration for safe operating
temperature within the range of 30 to 60%. Use
the special tool LLC changer (MB991871) to refill
the engine coolant up to the top of the radiator
port. A convenient mixture is a 50% water and
50% antifreeze solution (freezing point:
−31°C).
Recommended antifreeze: DIA QUEEN SUPER
LONG LIFE COOLANT or equivalent
Quantity:
<M/T> 5.3 L
<CVT> 5.4 L
NOTE: For how to use special tool MB991871,
refer to its manufacturer’s instructions.
9. Tighten the radiator cap securely.
10.Remove the radiator condenser tank cap, and
add the engine coolant up to the "F" line of the
level gauge.
Main
Index
Group
TOC
Нет комментариевНе стесняйтесь поделиться с нами вашим ценным мнением.
Текст