Mitsubishi Colt Ralliart. Manual — part 606
INLET MANIFOLD
ENGINE OVERHAUL <4G1>
11D-24
INLET MANIFOLD
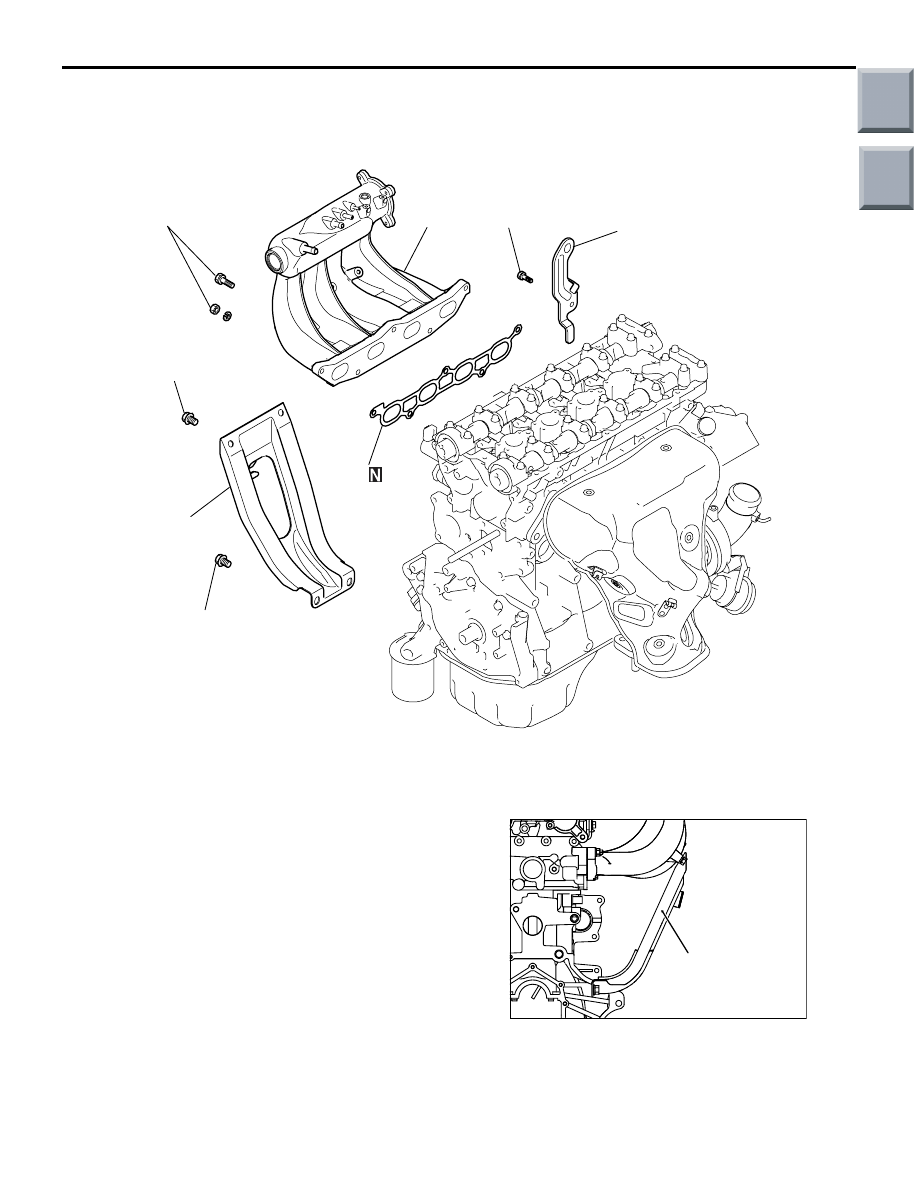
REMOVAL AND INSTALLATION
M1113026100169
AK401840 AC
1
18 ± 2 N·m
2
3
4
18 ± 2 N·m
31 ± 3 N·m
19 ± 3 N·m
Removal steps
>>
A
<< 1. Inlet manifold stay
2. Inlet manifold
3. Inlet manifold gasket
4. Engine hanger
INSTALLATION SERVICE POINTS
>>A<< INLET MANIFOLD STAY INSTAL-
LATION
AK401854AC
Inlet manifold stay
Make sure that the inlet manifold stay tightly fits the
inlet manifold and the mating boss of the cylinder
block, then tighten bolts the specified torques.
Tightening torque:
M8 18
± 2 N⋅m
M10 31
± 3 N⋅m
Main
Index
Group
TOC

EXHAUST MANIFOLD
ENGINE OVERHAUL <4G1>
11D-25
EXHAUST MANIFOLD
REMOVAL AND INSTALLATION
M1113004900918
AK401835AB
1
50 ± 10 N·m
19 ± 3 N·m
10 ± 2 N·m
10 ± 2 N·m
35 ± 6 N·m
59 ± 5 N·m
59 ± 5 N·m
31 ± 2 N·m
31 ± 2 N·m
17 ± 2 N·m
17 ± 2 N·m
59 ± 5 N·m
49 ± 5 N·m
24 ± 4 N·m
2
3
4
5
6
7
8
9
10
10 ± 2 N·m
12
11
13
14
15
16
19
18
17
29 ± 3 N·m
Removal steps
1. Oxygen sensor
2. Turbocharge cover
3. Oil return pipe
>>
C
<< 4. Oil return pipe gasket
>>
C
<< 5. Oil return pipe gasket
>>
B
<< 6. Exhaust fitting bracket
7. Exhaust fitting
8. Exhaust fitting gasket
9. Turbocharger bracket
10. Oil pipe
>>
A
<< 11. Water pipe "B"
12. Turbocharger
13. Turbocharger gasket
>>
A
<< 14. Water pipe "A"
15. Exhaust manifold
16. Exhaust manifold gasket
17. Thermostat housing
18. Thermostat housing gasket
19. Engine hanger
Removal steps (Continued)
Main
Index
Group
TOC

EXHAUST MANIFOLD
ENGINE OVERHAUL <4G1>
11D-26
INSTALLATION SERVICE POINTS
>>A<< WATER PIPE INSTALLATION
AK401841AC
Water pipe A
Water pipe B
Turbocharger
Put the bracket of the water pipe "B" over the bracket
of the water pipe "A" as shown in the illustration.
Tighten them together with the turbocharger to the
tightening torque of 10
± 2 N⋅m.
>>B<< EXHAUST FITTING BRACKET
INSTALLATION
AK401852 AC
Exhaust fitting
Turbocharger
bracket
Exhaust fitting bracket
Make sure that the exhaust fitting bracket fits exactly
the exhaust fitting and the turbocharger bracket.
Tighten the exhaust fitting bracket to the specified
torque of 35
± 6 N⋅m.
>>C<< OIL RETURN PIPE GASKET
INSTALLATION
AK401853 AC
B
A
B
A
Install the projection of the oil return pipe gasket to
the turbocharger and the oil pan as shown in the
illustration.
Main
Index
Group
TOC

ROCKER ARMS AND CAMSHAFT
ENGINE OVERHAUL <4G1>
11D-27
ROCKER ARMS AND CAMSHAFT
REMOVAL AND INSTALLATION
M1113005401414
AK202372
6
14
9
11
12
13
10
7
1
2
3
5
11 ± 1 N·m
22 ± 4 N·m
42 ± 2 N·m
30 ± 3 N·m
8
21 ± 2 N·m
11 ± 1 N·m
4
AC
21 ± 2 N·m
Apply engine oil to
all moving parts
before installation.
Removal steps
>>
H
<< 1. Oil feeder control valve
2. Oil pipe
>>
G
<< 3. Oil feeder control valve filter
>>
F
<< 4. Oil seal
>>
E
<< 5. Circular packing
<<
A
>> >>
D
<< 6. Cam position sensing cylinder
>>
C
<< 7. Front bearing cap
>>
C
<< 8. Bearing cap
>>
C
<< 9. Rear right bearing cap
>>
C
<< 10. Rear left bearing cap
>>
B
<< 11. Intake camshaft
>>
B
<< 12. Exhaust camshaft
13. Roller rocker arm
<<
B
>> >>
A
<< 14. Lash adjuster
Removal steps (Continued)
Main
Index
Group
TOC
Нет комментариевНе стесняйтесь поделиться с нами вашим ценным мнением.
Текст