Mitsubishi Colt Ralliart. Manual — part 519

HEADLINING
INTERIOR
52A-16
HEADLINING
REMOVAL AND INSTALLATION
M1521001400724
AC402991
Section A – A
Section B – B
1
1
2
2
3
3
4
5
7
8
8
A
A
B
B
4
9
6
AD
10, 11
Section C – C
C
C
10
11
7
7
5
7
Clip
Clip
Claw
Removal steps
1.
Roof inside assist grip
2.
Sunvisor
<<
A
>>
3.
Sunvisor holder
4.
Sunroof switch cover <Vehicles
with sunroof >
<<
B
>>
5.
Overhead console assembly
<Vehicles with overhead console>
6.
Sunroof opening trim <Vehicles
with sunroof>
<<
C
>>
7.
Headlining assembly
8.
Assist grip bracket
9.
Overhead console bracket
<Vehicles with overhead console>
10. Map lamp bracket <Vehicles
without sunroof>
11. Map lamp bracket <Vehicles with
sunroof>
Removal steps (Continued)
Main
Index
Group
TOC

HEADLINING
INTERIOR
52A-17
REMOVAL SERVICE POINTS
<<A>> SUNVISOR HOLDER REMOVAL
AC208653
Flat-tipped screwdriver
Sunvisor holder
AD
Sunvisor holder
Use a flat-tipped screwdriver to disengage the tab of
the sunvisor holder, and remove it using moderate
pressure from the forefinger and thumb.
<<B>> OVERHEAD CONSOLE
ASSEMBLY REMOVAL
AC403107AC
A
A
Clip
Claw
Section A – A
Clip
Claw
Clip
Tapping screw
Tapping screw
Overhead console
assembly
Headlining assembly
1. Open the sunglasses holder, and remove the
tapping screw.
2. Shift downward the overhead console assembly
while pressing toward the vehicle rear, and
disengage the overhead console assembly and
overhead console bracket.
3. Unlatch the clips and claws shown in the
illustration from the roof panel, and remove the
overhead console assembly.
Main
Index
Group
TOC
HEADLINING
INTERIOR
52A-18
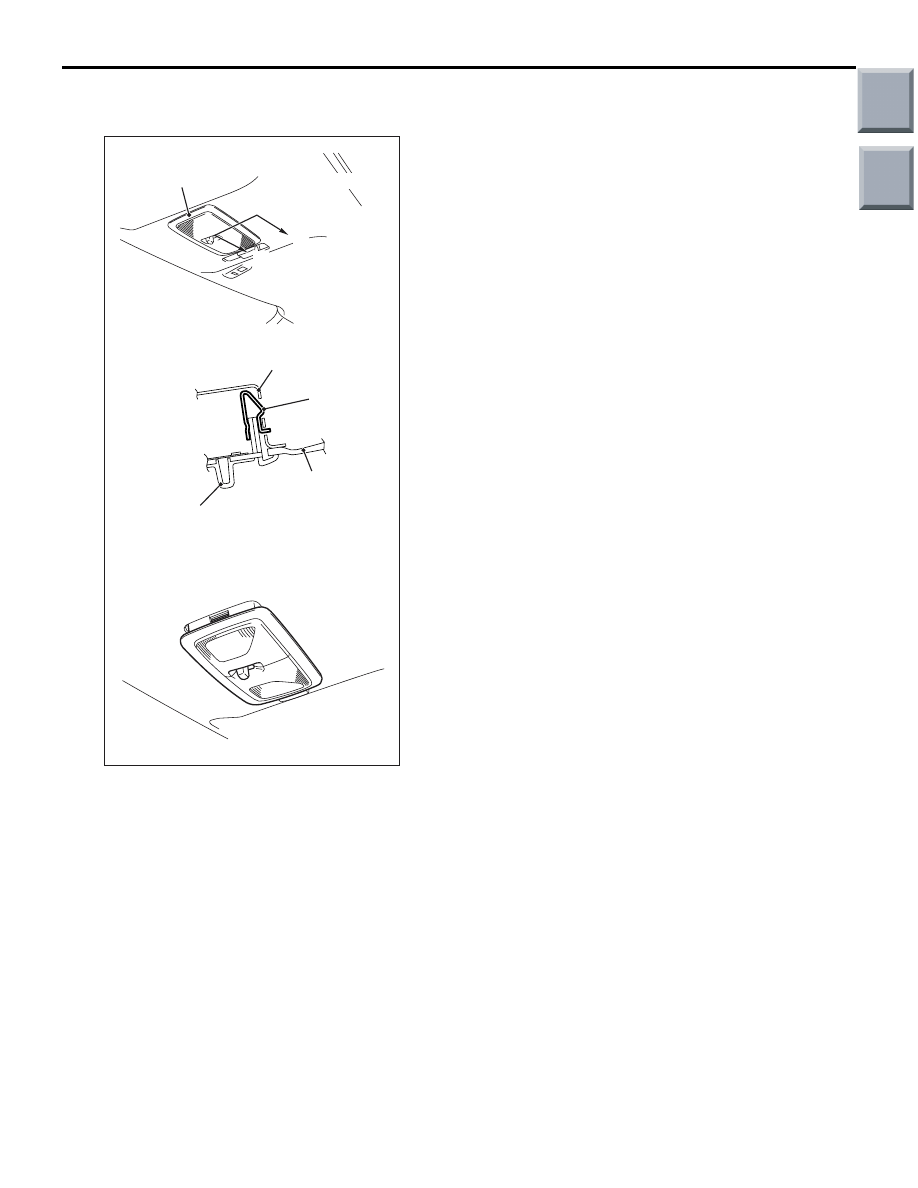
<<C>> HEADLINING ASSEMBLY
REMOVAL
AC208639
Front room lamp
assembly
Clip
Front room lamp
assembly
Headlining assembly
Map lamp bracket
A
A
Section A – A
AB
Map lamp bracket unclipped
For the vehicles without overhead console, press the
front room lamp assembly toward the vehicle front to
disengage the map lamp bracket and front room
lamp assembly clip. Remove the headlining assem-
bly, with the room lamp assembled to the headlining,
from the vehicle.
Main
Index
Group
TOC

INSIDE REAR VIEW MIRROR
INTERIOR
52A-19
DISASSEMBLY AND REASSEMBLY
M1521009100125
AC509882AB
1
2
3
4
Disassembly steps
1.
Front room lamp assembly
2.
Rear room lamp clip
3.
Rear room lamp assembly
4.
Headlining
INSIDE REAR VIEW MIRROR
M1521002600301
REMOVAL SERVICE POINT
AC209066
Claw B
Claw A
Cover
1
2
3
AD
1. Disengage the claw A and lower the cover toward
arrow 1 direction.
2. Push the claw B toward arrow 2 direction to
unlock, and pull out the mirror toward arrow 3
direction.
Disassembly steps (Continued)
Main
Index
Group
TOC
Нет комментариевНе стесняйтесь поделиться с нами вашим ценным мнением.
Текст