Honda Accord Hybrid (2022 year). Manual in english — page 17

uu
Audio System Basic Operation
u
Audio/Information Screen
270
Features
■
To shortcut icons on the home screen
You can store up to three icons on the upper left of the home screen.
1.
Select and hold an icon.
u
The screen switches to the customization
screen.
2.
Drag and drop the icon you want to store to
the upper left of the home screen.
u
The icon is stored as a shortcut.
3.
Select
Done
.
u
The screen will return to the home
screen.
1
To shortcut icons on the home screen
Select
Tips
to show tips. To hide them, select it again.
Select and hold.
Drag and
drop to
preset icon.
Shortcut
Icons

271
uu
Audio System Basic Operation
u
Audio/Information Screen
Continued
Features
1.
Select the system status icon.
u
The status area appears.
2.
Select an item to see the details.
3.
Press the
button or select the system
status icon to close the area.
■
Status Area
System
Status Icon
Status Area
uu
Audio System Basic Operation
u
Audio/Information Screen
272
Features
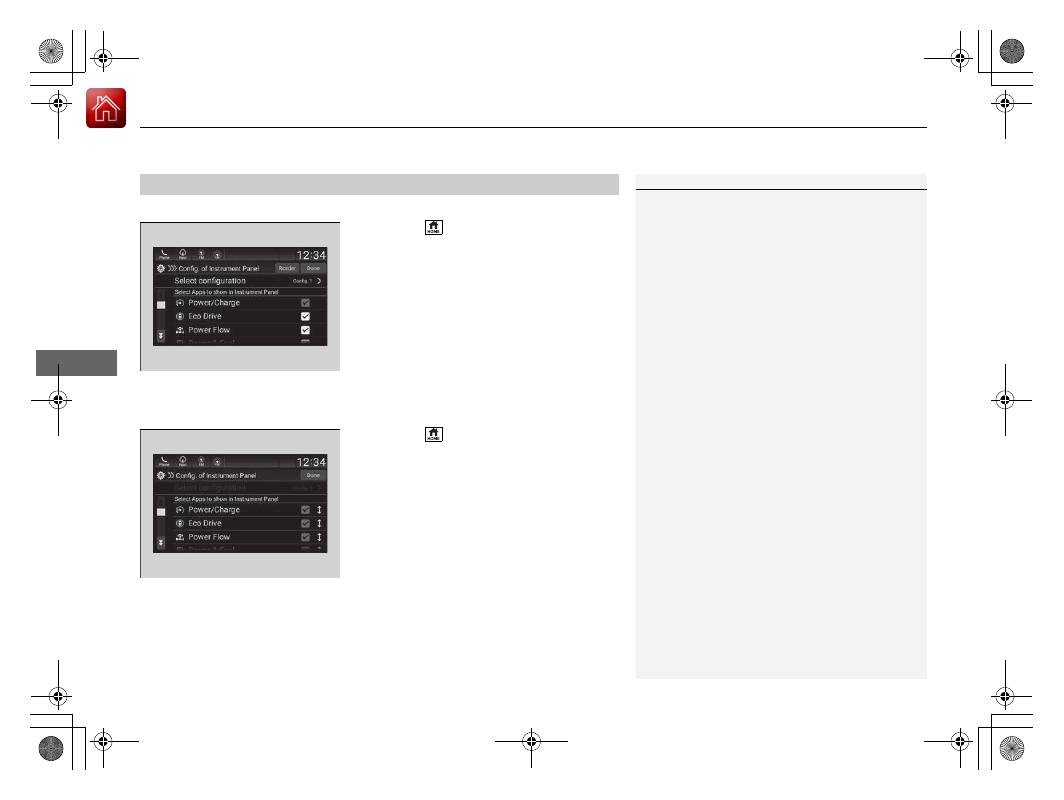
You can edit, show, or hide the meter contents on the driver information interface.
1.
Press the
button.
2.
Select
Settings
.
3.
Select
System
.
4.
Select
Config. of Instrument Panel
.
5.
Select the content you wish to show or
hide.
u
The checked items are displayed on the
driver information interface.
6.
Select
Done
.
■
Editing order
To change the order of the contents on the driver information interface, first select:
1.
Press the
button.
2.
Select
Settings
.
3.
Select
System
.
4.
Select
Config. of Instrument Panel
.
5.
Select
Reorder
.
6.
Select and hold the contents you want to
move.
7.
Drag and drop the contents to where you
want them to be.
8.
Select
Done
.
■
Customizing the Meter
1
You can store up to three customized configurations.
To select or customize a configuration, select
Select
configuration
.
273
uu
Audio System Basic Operation
u
System Updates
*
Continued
Features
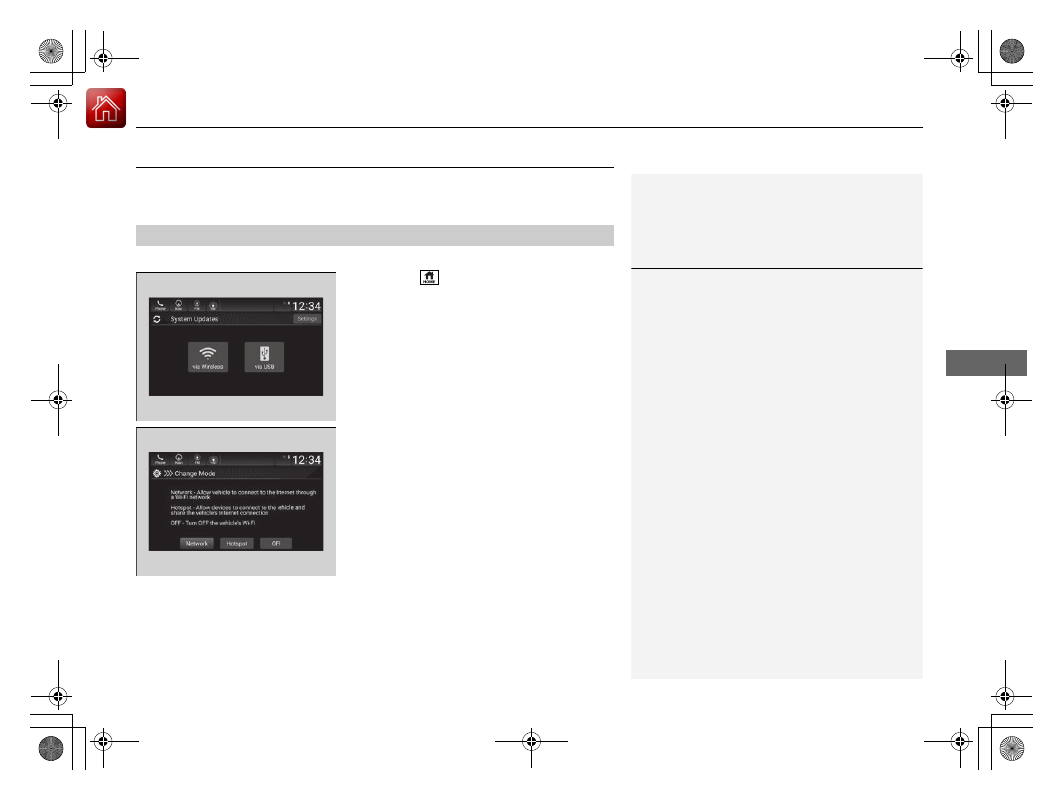
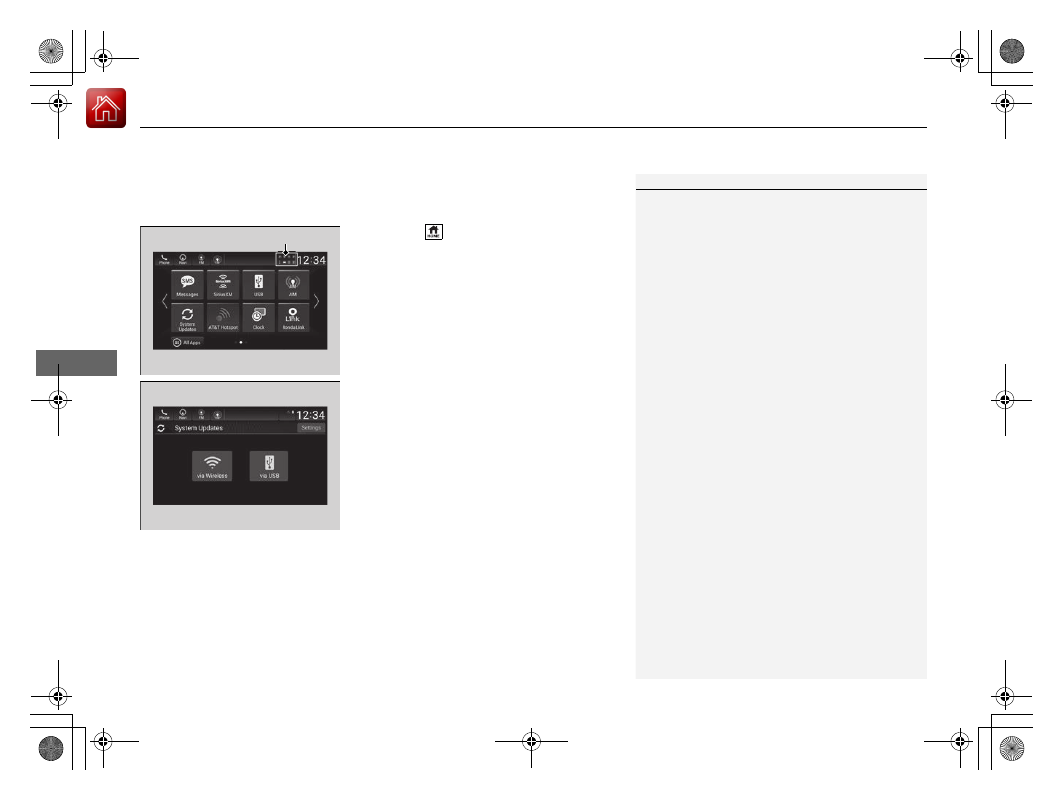
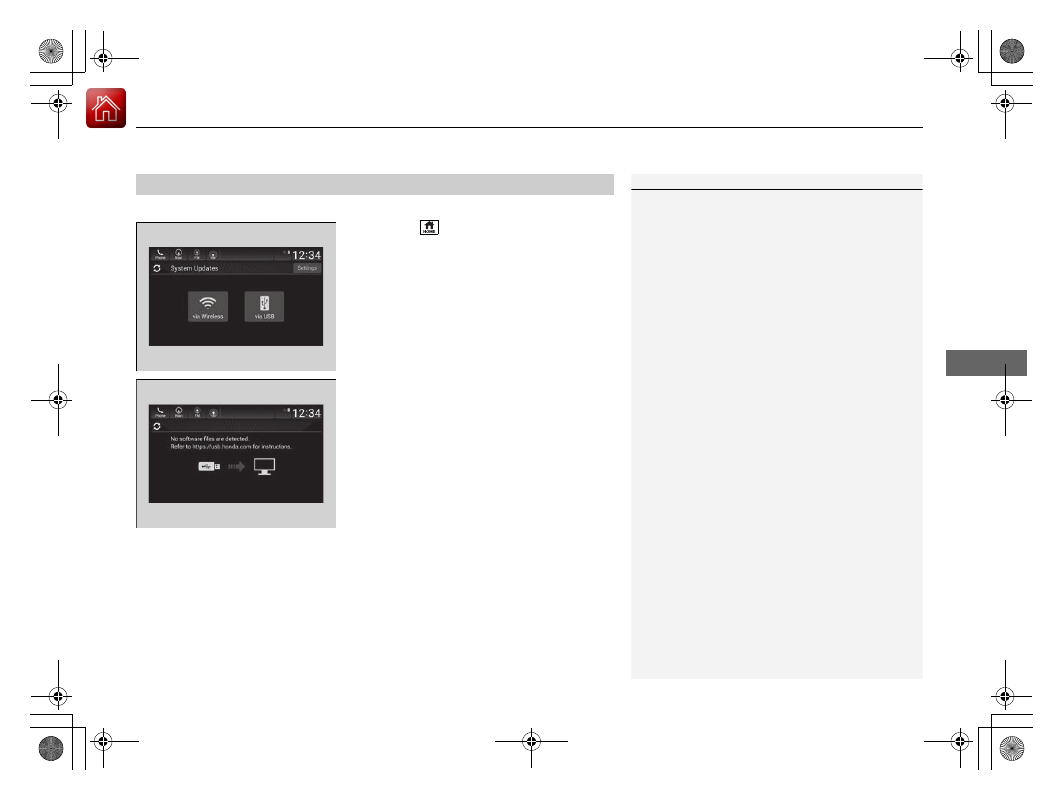
System Updates
*
The audio system’s firmware can be updated with a Wi-Fi connection or with a USB
device.
■
Wireless connection mode setup
1.
Press the
button.
2.
Select
System Updates
.
3.
Select
Settings
.
4.
Select
Connection Setup
.
5.
Select
Wi-Fi
.
6.
Select
Change Mode
.
7.
Select
Network
, then
Confirm
.
u
The display returns to the network list.
8.
Select an access point from the network list,
then
Save
.
u
If the audio system requires a password,
enter a password.
■
How to Update Wirelessly
1
Wireless connection mode setup
If your vehicle has a telematics control unit (TCU), you
do not need the wireless connection mode setup.
* Not available on all models
uu
Audio System Basic Operation
u
System Updates
*
274
Features
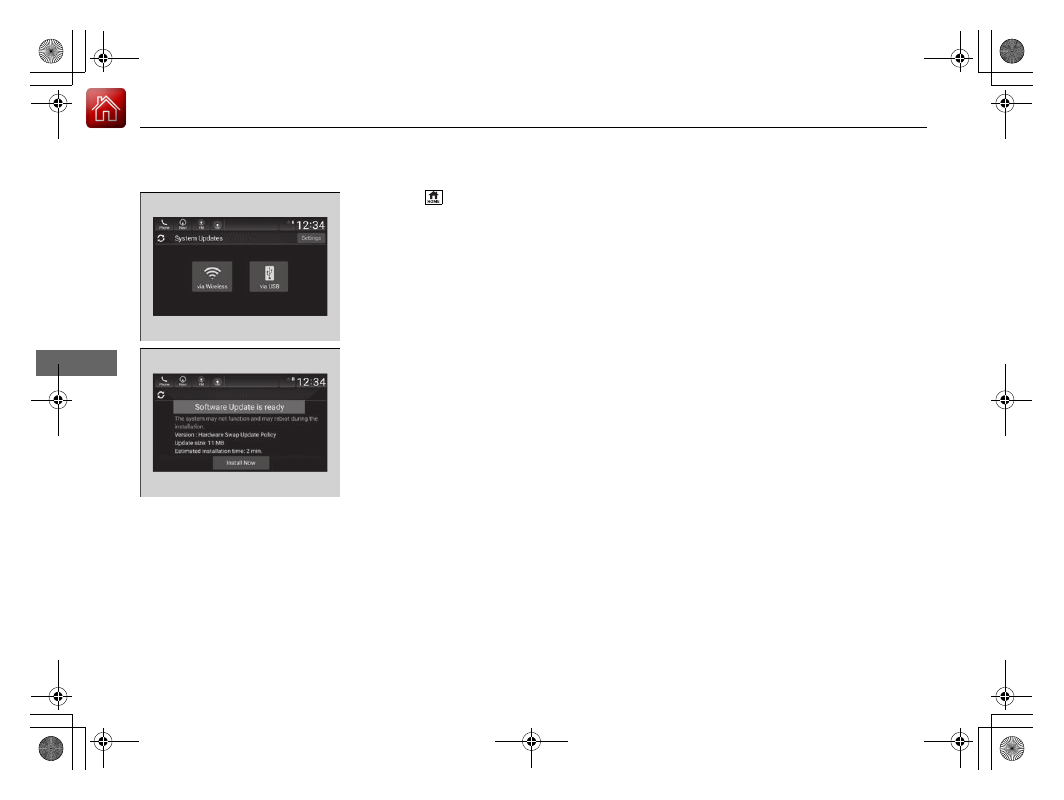
■
How to update
When the audio system update is available, the notification is shown on the audio/
information screen. Use the following procedure to update the system.
1.
Press the
button.
2.
Select
System Updates
.
3.
Select
via Wireless
.
u
If a notification is displayed on the
screen, the screen of step 5 will be
displayed.
4.
Select
Download Now
.
u
A notification appears on the screen.
1
You can update the system via Wi-Fi, but cannot use
the captive portal that require login or agreement the
terms of use on the browser.
Your download will be canceled if:
•
Your Wi-Fi connection is severed.
•
You turn off the ignition when the battery is low on
power.
Your download will recommence the next time a Wi-
Fi connection is established.
Notification

Continued
275
uu
Audio System Basic Operation
u
System Updates
*
Features
5.
Select
Install Now
or
Install while
Vehicle OFF
.
u
A notification appears on the screen if
the update is successful.
1
For battery protection,
Install while vehicle OFF
cannot be selected when the battery is low on power.
If you want to install the updated data, recharge the
battery or select
Install Now
.
276
uu
Audio System Basic Operation
u
System Updates
*
Features
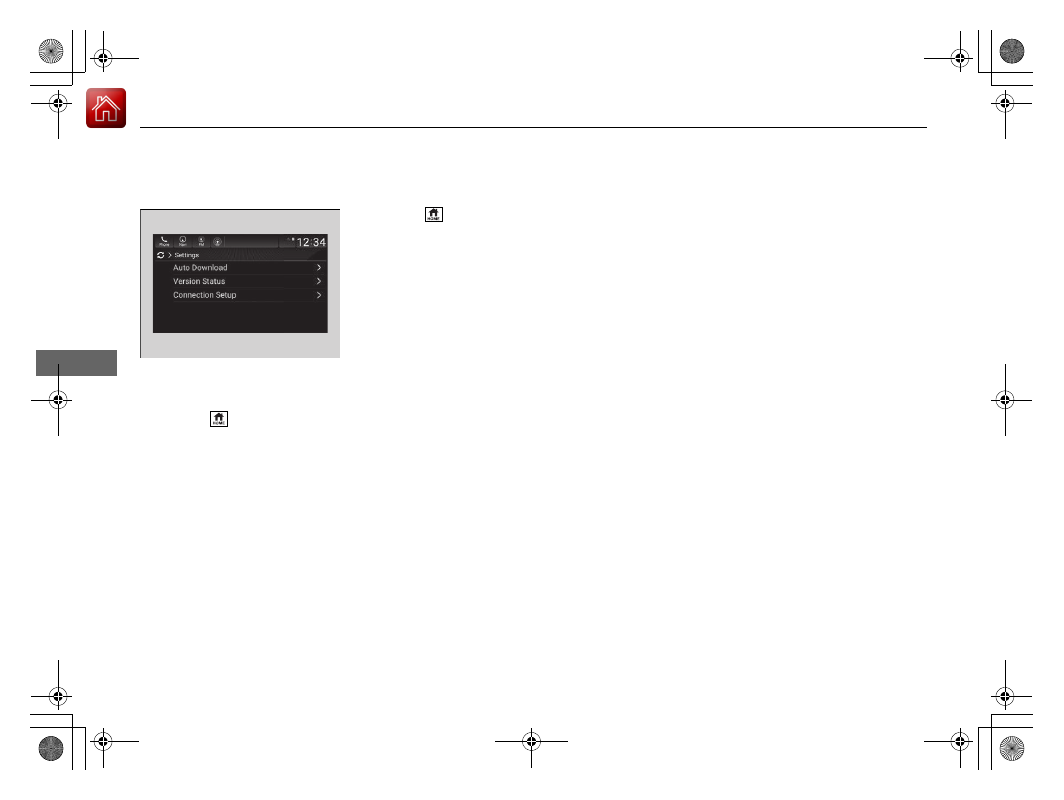
■
Automatic download settings
Use the following procedure to change to the automatic download setting.
1.
Press the
button.
2.
Select
System Updates
.
3.
Select
Settings
.
4.
Select
Auto Download
.
5.
Select the access point, then
Yes
.
■
View a version and update status
Use the following procedure to confirm the version and update status.
1.
Press the
button.
2.
Select
System Updates
.
3.
Select
Settings
.
4.
Select
Version Status
.
Continued
277
uu
Audio System Basic Operation
u
System Updates
*
Features
■
Download the update files from the server
1.
Press the
button.
2.
Select
System Updates
.
3.
Select
via USB
.
u
A notification appears on the screen.
4.
Connect a USB device into the USB port in
the center pocket.
u
The inventory data is copied into the USB
device.
2
5.
Remove the USB device from the USB port.
6.
Connect the USB device into your
computer, and then download the update
files.
u
Follow the link to download the required
software update files. Refer to
https://usb.honda.com
for instructions.
■
How to Update with a USB Device
1
How to Update with a USB Device
A USB device with a minimum of 8 GB of free space
or more is recommended.
Be sure to delete any previous inventory or update
files from the USB before starting the USB update
process.
278
uu
Audio System Basic Operation
u
System Updates
*
Features
■
Update the audio system
1.
Press the
button.
2.
Select
System Updates
.
3.
Select
via USB
.
u
A notification appears on the screen.
4.
Connect the USB device with the update
files into the USB port.
u
A notification appears on the screen.
2
P. 251
5.
Select
Install Now
.
u
A notification appears on the screen if
the update is successful.
279
uu
Audio System Basic Operation
u
Adjusting the Sound
Features
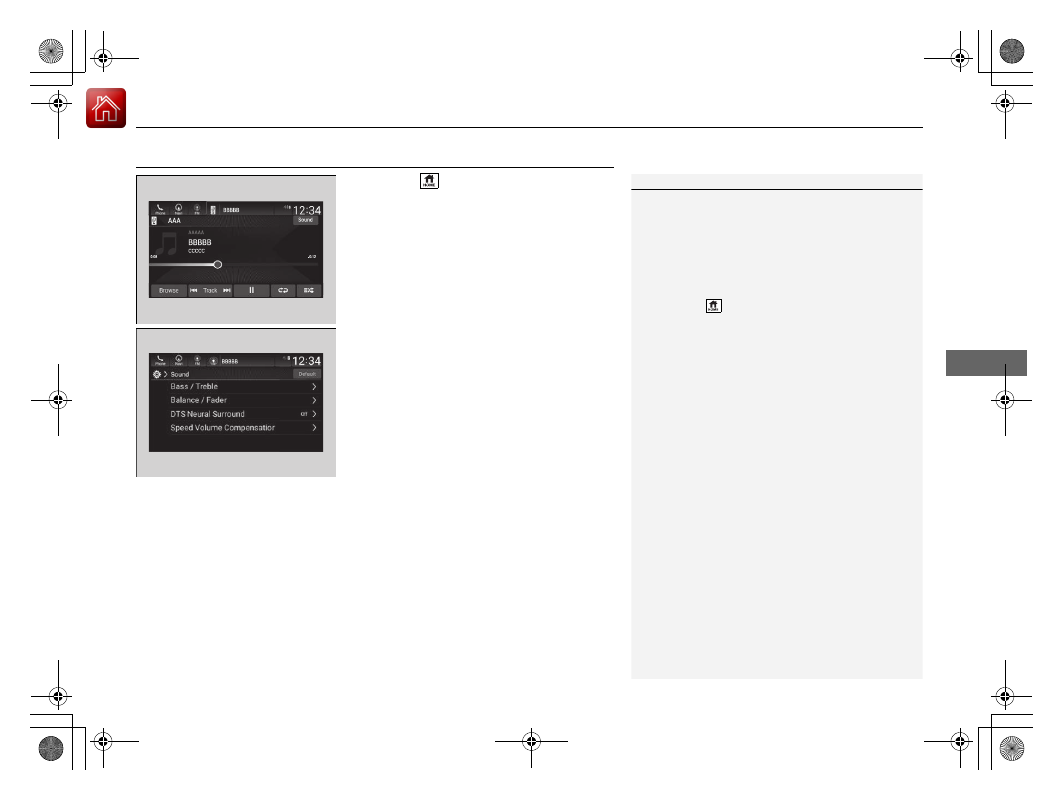
Adjusting the Sound
1.
Press the
button.
2.
Select an audio source icon.
3.
Select
Sound
.
4.
Select the setting you want.
5.
Select
Save
.
Select an item from the following choices:
•
Bass / Treble
: Treble, Midrange, Bass,
Subwoofer
*
•
Balance / Fader
: Balance, Fader
•
DTS Neural Surround
*
: DTS Neural
Surround
TM
•
Speed Volume Compensation
: Speed
Volume Compensation (SVC)
1
The SVC adjusts the volume level based on the
vehicle speed. As you go faster, audio volume
increases. As you slow down, audio volume
decreases.
You can also adjust the sound the following
procedure.
1. Press the
button.
2. Select
Settings
.
3. Select
Sound
.
To reset each setting for
Bass / Treble
,
Balance /
Fader
,
DTS Neural Surround
*
and
Speed Volume
Compensation
select
Default
.
* Not available on all models
280
uu
Audio System Basic Operation
u
Display Setup
Features
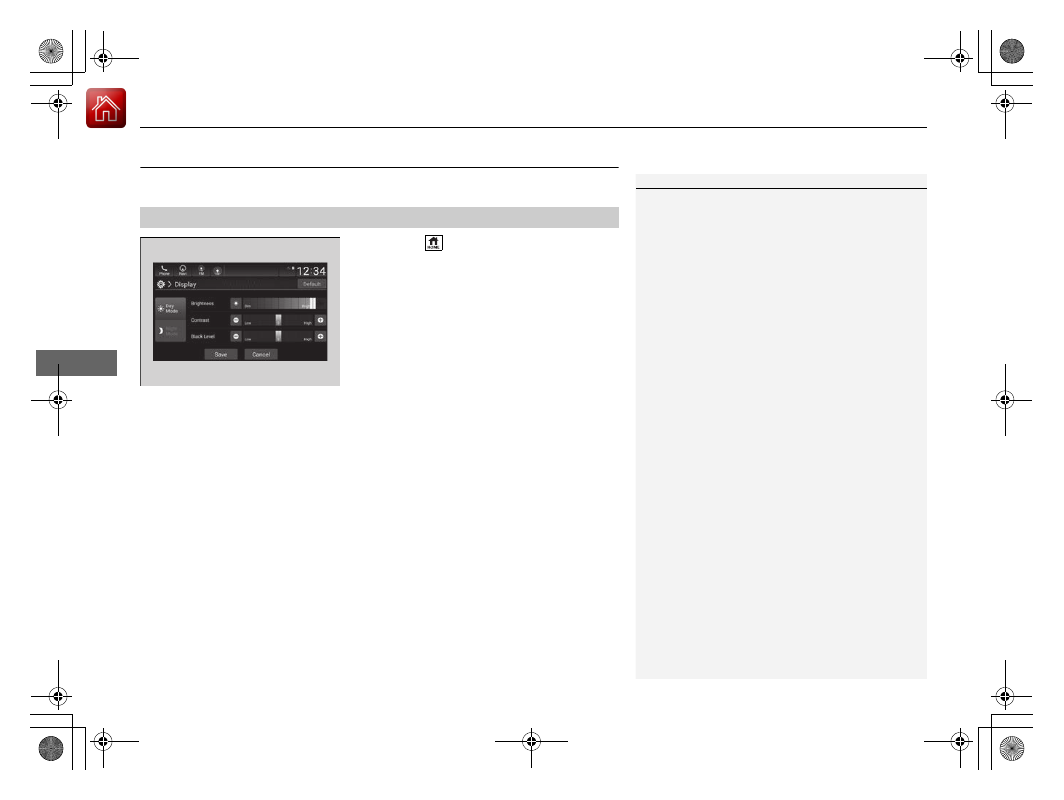
Display Setup
You can change the brightness of the audio/information screen.
1.
Press the
button.
2.
Select
Settings
.
3.
Select
Display
.
4.
Select
Day Mode
or
Night Mode
.
5.
Select the setting you want.
6.
Select
Save
.
■
Changing the Screen Brightness
1
Changing the Screen Brightness
You can change the
Contrast
and
Black Level
settings in the same manner.
To reset the settings, select
Default
.
281
uu
Audio System Basic Operation
u
Display Setup
Features
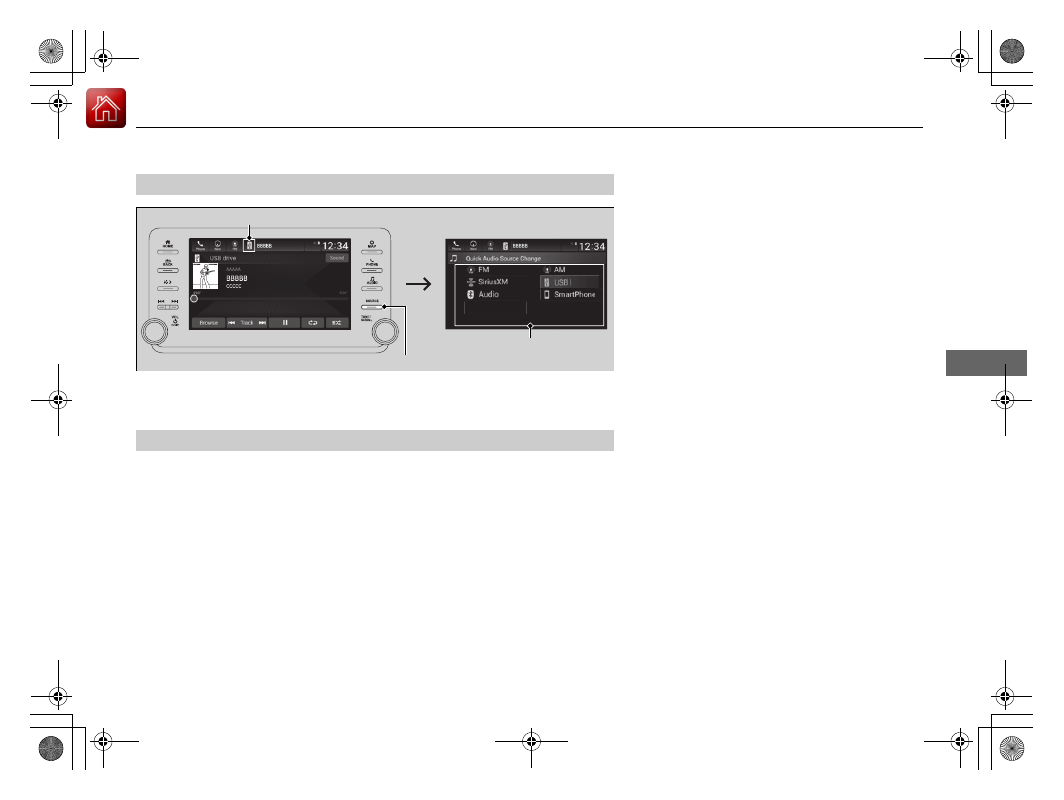
Select the current source icon, then select an icon on the source list or use the
SOURCE
button to switch the audio source.
Certain manual functions are disabled or inoperable while the vehicle is in motion.
You cannot select a grayed-out option until the vehicle is stopped.
■
Selecting an Audio Source
■
Limitations for Manual Operation
*
Select the source icon
Source Select Screen
Source List Icons
SOURCE
Button
* Not available on all models
282
uu
Audio System Basic Operation
u
Voice Control Operation
Features
Voice Control Operation
Your vehicle has a voice control system that allows hands-free operation.
The voice control system uses the
(talk) and
(back) buttons on the steering
wheel and a microphone near the map lights on the ceiling.
To achieve optimum voice recognition when using the voice control system:
•
Make sure the correct screen is displayed for the voice command that you are
using.
The system recognizes only certain commands.
Available voice commands:
2
•
Close the windows and moonroof
*
.
•
Adjust the dashboard and side vents so air does not blow onto the microphone
on the ceiling.
•
Speak clearly in a clear, natural speaking voice without pausing between words.
•
Reduce any background noise if possible. The system may misinterpret your
command if more than one person is speaking at the same time.
■
Voice Recognition
1
When you press the
button, a helpful prompt asks
what you would like to do. Press and release the
button again to bypass this prompt and give a
command.
* Not available on all models
283
uu
Audio System Basic Operation
u
Voice Control Operation
Continued
Features
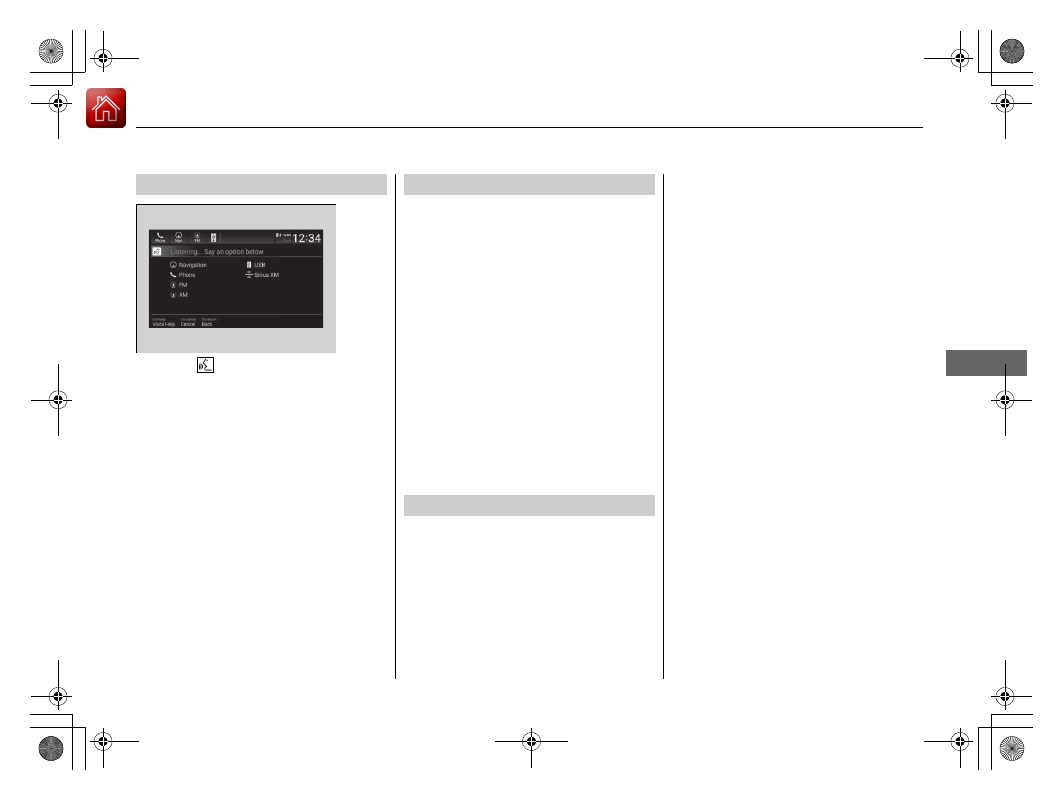
When the
(talk) button is pressed,
available voice commands appear on the
screen.
For a complete list of commands, say “
Voice
Help
” after the beep.
The system only recognizes the commands
on the following pages, at certain screens.
Free-form voice commands are not
recognized.
■
Voice Portal Screen
These commands can only be used when a
phone is connected.
When the system recognizes a phone
command, the screen will change to the
dedicated phone voice recognition screen.
•
Phone
•
Call <Your Contact Name>
•
Call <Phone Number>
The system only recognizes contact names
stored in the phonebook of your phone. If a
full name is registered in the first name
field, the system will recognize the first
name and last name as one contact name.
Phone commands are not available if using
Apple CarPlay.
When the system recognizes an audio
command, the screen will change to the
dedicated audio voice recognition screen.
■
Phone Commands
■
Audio Commands
■
FM Commands
•
FM
•
Tune to <87.7-107.9> FM
■
AM Commands
•
AM
•
Tune to <530-1710> AM
■
Sirius XM Commands
*
•
Sirius XM
•
Channel <1-999>
•
Channel <station name>
■
USB Commands
•
USB
•
Play Genre <Genre name>
•
Play Artist <Artist name>
•
Play Album <Album name>
•
Play Playlist <Playlist name>
•
Play Song <Song name>
•
Play Music
•
List Genre <Genre name>
•
List Artist <Artist name>
•
List Album <Album name>
•
List Playlist <Playlist name>
* Not available on all models
284
uu
Audio System Basic Operation
u
Voice Control Operation
Features
The system will accept navigation voice
commands when on the dedicated voice
command screen for navigation.
2
Refer to the Navigation System Manual
•
Voice Help
•
Cancel
•
Back
Voice Help provides guidance for the
current screen.
*1: Models with navigation system
■
Navigation Commands
*1
■
Standard Commands
285
uu
Audio System Basic Operation
u
Playing AM/FM Radio
Continued
Features
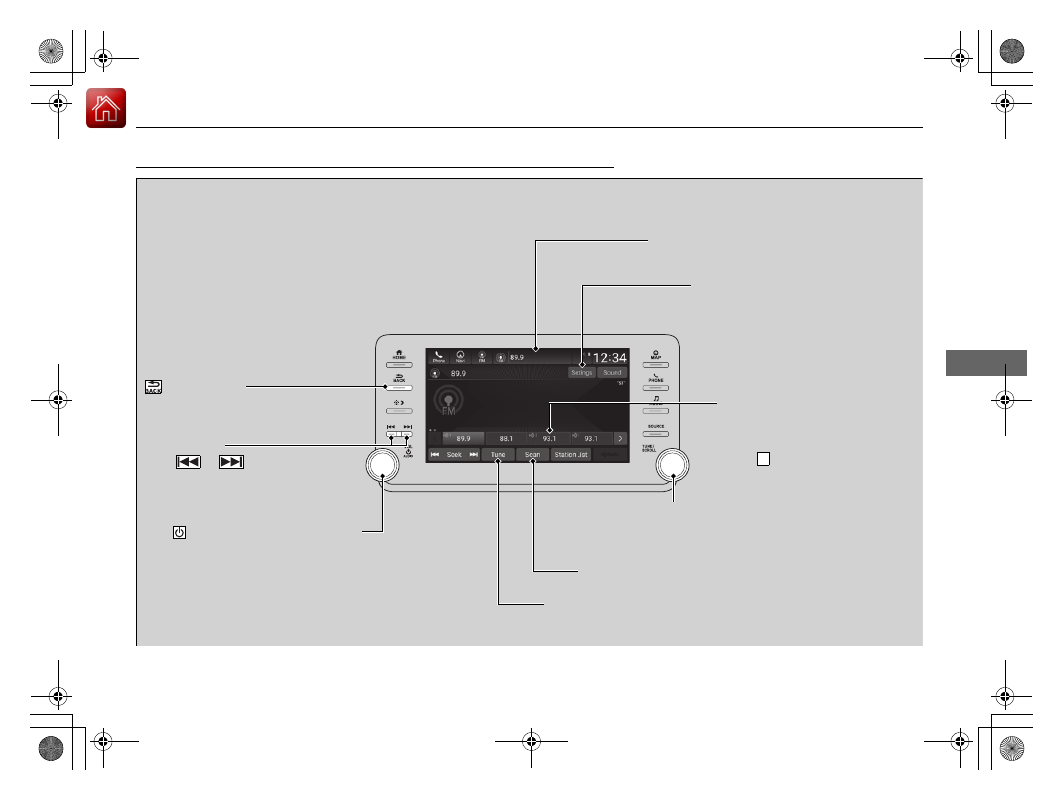
Playing AM/FM Radio
(Back) Button
Press to go back to the previous
display.
Seek Buttons
Press
or
to search up and
down the selected band for a
station with a strong signal.
VOL/
AUDIO (Volume/Power) Knob
Push to turn the audio system on and off.
Turn to adjust the volume.
Tune Icon
Select to use the on-screen keyboard for
entering the radio frequency directly.
Audio/Information Screen
Scan Icon
Select to scan each station with a strong signal.
Preset Icons
Tune the radio frequency for
preset memory.Select and hold the
preset icon to store that station.
Select
to display beyond preset
5.
>
Settings Icon
Select whether to tune to HD Radio
TM*
automatically.
Selector Knob
Turn to tune the radio frequency.
Press, and then turn to select an item. After that,
press again to make your selection.
* Not available on all models
Нет комментариевНе стесняйтесь поделиться с нами вашим ценным мнением.
Текст