Acura RLX HYBRID (2020 year). Manual in english — page 36
578
uu
Fuses
u
Fuse Locations
Han
d
lin
g the U
n
expected
■
Circuit protected and fuse rating
Circuit Protected
Amps
1
−
−
2
Front Seat Heaters/AVS
*
20 A
3
Rear Passenger’s Side
Power Window
20 A
4
Front Passenger’s Lumbar
Support
7.5 A
5
Daytime Running Lights
7.5 A
6
A/C Water Pump
10 A
7
Passenger’s Power Seat
Sliding
20 A
8
Passenger’s Power Seat
Reclining
20 A
9
Rear Seat Heaters
20 A
10
−
−
11
Fly Start
15 A
12
Accessory Power Socket
(Console Compartment)
20 A
13
Accessory Power Socket
(Center Pocket)
20 A
14
AS ECU
7.5 A
15
Glove Box
7.5 A
16
−
−
17
−
−
18
Front Passenger’s Power
Window
20 A
19
SRS1
10 A
*1:Models without surround view camera
system
*2:Models with surround view camera
system
20
ABS/VSA
7.5 A
21
BATT ECU
7.5 A
22
e-pretensioner
7.5 A
23
−
−
24
SRS2
7.5 A
25
Illumination
7.5 A
26
Right e-pretensioner
20 A
27
Heated Steering Wheel
10 A
28
Audio AMP
30 A
*1
40 A
*2
Circuit Protected
Amps
* Not available on all models
-------------------------------------------------------------------------------------------------------------------------------------------------------------
579
uu
Fuses
u
Inspecting and Changing Fuses
Han
d
lin
g the U
n
expected
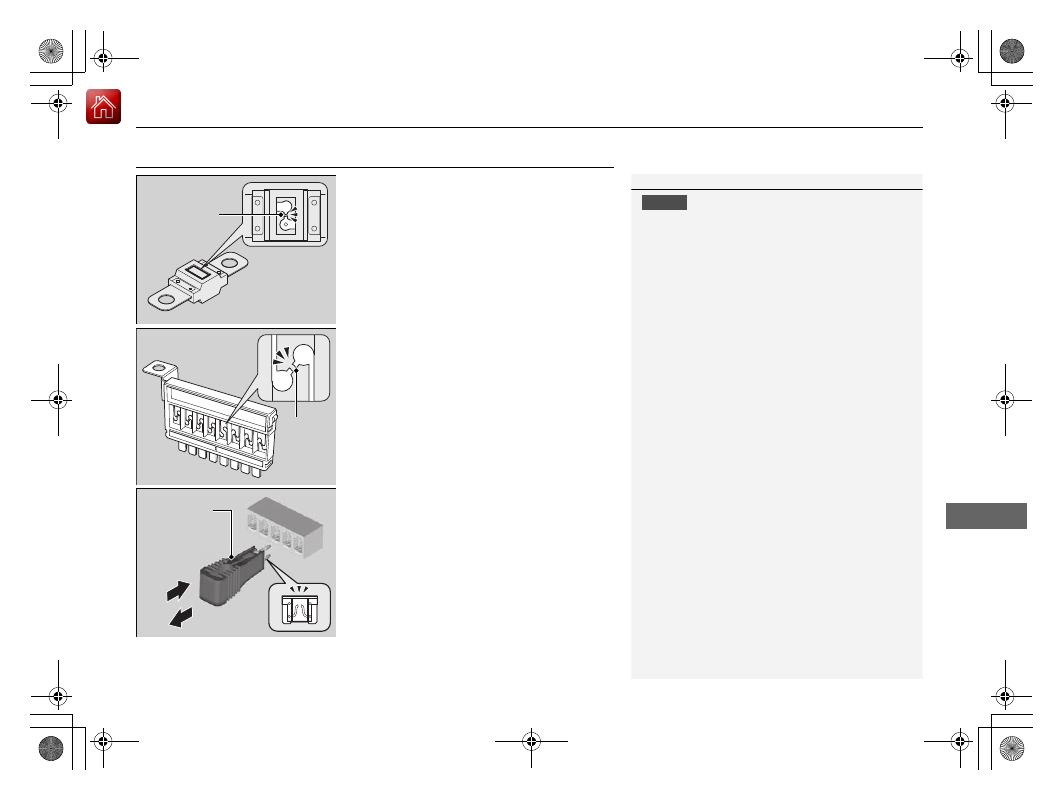
Inspecting and Changing Fuses
1.
Set the power mode to VEHICLE OFF. Turn
headlights and all accessories off.
2.
Remove the fuse box cover.
3.
Check the large fuse in the engine
compartment.
u
If the fuse is blown, use a Phillips-head
screwdriver to remove the screw and
replace it with a new one.
4.
Inspect the small fuses in the engine
compartment and the vehicle interior.
u
If there is a blown fuse, remove it with
the fuse puller and replace it with a new
one.
1
NOTICE
Replacing a fuse with one that has a higher rating
greatly increases the chances of damaging the
electrical system.
Replace fuse with a spare fuse of the same specified
amperage.
Confirm the specified amperage using the charts on
P. to 577.
There is a fuse puller in the engine compartment fuse
box located near the brake fluid reserve tank.
Blown Fuse
Combined Fuse
Blown
Fuse
Fuse Puller
-------------------------------------------------------------------------------------------------------------------------------------------------------------

580
Han
d
lin
g the U
n
expected
Emergency Towing
Call a professional towing service if you need to tow your vehicle.
■
Flat bed equipment
The operator loads your vehicle on the back of a truck.
This is the only way you can safely transport your vehicle.
Any other towing method will damage the vehicle’s drive system.
1
NOTICE
Trying to lift or tow your vehicle by the bumpers will
cause serious damage. The bumpers are not designed
to support the vehicle's weight.
NOTICE
Improper towing such as towing behind a
motorhome or other motor vehicle can damage the
transmission.
Never tow your vehicle with just a rope or chain.
It is very dangerous since ropes or chains may shift
from side to side or break.
-------------------------------------------------------------------------------------------------------------------------------------------------------------
581
Han
d
lin
g the U
n
expected
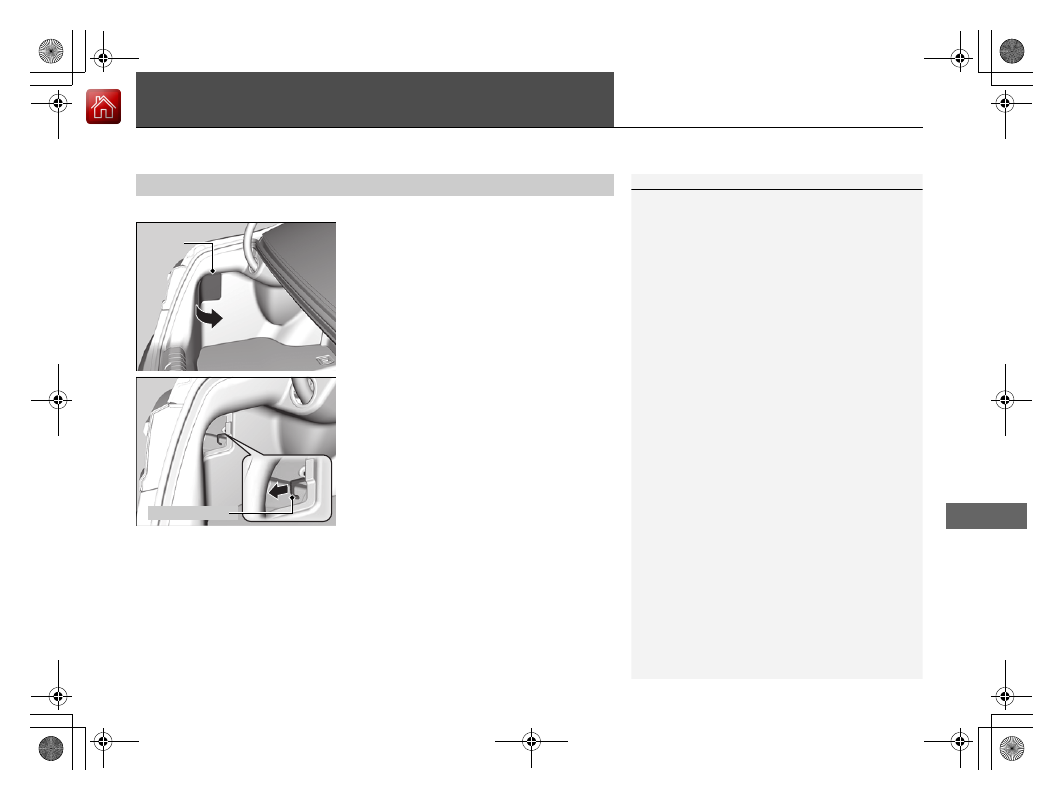
When You Cannot Unlock the Fuel Fill Door
If you cannot unlock the fuel fill door, use the following procedure.
1.
Open the trunk and remove the cover.
2.
Pull the release lever toward you.
u
The release lever unlocks the fuel fill door
when it is pulled.
■
What to Do When Unable to Unlock the Fuel Fill Door
1
When You Cannot Unlock the Fuel Fill Door
After taking these steps, contact a dealer to have
your vehicle checked.
Cover
Release Lever
-------------------------------------------------------------------------------------------------------------------------------------------------------------
582
Han
d
lin
g the U
n
expected
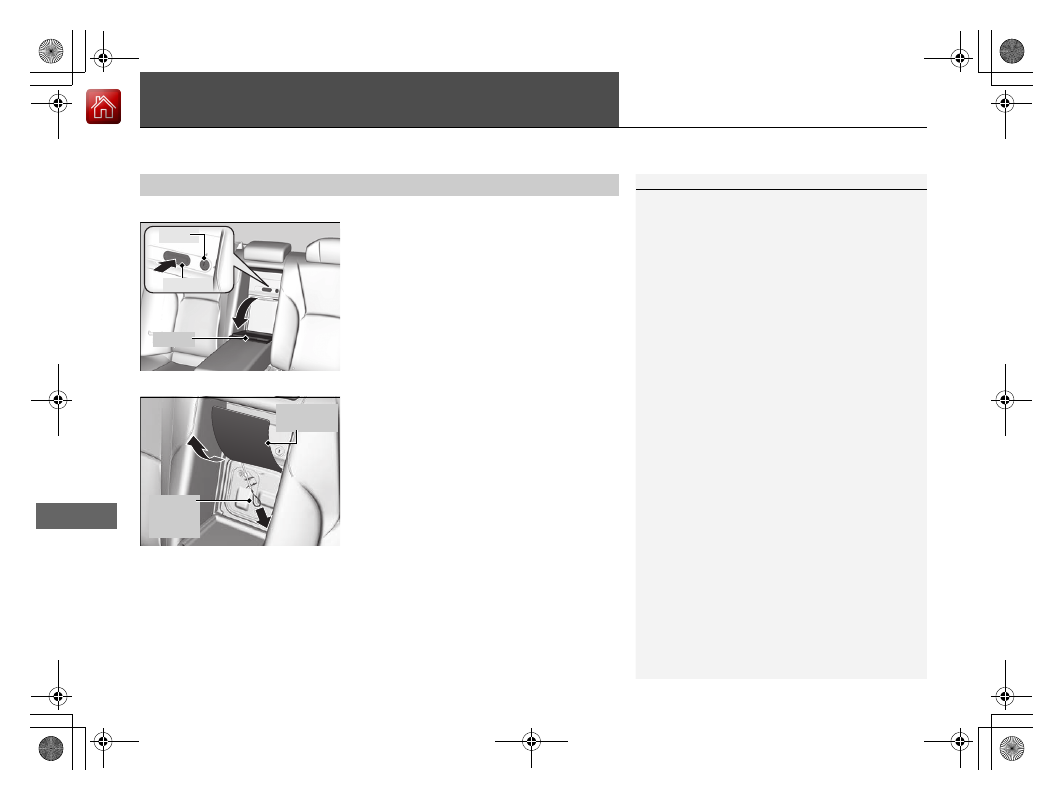
When You Cannot Open the Trunk
If you cannot open the trunk, use the following procedure.
1.
Pull the rear seat armrest down.
2.
Push the button to open the cover.
u
The cover latches when you push it back
to the original position.
u
You can lock and unlock this cover using
the built-in key.
To lock the cover
: Insert the key to the
lock, then turn it the right.
To unlock the cover
: Insert the key to
the lock, then turn it the left.
3.
With pulling the inner partition up, pull the
trunk release handle down to the direction
of the arrow in the image.
■
What to Do When Unable to Open the Trunk
1
What to Do When Unable to Open the Trunk
Following up:
After taking these steps, contact a dealer to have
your vehicle checked.
Lock
Button
Cover
Trunk
Release
Handle
Inner
Partition
-------------------------------------------------------------------------------------------------------------------------------------------------------------
583
Han
d
lin
g the U
n
expected
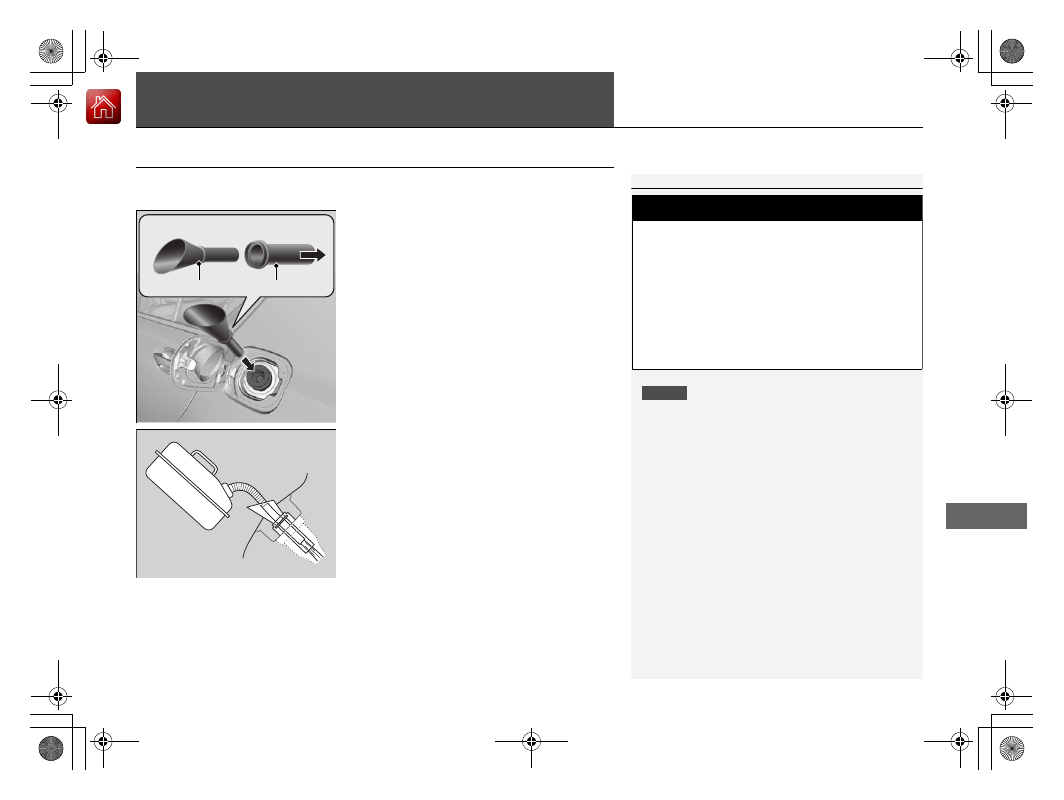
Refueling
Refueling From a Portable Fuel Container
If you have run out of fuel and need to refuel your vehicle from a portable fuel
container, use the funnel provided with your vehicle.
1.
Turn off the power system.
2.
Press the fuel fill door release button.
u
The fuel fill door opens.
3.
Take the funnel out of the tool case in the
trunk.
2
4.
Remove the
funnel from the case
.
5.
Place the end of the funnel on the lower
part of filler opening, then insert it slowly
and fully.
u
Make sure that the end of the funnel
goes down along with the filler pipe.
6.
Fill the tank with fuel from the portable fuel
container.
u
Pour fuel carefully so you do not spill any.
7.
Remove the funnel from the filler neck.
u
Wipe up any fuel from the funnel before
storing it.
8.
Shut the fuel fill door by hand.
1
Refueling From a Portable Fuel Container
NOTICE
Do not insert the nozzle of a portable fuel container
or any funnel other than the one provided with your
vehicle. Doing so can damage the fuel system.
Do not try to pry open or push open the sealed fuel
tank with foreign objects. This can damage the fuel
system and its seal.
Make sure the fuel in the portable fuel container is
gasoline before you refuel.
3
WARNING
Gasoline is highly flammable and explosive.
You can be burned or seriously injured
when handling fuel.
•
Turn the power system off, and keep
heat, sparks, and flame away.
•
Handle fuel only outdoors.
•
Wipe up spills immediately.
Funnel
Case
-------------------------------------------------------------------------------------------------------------------------------------------------------------
585
Information
This chapter includes your vehicle’s specifications, locations of identification numbers, and other
information required by regulation.
Vehicle Identification Number (VIN),
Engine Number, Motor Number, and
Transmission Number. . . . . . 588
-------------------------------------------------------------------------------------------------------------------------------------------------------------

586
Info
rm
ation
Specifications
■
Vehicle Specifications
■
Air Conditioning
Model
RLX
No. of Passengers:
Front
2
Rear
3
Total
5
Weights:
Gross Vehicle Weight
Rating
See the certification label on the driver’s
doorjamb
Gross Axle Weight
Rating (Front)
See the certification label on the driver’s
doorjamb
Gross Axle Weight
Rating (Rear)
See the certification label on the driver’s
doorjamb
Refrigerant Type
HFC-134a (R-134a)
Charge Quantity
15.3 - 17.1 oz (435 - 485 g)
Lubricant Type
ND-OIL 11
Quantity
7.9 - 8.8 cu-in (130.0 - 145.0 cm
3
)
■
Engine Specifications
■
Fuel
■
Washer Fluid
Displacement
212 cu-in (3,471 cm
3
)
Spark Plugs
NGK
DILZKR7B11G
Type
Unleaded premium gasoline, Pump octane
number of 91 or higher
Fuel Tank Capacity
15.2 US gal (57 L)
Tank Capacity
U.S.: 2.6 US qt (2.5 L)
Canada: 5.3 US qt (5.0 L)
■
Light Bulbs
*1: Not available on all models
Headlights (Low Beam)
LED
Headlights (High Beam)
LED
Fog Lights
*1
LED
Front Turn Signal Lights
LED
Parking/Daytime Running Lights
LED
Front Side Marker Lights
LED
Side Turn Signal Lights
(on Door Mirrors)
LED
Brake Lights
LED
Taillights
LED
Rear Side Marker Lights
LED
Back-Up Lights
LED
Rear Turn Signal Lights
LED
High-Mount Brake Light
LED
Rear License Plate Lights
LED
Door Outer Handle Ambient Lights
LED
Interior Lights
Front and Rear Map Lights
LED
Front and Rear Ambient Lights
LED
Vanity Mirror Lights
1.4 W
Front Door Pocket Lights
LED
Center Pocket Light
LED
Beverage Holder Light
LED
Door Courtesy Lights
3.4 W
Console Compartment Light
LED
Glove Box Light
LED
Front and Rear
*1
Foot Lights
LED
Door Inner Handle Lights
LED
Trunk Light
5 W
-------------------------------------------------------------------------------------------------------------------------------------------------------------
587
uu
Specifications
u
Info
rm
ation
■
Brake Fluid
■
Dual Clutch Transmission Fluid
■
Twin Motor Unit Fluid
Specified
Acura Heavy Duty Brake Fluid DOT 3
Specified
Acura ATF DW-1
Capacity
Change
3.7 US qt (3.5 L)
Specified
Acura ATF DW-1
Capacity
Change
2.56 US qt (2.42 L)
■
Engine Oil
■
Engine Coolant
■
Inverter Coolant
Recommended
·Genuine Acura Motor Oil 0W-20
·API Premium-grade 0W-20 detergent oil
Capacity
Change
4.2 US qt (4.0 L)
Change
including
filter
4.5 US qt (4.3 L)
Specified
Acura Long Life Antifreeze/Coolant Type2
Ratio
50/50 with distilled water
Capacity
2.1 US gal (7.9 L)
(change including the remaining
0.225 US gal (0.85 L) in the reserve tank)
Specified
Acura Long Life Antifreeze/Coolant Type2
Ratio
50/50 with distilled water
Capacity
0.32 US gal (1.23 L)
(change including the remaining
0.03 US gal (0.11 L) in the reserve tank)
■
Tire
*1: Vehicles with optional spare tire kit
Regular
Size
245/40R19 98W
Pressure
psi (kPa [kgf/cm
2
])
36 (250 [2.5])
Compact
Spare
*1
Size
T155/70D17 110M
Pressure
psi (kPa [kgf/cm
2
])
60 (420 [4.2])
Wheel Size
Regular
19 x 8J
Compact Spare
*1
17 x 4T
-------------------------------------------------------------------------------------------------------------------------------------------------------------

588
Info
rm
ation
Identification Numbers
Vehicle Identification Number (VIN), Engine Number,
Motor Number, and Transmission Number
Your vehicle has a 17-digit vehicle identification number (VIN) used to register your
vehicle for warranty purposes, and for licensing and insuring your vehicle.
The locations of your vehicle’s VIN, engine number, motor number, and
transmission number are shown as follows.
1
Vehicle Identification Number (VIN), Engine Number, Motor
Number, and Transmission Number
The interior vehicle identification number (VIN) is
located under the cover.
Cover
Vehicle Identification Number
Engine Number
Dual Clutch
Transmission
Number
Certification Label/
Vehicle Identification Number
Vehicle Identification Number
Motor Number
Motor Number
Motor Number
-------------------------------------------------------------------------------------------------------------------------------------------------------------
589
Info
rm
ation
Devices that Emit Radio Waves
Each radio frequency device installed in the vehicle conforms to the requirements
and standards of the regulation listed below:
As required by the FCC:
This device complies with Part 15 of the FCC rules. Operation is
subject to the following two conditions: (1) This device may not
cause harmful interference, and (2) this device must accept any
interference received, including interference that may cause
undesired operation.
Changes or modifications not expressly approved by the party
responsible for compliance could void the user’s authority to
operate the equipment.
This device complies with industry Canada licence-exempt RSS standard(s).
Operation is subject to the following two conditions: (1) this device may not cause
interference, and (2) this device must accept any interference, including interference
that may cause undesired operation of the device.
-------------------------------------------------------------------------------------------------------------------------------------------------------------
590
Info
rm
ation
Reporting Safety Defects
In the U.S.
If you believe that your vehicle has a defect which could cause a crash or could cause injury or death, you
should immediately inform the National Highway Traffic Safety Administration (NHTSA) in addition to
notifying American Honda Motor Co., Inc.
If NHTSA receives similar complaints, it may open an investigation, and if it finds that a safety defect exists
in a group of vehicles, it may order a recall and remedy campaign. However, NHTSA cannot become involved
in individual problems between you, your dealer, or American Honda Motor Co., Inc.
To contact NHTSA, you may call the Vehicle Safety Hotline toll-free at 1-888-327-4236 (TTY: 1-800-424-
9153); go to
; or write to: Administrator, NHTSA, 1200 New Jersey Avenue, SE.,
Washington, DC 20590. You can also obtain other information about motor vehicle safety from
In Canada
If you believe that your vehicle has a defect which could cause a crash or could cause injury or death, you
should immediately inform Honda Canada Inc. and you may also inform Transport Canada.
If Transport Canada receives similar complaints, it may open an investigation, and if it finds that a safety
defect exists in a group of vehicles, it may lead to a recall and remedy campaign. However, Transport Canada
cannot become involved in individual problems between you, your dealer, or Honda Canada Inc.
To contact Transport Canada’s Defect Investigations and Recalls Division, you may call 1-800-333-0510. For
more information on reporting safety defects or about motor vehicle safety, go to
-------------------------------------------------------------------------------------------------------------------------------------------------------------
591
Continued
Info
rm
ation
Emissions Testing
Testing of Readiness Codes
Your vehicle has readiness codes as part of the onboard self diagnostic system.
Some States use these codes for testing to verify whether your vehicle’s emissions
components are working properly.
The codes may not be read properly if testing is performed just after the 12-volt
battery has gone dead or been disconnected.
To check if they are set, set the power mode to ON, without turning the power
system on. The malfunction indicator lamp will come on for several seconds. If it
then goes off, the readiness codes are set. If it blinks five times, the readiness codes
are not set.
If you are required to have your vehicle tested before the readiness codes are ready,
prepare the vehicle for retesting by doing the following:
1.
Fill the gas tank to approximately 3/4 full.
2.
Park the vehicle and leave the power system off for 6 hours or more.
3.
Make sure the ambient temperature is between 40°F and 95°F (4°C and 35°C).
4.
Turn the power system on.
1
The readiness codes are erased when the 12-volt
battery is disconnected, and set again only after
several days of driving under a variety of conditions.
If a testing facility determines that the readiness
codes are not set, you may be requested to return at
a later date to complete the test.
If the testing facility determines the readiness codes
are still not set, see a dealer.
-------------------------------------------------------------------------------------------------------------------------------------------------------------
592
uu
Emissions Testing
u
Testing of Readiness Codes
Info
rm
ation
5.
Select a nearby, lightly traveled major highway where you can maintain a speed
of 50 mph (80 km/h) over for at least 20 minutes. Drive on the highway in
(
D
with SPORT mode. Do not use cruise control.
6.
Drive in city or suburban traffic for at least 10 minutes. When traffic conditions
allow, let the vehicle coast for several seconds without using the accelerator pedal
or the brake pedal.
7.
Park the vehicle and leave the power system off for 40 minutes.
-------------------------------------------------------------------------------------------------------------------------------------------------------------
593
Continued
Info
rm
ation
Warranty Coverages
■
U.S.Owners
Your new vehicle is covered by these warranties:
New Vehicle Limited Warranty –
covers your new vehicle, except for the
emissions control systems and accessories, against defects in materials and
workmanship.
Emissions Control Systems Defects Warranty and Emissions Performance
Warranty –
these two warranties cover your vehicle’s emissions control systems.
Time, mileage, and coverage are conditional. Please read your warranty booklet for
exact information.
Seat Belt Limited Warranty –
a seat belt that fails to function properly is covered
by a limited warranty. Please read your warranty booklet for details.
Rust Perforation Limited Warranty –
all exterior body panels are covered against
rusting from the inside out for the specified time period, regardless of mileage.
Accessory Limited Warranty –
Acura accessories are covered under this warranty.
Time and mileage limits depend on the type of accessory and other factors. Please
read your warranty booklet for details.
Replacement Parts Limited Warranty –
covers all Acura replacement parts
against defects in materials and workmanship.
-------------------------------------------------------------------------------------------------------------------------------------------------------------
594
uu
Warranty Coverages
u
Info
rm
ation
Replacement 12-Volt Battery Limited Warranty –
provides prorated coverage
for a replacement battery purchased from your dealer.
Replacement Muffler Lifetime Limited Warranty –
provides coverage for as
long as the purchaser of the muffler owns the vehicle.
Restrictions and exclusions apply to all these warranties. Please read the Acura
warranty information booklet that came with your vehicle for precise information on
warranty coverages. Your vehicle’s original tires are covered by their manufacturer.
Tire warranty information is in a separate booklet.
■
Canadian Owners
Please refer to the warranty manual that came with your vehicle.
■
EPA Contact Information
An owner may obtain further information concerning emission warranties or report
violations of the terms of the emission warranties by contacting:
U.S. Environmental Protection Agency
Office of Transportation and Air Quality
Compliance Division, Light-Duty Vehicle Group
Attn: Warranty Complaints
2000 Traverwood Drive
Ann Arbor, MI 48105
Email: complianceinfo@epa.gov
-------------------------------------------------------------------------------------------------------------------------------------------------------------
Нет комментариевНе стесняйтесь поделиться с нами вашим ценным мнением.
Текст