Acura RL (1996-2004 year). Manual — part 565
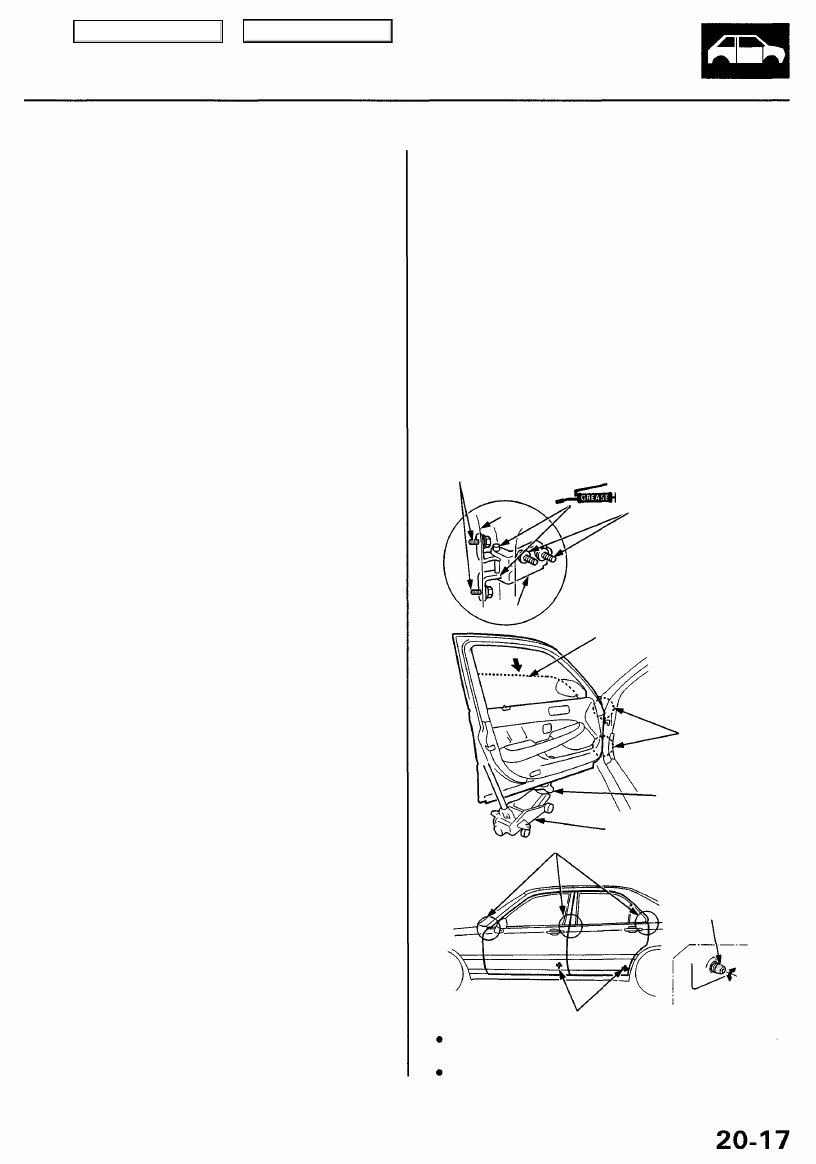
Position Adjustment
NOTE: Place the vehicle on a firm, level surface when
adjusting the doors.
After installing the door, check for a flush fit with the
body, then check for equal gaps between the front, rear,
and bottom door edges and the body. The door and body
edges should also be parallel. Before adjusting, replace
the mounting bolts. Adjust at the hinges as shown.
CAUTION: Place a shop towel on the jack to prevent
damage to the door when loosening the door and hinge
mounting bolts for adjustment.
DOOR MOUNTING BOLTS
8 x 1.25 mm
29 N-m (3.0 kgf-m, 22 Ibf-ft)
Loosen the door mounting bolts slightly
to move the door in or out until
it's flush with the body. If necessary,
you can install a shim behind one
hinge to make the door edges
parallel with the body.
HINGE MOUNTING BOLTS
8 x 1.25 mm
29 N-m (3.0 kgf-m, 22 Ibf-ft)
Remove the inner fender,
loosen the hinge mounting
bolts, and move the door
backward or forward,
up or down as necessary
to equalize the gaps.
HINGES
SHOP
TOWEL
JACK
The door and body edges should be parallel.
If necessary,
adjust the door
cushion.
DOOR CUSHIONS
NOTE:
Apply touch-up point to the hinge mounting bolts
and around the hinges.
Check for water leaks.
DOOR
HINGE
Lower the glass.
Main Menu
Table of Contents
Doors
Mirrors
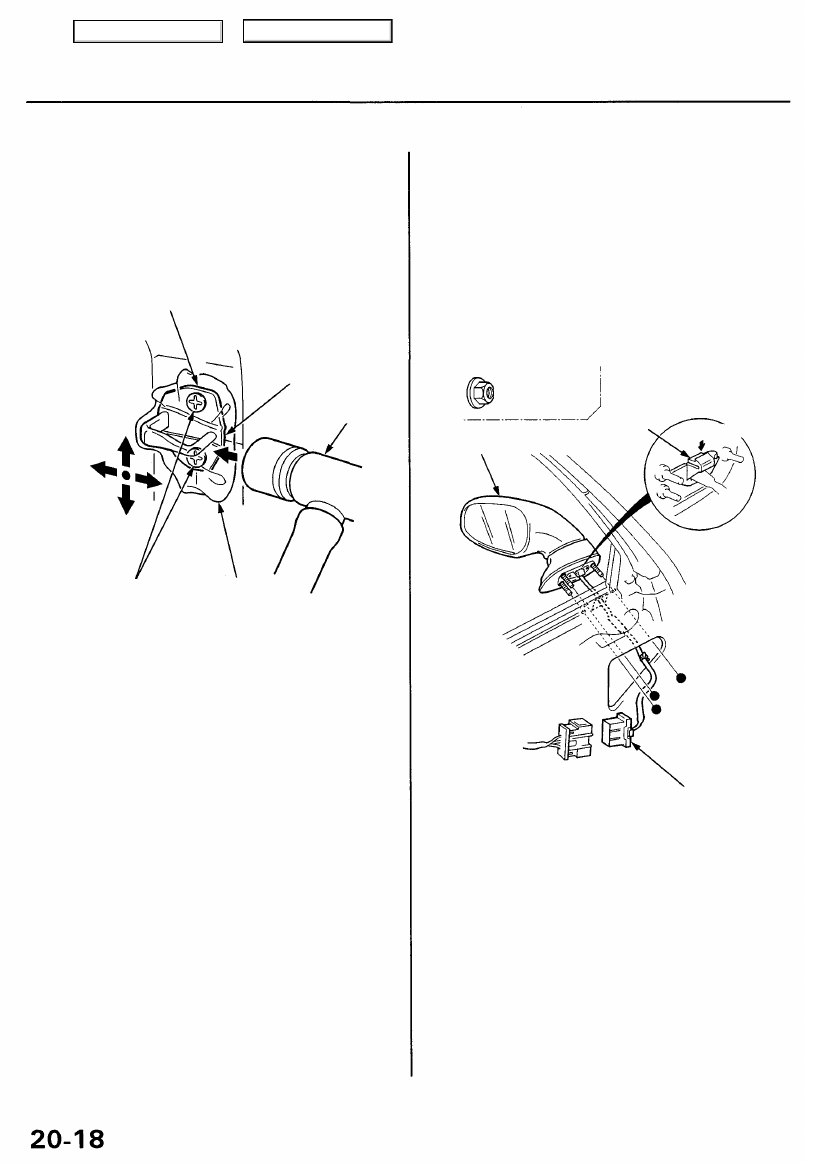
Striker Adjustment
Make sure the door latches securely without slamming it.
If necessary, adjust the striker: The striker nuts are fixed.
The striker can be adjusted slightly up or down, and in or
out.
1. Loosen the screws, then insert a shop towel between
the body and striker.
STRIKER
PLASTIC
HAMMER
2. Lightly tighten the screws.
3. Wrap the striker with a shop towel, then adjust the
striker by tapping it with a plastic hammer.
CAUTION: Do not tap the striker too hard.
4. Loosen the screws and remove the shop towel.
5. Lightly tighten the screws.
6. Hold the outer handle out, and push the door
against the body to be sure the striker allows a flash
fit. If the door latches properly, tighten the screws
and recheck.
Power Mirror Removal
NOTE: Take care not to scratch the mirror and door.
1. Raise the glass fully.
2. Remove the door panel (see page
), then
remove the plastic cover as needed.
3. Disconnect the connector, and detach the clip.
Remove the nuts, detach the clip, then remove the
mirror while holding it.
•: Nut locations, 3
6 x 1.0 mm
19.8 N-m (1.0 kgf-m,
7.2 Ibf-ft)
CONNECTOR
4. Installation is the reverse of the removal procedure.
NOTE: Make sure the connector is connected prop-
erly.
Insert a shop towel
between the body and
striker.
MIRROR
CLIP
Push here.
SCREWS
8 x 1.25 mm
18 N-m (1.8 kgf-m,
13 Ibf-ft)
SHOP
TOWEL
Main Menu
Table of Contents
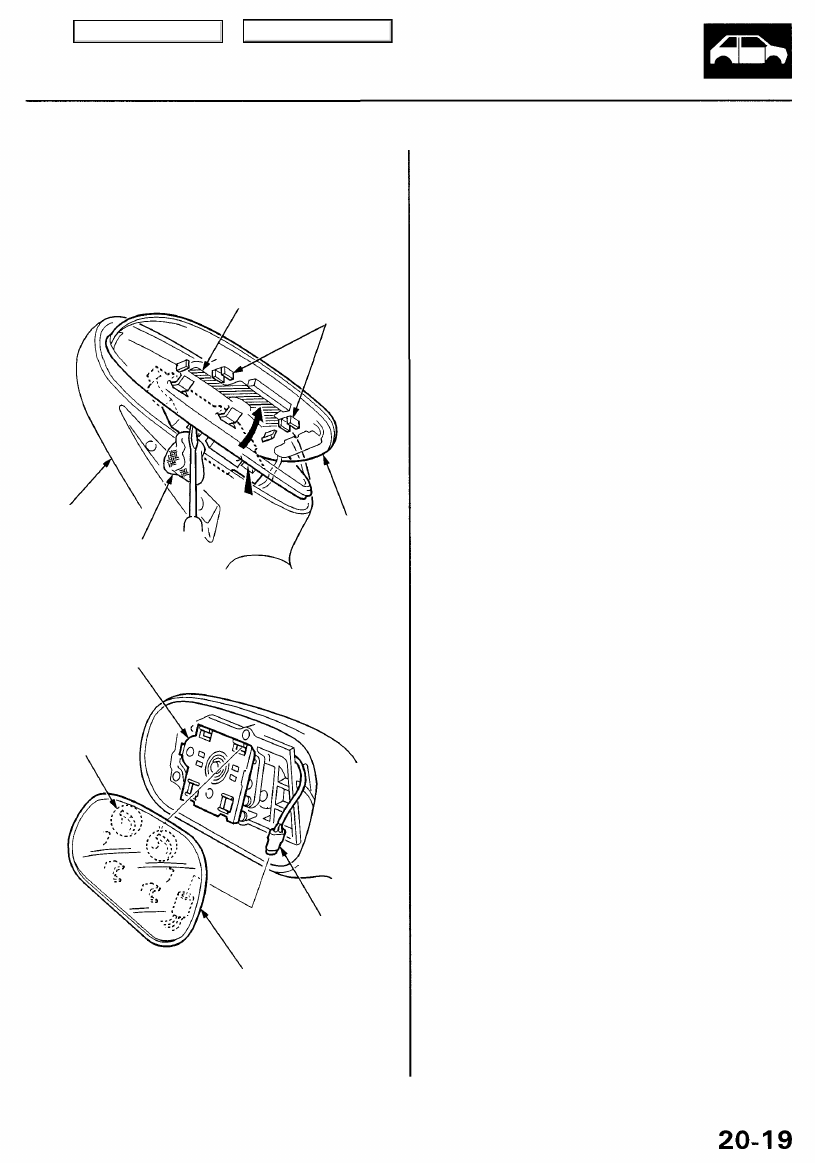
Mirror Holder Removal
NOTE: Take care not to scratch the mirror housing.
1. Pry the mirror holder out from the bottom until you
can see the actuator, then detach the hooks using a
flat tip screwdriver.
CAUTION: When prying with a flat-tip screwdriver,
wrap it with a shop towel to prevent damage.
ADHESIVE TAPE
HOOKS
MIRROR
HOUSING
SHOP
TOWEL
MIRROR
HOLDER
2. Detach the hooks, disconnect the defogger connec-
tor (if so equipped), then remove the mirror holder
from the actuator.
ACTUATOR
HOOK
DEFOGGER
CONNECTOR
MIRROR HOLDER
3. Installation is the reverse of the removal procedure.
Main Menu
Table of Contents
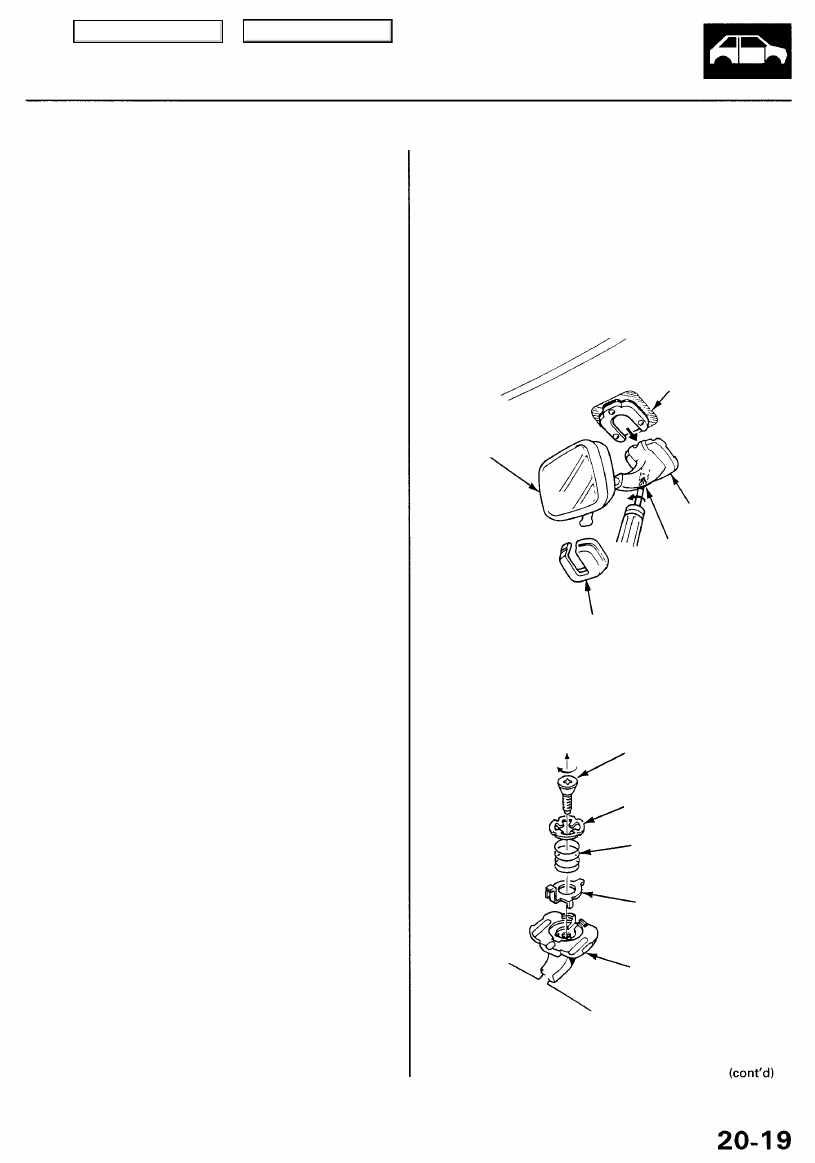
Rearview Mirror Removal
'96 - 98 models:
1. Carefully remove the cover with a flat tip screwdriver.
CAUTION: When prying with a flat-tip screwdriver,
wrap it with protective tape to prevent damage.
2. Loosen the lock bolt, then slide the mirror stay from
the lug.
LUG
REARVIEW
MIRROR
MIRROR STAY
LOCK BOLT
Counterclockwise
to loosen.
COVER
3. Remove the lock bolt, then remove the toothed lock
washer and hold spring from the mirror stay.
LOCK BOLT
Left-hand
threads
TOOTHED LOCK WASHER
HOLD SPRING
HOOK PLATE
MIRROR STAY
4. Installation is the reverse of the removal procedure.
Main Menu
Table of Contents
Нет комментариевНе стесняйтесь поделиться с нами вашим ценным мнением.
Текст