Acura RL (1996-2004 year). Manual — part 480
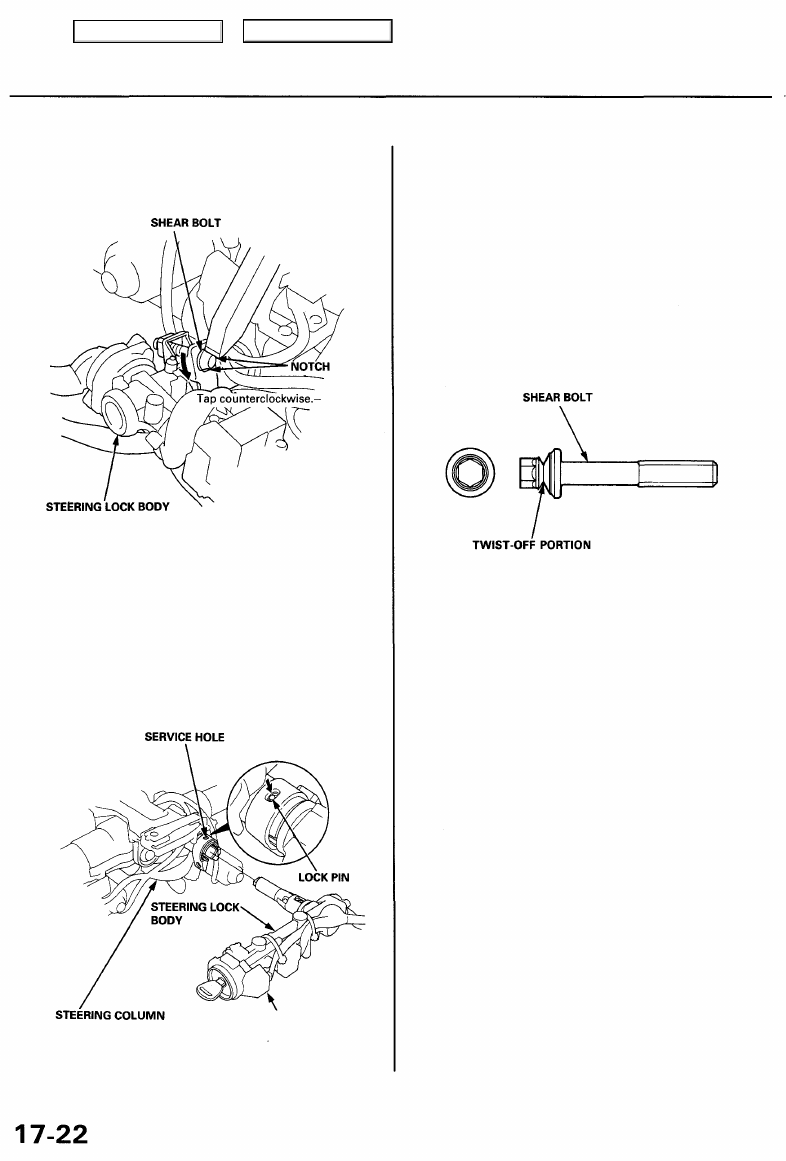
Steering Lock Replacement
1. Remove the steering column (see page
).
2. File a notch into the shear bolt head.
Steering Column
7. Insert the ignition key into the new steering lock
body, and turn it to "ACC (I)" position.
8. Push the lock pin down, and insert the steering lock
body into the steering column until it clicks into place.
9. Loosely install the new shear bolt.
10. Make sure the steering wheel lock operates smoothly,
and that the ignition key turns freely.
11. Tighten the shear bolt until the hex head twists off.
3. Set the tip of a chisel in the notch, and loosen the
bolt by tapping on the chisel.
4. Remove the shear bolt from the switch body.
5. Insert the ignition key and turn it to "ACC (I)" posi-
tion.
6. Push the lock pin down, and pull out the steering
lock body from the steering column.
Main Menu
Table of Contents

Power Steering Hoses, Lines
Fluid Leakage Inspection
HOSES and LINES
• Inspect hoses for damage, leaks, interference and
twisting.
• Inspect fluid lines for damage, rusting and leakage.
• Inspect for leaks at hose and line joints and connec-
tions.
Replacement
NOTE: CAUTION: Check all clamps for deterioration or defor-
• Connect each hose to the corresponding line securely mation, replace with the clamps new ones of necessary.
until it contacts the stop on the line. Install the clamp
or adjustable clamp at the specified distance from the
hose end as shown.
• Add the recommended power steering fluid to the
specified level on the reservoir and check for leaks.
ADJUSTABLE HOSE CLAMP: (a) HOSE CLAMP: (b)
• Position the adjustable hose clamps at the points indi- • Position hose clamps at the points indicated by (b) in
cated by (a) in the drawing above. the drawing above.
• Slide the hose over the line until it contacts the stop. • Slide the hose over the line until it contacts the stop.
Main Menu
Table of Contents
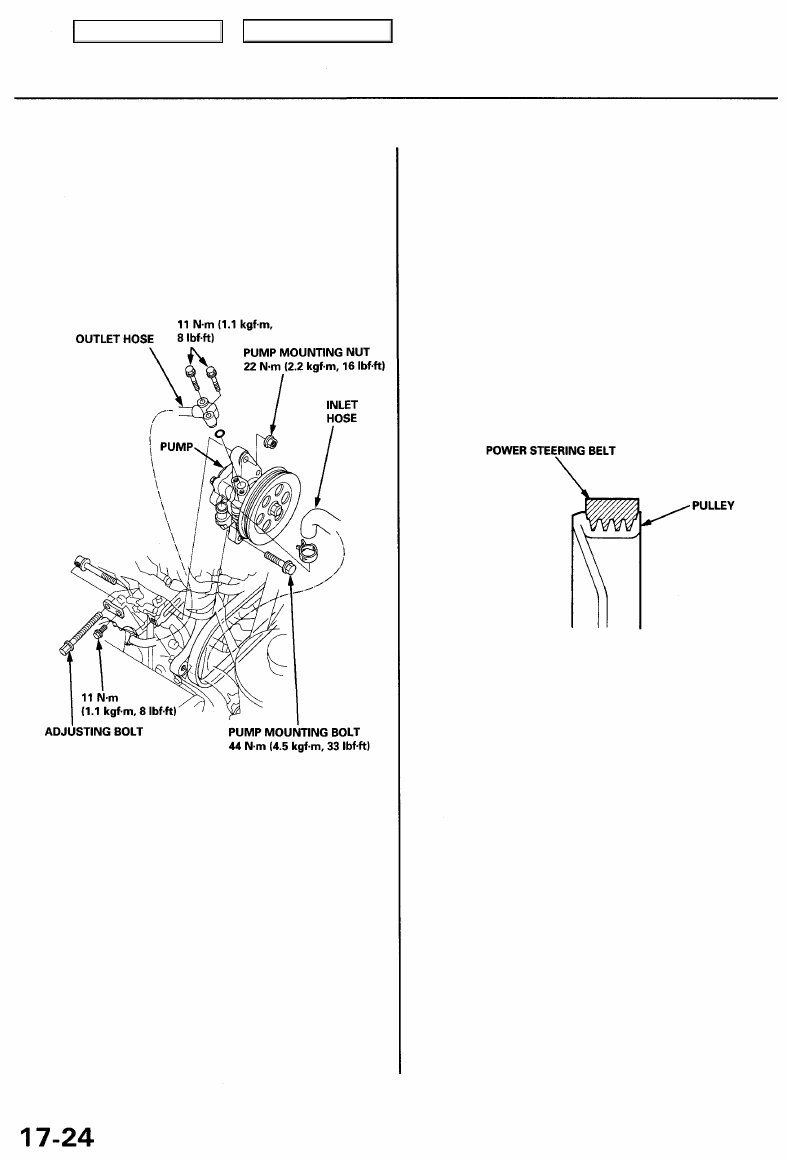
Power Steering Pump
Removal/Installation
NOTE: Before disconnecting the hoses from the pump,
place a suitable container under the vehicle.
1. Remove the air cleaner (ACL) and intake air duct.
2. Remove the belt by loosening the pump mounting
bolt, nut and adjusting bolt.
5. Connect the inlet and outlet hoses. Tighten the pump
fittings securely.
6. Loosely install the pump in the pump bracket with
mounting bolt, nut and adjusting bolt.
7. Install the pump belt
CAUTION:
• Make sure that the power steering belt is prop-
erly positioned on the pulleys.
• Do not get power steering fluid or grease on the
power steering belt or pulley faces. Clean off any
fluid or grease before installation.
8. Adjust the pump belt (see page
).
9. Install the air cleaner (ACL) and intake air duct.
10. Fill the reservoir to the upper level line (see page
).
3. Disconnect the inlet and outlet hoses from the pump,
and plug the hoses.
NOTE: Take care not to spill the fluid on the body
or parts. Wipe off any spilled fluid at one.
4. Remove the pump mounting bolt, nut and adjusting
bolt, then remove the pump.
NOTE:
• Do not turn the steering wheel with the pump
removed.
• Wrap the opening of the pump with a piece of
tape to prevent foreign material from entering the
pump.
Main Menu
Table of Contents

Disassembly
CAUTION: The power steering components are made of aluminum. Avoid damaging the components during assembly.
NOTE:
• Clean the disassembled parts with a solvent, and dry them with compressed air. Do not dip the rubber parts in a sol-
vent.
• Always replace the O-rings and rubber seals with new ones before assembly.
• Apply recommended power steering fluid to the parts indicated in the assembly procedures.
• Do not allow dust, dirt, or other foreign materials to enter the power steering system.
• Replace the pump as an assembly if the parts indicated with asterisk (*) are worn or damaged.
BALL BEARING
Inspection and Replacement,
see page
*FLOW CONTROL VALVE
Inspection and Overhaul,
see page
Main Menu
Table of Contents
Нет комментариевНе стесняйтесь поделиться с нами вашим ценным мнением.
Текст