Acura RL (1996-2004 year). Manual — part 28
Soft Chipping Guard Primer Coat
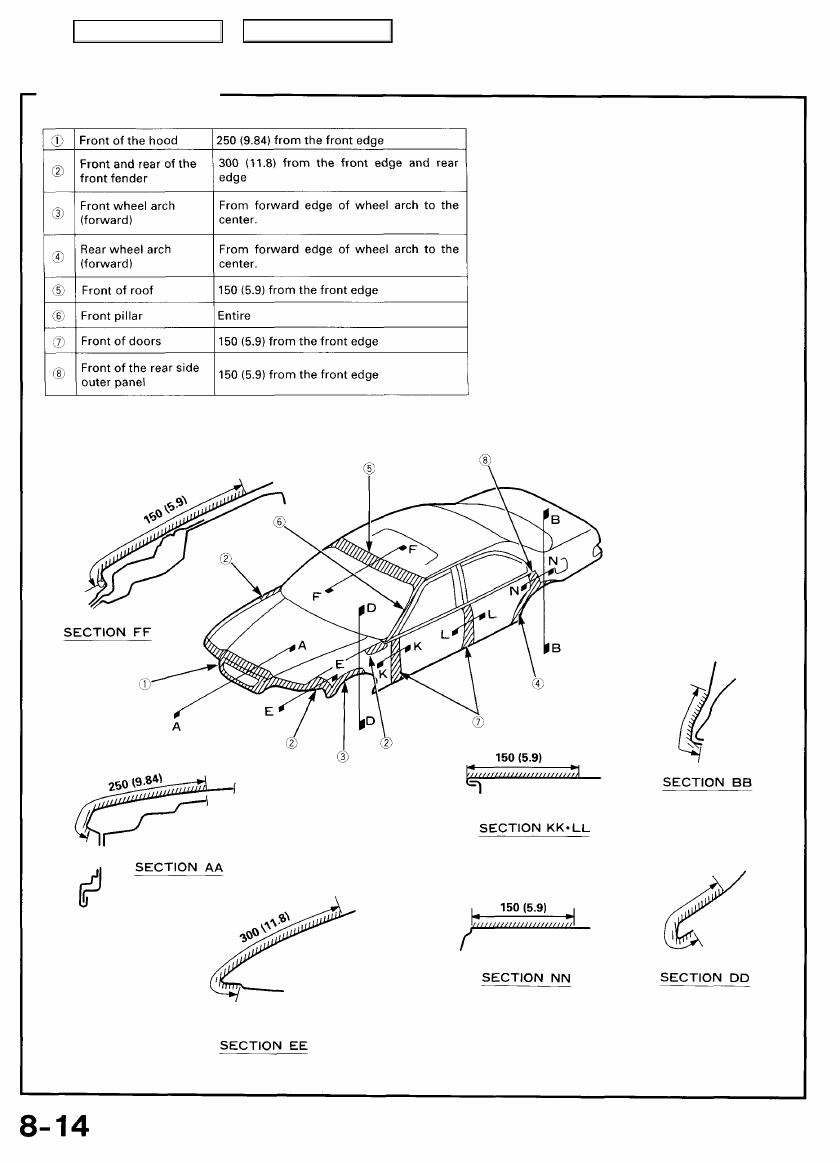
Coating Diagram
The diagram shows the areas to which soft
chipping primer is to be applied.
NOTE: Make sure to coat the flange on front
and rear wheel arches.
Unit: mm (in)
Main Menu
Table of Contents
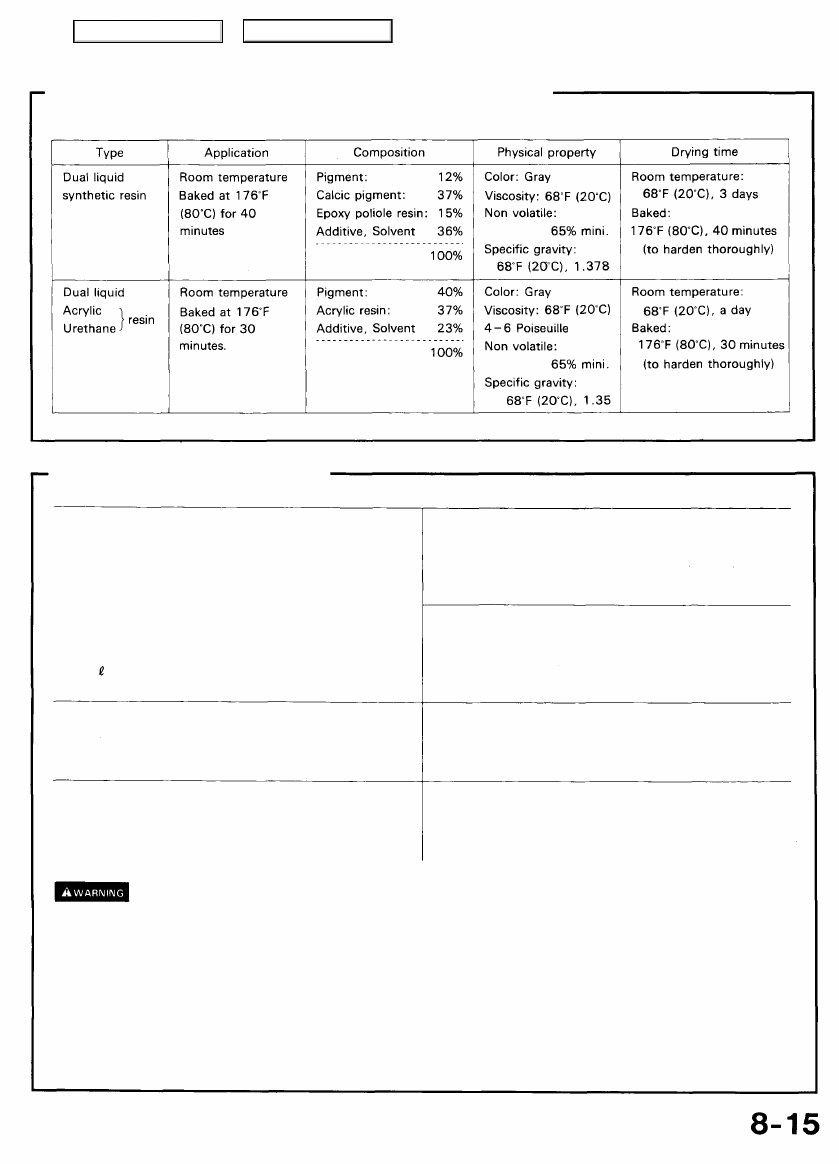
Types of Soft Chipping Guard Primer (Reference)
Repair Materials and Tools
Gun and brushes:
• Spray gun
NOTE: Any gun having a tip of more than 1.0 mm
(0.04 in) in diameter may be used for spraying the
primer.
• Viscosity measure
Iwata-type (IMS) cup, Ford cup
• Beaker
1-2 (1.05-2.10 US. qt, 0.9-2 Imp. qt) in capacity
• Stirring stick
Tools:
• Air or double action sander
• Sandpaper .(#240-#400)
Thinner and cleaner:
• Use the thinner specified for the primer.
• Any commercially available lacquer thinner may be used
to clean the gun.
Materials:
• Use primers equivalent to the ones shown in Types of
Chipping Guard Primer (Reference).
• Make sure to keep the thickness of the coat at 20
microns.
Masking:
• Masking tape, paper, vinyl sheet and plate (veneer and
steel).
• Masking plates are not necessary when spraying in a
booth.
Protectors:
• Wear an approved respirator or dust mask, gloves,
safety goggles and other protective clothing.
• Rags.
• Most paints contain substances that are harmful if inhaled or swallowed. Read the paint label before opening the
container.
• Spray paint only in a well ventilated area.
• Cover spilled paint with sand, or wipe it up at once.
• Wear an approved respirator, gloves, eye protection and appropriate clothing when painting. Avoid contact with skin.
• If paint gets in your mouth or on your skin, rinse or wash thoroughly with water. If paint gets in your eyes, flush with
water and get prompt medical attention.
• Paint is flammable. Store it in a safe place, and keep it away from sparks, flames or cigarettes.
Main Menu
Table of Contents
Soft Chipping Guard Primer Coat
Coating Procedures
NOTE: This section covers the application of the soft
chipping primer to the replacement part.
1. Sanding the replacement part
Wear goggles or safety glasses to pre-
vent eye injury.
Sand the area to be painted with #240-#400 sand-
paper.
NOTE:
• Do not oversand the edges or corners of the part.
• Do not expose bare metal.
2. Air blowing/degreasing
NOTE: Measure the primer and hardener so they are in
correct ratio.
• Add the specified thinner to the mixture of hardener
and primer to attain the proper viscosity for spray-
ing.
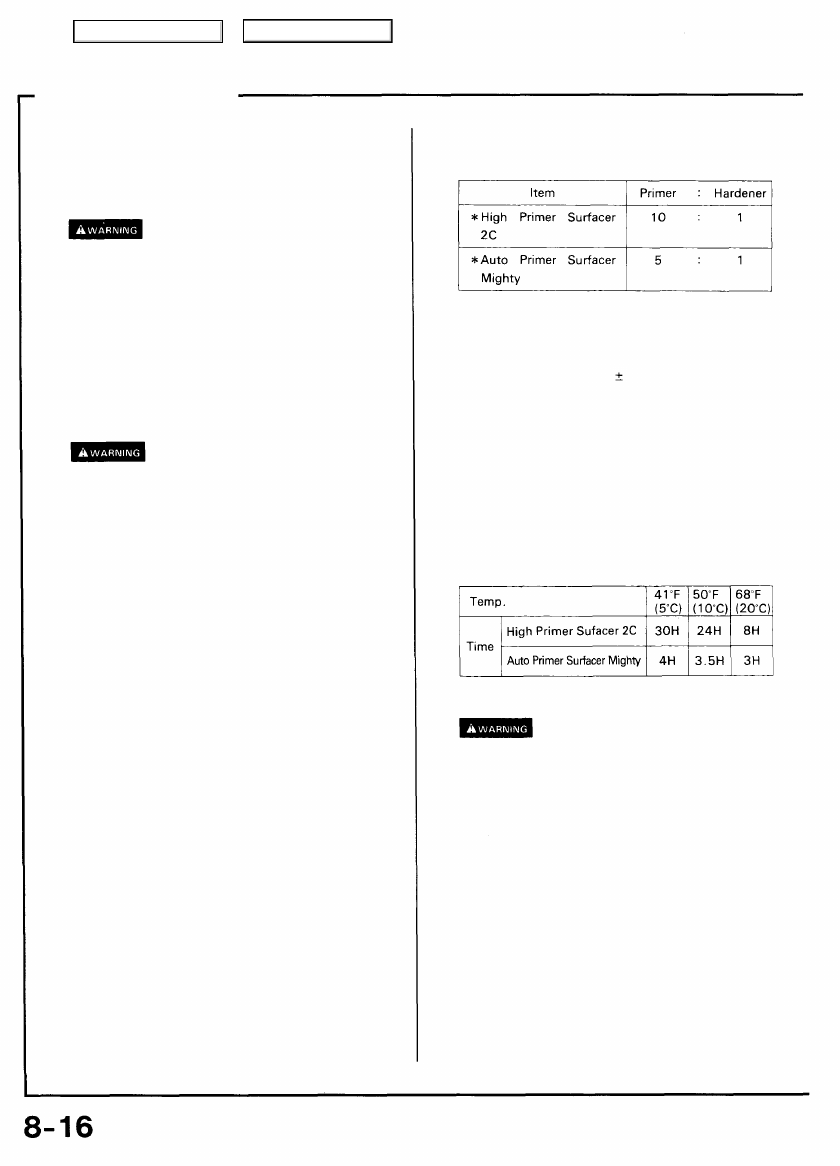
2C 68'F (20'C) 18 sec 1
• These substances are not available in the USA Honda
recommends using DuPont's 123 Vinyl Coating, or
Sherwin-Williams' Vinyl Gravel Guard. Follow the
manufacturer's instructions for application.
• Use the following materials:
• Spies Hecker Permacron 4:1 Surfacer 4:1 (Herberts)
• Standox 2K 4:1 Special Filler (Herberts)
• Once mixed with the hardener and thinner, the
primer must be used within the times shown below.
• Do not use high air pressure; use only an ap-
proved, 210 kPa (2.1 kgf/cm
2
, 30 psi) air nozzle.
• Wear goggles or safety glasses to prevent eye
injury.
• Paint thinner is flammable. Store it in a safe
place, and keep it away from sparks, flames or
cigarettes.
Clean the surface with compressed air and wax and
grease remover.
3. Masking
• Place masking tape or paper around the surface to
be painted.
• Cover as wide an area as possible with tape or paper
to keep primer from spreading.
4. Spraying chipping guard primer
• Stir the primer thoroughly.
• Put the primer in a beaker and weigh the needed
amount of primer to be used.
• Mix the hardener into the primer, following the
manufacturer's instructions.
• Most paints contain substances that are harmful
if inhaled or swallowed. Read the paint label
before opening the container. Spray paint only in
a well ventilated area.
• Cover spilled paint with sand, or wipe it up at
once.
• Wear an approved respirator, gloves, eye protec-
tion and appropriate clothing when painting.
Avoid contact with skin.
• If paint gets in your mouth or on your skin, rinse
or wash thoroughly with water. If paint gets in
your eyes, flush with water and get prompt
medical attention.
• Paint is flammable. Store it in a safe place, and
keep it away from sparks, flames or cigarettes.
Main Menu
Table of Contents
7. Intermediate and Top coating
• Sand the chipping guard primer film with #280-
#400 sandpaper.
• Follow the intermediate/top coating procedures (see
pages
and
).
• Fill the gun's paint cup with the primer. Use a
strainer when pouring the primer into the cup.
• Primer should never be applied to a dirty or greasy
surface. Before spraying, blow dust and dirt off the
surface and clean with wax and grease remover.
(Method of spraying)
• Do not try to cover the surface with one heavy
coat. Apply several thin coats.
NOTE:
• Spray coat 4-5 coats to get 20 microns of thick-
ness, as one coat deposits 5-7 microns.
• Spray the primer at 250-300 kPa (2.5-3.0 kgf/
cm
2
, 35.6-42.7 psi) pressure. Spraying with im-
proper air pressure will cause imperfections.
• Open the gun 3-4 turns.
• Wipe up unwanted primer immediately with
thinner.
5. Cleaning spray gun
• After spraying, be sure to clean the spray gun
thoroughly with thinner or solvent.
• The gun will be perrnanently clogged if the primer is
allowed to dry.
6. Drying
• After spraying the chipping guard primer, air-dry for
7-10 minutes to evaporate the thinner in the
primer. Then dry it with infrared lamps at 176°F
(80°C) for 30-40 minutes.
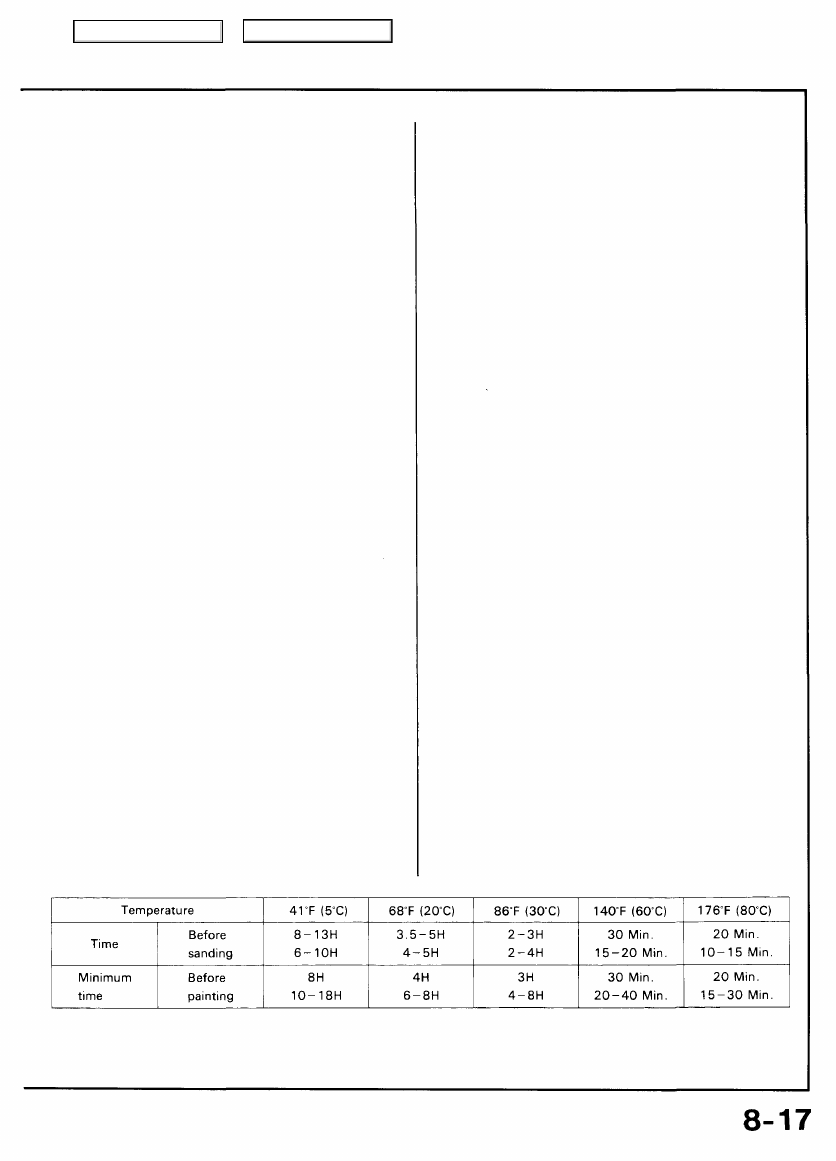
NOTE: Insufficient baking may cause pinholes if the
primer coat is too thick.
• The temperature lamps and drying time
recommendations should be followed closely.
NOTE: The upper line of time shows specifications for High Primer Surfacer 2C, and the lower line Auto Primer Surfacer Mighty.
Main Menu
Table of Contents
Нет комментариевНе стесняйтесь поделиться с нами вашим ценным мнением.
Текст