Acura RL (1996-2004 year). Manual — part 613
Ignition Switch
Test
SRS components are located in this area. Review the
SRS component locations, precautions, and procedures
in the SRS (
) before performing repairs or
service.
NOTE: The PCM memory must be reset after reconnecting
1. Make sure you have the anti-theft code for the radio
and the navigation system, then write down the fre-
quencies for the radio's preset buttons.
2. Disconnect the battery negative cable.
3. Remove the dashboard lower cover (see
).
4. Disconnect the 7P connector from the under-dash
fuse/relay box.
7P CONNECTOR
Wire side of
female terminals
WHT
BLK/YEL
YEL
WHT/RED
BLK/WHT
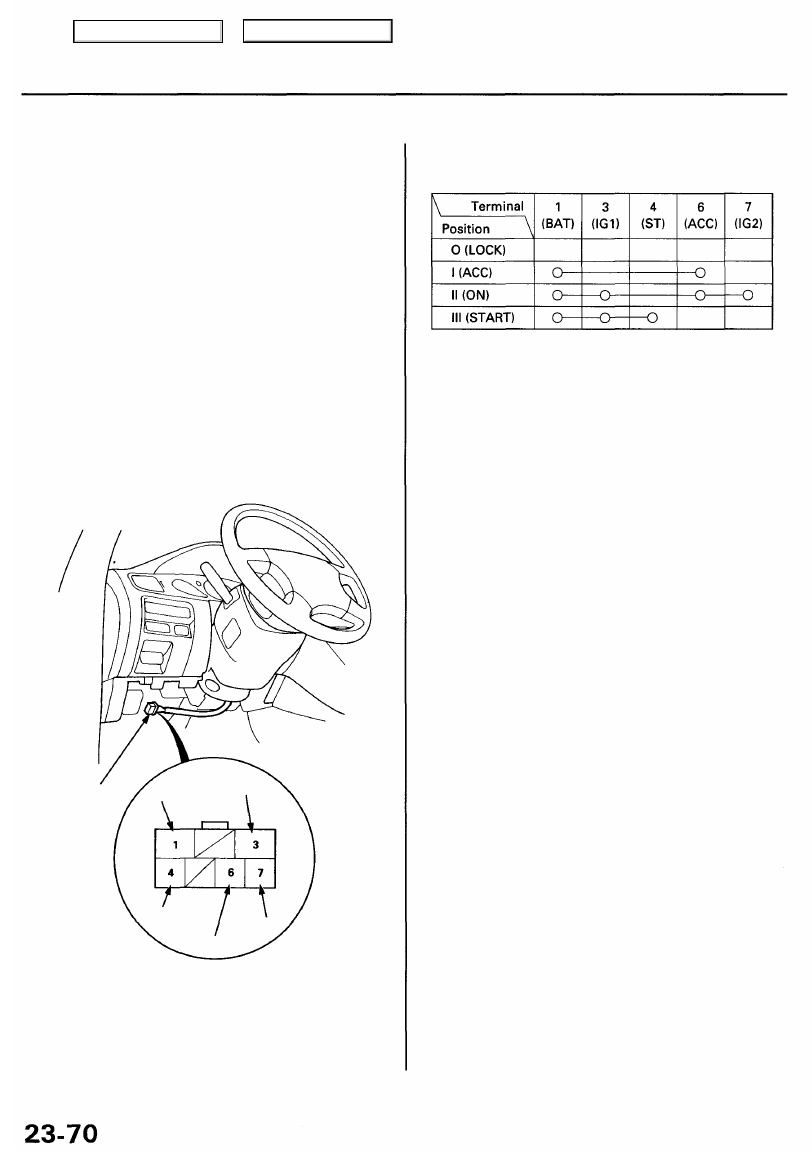
5. Check for continuity between the terminals in each
switch position according to the table.
6. If the continuity checks do not agree with the table,
replace the electrical switch.
7. After reconnecting the battery, enter the anti-theft
code for the radio and the navigation system, then
enter the customer's radio station presets.
Main Menu
Table of Contents
8. After reconnecting the battery, enter the anti-theft
code for the radio and the navigation system, then
enter the customer's radio station presets.
SWITCH
LOCK CYLINDER
Electrical Switch Replacement
SRS components are located in this area. Review the
SRS component locations, precautions,and procedures
in the SRS (
) before performing repairs or
service.
NOTE: The PCM memory must be reset after reconnecting
the battery (see
1. Make sure you have the anti-theft code for the radio
and the navigation system, then write down the fre-
quencies for the radio's preset buttons.
2. Disconnect the battery negative cable.
3. Remove the dashboard lower cover (see
).
4. Disconnect the 7P connector from the under-dash
fuse/relay box.
5. Remove the steering column covers (see
).
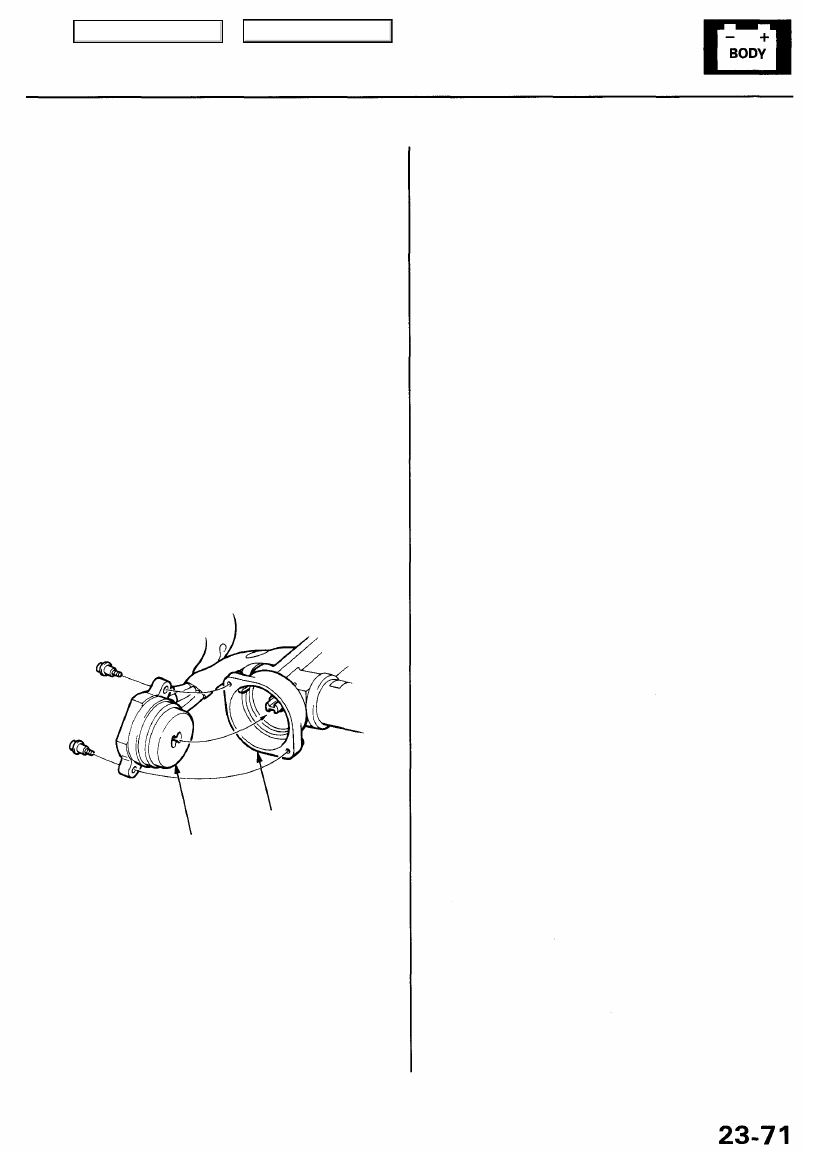
6. Insert the ignition key, and turn it to "0".
7. Remove the two screws and the electrical switch
from the steering lock.
Main Menu
Table of Contents

Battery
Test
• Battery fluid (electrolyte) contains sulfuric acid. It may cause severe burns if it gets on your skin or in your eyes. Wear
protective clothing and a face shield.
— If electrolyte gets on your skin or clothes, rinse it off with water immediately.
— If electrolyte gets in your eyes, flush it out by splashing water in your eyes for at least 15 minutes; call a physician
immediately.
• A battery gives off hydrogen gas. If ignited, the hydrogen will explode and could crack the battery case and splatter
acid on you. Keep sparks, flames, and cigarettes away from the battery.
• Overcharging will raise the temperature of the electrolyte. This may force electrolyte to spray out of the battery vents.
Follow the charger manufacturer's instructions, and charge the battery at a proper rate.
NOTE: The PCM memory must be reset after reconnecting the battery (see
).
Use either a JCI or Bear ARBST tester, and follow the manufacturer's procedures. If you don't have one of these
computerized testers, follow this conventional test procedure:
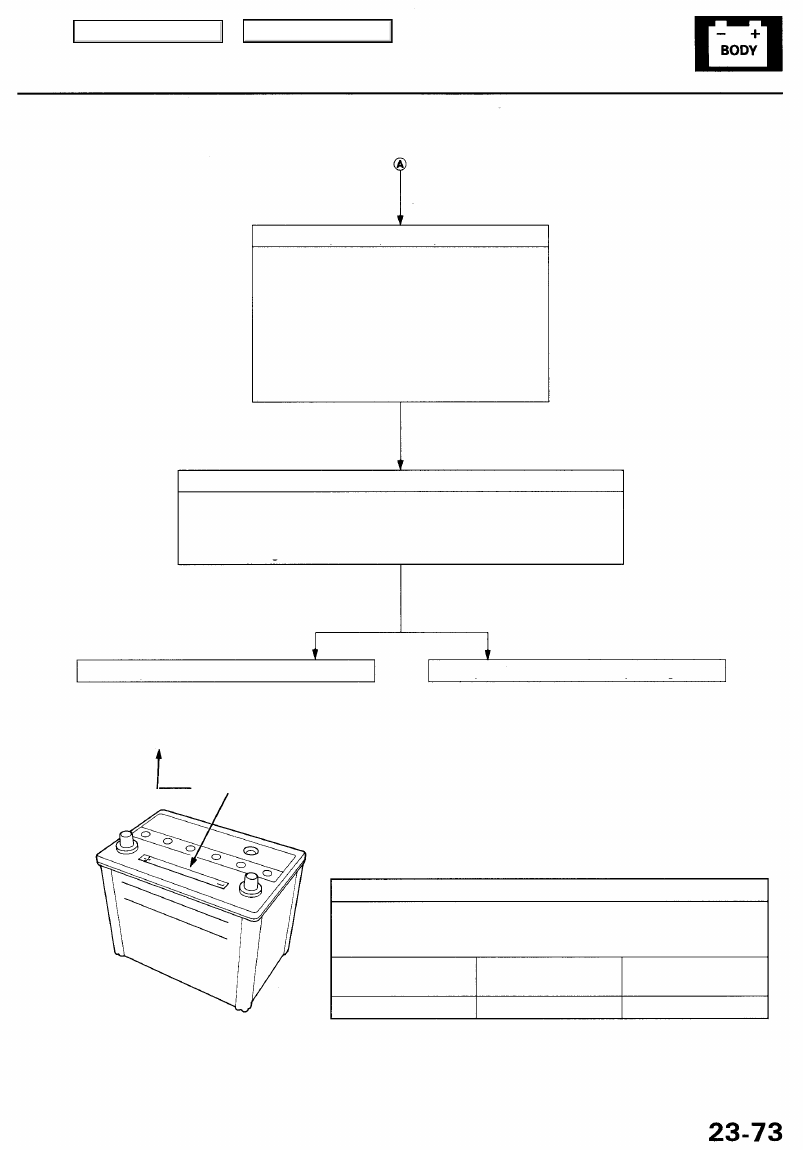
To get accurate results, the temperature of the electrolyte must be between 70°F (21°C) and 100°F (38°C).
Stays above 9.6 volts;
battery is OK.
Drops below 9.6 volts.
• Apply 300 amp load for 15 seconds to remove
surface charge.
• Allow 15 seconds recovery period.
• Apply test load (see Test Load Chart).
• Record voltage at the end of 15 seconds.
Test Load Capacity (#1)
EYE Indicates OK
If the indicator shows low electrolyte, add distilled
water if possible.
EYE Indicates LOW
CHARGE
Check Indicator EYE Color
If the case is cracked or the posts are loose, replace
the battery.
Check For Damage
Main Menu
Table of Contents
Charge on High Setting (40 amps)
Charge until EYE shows charge is OK; plus an
additional 30 minutes to assure full charge.
NOTE: If the battery charge is very low, it may
be necessary to bypass the charger's polarity
protection circuitry.
If the EYE does not show charge is OK within
3 hours, the battery is no-good; replace it.
Write down how long the battery was
charged.
Test Load Capacity (#2)
• Apply 300 amp load for 15 seconds to remove surface charge.
• Allow 15 seconds recovery period.
• Apply test load (see Test Load Chart).
• Record voltage at the end of 15 seconds.
Stays above 9.6 volts; battery is OK.
Drops below 9.6 volts; battery is no-good.
BATTERY CODE
80D26R-MF
TEST LOAD CHART
Use the test load or 1/2 the cold cranking amps (CCA) printed on the
label on the top of the battery. If neither is indicated, use the
information below:
BATTERY
CODE
COLD CRANKING
AMPS (CCA)
LOAD
(amps)
270
550
80
Main Menu
Table of Contents
Нет комментариевНе стесняйтесь поделиться с нами вашим ценным мнением.
Текст