Acura RL (1996-2004 year). Manual — part 568
Rear Window
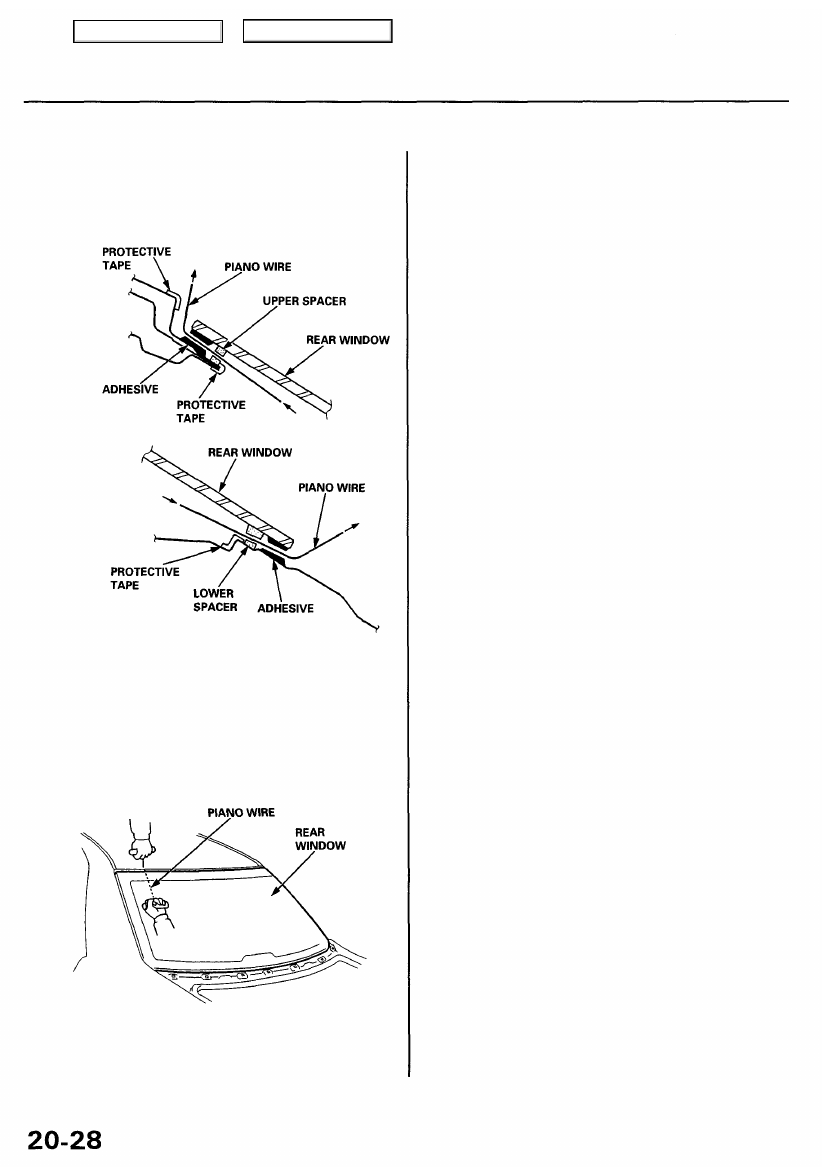
Removal (cont'd)
5. Apply protective tape along the edge of the body as
shown. Using an awl, make a hole through the
adhesive from inside the vehicle. Push the piano
wire through the hole, and wrap each end around a
piece of wood.
6. With a helper on the outside, pull the piano wire
back and forth in a sawing motion, and carefully cut
through the adhesive around the entire rear win-
dow.
CAUTION: Hold the piano wire as close to the rear
window as possible to prevent damage to the body.
7. Carefully remove the rear window.
Main Menu
Table of Contents

Installation
1. Using a knife, scrape the old adhesive smooth to a
thickness of about 2 mm (0.08 in.) on the bonding
surface around the entire rear window opening
flange.
NOTE:
• Do not scrape down to the painted surface of the
body; damaged paint will interfere with proper
bonding
• Mask off surrounding surfaces before painting.
• Remove the rubber dam, fasteners and spacers
from the body.
2. Clean the body bonding surface with a sponge
dampened in alcohol.
NOTE: After cleaning, keep oil, grease and water
from getting on the surface.
3. If the old rear window is to be reinstalled, use a putty
knife to scrape off all traces of old adhesive and the
rubber dam, then clean the rear window surface with
alcohol where new adhesive is to be applied.
NOTE: Make sure the bonding surface is kept free
of water, oil and grease.
CAUTION: Avoid setting the rear window on its
edges; small chips may later develop into cracks.
Rear Window
Main Menu
Table of Contents

4. Glue the rubber dam, fasteners, and spacers to the
inside face of the rear window as shown. If neces-
sary, glue the terminal base cover to the rear win-
dow.
NOTE: Be careful not to touch the rear window where
adhesive will be applied.
13 mm
(0.51 in.)
ALIGNMENT MARKS
SIDE
SPACER
ALIGNMENT
MARKS
REAR WINDOW
5. Align and glue the molding to the edge of the rear
window.
NOTE: Be careful not to touch the rear window where
adhesive will be applied.
GLASS
MOLDING
ADHESIVE
TAPE
MOLDING REAR WINDOW
50 mm
(2 in.)
Apply primer (3M N-200, or equivalent) to edge
of the windshield.
6. Install the fasteners to the body as shown.
ALIGNMENT
MARKS
TERMINAL
BASE COVER
13 mm
(0.51 in.)
ALIGNMENT MARKS
LOWER SPACER
SIDE
FASTENER
13 mm
(0.51 in.)
13 mm
(0.51 in.)
UPPER
FASTENER
ALIGNMENT MARKS
UPPER
SPACER
13 mm
(0.51 in.)
RUBBER
DAM
ALIGNMENT MARK
ALIGNMENT MARK
Spacer, rubber dam, fastener, terminal base cover locations
50 mm
(2 in.)
Fastener locations
Main Menu
Table of Contents

Rear Window
Installation (cont'd)
7.
Set the rear window, then center it in the opening.
Make alignment marks across the rear window and
body with a grease pencil at the four points shown.
NOTE: Be careful not to touch the rear window
where adhesive will be applied.
ALIGNMENT MARK
REAR
WINDOW
8. Remove the rear window.
9. With a sponge, apply a light coat of glass primer
around the edge of the rear window as shown, then
lightly wipe it off with gauze or cheesecloth.
NOTE:
Do not apply body primer to the rear window,
and do not get body and glass primer sponges
mixed up.
Never touch the primed surfaces with your hands.
If you do, the adhesive may not bond to the rear
window properly, causing a leak after the rear
window is installed.
Keep water, dust, and abrasive materials away
from the primed surface.
: Apply glass primer here.
REAR WINDOW
10. With a sponge, apply a light coat of body primer to
the original adhesive remaining around the rear
window opening flange. Let the body primer dry for
at least 10 minutes.
NOTE:
Do not apply glass primer to the body, and be care-
ful not to mix up glass and body primer sponges.
Never touch the primed surfaces with your hands.
: Apply body primer here.
20 mm (0.79 in.)
20 mm (0.79 in.)
11. Before filling a cartridge, cut the end of the nozzle
as shown.
Cut nozzle
end as shown.
10 mm (0.39 in.)
7 mm (0.27 in.)
MOLDING
Apply glass primer
to the molding.
MOLDING
10 mm
(0.39 in.)
UPPER
SPACER
GLASS
Inside
LOWER
SPACER
12 mm
(0.47 in.)
20 mm (0.79 in.)
Main Menu
Table of Contents
Нет комментариевНе стесняйтесь поделиться с нами вашим ценным мнением.
Текст