Acura RL (1996-2004 year). Manual — part 368

II. Powertrain Control Module (PCM) Reset Procedure
NOTE: The PCM memory setting is needed after resetting the PCM (see page
).
Either of the following actions will reset the PCM.
• Use the OBD II scan tool or Honda PGM Tester to clear the PCM's memory.
NOTE: See the OBD II scan tool or Honda PGM Tester user's manuals for specific operating instructions.
• Turn the ignition switch OFF. Remove the BACK UP RADIO (7.5 A) fuse from the under-hood fuse/relay box for
10 seconds.
NOTE: If the BACK UP RADIO (7.5 A) fuse is removed and the ignition switch ON (II), MIL will report on and
BACK UP RADIO
(7.5 A) FUSE
PCM will store the DTC P0560.
UNDER-HOOD
FUSE/RELAY
BOX
III. Final Procedure (this procedure must be done after any troubleshooting)
1. Remove the SCS service connector if it is connected.
NOTE: If the SCS service connector is connected and there are no DTCs stored in the PCM, the MIL will stay
on when the ignition switch is turned ON (II).
2. Do the PCM Reset Procedure.
3. Turn the ignition switch OFF.
4. Disconnect the OBD II scan tool or Honda PGM Tester from the Data Link Connector.
Main Menu
Table of Contents

PCM
PCM
COVER
9.8 N-m
(1.0 kgf-m,
7.2 Ibf-ft)
6. After completing your tests, reinstall both PCM's, and destroy the temporary key.
If the inspection for a particular code requires voltage or resistance checks at the PCM connectors, remove the right
door sill molding. Pull the carpet back to expose the PCM. Unbolt the PCM cover, and connect the backprobe sets and
a digital multimeter as described below. Check the system according to the procedure described for the appropriate code(s)
listed on the following pages.
DONOR
KEY
TEMPORARY
KEY
Troubleshooting
Troubleshooting Procedures (cont'd)
IV. Known-Good PCM Substitution
Use the following procedure if you need a known-good PCM to test a vehicle. It allows you to swap an PCM from a
"donor" vehicle without having to program it to the test vehicle's ignition key.
1. Cut a temporary ignition key for the test vehicle with a non-immobilizer key blank.
2. Remove the PCM from the test vehicle.
3. Write the test vehicle's VIN on the PCM you just removed to avoid confusing it with the donor vehicle's PCM.
4. Remove the known-good PCM from the donor vehicle, and install it in the test vehicle.
5. Tape the donor vehicle's ignition key head-to-head to the test vehicle's temporary key. The PCM will recognize the code
from the donor vehicle's key and allow you to start the engine with the temporary key.
Main Menu
Table of Contents

How to Use the Backprobe Sets
Connect the backprobe adapters to the stacking patch cords, and connect the cords to a multimeter. Using the wire
insulation as a guide for the contoured tip of the backprobe adapter, gently slide the tip into the connector from the wire
side until it comes in contact with terminal end of the wire.
Backprobe Adapter
DIGITAL MULTIMETER
(Commercially available) or
KS - AHM - 32 - 003
Stacking Patch
Cord
BACKPROBE SET
07SAZ - 001000A (Two required)
CAUTION:
• Puncturing the insulation on a wire can cause poor or intermittent electrical connections.
• Bring the tester probe into contact with the terminal from the terminal side of wire harness connectors in the engine
compartment. For female connectors, just touch lightly with the tester probe and do not insert the probe.
TESTER PROBE
RUBBER SEAL
WIRE HARNESS
TERMINAL
Main Menu
Table of Contents
Troubleshooting
Troubleshooting Procedures (cont'd)
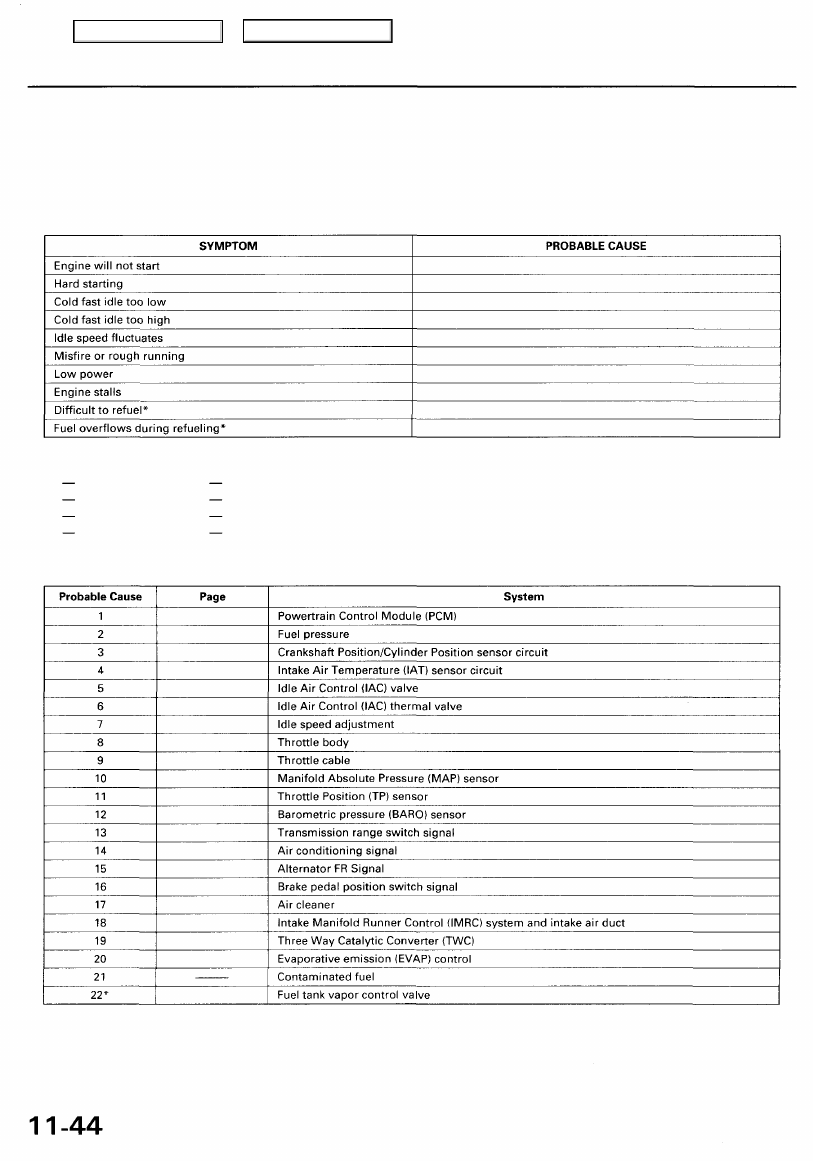
Symptom Chart
Listed below are symptoms and probable causes for problems that DO NOT cause the Malfunction Indicator Lamp (MIL) to
come on. If the MIL was reported on, go to page
Troubleshoot each probable cause in the order listed (from left to right) until the symptom is eliminated.
The probable cause and troubleshooting page reference can be found below.
*: '00 - 01 models
2, 3, 21, 13, 1
2, 10, 12, 20, 21
5, 6, 7, 4
5, 6, 7, 9, 8
5, 14, 15, 6, 7, 9, 8
Troubleshoot for misfire on pages
2, 8, 9, 11, 18, 17, 19, 10
2, 5, 10, 21, 7, 3, 16
20, 22
20, 22
Other Probable Causes for an engine that will not start:
Compression
PGM-FI main relay
Engine locked up
Timing belt
Starting system
Ignition system
Overheating
Battery
Probable Cause List (For the DTC Chart, see page
*: '00 - 01 models
(see DTC chart)
(see DTC chart)
(see DTC chart)
(see DTC chart)
(see DTC chart)
(see DTC chart)
(see DTC chart)
(see DTC chart)
Main Menu
Table of Contents
Нет комментариевНе стесняйтесь поделиться с нами вашим ценным мнением.
Текст