Acura RL (1996-2004 year). Manual — part 241
Power Windows
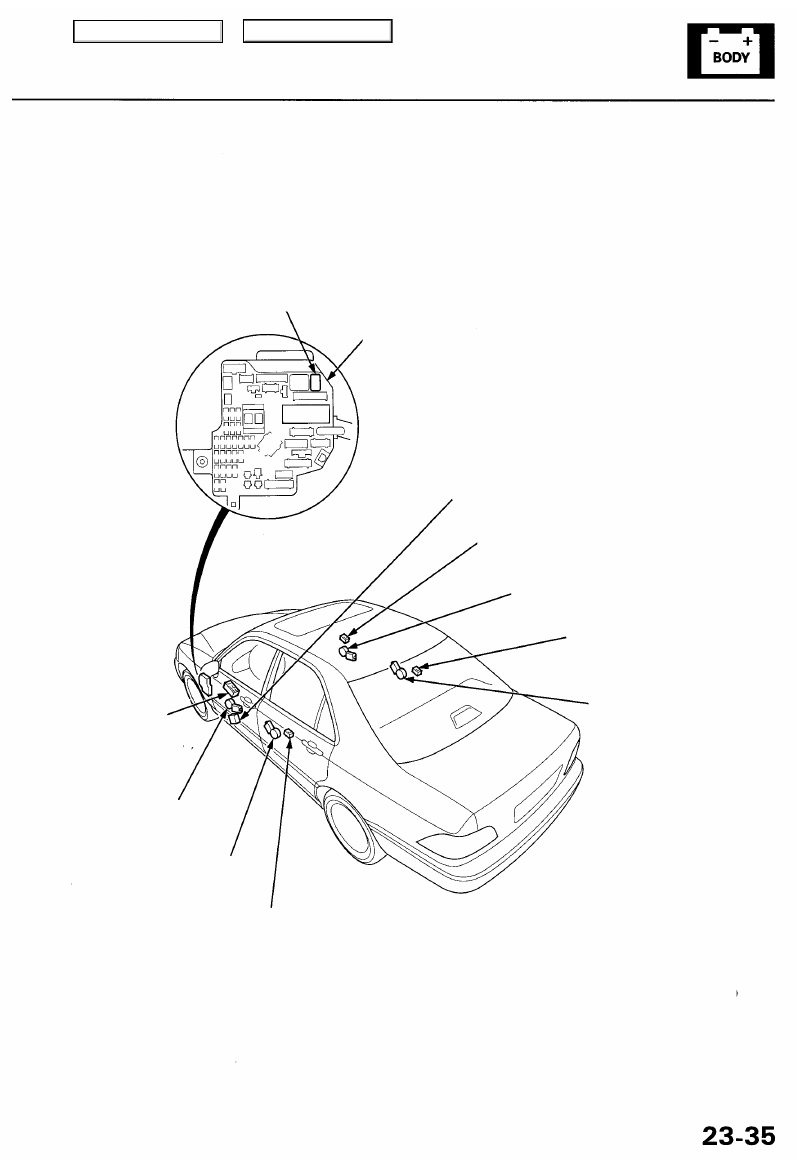
Component Location Index
'02 model:
NOTE: Refer to the '96 - 01 3.5RL Service Manual, P/N 61SZ305,
for the items not shown in this section.
UNDER-DASH
FUSE/RELAY
BOX
POWER WINDOW MASTER
SWITCH*
Driver's window switch
Test, page
DRIVER'S WINDOW
MOTOR
Test, page
LEFT REAR WINDOW MOTOR
POWER WINDOW CONTROL UNIT
Input, Test
FRONT PASSENGER'S WINDOW SWITCH
•Test, page
Replacement, page
FRONT PASSENGER'S WINDOW MOTOR
RIGHT REAR WINDOW SWITCH
Test, page
RIGHT REAR WINDOW MOTOR
Test, page
LEFT REAR WINDOW
SWITCH
Test, page
*: You can also test the switches by using the self-diagnosis function (mode 2). (See page
of the '96-01 3.5RL Service Manual.]
Main Menu
Table of Contents
Power Windows
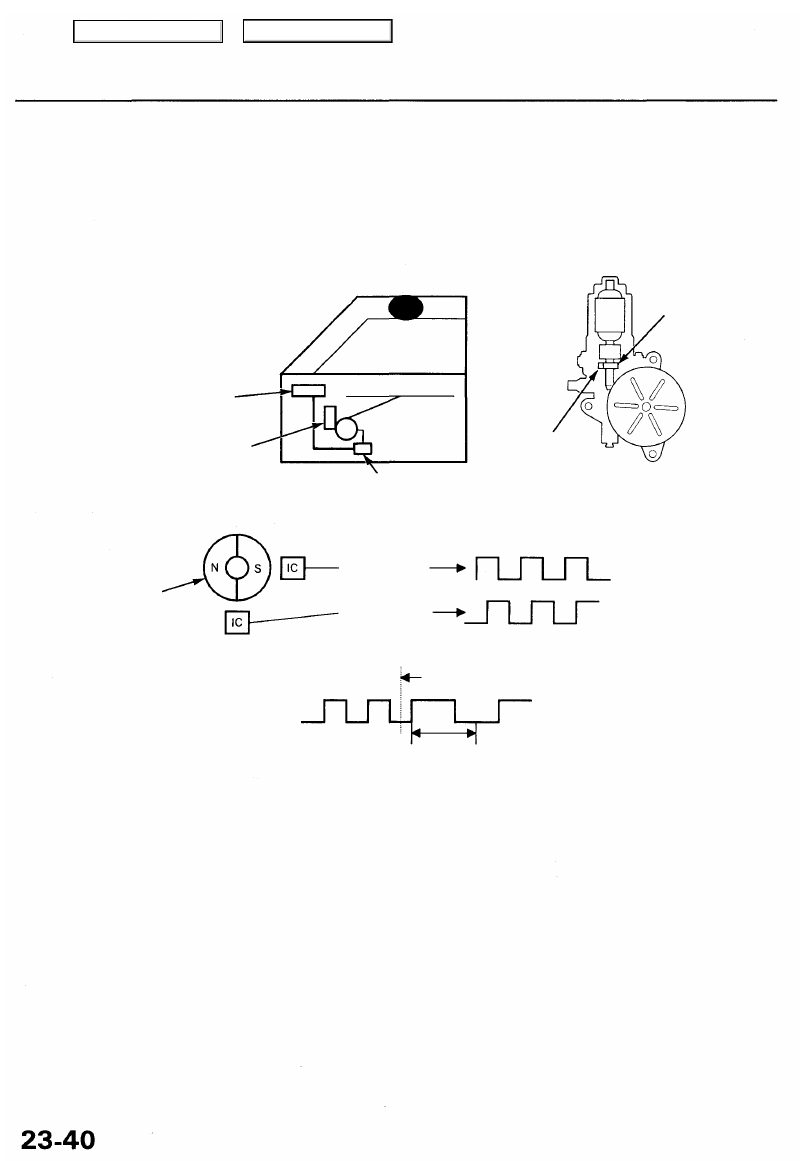
Descriptions
The driver's window will stop and automatically open if you pinch your hand or something during auto-up operation.
The system is composed of the power window master switch, the power window control unit and the driver's window
motor.
The power window motor incorporates a pulser which generates pulses during the motor's operation and sends the puls-
es to the power window control unit. As soon as the power window control unit detects no pulses from the pulser, the
control unit makes the power window motor stop and reverse.
POWER WINDOW MASTER
SWITCH
POWER WINDOW MOTOR
HOLE IC UNIT
MAGNET
POWER WINDOW
CONTROL UNIT
Sensor
MAGNET
Period of pulses -
Period of
pulses
Position when something
is pinched
Threshold value for
judgment of pinching
Resetting the power window unit
Resetting the power window control unit is required after performing the following procedures:
— disconnecting the battery.
— removing No. 41 (20 A) fuse.
— disconnecting the connector from the power window control unit.
— removing the window regulator, glass or glass run channel.
1. Make sure the glass is installed properly.
2. Turn the ignition switch OFF.
3. Remove the No. 41 (20 A) fuse in the under-hood fuse/relay box.
4. Turn the ignition switch ON (II) on for 2 seconds, then turn it OFF. Reinstall the NO. 41 (20 A) fuse in the under-hood
fuse/relay box.
5. Turn the ignition switch ON (II).
6. Make sure the driver's window does not work in AUTO with the ignition switch ON (II).
7. Move the driver's window all the way down by using the driver's switch.
8. Move the driver's window all the way up by using the driver's switch when the window reaches the top, hold the
driver's window switch in the up position for 2 seconds.
* If the window does not work in AUTO, reset the power window master switch according to the above procedures again.
Period of pulses
Main Menu
Table of Contents

Driver's Window Motor Test ('02-04 Models)
Motor Test:
1. Remove the driver's door panel.
2. Disconnect the 6P connector from the window motor.
6P CONNECTOR
Terminal side of
male terminals
3. Test the motor in each direction by connecting bat-
tery power and ground according to the table.
CAUTION: When the motor stops running, discon-
nect one lead immediately.
4. If the motor does not run or fails to run smoothly,
replace it.
Pulser Test:
5. Reconnect the 6P connector to the window motor.
6. Check for voltage between the terminals.
• There should be battery voltage between the No.
6 (+) and No. 4 (-) terminals when the ignition
switch is ON (II).
• Connect the an analog voltmeter between the
No. 5 (+) and No. 4 (-) terminals, and run the
window motor down or up. The voltmeter needle
should move back and forth alternately.
• Connect the an analog voltmeter between the
No. 3 (+) and No. 4 (-) terminals, and run the
window motor down or up. The voltmeter needle
should move back and forth alternately.
7. If the voltage does not fluctuate, replace the window
motor.
Main Menu
Table of Contents
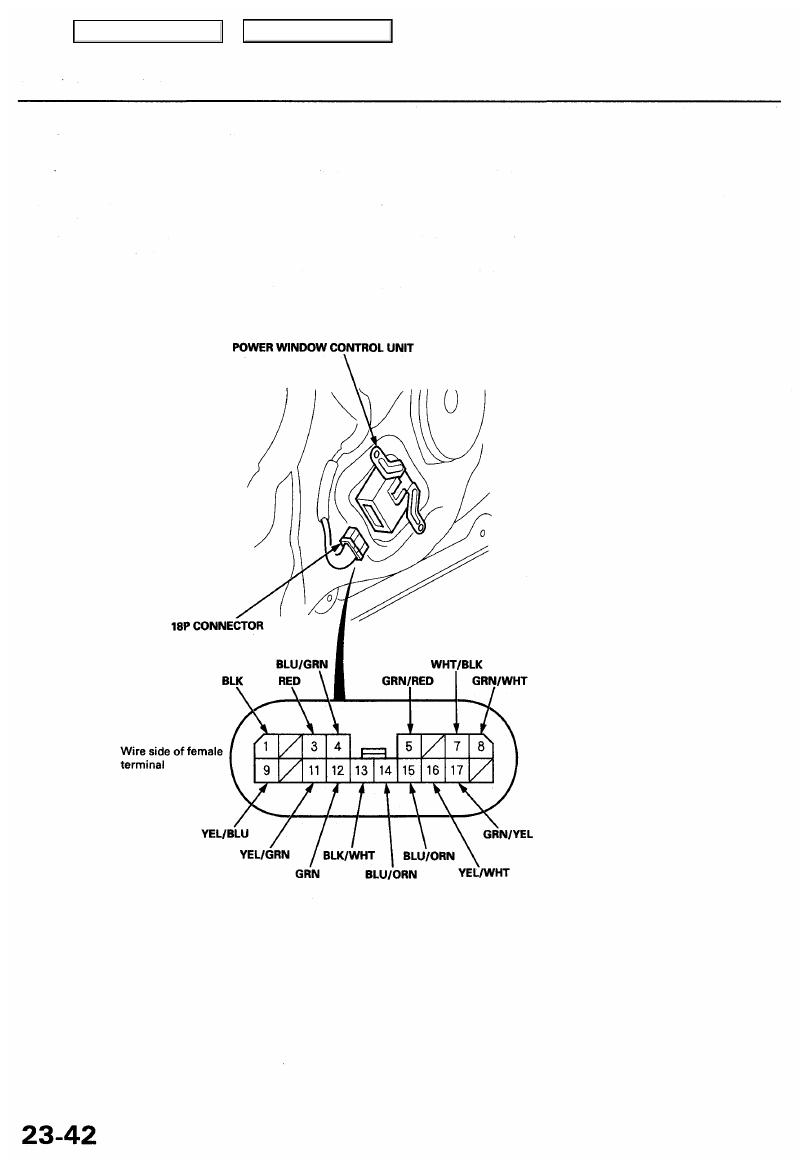
Power Windows
Control Unit Input Test
1. Remove the driver's door panel, and disconnect the 18P connector from the control unit.
2. Inspect the connector and socket terminals to be sure they are all making good contact.
• If the terminals are bent, loose or corroded repair them as necessary, and recheck the system.
• If the terminals look OK, make the following input tests at the connector.
— If a test indicates a problem, find and correct the cause, then recheck the system.
— If all the input tests prove OK, the control unit must be faulty; replace it.
Main Menu
Table of Contents
Нет комментариевНе стесняйтесь поделиться с нами вашим ценным мнением.
Текст