Acura TL (1995-1998) body repair. Manual — part 7
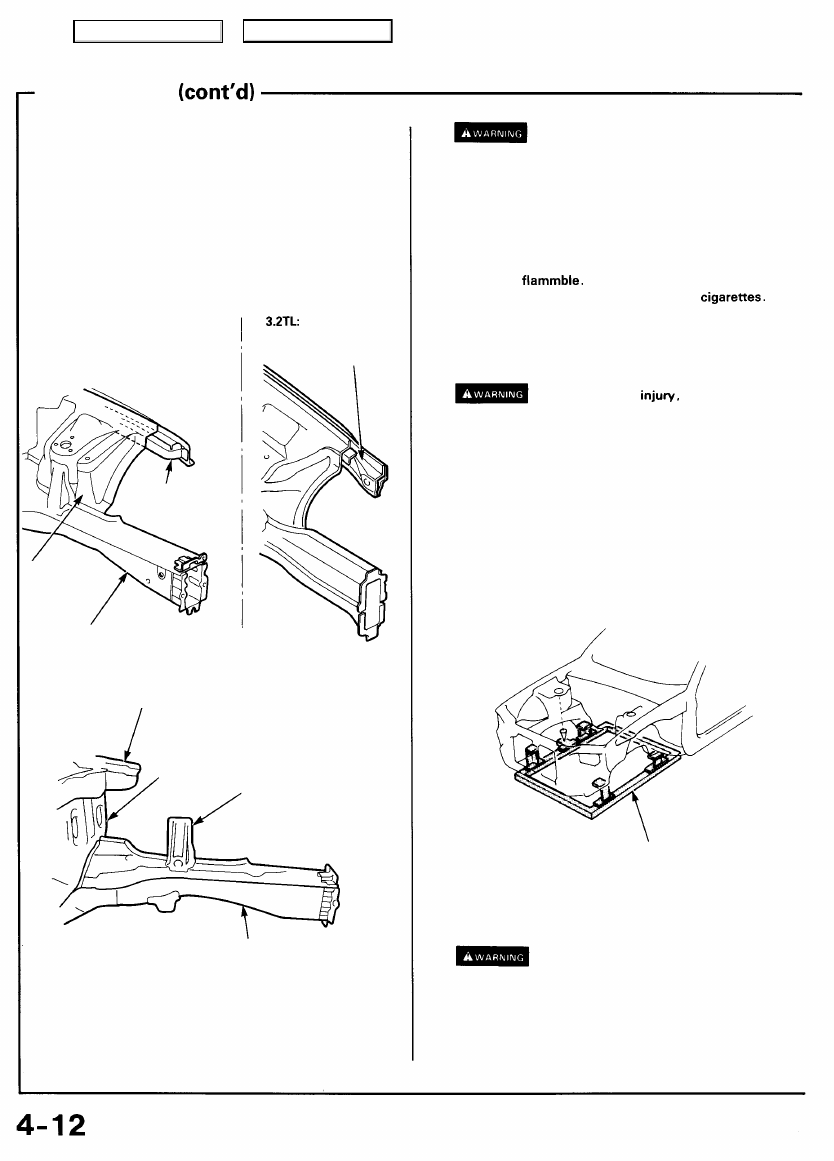
3.2TL:
Main Menu
Table of Contents
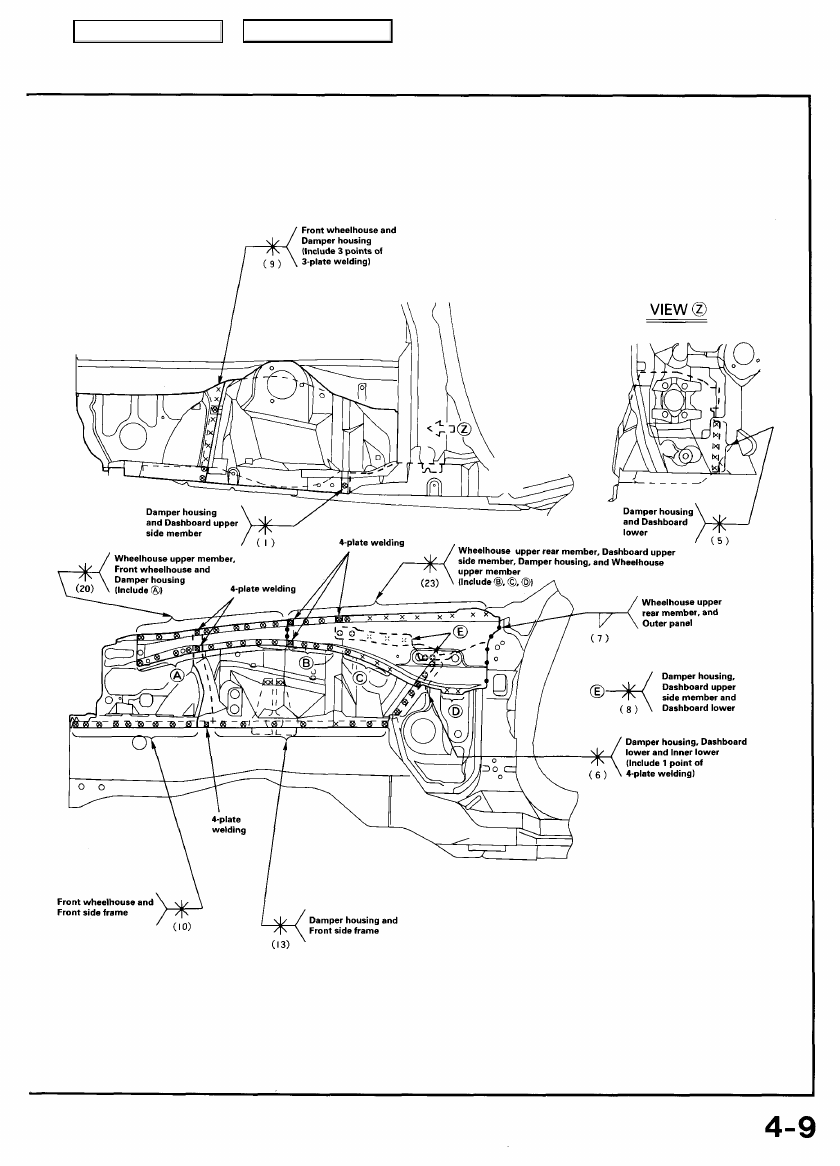
Front Wheelhouse/Damper Housing
Replacement
1. Remove the related parts.
• Parts to be removed when removing the front bulk-
head
• Parts on passenger side of lower dashboard which
are especially flammable
• Electrical accessories in engine compartment and
wire harnesses.
NOTE: See the 95-96 Acura 2.5TL & 96 Acura 3.2TL
Service Manuals, for removal and installation of the
engine, front suspension and brakes.
2. Pull out and straighten the damaged area to approxi-
mately the original shape.
• Attach the car to the frame straightener by tighten-
ing the underbody clamps at the horizontal pinch
weld points.
NOTE: Refer to the 95-96 Acura 2.5TL & 96 Acura 3.2TL
Service Manuals for safety stand location points.
• Before cutting off the damaged sections, pull them
out so that they are restored to the original shape.
• Do not pull out more than necessary.
• Pull out and straighten the damaged area of the
lower dashboard, front pillar, and other parts.
• After pulling, check the damper housing position
using the body dimensional drawings (see
).
NOTE: Check the condition of the door and hinges.
3. Peel off the undercoat.
Heat the undercoat at the weld areas of the wheelhouse
and front side frame with a gas torch, and peel off the
undercoat with a metal spatula.
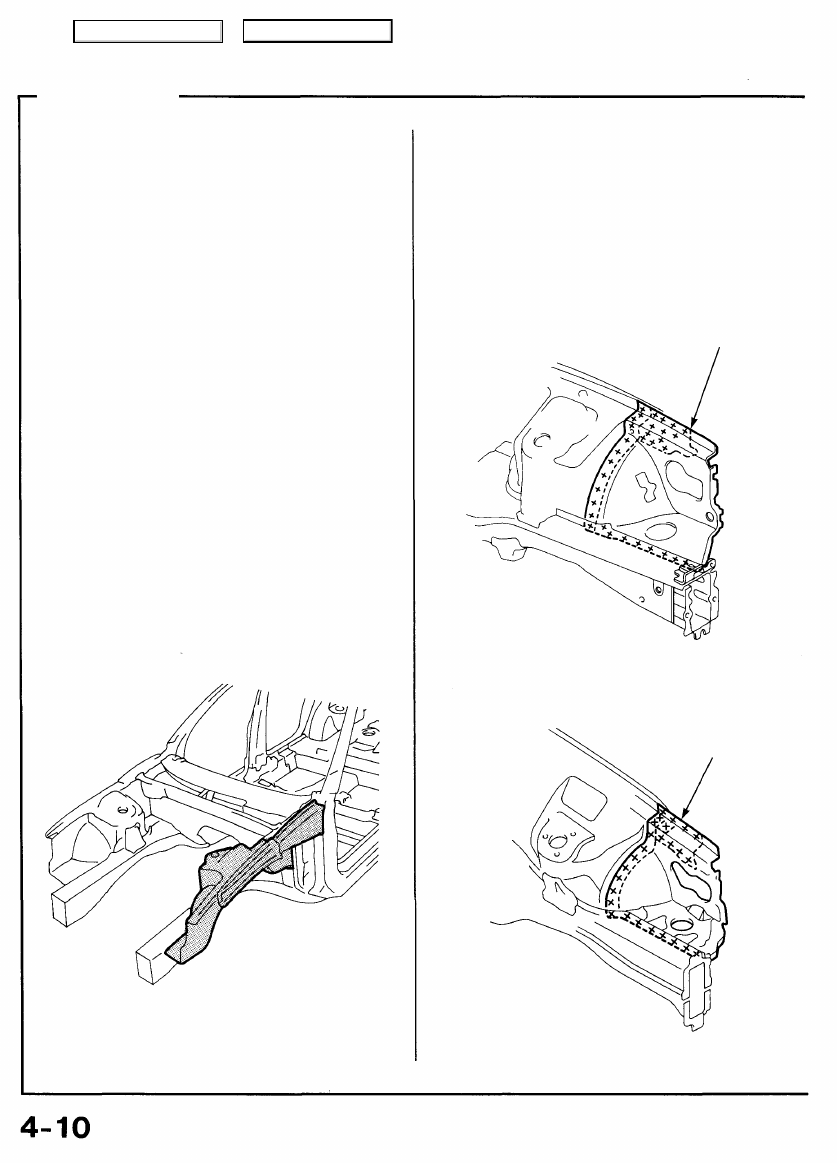
4. Cut and pry off the front wheelhouse and damper
housing.
-1. When replacing the front wheelhouse only.
• Center punch around the spot weld imprints on the
front side frame and damper housing.
• Drill holes in the center punched areas using a spot
cutter.
• Using a chisel, pry off the welded flange.
2.5TL:
FRONT WHEELHOUSE
3.2TL:
FRONT WHEELHOUSE
Main Menu
Table of Contents

-2. Replace the damper housing with the front
wheelhouse.
• Remove the wheelhouse upper rear member.
• Remove the MIG weld flange with a disc sander.
To prevent eye injury, wear goggles or
safety glasses whenever sanding, cutting or grinding.
• Using a chisel,
off the welded flange form the
front pillar and damper housing.
NOTE: Remove the wheelhouse upper rear member
carefully so they can be reused.
3.2TL:
WHEELHOUSE UPPER
REAR MEMBER
WHEELHOUSE UPPER
REAR MEMBER
2.5TL:
DASHBOARD
UPPER SIDE
MEMBER
3.2TL:
DAMPER
HOUSING
FRONT SIDE FRAME
DASHBOARD UPPER SIDE MEMBER
FRONT PILLAR
INNER LOWER
Main Menu
Table of Contents
Front wheelhouse/Damper housing
Replacement
5. Mold the related parts.
• Level and finish the burrs left on the welding
surfaces with a sander.
• Fill all drilled holes by MIG or gas welding.
Use a hammer and dolly to even out the welded areas of
the lower dashboard, front side frame and dashboard
upper side member.
2.5TL:
WHEELHOUSE UPPER
MEMBER DIAGONAL
WHEELHOUSE
UPPER
EXTENSION
FRONT SIDE FRAME
DASHBOARD UPPER
SIDE MEMBER
DASHBOARD LOWER
DAMPER STIFFENER
FRONT SIDE FRAME
6. Set the new front wheelhouse and damper housing.
• Apply body paint to both sides of the new front
wheelhouse and damper housing.
• See Paint Repair section.
• Ventilate when spraying paint. Most paint
contains substances that are harmful if inhaled
or swallowed. Read the paint label before
opening the paint container.
• Avoid contact with skin. Wear an approved
respirator, gloves, eye protection and appropriate
clothing when painting.
• Paint is
Store it in a safe place, and
keep it away from sparks, flames or
• Remove the undercoat from both sides of the weld-
ing section and expose the steel plate using a disc
sander.
To prevent eye
wear goggles
or safety glasses whenever sanding, cutting or
grinding.
• Clamp to the front side frame with vise-grips and
squill vises.
NOTE: Apply the spot sealer to the welding surface
when spot welding.
• Clamp the front bulkhead with vise-grips.
• Measure the front compartment diagonally.
NOTE: Use of a positioning jig is recommended (see
page
).
POSITIONING JIG
• Spot weld several points in the clamped sections, and
temporarily attach the front wheelhouse and damper
housing.
To prevent eye injury and burns
when welding, wear an approved welding helmet,
gloves and safety shoes.
7. Check the dimensions, temporarily install the hood, front
fender and headlight, and check for differences in level
and clearance.
DAMPER
HOUSING
Main Menu
Table of Contents
Нет комментариевНе стесняйтесь поделиться с нами вашим ценным мнением.
Текст