Mazda CX-7 (2012 year). Instruction — part 22
Black plate (344,1)
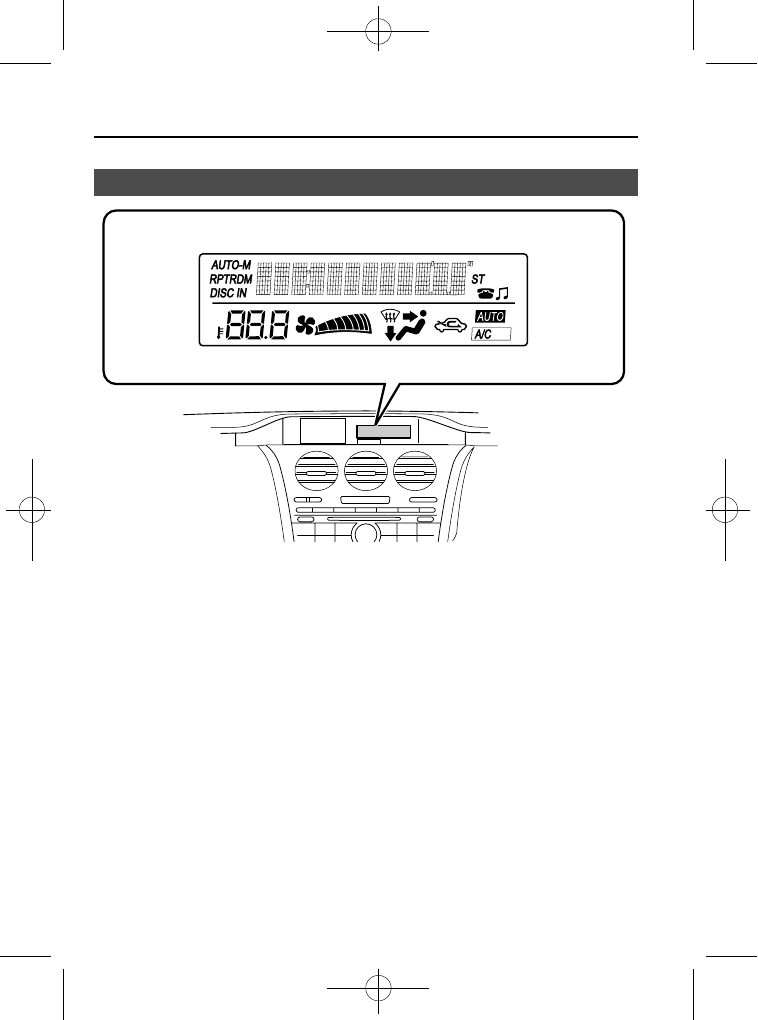
Information Display
Audio display
Climate control display
qInformation Display Functions
The information display has the following functions:
l
Climate Control Display (Fully Automatic Type Air Conditioning System)
l
Audio Display
l
Bluetooth
®
Hands-Free Display
í
Refer to Bluetooth® Hands-Free on page 6-72.
6-106
Interior Comfort
í
Some models.
CX-7_8CG3-EA-11J_Edition1 Page344
Saturday, September 24 2011 10:33 AM
Black plate (345,1)
qClimate Control Display
The climate control system status is
displayed. To operate the climate control
system, refer to
“Climate Control System”
(page 6-2).
qAudio Display
The audio system status is displayed. To
operate the audio system, refer to
“Audio System” (page 6-14).
Interior Comfort
6-107
CX-7_8CG3-EA-11J_Edition1 Page345
Saturday, September 24 2011 10:33 AM
Black plate (346,1)
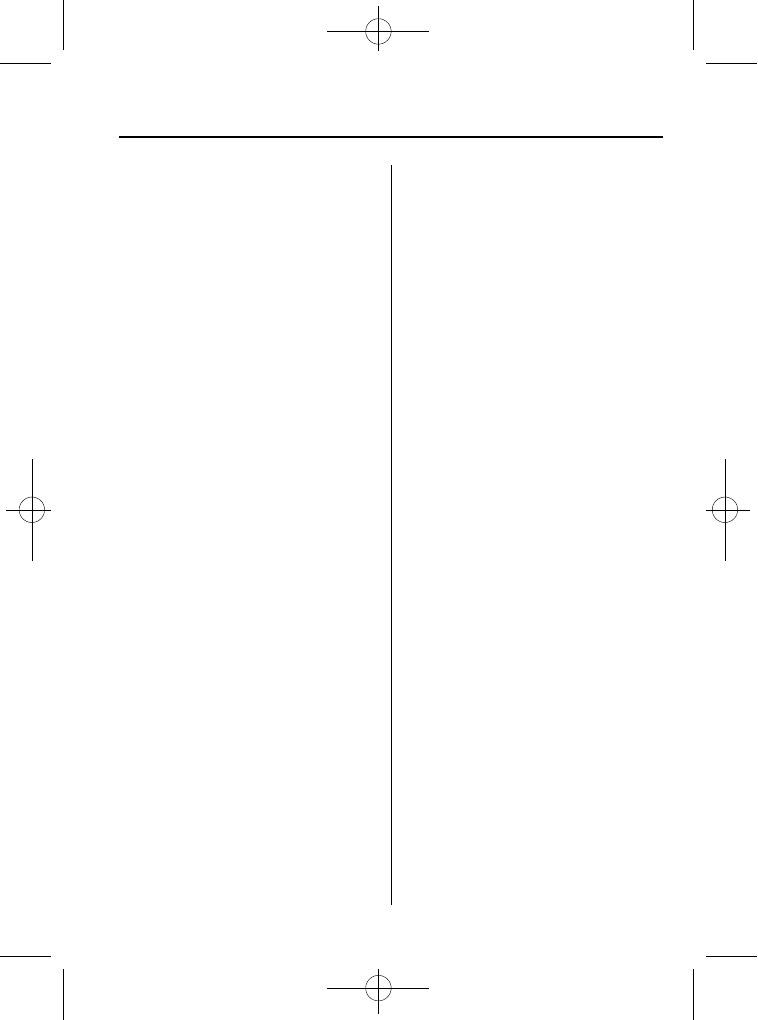
Multi Information Display
Clock adjustment buttons
Clock adjustment buttons
Without navigation system
and rear view monitor
With navigation system or
rear view monitor
Steering Switch
Left switch
Right switch
Navi switch
BACK switch
INFO switch
Enter (up/down) switch
6-108
Interior Comfort
CX-7_8CG3-EA-11J_Edition1 Page346
Saturday, September 24 2011 10:33 AM
Black plate (347,1)
Switch
Function
Enter (up/down) switch Used to select a menu and change numbers. Select up or down and press enter.
Right switch/Left
switch
Used to select digits when setting numbers.
Navi switch
(With navigation sys-
tem)
Press to switch the system to the navigation system screen.
BACK switch
Press during SETTINGS to return to the previous screen.
INFO switch
Press to switch to the multi information display.
Switches the setting display in the order of Trip computer
(average fuel economy/average vehicle speed)
→ Trip computer
(current fuel economy/distance-to-empty)
→ Audio display → Settings
(reset averages/maintenance/preferences). Each time the switch is pressed, the multi
information display cycles through.
qMulti Information Display Functions
Function name
Details
See page
Clock
Constant display of time.
Outside temperature
display
Constant display of ambient temperature.
Audio display
Displays the audio operation status. Displayed when the INFO switch is
pressed.
Trip computer
Displays the average fuel economy, average vehicle speed, current fuel
economy, and distance-to-empty. Displayed when the INFO switch is
pressed.
Maintenance monitor Notification of periodic inspection and tire rotation period
Warning indicator
Notification of the need to take caution
Settings
Used to change the multi information display settings. Displayed when the
INFO switch is pressed.
Rear view monitor
The rear view monitor is a visual assist system when reversing the vehicle
that provides images from the rear of the vehicle.
Navigation system
Refer to the separate manual
Interior Comfort
6-109
CX-7_8CG3-EA-11J_Edition1 Page347
Saturday, September 24 2011 10:33 AM
Black plate (348,1)
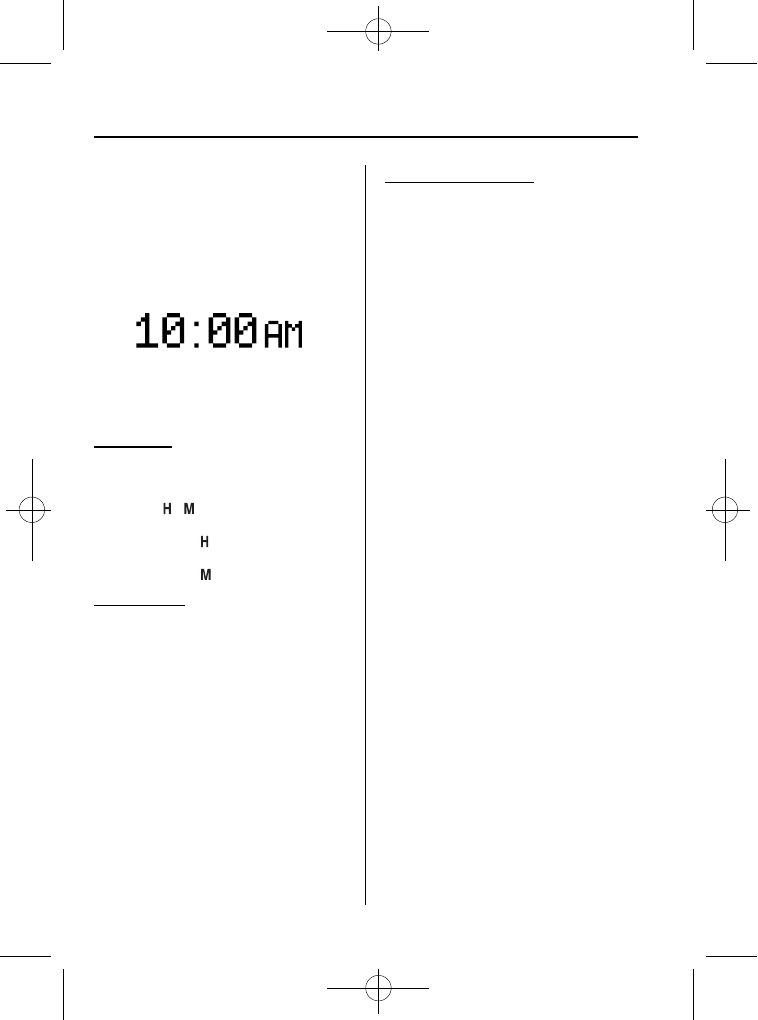
qClock
The time is displayed when the ignition is
switched to ACC or ON.
Time setting
1. Switch the ignition to ACC or ON.
2. Adjust the time using the time setting
buttons ( ,
).
The hours advance while the time
setting button ( ) is pressed.
The minutes advance while the time
setting button (
) is pressed.
Time resetting
1. Switch the ignition to ACC or ON.
2. Press the :00 button.
3. When the button is pressed, the time
will be reset as follows:
(Example)
12:01
―12:29→12:00
12:30
―12:59→1:00
NOTE
When the :00 button is pressed, the seconds
will start at
“00”.
With navigation system
Time zone switching
1. Press the INFO switch until the
SETTINGS screen is displayed.
2. Select PREFERENCES by pressing the
Enter (up/down) switch up or down,
and then press the Enter (up/down)
switch.
3. Select TIME ZONE by pressing the
Enter (up/down) switch up or down,
and then press the Enter (up/down)
switch.
4. Select the desired time zone by
pressing the Enter (up/down) switch up
or down, and then press the Enter (up/
down) switch.
NOTE
l
Daylight saving time is not reflected in the
time zone displayed.
l
The clock does not display if there is no
GPS signal reception.
l
If the battery cables are disconnected and
then reconnected, the clock does not
operate until a GPS signal is received. Do
not place objects on the dashboard,
otherwise the clock may be unable to
receive the GPS signal normally.
6-110
Interior Comfort
CX-7_8CG3-EA-11J_Edition1 Page348
Saturday, September 24 2011 10:33 AM
Black plate (349,1)
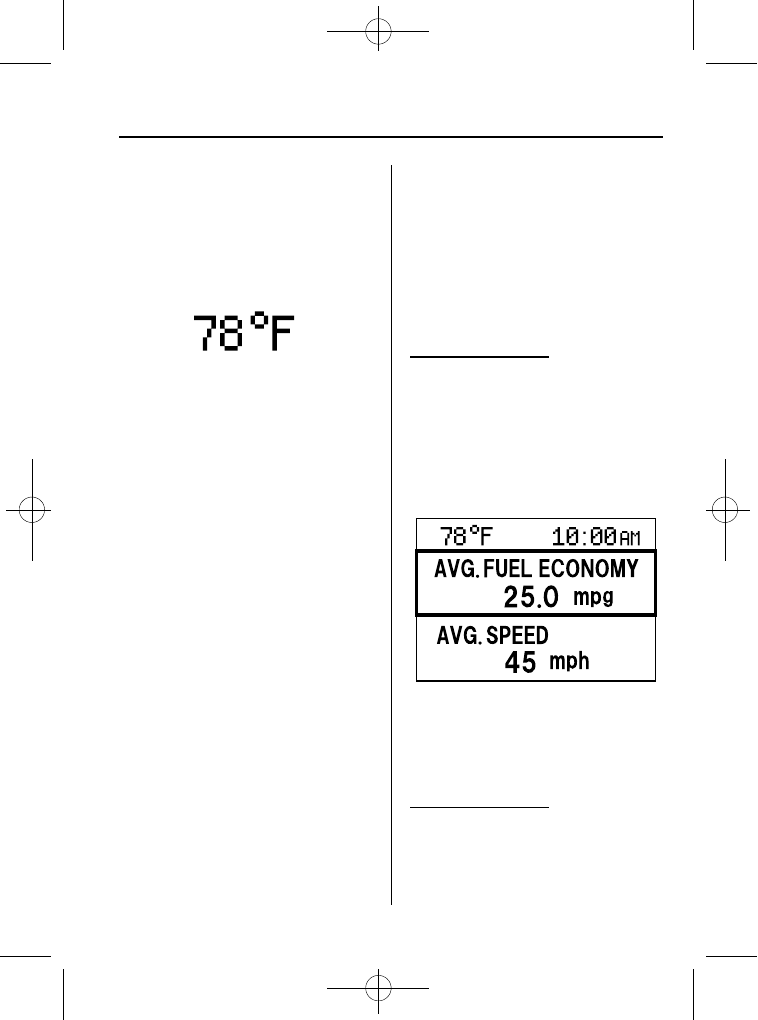
qOutside Temperature Display
When the ignition is switched ON, the
ambient temperature is displayed.
NOTE
l
Under the following conditions, the ambient
temperature display may differ from the
actual ambient temperature depending on
the surroundings and vehicle conditions:
l
Significantly cold or hot temperatures.
l
Sudden changes in ambient temperature.
l
The vehicle is parked.
l
The vehicle is driven at low speeds.
l
When the ignition is switched to ACC,
“- - -” is displayed.
qAudio Display
Press the INFO switch until the AUDIO
screen is displayed. The audio operation
status is displayed.
To operate the audio system, refer to
“Audio System” (page 6-14).
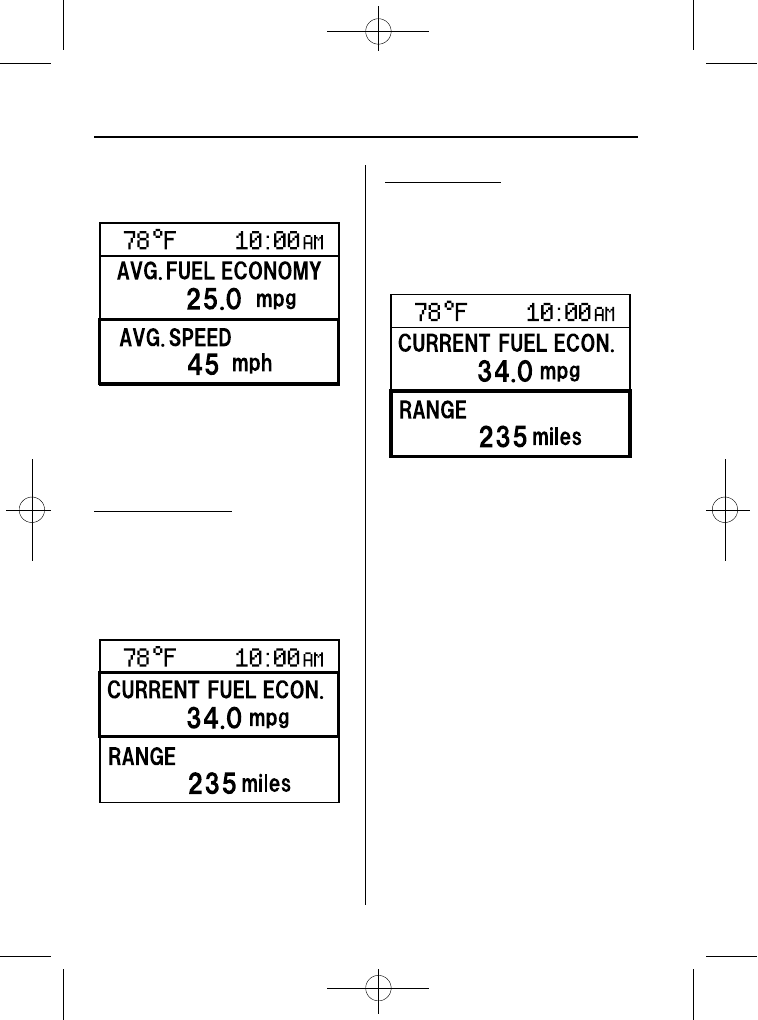
qTrip Computer
The trip computer can display the
following:
l
The average fuel economy.
l
The average vehicle speed.
l
The current fuel economy.
l
The approximate distance you can
travel on the available fuel.
1. Switch the ignition ON.
2. Press the INFO switch until the trip
computer screen is displayed.
If you have any problems with your trip
computer, consult an Authorized Mazda
Dealer.
Average fuel economy
This mode displays the average fuel
economy by calculating the total fuel
consumption and the total traveled
distance since purchasing the vehicle, re-
connecting the battery after disconnection,
or resetting the data. The average fuel
economy is calculated and displayed
every minute.
To erase the displayed data, Refer to
Settings on page 6-117.
After erasing, the calculated average fuel
economy in - - - L/100 km (- - - mpg) is
displayed after 1 minute has elapsed.
Average vehicle speed
This mode displays the average vehicle
speed by calculating the distance and the
time traveled since connecting the battery
or resetting the data.
Interior Comfort
6-111
CX-7_8CG3-EA-11J_Edition1 Page349
Saturday, September 24 2011 10:33 AM
Black plate (350,1)
The average vehicle speed will be
calculated every 10 seconds.
To erase the displayed data, Refer to
Settings on page 6-117.
After erasing, the calculated average
vehicle speed in - - - km/h (- - - mph) is
displayed after 1 minute has elapsed.
Current fuel economy
This mode displays the current fuel
economy by calculating the amount of
fuel consumption and the distance
traveled.
The current fuel economy will be
calculated every 2 seconds.
When you've slowed to about 5 km/h (3
mph), - - - L/100 km (- - - mpg) will be
displayed.
Distance-to-empty
This mode displays the approximate
distance you can travel on the remaining
fuel based on the fuel economy.
The distance-to-empty will be calculated
every second.
NOTE
l
Even though the distance-to-empty display
may indicate a sufficient amount of
remaining driving distance before refueling
is required, refuel as soon as possible if the
fuel gauge needle nears E or the low fuel
warning light illuminates.
l
The display will not change unless you add
more than approximately 5 L {6 US qt, 5
Imp qt} of fuel.
l
When the ignition is switched to ACC,
“- - -” is displayed.
6-112
Interior Comfort
CX-7_8CG3-EA-11J_Edition1 Page350
Saturday, September 24 2011 10:33 AM
Black plate (351,1)
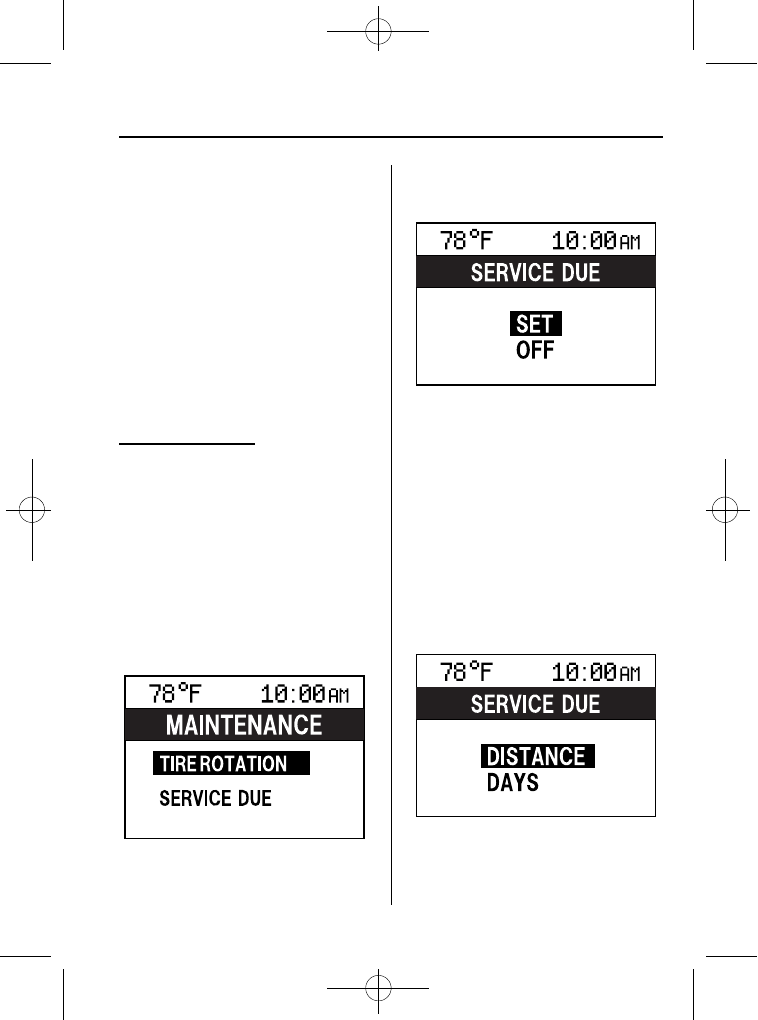
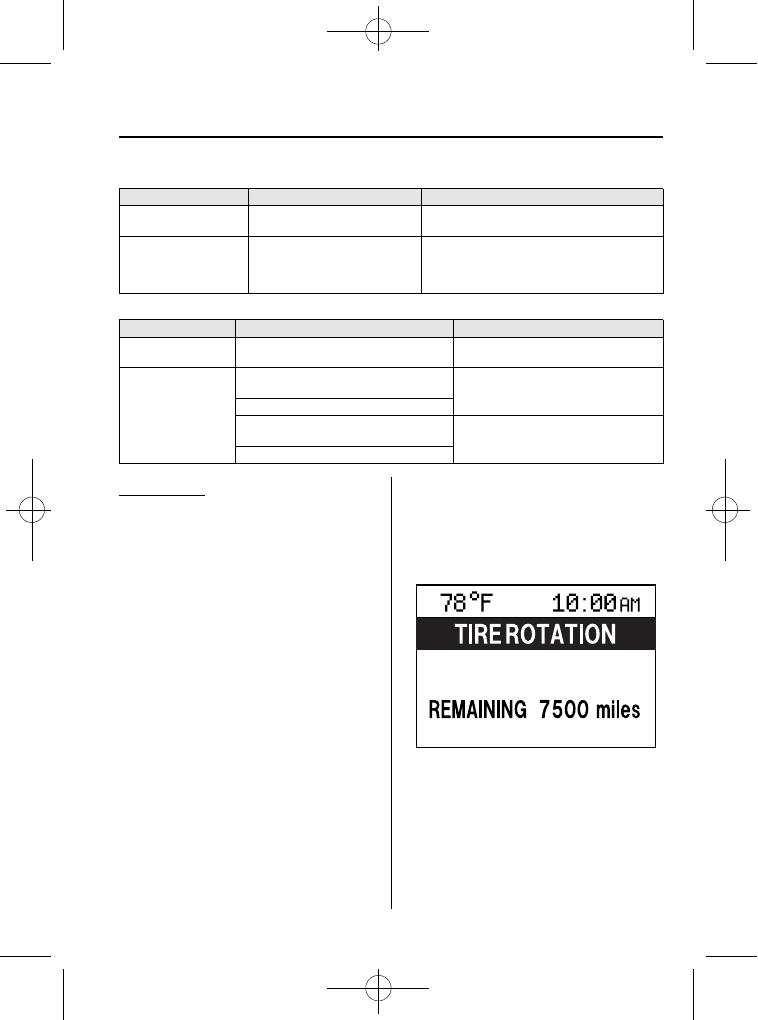
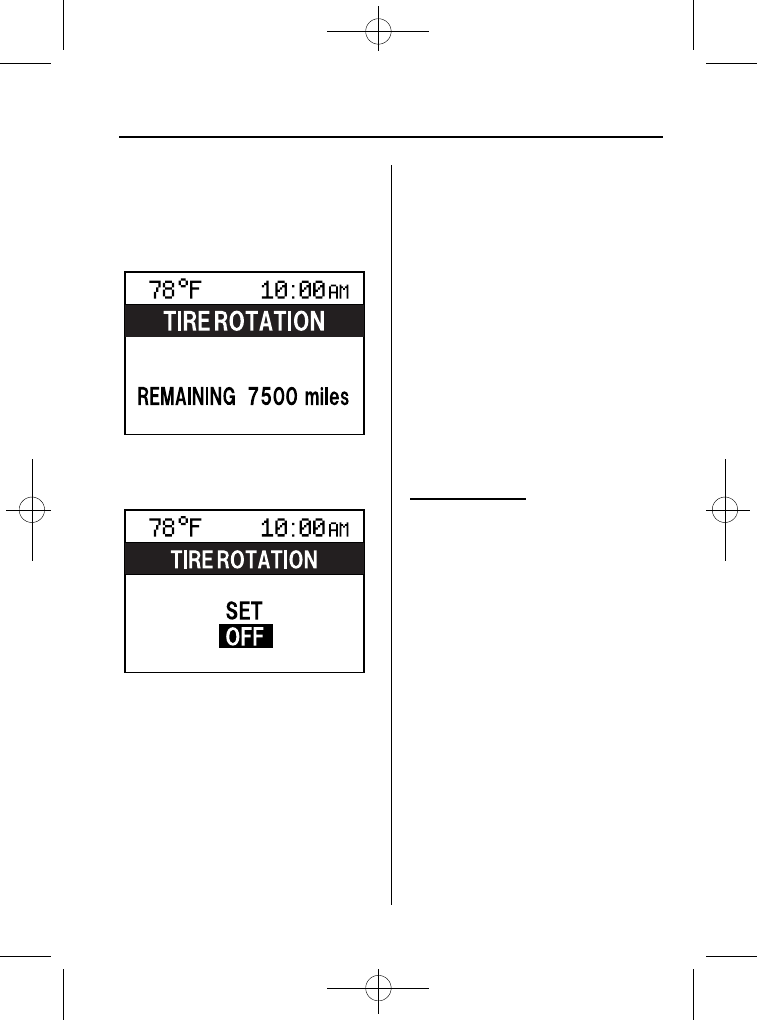
qMaintenance Monitor
The periodic inspection and tire rotation
period notification can be displayed by
turning the Maintenance Monitor on.
NOTE
l
This function is inoperable while the
vehicle is being driven.
l
(With navigation system)
If the battery cables are disconnected and
then reconnected, the SERVICE DUE item
in the MAINTENANCE setting cannot be
done until the clock resets after receiving a
GPS signal. Perform this setting after the
clock resumes operation.
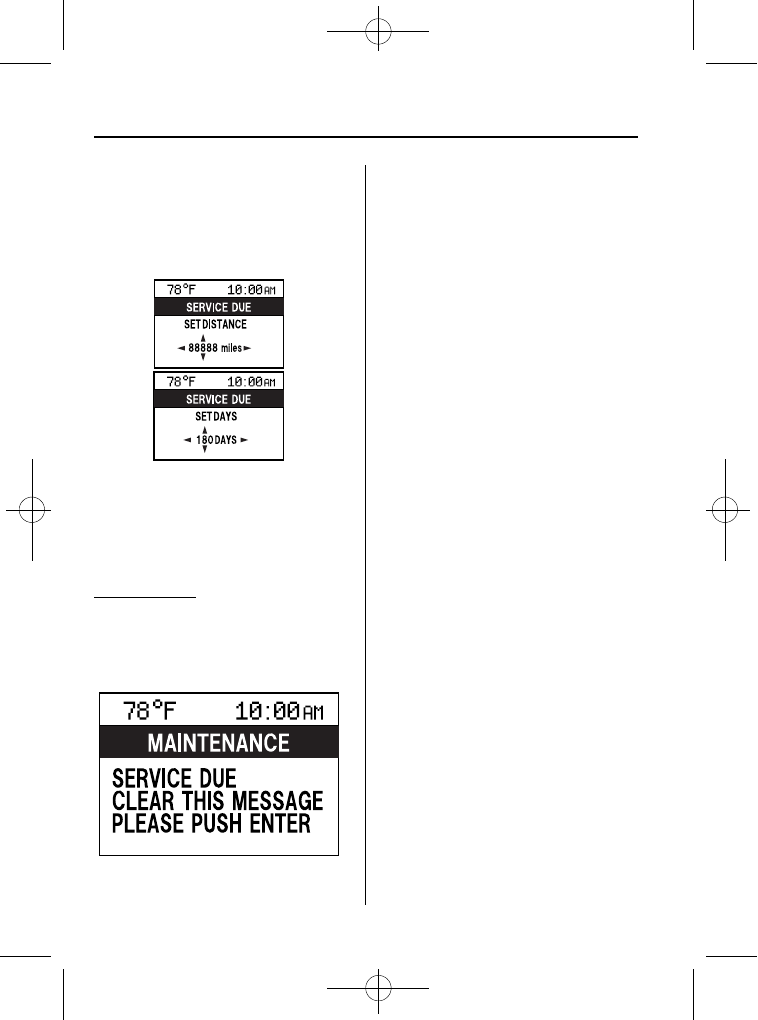
Initial setting method
1. Press the INFO switch until the
SETTINGS screen is displayed.
2. Select MAINTENANCE by pressing
the Enter (up/down) switch up or
down, and then press the Enter (up/
down) switch.
3. Select the item you want to turn on
(TIRE ROTATION or SERVICE DUE)
by pressing the Enter (up/down) switch
up or down, and then press the Enter
(up/down) switch.
4. Press the Enter (up/down) switch.
5. Select SET and press the Enter (up/
down) switch.
NOTE
l
For the service due notification, either the
number of days or distance can be set.
When selecting one of the two settings, the
setting not selected is set to the initial value
automatically.
l
Because tire rotation can only be set
according to distance, the screen for setting
distance is displayed when SET is selected.
6. Select DISTANCE or DAYS and press
the Enter (up/down) switch. The screen
for setting the distance or days to the
next maintenance period is displayed.
Interior Comfort
6-113
CX-7_8CG3-EA-11J_Edition1 Page351
Saturday, September 24 2011 10:33 AM
Black plate (352,1)
7. Select a digit using the Right switch/
Left switch, and press the Enter (up/
down) switch up or down to change the
value of the digit. If there is no need to
change a digit, leave it as it is and press
the Enter (up/down) switch.
NOTE
The initial setting values are displayed
corresponding to the maintenance schedule
(except Puerto Rico). For each regional
maintenance schedule, Refer to Scheduled
Maintenance on page 8-3.
Message display
When the remaining days or the distance
approaches 0, a message is displayed for 5
seconds each time the ignition is switched
to ACC or ON.
NOTE
l
If the Enter (up/down) switch is pressed
while a message is displayed, it will no
longer be displayed the next time the engine
is started.
l
After the vehicle is serviced and the
remaining days/distance is reset, the
message for the next maintenance period
will be displayed when the remaining
distance or days to the next maintenance
period approaches 0 (displays when engine
is started).
l
If there are multiple tire rotation periods or
service due, they are displayed according to
their order.
l
If there is more than one servicing due
deadline with one past due and the other
approaching, only the one which is past due
will be displayed.
6-114
Interior Comfort
CX-7_8CG3-EA-11J_Edition1 Page352
Saturday, September 24 2011 10:33 AM
Black plate (353,1)
Display period
Item
Start of message display
End of message display
TIRE ROTATION
When remaining distance is less
than 500 km (300 mile)
Distance exceeds 500 km (300 mile) from
remaining distance of 0 km
SERVICE DUE
When remaining distance is less
than 500 km (300 mile), or
remaining days are less than 15
(which ever comes first)
Distance exceeds 500 km (300 mile) from
remaining distance of 0 km, or 15 days have
elapsed since remaining days reached
“0” days
(which ever comes first)
Message display
Item
Timing
Displayed message
TIRE ROTATION
Remaining distance:
500 km (300 mile) to -500 km (-300 mile)
TIRE ROTATION DUE
SERVICE DUE
Remaining distance:
500 km (300 mile) to 0 km (0 mile)
SERVICE DUE
Remaining days: 15 to 0 days
Remaining distance:
0 km (0 mile) to -500 km (-300 mile)
SERVICE OVERDUE
Remaining days:0 to 15 days
Reset method
If resetting is performed after a tire
rotation or periodic inspection has been
done, a notification of the next
maintenance period will be displayed
when the period approaches.
1. Press the INFO switch until the
SETTINGS screen is displayed.
2. Select MAINTENANCE by pressing
the Enter (up/down) switch up or
down, and then press the Enter (up/
down) switch.
3. Select the item you would like to reset
(TIRE ROTATION or SERVICE DUE)
by pressing the Enter (up/down) switch
up or down, and then press the Enter
(up/down) switch.
NOTE
l
The current remaining distance and days is
displayed.
l
Even if the remaining distance or days have
surpassed 0, the display does not display a
minus (
―) and leaves the value at 0.
4. Press the Enter (up/down) switch.
Interior Comfort
6-115
CX-7_8CG3-EA-11J_Edition1 Page353
Saturday, September 24 2011 10:33 AM

Black plate (354,1)
5. Select SET and press the Enter (up/
down) switch.
NOTE
If the SERVICE DUE item has been set, both
the days and distance can be selected. Because
the tire rotation item can only be set according
to distance, the screen for setting distance is
displayed when SET is selected.
6. The DISTANCE or DAYS screen is
displayed, and the remaining distance
and days values return to the values
previously set. If no changes are
necessary, press the Enter (up/down)
switch.
NOTE
l
If the settings are changed from the initial
values, the values which you set are
displayed, not the initial values.
l
Even if the battery is disconnected, the
remaining distance and days information is
not erased.
l
If the multi information display is replaced
or repaired, there is the possibility that the
remaining distance and days information
may be erased.
Method for turning the system off
The maintenance monitor can be turned
off even after it has been turned on. If you
want to turn it off, the remaining distance
and days calculation to the next
maintenance period is stopped, and a
message does not display to indicate an
approaching maintenance period.
1. Press the INFO switch until the
SETTINGS screen is displayed.
2. Select MAINTENANCE by pressing
the Enter (up/down) switch up or
down, and then press the Enter (up/
down) switch.
6-116
Interior Comfort
CX-7_8CG3-EA-11J_Edition1 Page354
Saturday, September 24 2011 10:33 AM
Black plate (355,1)
3. Select the item you want to turn off
(TIRE ROTATION or SERVICE DUE)
by pressing the Enter (up/down) switch
up or down, and then press the Enter
(up/down) switch.
4. Select OFF and press the Enter (up/
down) switch.
qWarning Indicator
The following warning indicators are
displayed according to necessity. Warning
indicators are displayed regardless of the
multi information display operation.
l
DOOR OPEN (including the liftgate)
l
TIGHTEN FUEL CAP (Displayed
when the check fuel cap warning light
illuminates in the instrument cluster.)
l
CHECK TIRE PRESSURE
l
RELEASE PARKING BRAKE
NOTE
When more than two warnings occur at the
same time, indicators are switched at each
specified time.
qSettings
The following settings can be changed:
l
Screen adjustment (Brightness/contrast,
screen-off)
í
l
Buzzer volume (Ignition key reminder,
lights-on reminder)
l
Turn indicator sound
l
Distance unit
l
Temperature unit
l
Display language
The data for the trip computer average
fuel economy and the average vehicle
speed can also be reset.
To change settings
1. Press the INFO switch until the
SETTINGS screen is displayed.
2. Select PREFERENCES by pressing the
Enter (up/down) switch up or down,
and then press the Enter (up/down)
switch.
3. Select the setting item you want to
change by pressing the Enter (up/
down) switch up or down, and then
press the Enter (up/down) switch.
4. Select the desired setting by pressing
the Enter (up/down) switch up or
down, and then press the Enter (up/
down) switch.
Interior Comfort
6-117
í
Some models.
CX-7_8CG3-EA-11J_Edition1 Page355
Saturday, September 24 2011 10:33 AM
Black plate (356,1)
NOTE
The buzzer volume for both the ignition key
reminder and the lights-on reminder is
changed simultaneously. If you prefer separate
buzzer volume settings, consult an Authorized
Mazda Dealer. If separate buzzer volume
settings have been done at an Authorized
Mazda Dealer, you will be unable to change
the settings.
Resetting the data for the trip computer
average fuel economy and the average
vehicle speed
1. Press the INFO switch until the
SETTINGS screen is displayed.
2. Select RESET AVERAGES and press
the Enter (up/down) switch.
3. Select FUEL ECONOMY or SPEED,
and press the Enter (up/down) switch.
6-118
Interior Comfort
CX-7_8CG3-EA-11J_Edition1 Page356
Saturday, September 24 2011 10:33 AM
Black plate (357,1)
qRear View Monitor
í
The rear view monitor is a visual assist system when reversing the vehicle that provides
images from the rear of the vehicle.
WARNING
The rear view monitor is only a visual assist device when reversing the vehicle. The
images on the screen may be different from the actual conditions. Always drive
carefully confirming the safety of the rear and the surrounding conditions by looking
directly with your eyes. Reversing the vehicle by only looking at the screen may cause
an accident or a collision with an object.
CAUTION
Ø When the display is cold, images may course across the monitor or the screen and
may be dimmer than usual, which could cause difficulty in confirming the
surrounding conditions of the vehicle. Always drive carefully confirming the safety
of the rear and the surrounding conditions by looking directly with your eyes.
Ø Do not apply excessive force to the camera. The camera position and angle may
deviate.
Ø Do not disassemble, modify, or remove it as it may no longer be waterproof.
Ø The camera cover is made of plastic. Do not apply degreasing agents, organic
solvents, wax, or glass coating agents to the camera cover. If any are spilled on
the cover, wipe off with a soft cloth immediately.
Ø Do not rub the cover excessively, or polish it using an abrasive compound or a
hard brush. The cover may be damaged affecting the image.
NOTE
l
If water, snow, or mud is stuck on the camera lens, wipe it off using a soft cloth. If it cannot be
wiped off, use a mild detergent.
l
If the camera temperature changes rapidly, such as by pouring hot water on it under cold
temperature conditions, the rear view monitor may not operate correctly.
Interior Comfort
6-119
í
Some models.
CX-7_8CG3-EA-11J_Edition1 Page357
Saturday, September 24 2011 10:33 AM
Black plate (358,1)
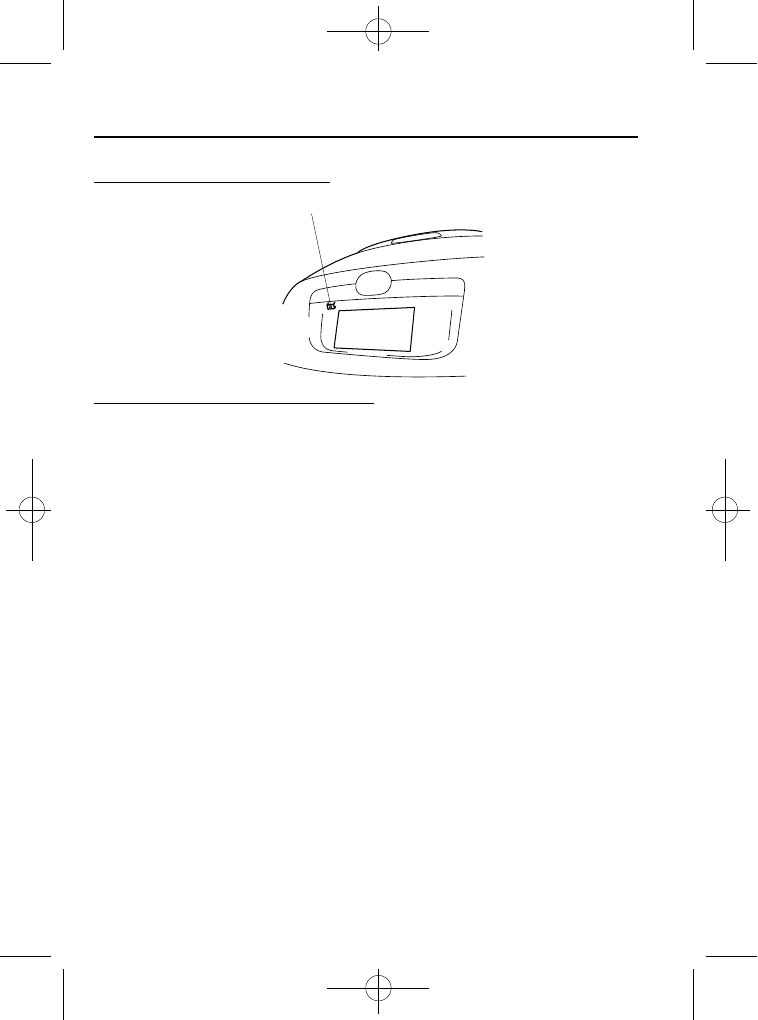
Rear View Parking Camera Location
Rear View Parking Camera
Switching to the Rear View Monitor Display
Shift the shift lever to R with the ignition switched ON to switch the display to the rear
view monitor display.
NOTE
When the shift lever is shifted from R to another shift lever position, the screen returns to the previous
display.
6-120
Interior Comfort
CX-7_8CG3-EA-11J_Edition1 Page358
Saturday, September 24 2011 10:33 AM
Black plate (359,1)
Displayable Range on the Screen
The images on the screen may be different from the actual conditions.
(Screen display)
(Actual view)
Both bumper ends are not displayed.
Both bumper ends are not displayed.
Object
NOTE
l
The displayable range varies depending on the vehicle and road conditions.
l
The displayable range is limited. Objects under the bumper or around the bumper ends cannot be
displayed.
l
The distance appearing in the displayed image is different from the actual distance because the
rear view parking camera is equipped with a specific lens.
l
Some optionally installed vehicle accessories may be picked up by the camera. Do not install any
optional parts that can interfere with the camera view, such as illuminating parts or parts made of
reflective material.
l
It may be difficult to see the display under the following conditions, however, it does not indicate a
malfunction.
l
In darkened areas.
l
When the temperature around the lens is high/low.
l
When the camera is wet such as on a rainy day or during periods of high humidity.
l
When foreign material such as mud is stuck around the camera.
l
When the camera lens reflects sunlight or headlight beams.
l
If the camera picks up a high-intensity light such as sunlight reflected off the vehicle body, a
bright belt (light line) may appear on the display. (Smear phenomenon)
l
Image display may be delayed if the temperature around the camera is low.
Interior Comfort
6-121
CX-7_8CG3-EA-11J_Edition1 Page359
Saturday, September 24 2011 10:33 AM
Нет комментариевНе стесняйтесь поделиться с нами вашим ценным мнением.
Текст