Mazda CX-9 (2022 year). Manual in english — page 18
Maintenance and Care
Owner Maintenance
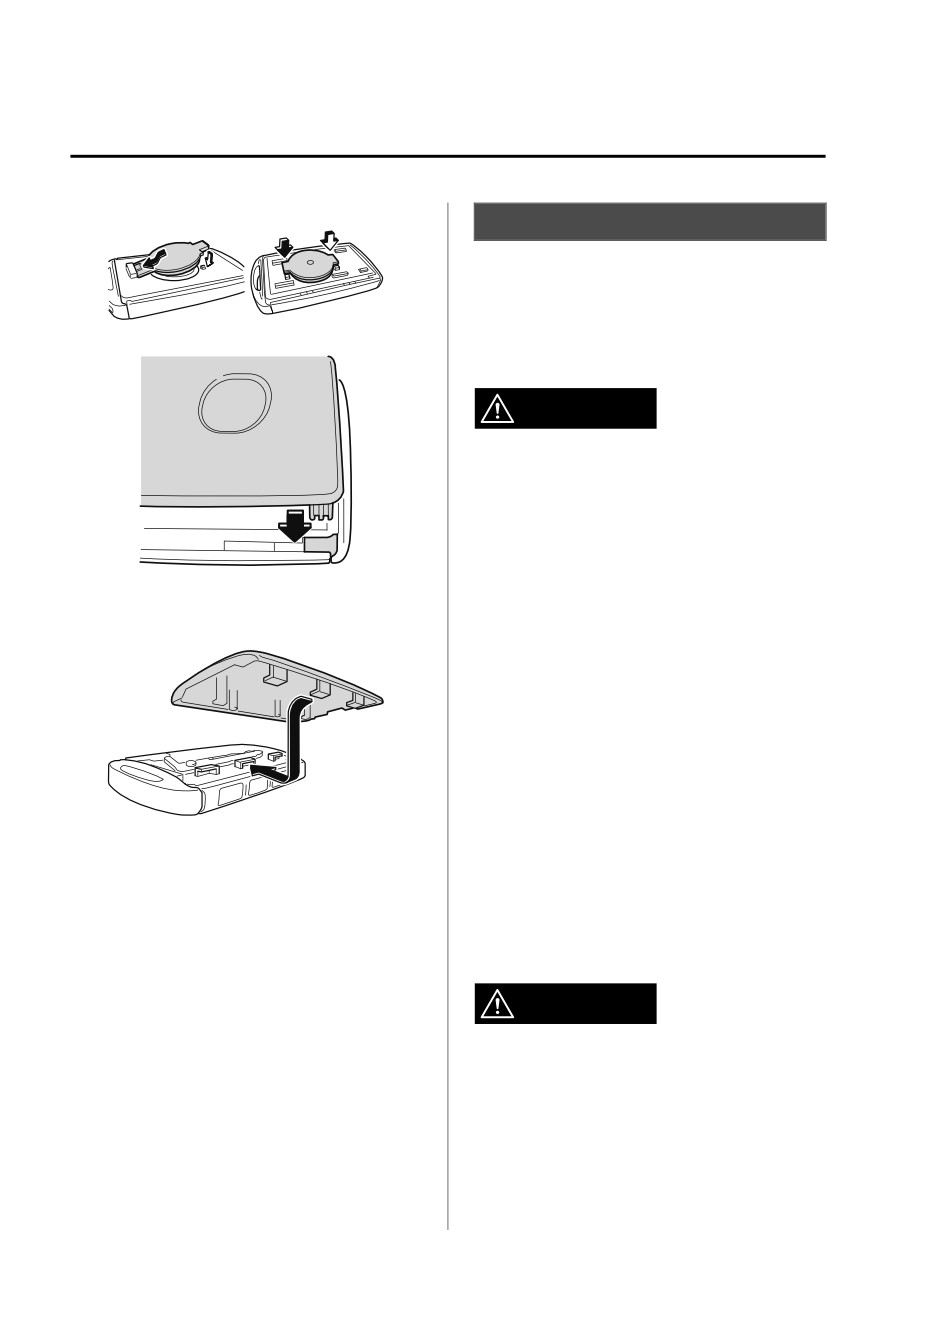
8.
Install the cap.
Tires
For reasons of proper performance, safety,
and better fuel economy, always maintain
recommended tire inflation pressures and
9.
Install the upper cover.
stay within the recommended load limits
and weight distribution.
WARNING
Using Different Tire Types:
Driving your vehicle with different types of
tires is dangerous. It could cause poor
handling and poor braking; leading to loss
of control.
10. Insert the tabs of the lower cover into
Except for the limited use of the temporary
the slots of the transmitter and install
spare tire, use only the same type tires
the lower cover.
(radial, bias-belted, bias-type) on all four
wheels.
Using Wrong-Sized Tires:
Using any other tire size than what is
specified for the vehicle (page 9-7) is
dangerous. It could seriously affect ride,
handling, ground clearance, tire clearance,
and speedometer calibration. This could
cause you to have an accident. Use only
tires that are the correct size specified for
the vehicle.
▼ Tire Inflation Pressure
WARNING
Always inflate the tires to the correct
pressure:
Overinflation or underinflation of tires is
dangerous. Adverse handling or
unexpected tire failure could result in a
serious accident.
Refer to Tires on page 9-7.
6-34
Maintenance and Care
Owner Maintenance
Use only a Mazda-genuine tire valve cap:
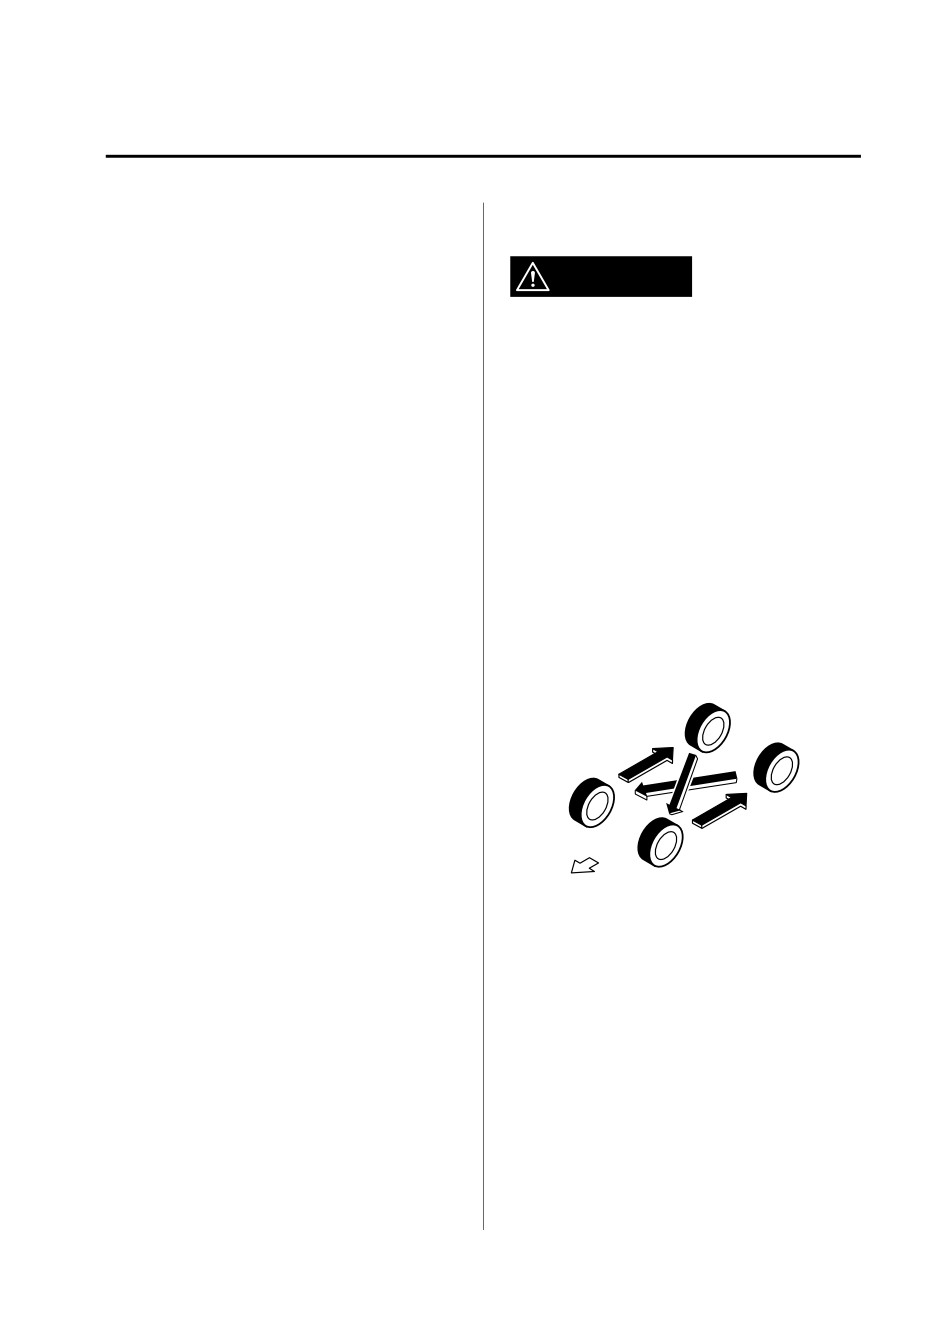
▼ Tire Rotation
Use of a non-genuine part is dangerous as
the correct tire air pressure cannot be
WARNING
maintained if the tire valve becomes
damaged. If the vehicle is driven under this
condition, the tire air pressure will decrease
Rotate tires periodically:
which could result in a serious accident. Do
Irregular tire wear is dangerous. To
not use any part for the tire valve cap that
equalize tread wear for maintaining good
is not a Mazda-genuine part.
performance in handling and braking,
rotate the tires every 12,000 km (7,500
Inspect all tire pressures monthly
miles). However Mazda recommends to
(including the spare) when the tires are
rotate every 8,000 km (5,000 miles) to help
cold. Maintain recommended pressures for
increase tire life and distribute wear more
the best ride, handling, and minimum tire
evenly.
wear.
Refer to Scheduled Maintenance on page
Refer to the specification charts (page
6-4.
9-7).
NOTE
During rotation, inspect them for correct
Always check tire pressure when tires
balance.
are cold.
Warm tires normally exceed
recommended pressures. Do not release
air from warm tires to adjust the
pressure.
Underinflation can cause reduced fuel
economy, uneven and accelerated tire
wear, and poor sealing of the tire bead,
which will deform the wheel and cause
Forward
separation of tire from rim.
Do not include (TEMPORARY USE ONLY)
Overinflation can produce a harsh ride,
spare tire in rotation.
uneven and accelerated tire wear, and a
Also, inspect them for uneven wear and
greater possibility of damage from road
damage. Abnormal wear is usually caused
hazards.
by one or a combination of the following:
Keep your tire pressure at the correct
levels. If one frequently needs inflating,
Incorrect tire pressure
have it inspected.
Improper wheel alignment
Out-of-balance wheel
6-35
Maintenance and Care
Owner Maintenance
Severe braking
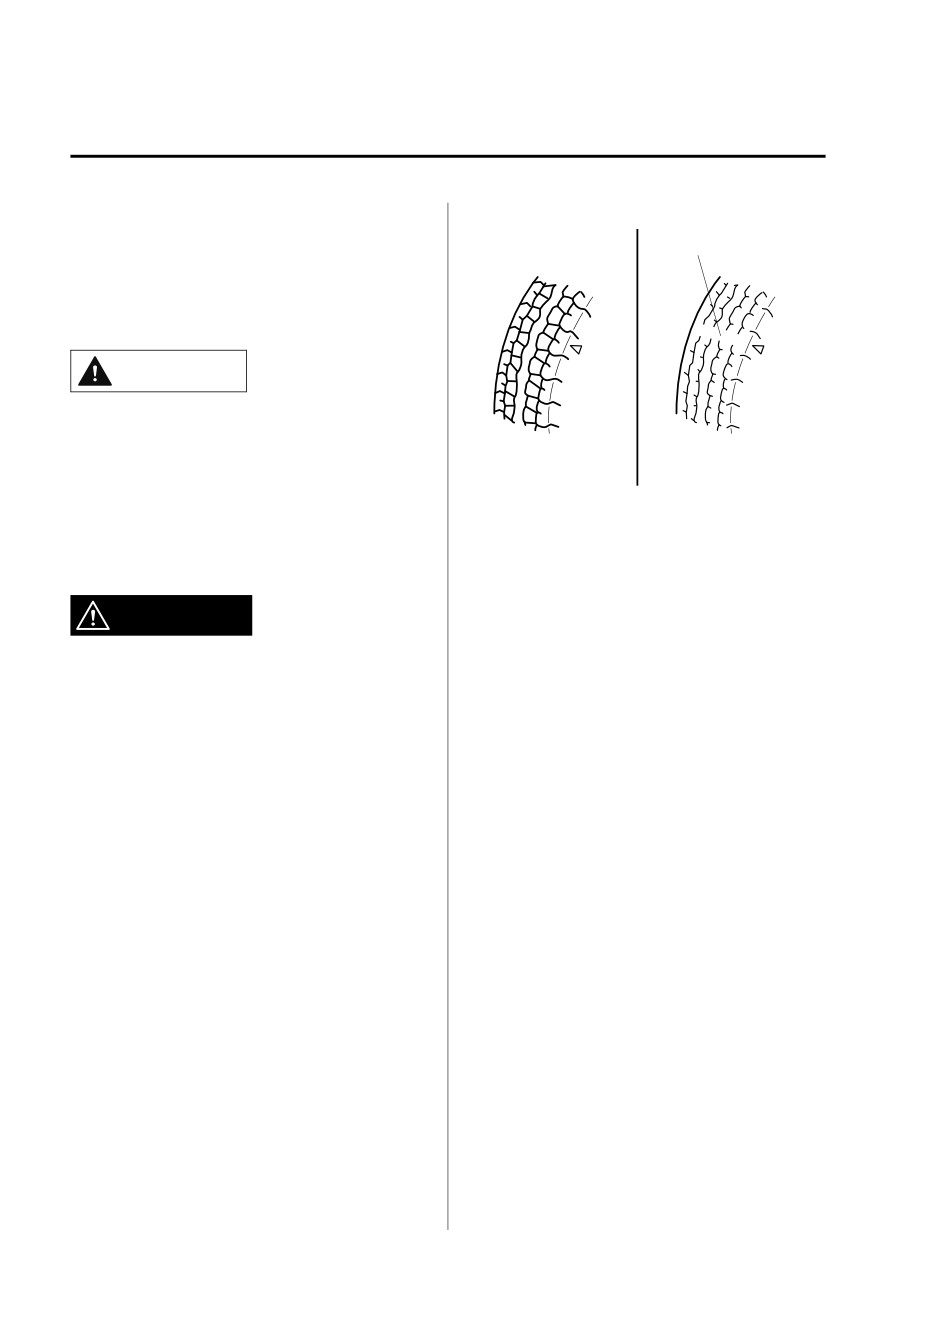
Replace the tire when this happens.
Tread wear indicator
After rotation, inflate all tire pressures to
specification (page 9-7) and inspect the
lug nuts for tightness.
CAUTION
Rotate unidirectional tires and radial tires
that have an asymmetrical tread pattern or
New tread
Worn tread
studs only from front to rear, not from side
to side. Tire performance will be reduced if
You should replace the tire before the band
rotated from side to side.
crosses the entire tread.
▼ Replacing a Tire
NOTE
Tires degrade over time, even when they
WARNING
are not being used on the road. It is
recommended that tires generally be
replaced when they are 6 years or older.
Always use tires that are in good condition:
Heat caused by hot climates or frequent
Driving with worn tires is dangerous.
high loading conditions can accelerate the
Reduced braking, steering, and traction
aging process. You should replace the
could result in an accident.
spare tire when you replace the other road
tires due to the aging of the spare tire. The
Replace all four tires at the same time:
period in which the tire was manufactured
Replacing just one tire is dangerous. It
(both week and year) is indicated by a
could cause poor handling and poor
4-digit number.
braking resulting in loss of vehicle control.
Refer to Tire Labeling on page 8-25.
Mazda strongly recommends that you
replace all four tires at the same time.
▼ Temporary Spare Tire
If a tire wears evenly, a wear indicator will
Inspect the temporary spare tire at least
appear as a solid band across the tread.
monthly to make sure it is properly
inflated and stored.
NOTE
The temporary spare tire condition
gradually deteriorates even if it has not
been used.
The temporary spare tire is easier to
handle because of its construction which is
lighter and smaller than a conventional
6-36
Maintenance and Care
Owner Maintenance
tire. This tire should be used only for an
▼ Replacing a Wheel
emergency and only for a short distance.
WARNING
Use the temporary spare tire only until the
conventional tire is repaired, which should
be as soon as possible.
Always use wheels of the correct size on
Refer to Tires on page 9-7.
your vehicle:
Using a wrong-sized wheel is dangerous.
Braking and handling could be affected,
CAUTION
leading to loss of control and an accident.
¾ Do not use your temporary spare tire rim
CAUTION
with a snow tire or a conventional tire.
Neither will properly fit and could
A wrong-sized wheel may adversely affect:
damage both tire and rim.
¾ The temporary spare tire has a tread life
¾ Tire fit
of less than 5,000 km (3,000 miles). The
¾ Wheel and bearing life
tread life may be shorter depending on
¾ Ground clearance
driving conditions.
¾ Snow-chain clearance
¾ The temporary spare tire is for limited
¾ Speedometer calibration
use, however, if the tread wear
¾ Headlight aim
solid-band indicator appears, replace the
¾ Bumper height
tire with the same type of temporary
¾ Tire Pressure Monitoring System*
spare (page 6-36).
NOTE
NOTE
When replacing a wheel, make sure the
Tires degrade over time, even when they
new one is the same as the original
are not being used on the road. It is
factory wheel in diameter, rim width,
recommended that tires generally be
and offset (inset/outset).
replaced when they are 6 years or older.
For details, contact an Authorized
Heat caused by hot climates or frequent
Mazda Dealer.
high loading conditions can accelerate the
aging process. You should replace the
spare tire when you replace the other road
Proper tire balancing provides the best
tires due to the aging of the spare tire. The
riding comfort and helps reduce tread
period in which the tire was manufactured
wear. Out-of-balance tires can cause
(both week and year) is indicated by a
vibration and uneven wear, such as
4-digit number.
cupping and flat spots.
Refer to Tire Labeling on page 8-25.
*Some models.
6-37
Maintenance and Care
Owner Maintenance
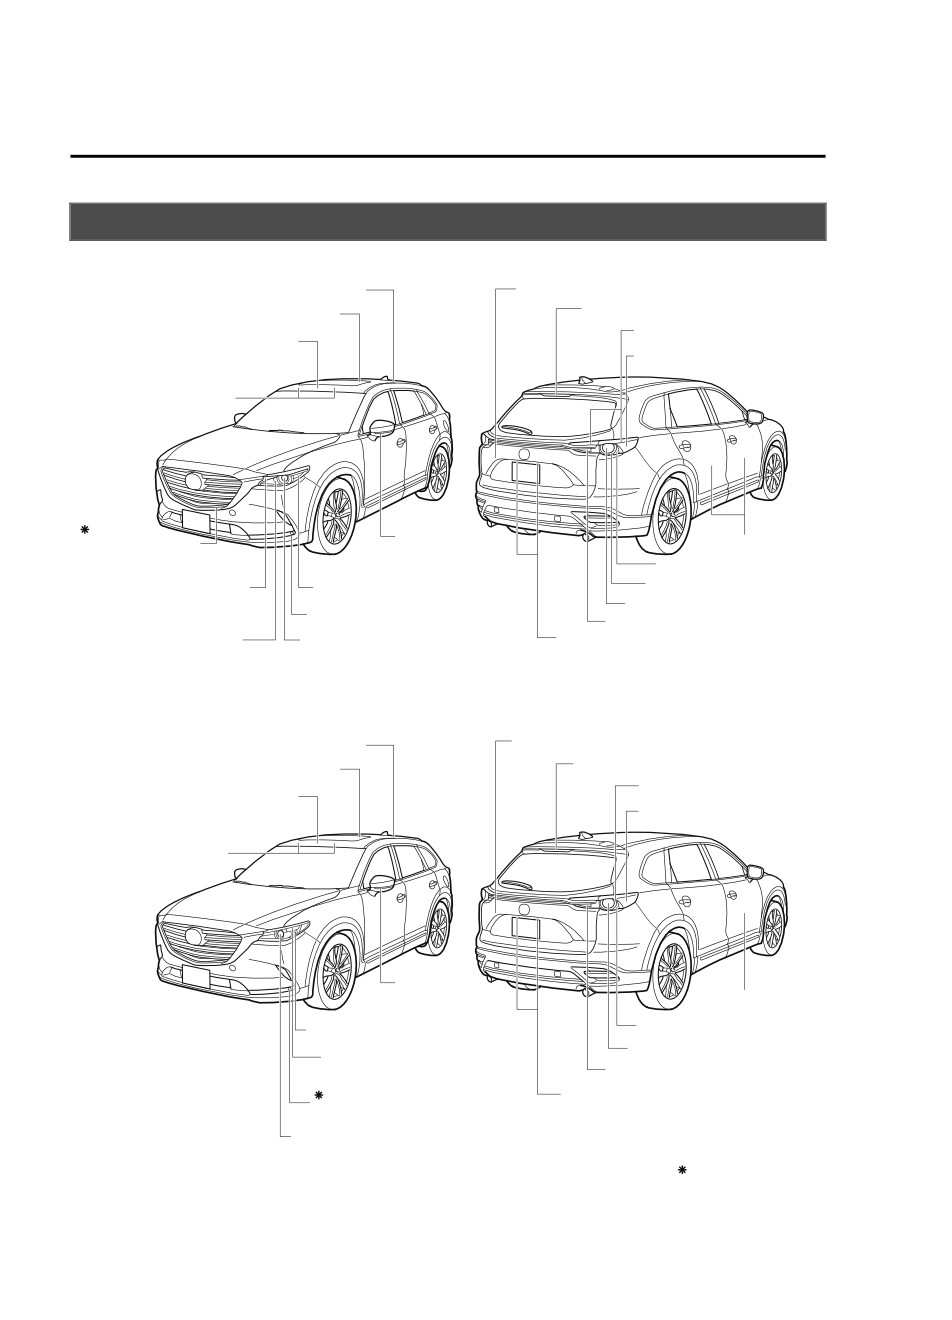
Light Bulbs
Type A (With Adaptive Front Lighting System (AFS))
Overhead light (Rear)
Luggage compartment light
High-mount brake light
Map lights (Center)
Taillights
Overhead lights (Front)/
Map lights (Front)
Rear side-marker lights
Vanity mirror lights
Signature wing
Side turn
Ambient lights
illumination
signal lights
Brake lights
Daytime running lights/
Front side-marker lights
Brake lights/Taillights
Rear turn signal lights
Parking lights
Fog lights
Reverse lights
Front turn signal lights
Headlights (Low/High beam)
License plate lights
Type B (Without Adaptive Front Lighting System (AFS))
Overhead light (Rear)
Luggage compartment light
High-mount brake light
Map lights (Center)
Brake lights/Taillights
Overhead lights (Front)/
Rear side-marker lights
Map lights (Front)
Vanity mirror lights
Side turn
Ambient lights
signal lights
Brake lights
Front turn signal lights
Rear turn signal lights
Parking lights/Front
Reverse lights
side-marker lights
License plate lights
Fog lights
Headlights (Low/High beam)/
Daytime running lights
Some models.
6-38
Maintenance and Care
Owner Maintenance
CAUTION
When removing the lens or lamp unit using a flathead screwdriver, make sure that the
flathead screwdriver does not contact the interior terminal. If the flathead screwdriver
contacts the terminal, a short circuit may occur.
NOTE
To replace the bulb, contact an Authorized Mazda Dealer.
Use the protective cover and carton for the replacement bulb to dispose of the old bulb
promptly and out of the reach of children.
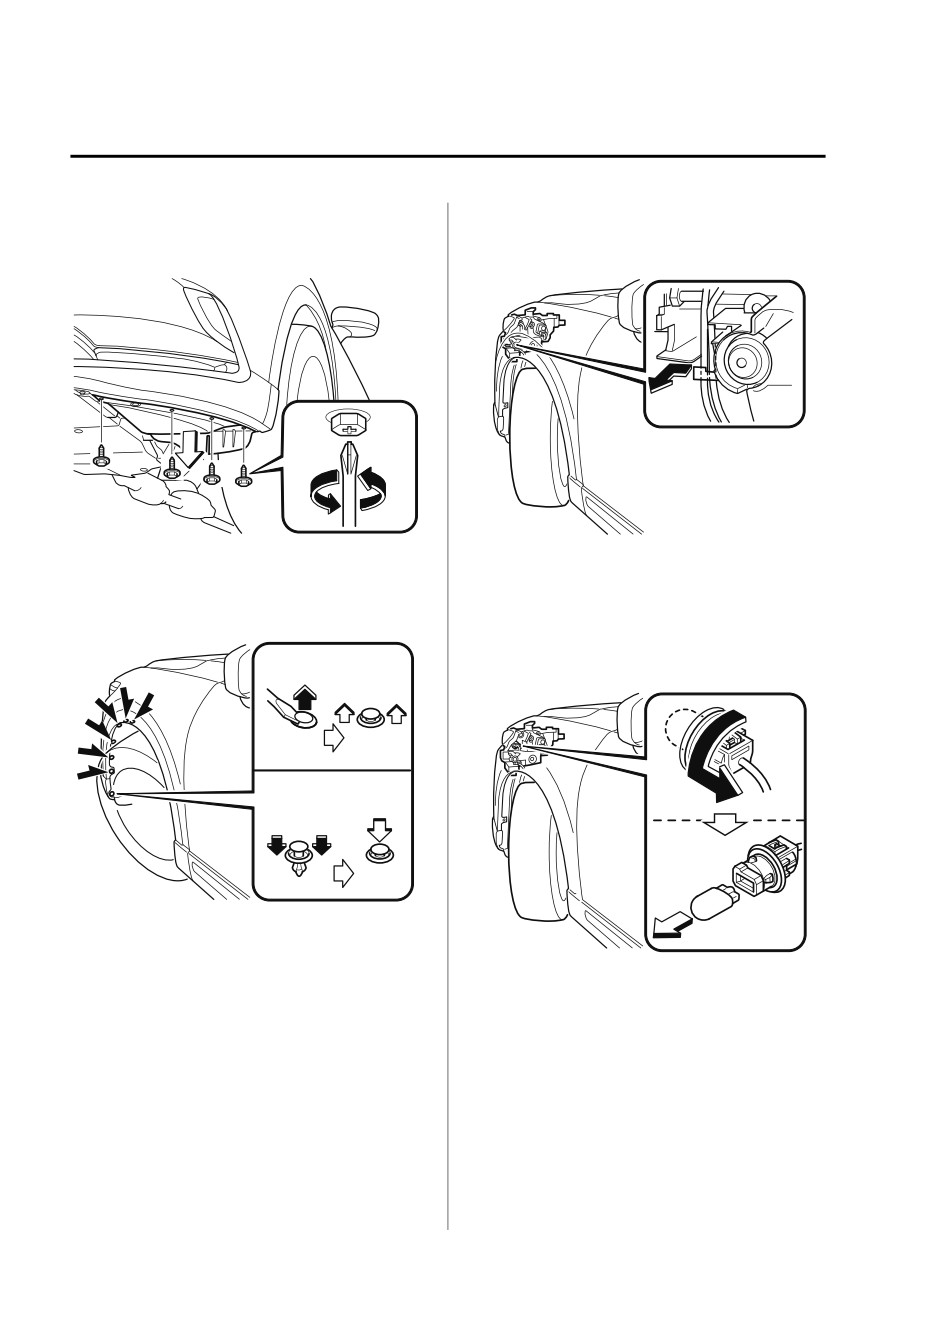
▼ Replacing Exterior Light Bulbs
Bulb type
The exterior lights have either LEDs or
Front turn signal lights (type B),
normal bulbs.
Parking lights/Front side-marker lights
(type B)
LED type
Headlights (type A)
NOTE
Headlights/Daytime running lights (type
When replacing a bulb for the front turn
B)
signal lights and parking lights/front
Front turn signal lights (type A)
side-marker lights, turn the steering wheel
Daytime running lights/Parking lights
and change the direction in which the tires
(type A)
are pointed to the position where the bulb
Front side-marker lights (type A)
replacement can be done easily.
Turn the steering wheel after starting the
Signature wing illumination (type A)*
engine and stop the engine after you finish
Fog lights*
turning the steering wheel.
Brake lights
Taillights
1. If you are changing the right bulb, start
High-mount brake light
the engine, turn the steering wheel all
Side turn signal lights
the way to the right, and turn off
Rear side-marker lights
engine. If you are changing the left
License plate lights
bulb, turn the steering wheel to the left,
and turn off engine.
The LED bulb cannot be replaced as a
single unit because it is an integrated unit.
2. Make sure the ignition is switched off,
and the headlight switch is off.
The LED bulb has to be replaced with the
unit. We recommend an Authorized
Mazda Dealer when the replacement is
necessary.
*Some models.
6-39
Maintenance and Care
Owner Maintenance
3. Turn the screw counterclockwise and
5. Disconnect the wiring harness by
remove it.
releasing the clamp.
4. Pull the center of each plastic retainer
6. Turn the socket and bulb assembly
and remove the retainers, and then
counterclockwise and remove it.
partially peel back the mudguard.
7. Disconnect the bulb from the socket.
Front turn signal lights
Removal
Installation
6-40
Maintenance and Care
Owner Maintenance
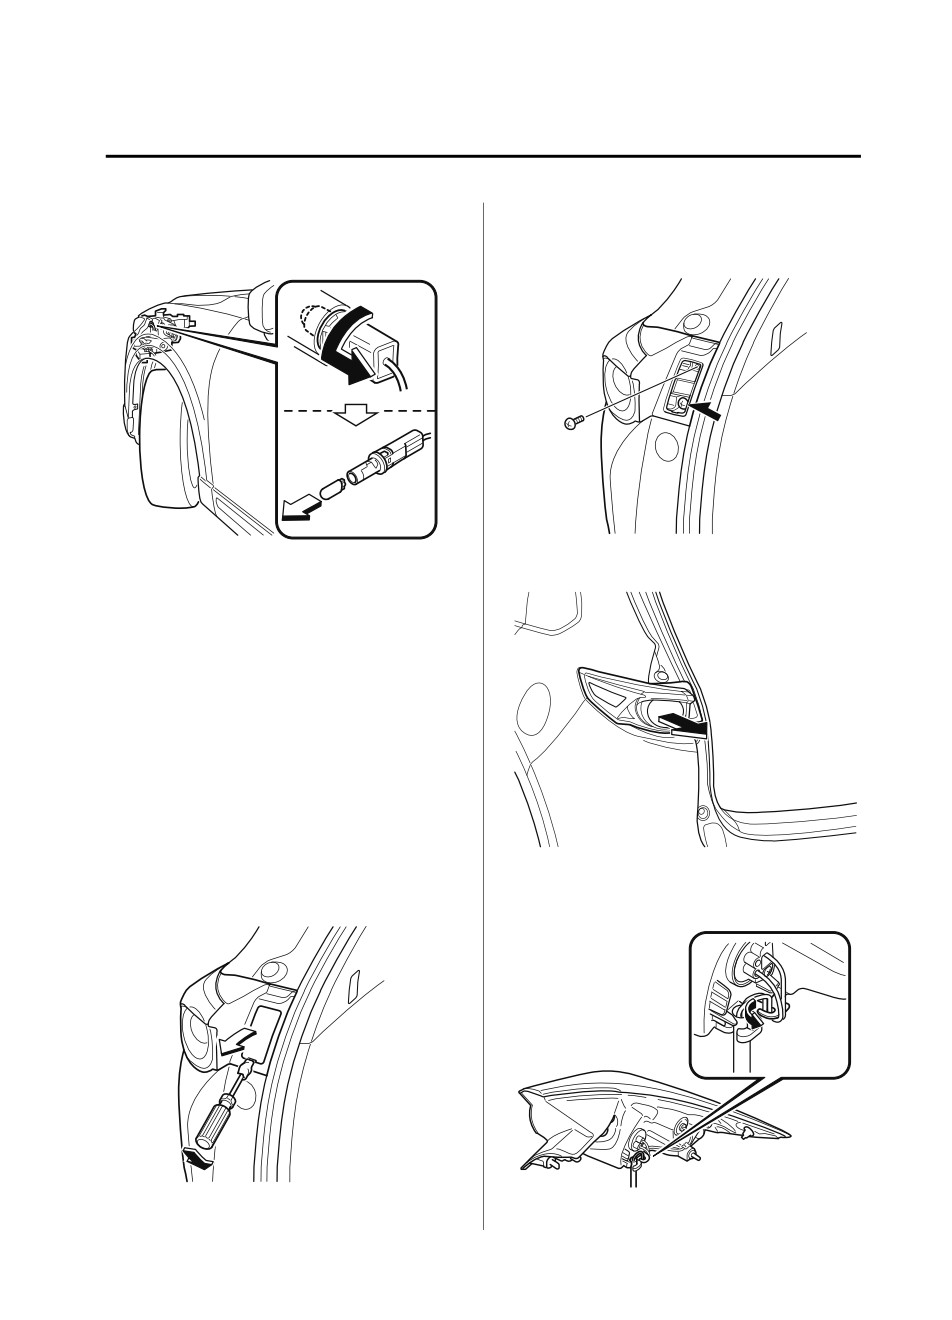
Parking lights/Front side-marker
3. Turn the screws counterclockwise and
lights
remove them.
4. Pull the unit rearward to remove it.
8. Install the new bulb in the reverse
order of the removal procedure.
NOTE
There will be no problem with
functionality with the wiring harness
disconnected in Step 5 left
disconnected.
Therefore, there is no need to connect
the wiring harness.
Rear turn signal lights
1. Make sure the ignition is switched off,
and the headlight switch is off.
5. Disconnect the wiring harness by
2. Remove the cover.
releasing the clamp.
6-41
Maintenance and Care
Owner Maintenance
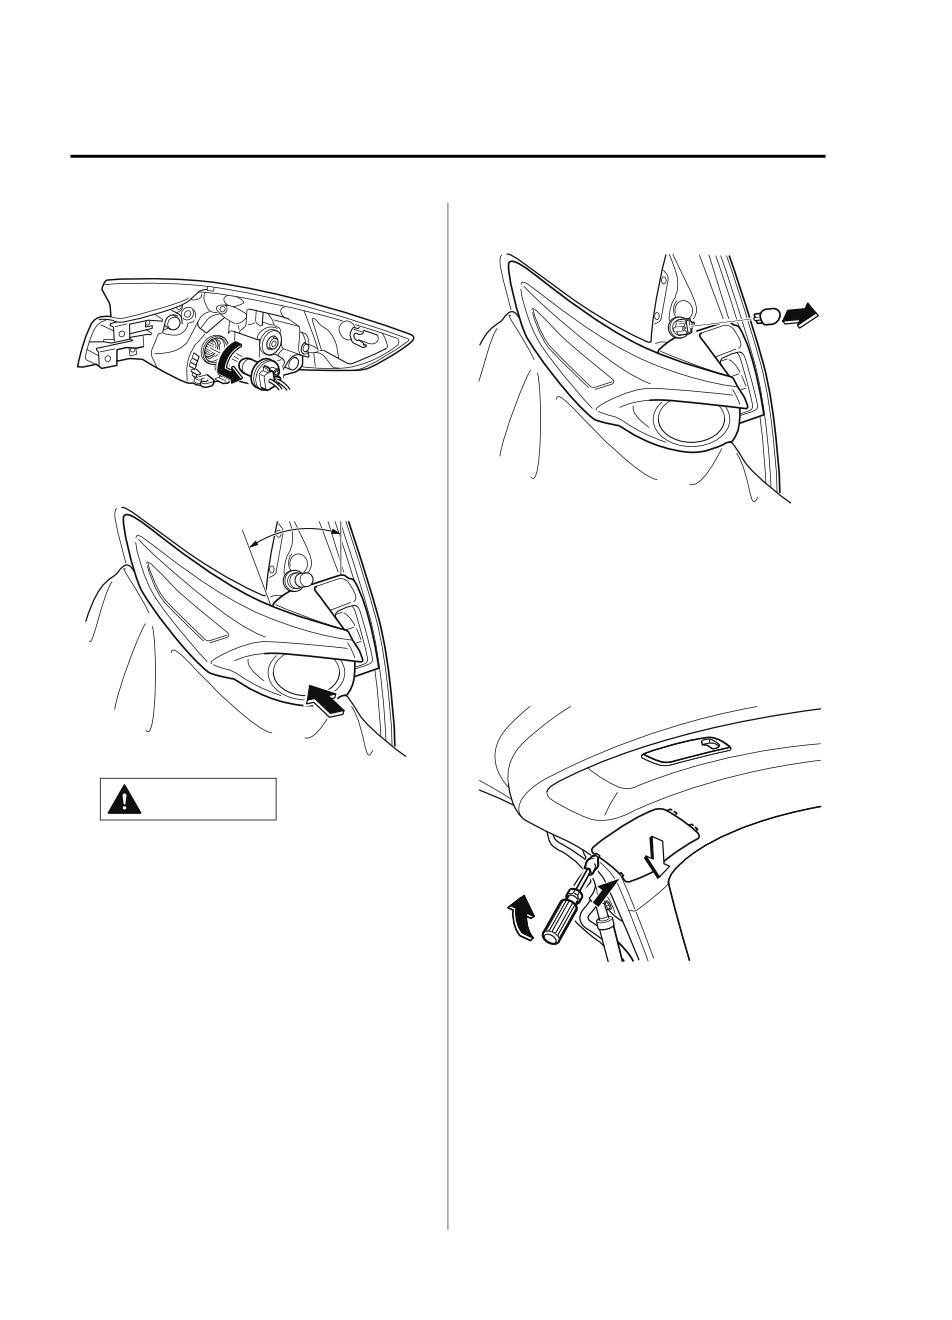
6. Turn the socket and bulb assembly
8. Disconnect the bulb from the socket.
counterclockwise and remove it.
7. Temporarily install the light unit with
the socket pulled out of the top of the
light unit.
Socket pull-out range
9. Install the new bulb in the reverse
order of the removal procedure.
Reverse lights
1. Make sure the ignition is switched off,
and the headlight switch is off.
2. Remove the cover.
CAUTION
¾ The wiring harness may be damaged
when temporarily installing the light
unit. When performing the
procedure, observe the following
points.
¾ Pull out the socket from within the
3. Disconnect the electrical connector
socket pull-out range shown in the
from the bulb by pressing the tab on
figure.
¾ Do not push the light unit into the
vehicle with force.
¾ When temporarily installing the light
unit, cover the rear bumper light unit
installation surface with a soft cloth.
The rear bumper may be scratched or
damaged if the light unit contacts it.
6-42
Maintenance and Care
Owner Maintenance
the connector with your finger and
The LED bulb has to be replaced with the
pulling the connector.
unit. If a replacement is necessary, consult
an Authorized Mazda Dealer.
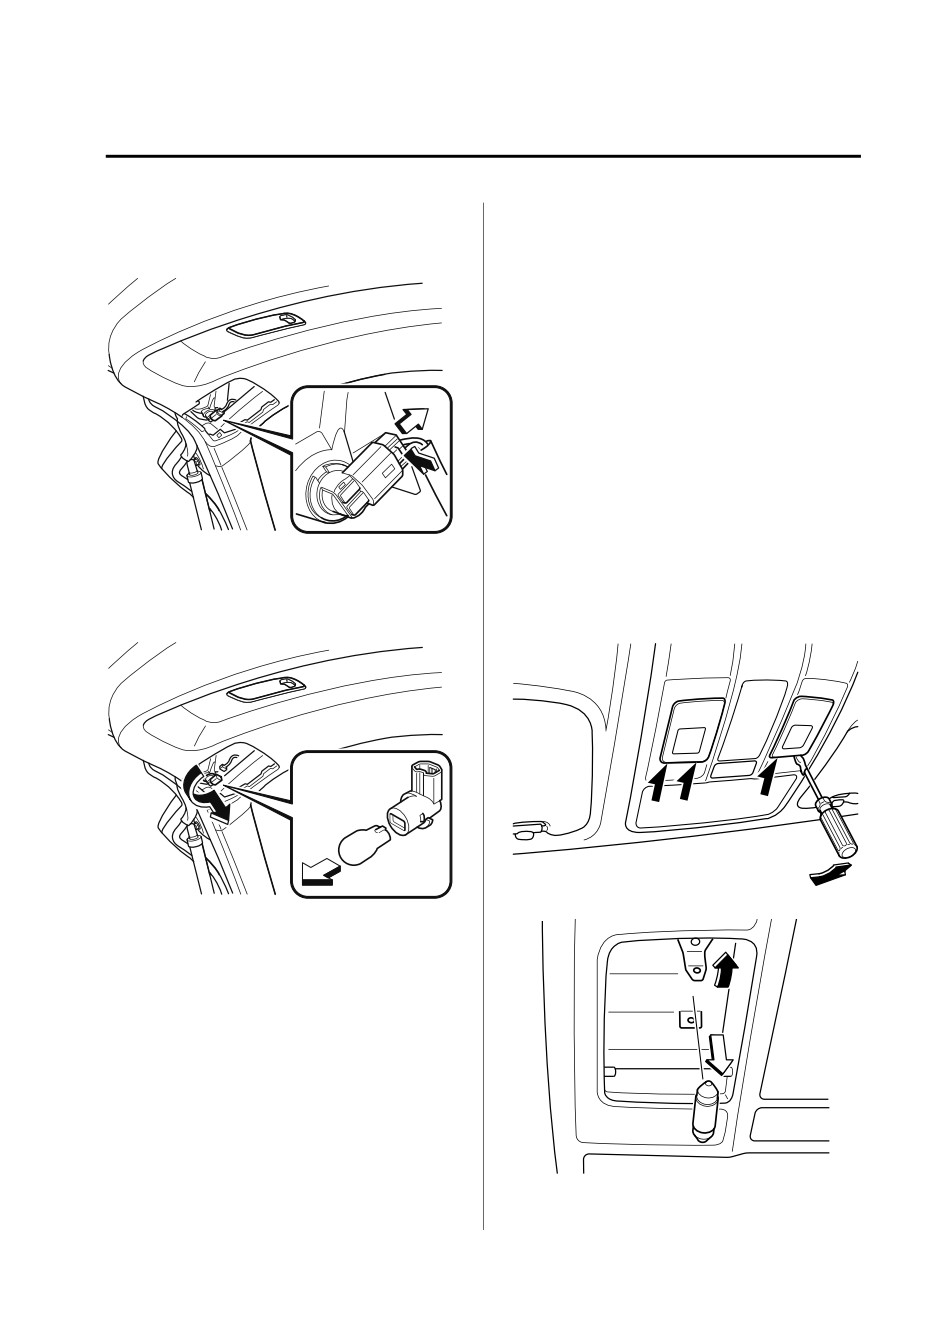
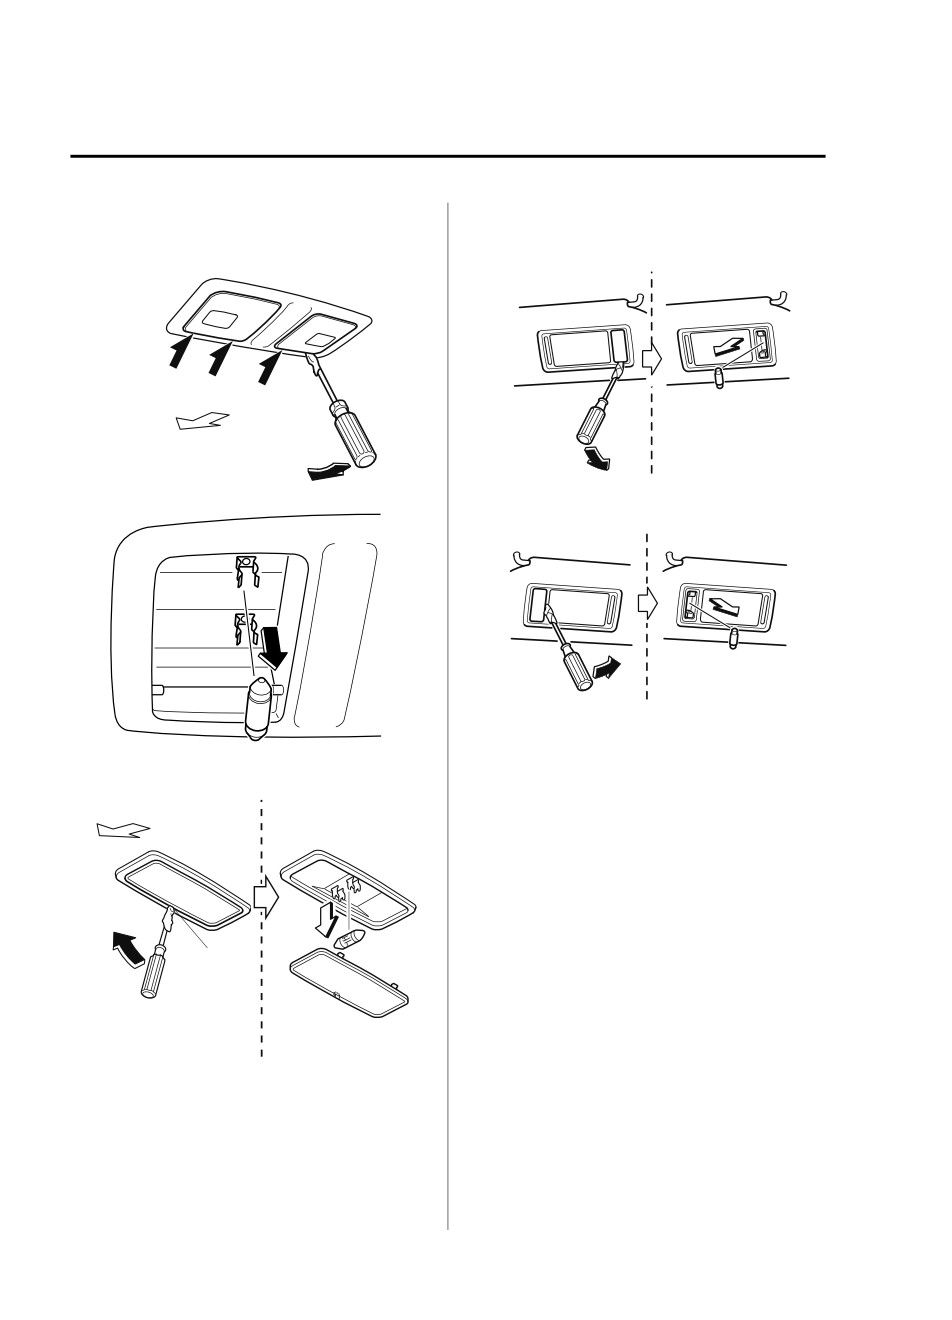
Overhead lights (Front)/Map lights
(Front) (bulb type), Overhead lights
(Center)/Map lights (Center) (bulb
type), Overhead light (Rear) (bulb
type), Vanity mirror lights (bulb type)
1. Wrap a small flathead screwdriver with
a soft cloth to prevent damage to the
lens, and then remove the lens by
carefully prying on the edge of the lens
with the flathead screwdriver.
4. Turn the socket and bulb assembly
2. Disconnect the bulb by pulling it out.
counterclockwise and remove it.
Overhead lights (Front)/Map lights
5. Disconnect the bulb from the socket.
(Front)
6. Install the new bulb in the reverse
order of the removal procedure.
▼ Replacing Interior Light Bulbs
Overhead lights (Front)/Map lights
(Front) (LED type), Overhead lights
(Center)/Map lights (Center) (LED
type), Overhead lights (Rear) (LED
type), Vanity mirror lights (LED type),
Ambient lights
The LED bulb cannot be replaced as a
single unit because it is an integrated unit.
6-43
Maintenance and Care
Owner Maintenance
Overhead lights (Center)/Map lights
Vanity mirror lights
(Center)
Driver’s seat
Forward
Passenger’s seat
3. Install the new bulb in the reverse
order of the removal procedure.
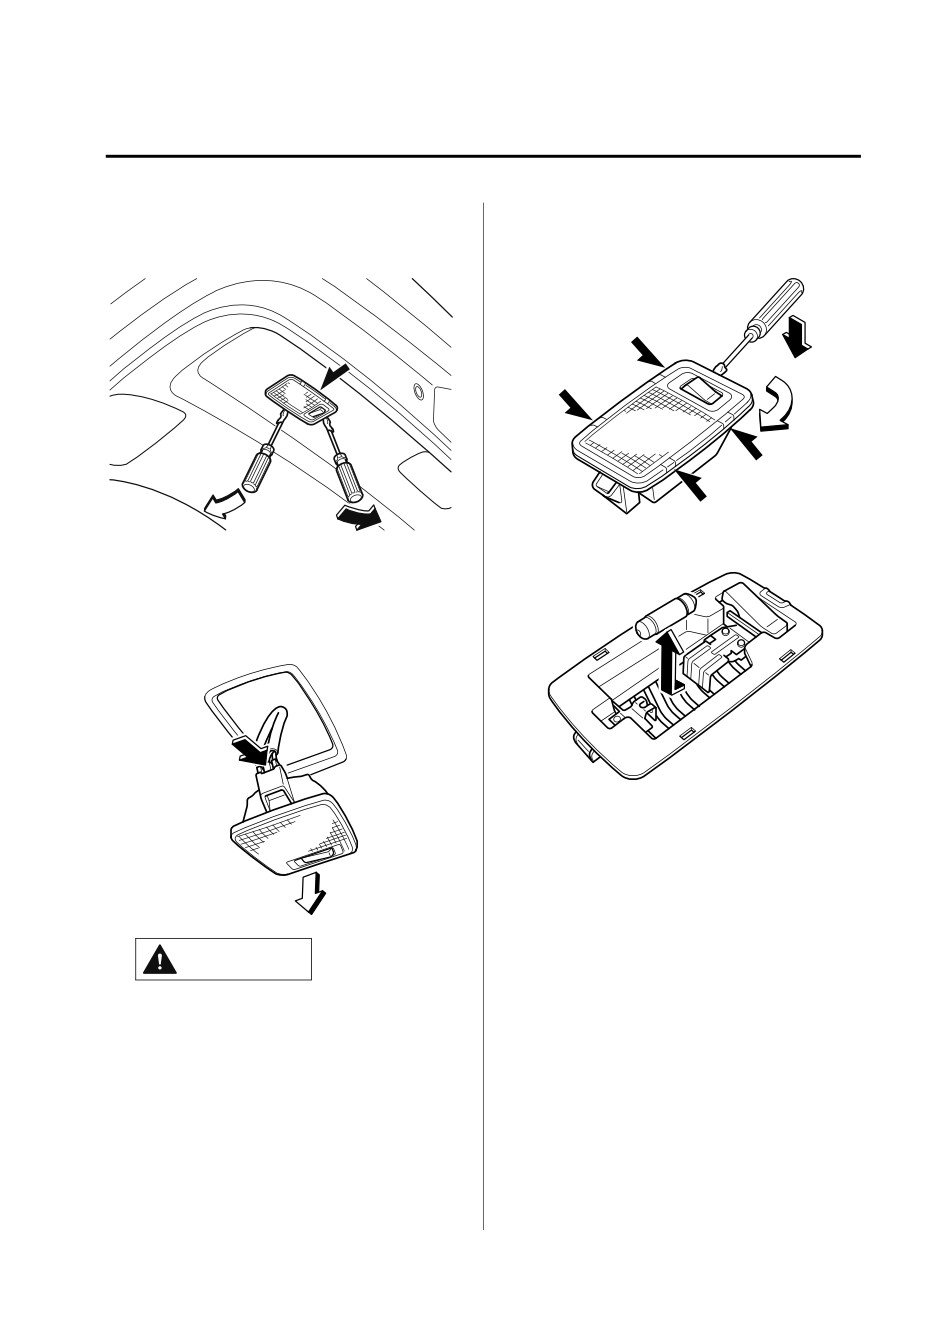
Overhead light (Rear)
Luggage compartment light
(LED type)
The LED bulb cannot be replaced as a
Forward
single unit because it is an integrated unit.
The LED bulb has to be replaced with the
unit. If a replacement is necessary, consult
an Authorized Mazda Dealer.
Edge
(Bulb type)
1. Wrap a small flathead screwdriver with
a soft cloth to prevent damage to the
lens and remove the lens unit by
6-44
Maintenance and Care
Owner Maintenance
carefully prying on the edge of the lens
and then slide the screwdriver to
unit with the flathead screwdriver.
detach the lens.
4. Disconnect the bulb by pulling it out.
2. Disconnect the electrical connector
from the bulb by pressing the tab on
the connector with your finger and
pulling the connector.
5. Install the new bulb in the reverse
order of the removal procedure.
CAUTION
When replacing the bulb always
disconnect the connector first.
Otherwise, electric and electronic
devices could be shorted.
3. Insert the flathead screwdriver into the
gap between the lens and the lens unit,
6-45
Maintenance and Care
Owner Maintenance
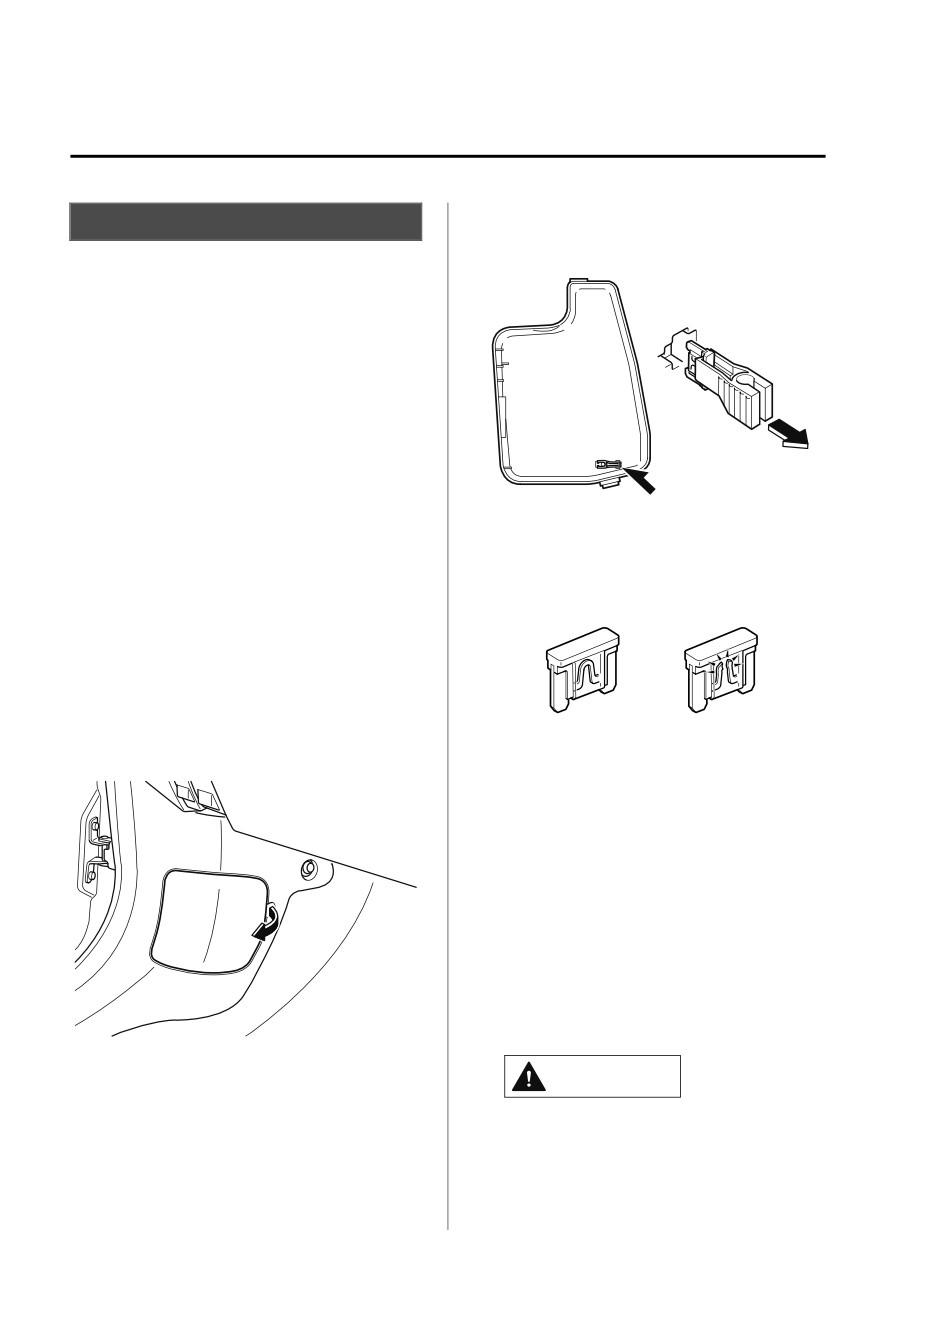
3.
Pull the fuse straight out with the fuse
Fuses
puller provided on the fuse block
Your vehicle's electrical system is
located in the engine compartment.
protected by fuses.
If any lights, accessories, or controls do
not work, inspect the appropriate circuit
protector. If a fuse has blown, the inside
element will be melted.
If the same fuse blows again, avoid using
that system and consult an Authorized
Mazda Dealer as soon as possible.
4.
Inspect the fuse and replace it if it is
blown.
▼ Fuse Replacement
Replacing the fuses on the vehicle's left
side
If the electrical system does not work, first
inspect the fuses on the vehicle's left side.
1. Make sure the ignition is switched off,
and other switches are off.
Normal
Blown
2. Open the fuse panel cover.
5. Insert a new fuse of the same
amperage rating, and make sure it fits
tightly. If it does not fit tightly, have an
expert install it. Consult an Authorized
Mazda Dealer.
If you have no spare fuses, borrow one
of the same rating from a circuit not
essential to vehicle operation, such as
the AUDIO or OUTLET circuit.
CAUTION
Always replace a fuse with a genuine
Mazda fuse or equivalent of the same
rating. Otherwise you may damage the
electric system.
6-46
Maintenance and Care
Owner Maintenance
6. Reinstall the cover and make sure that
WARNING
it is securely installed.
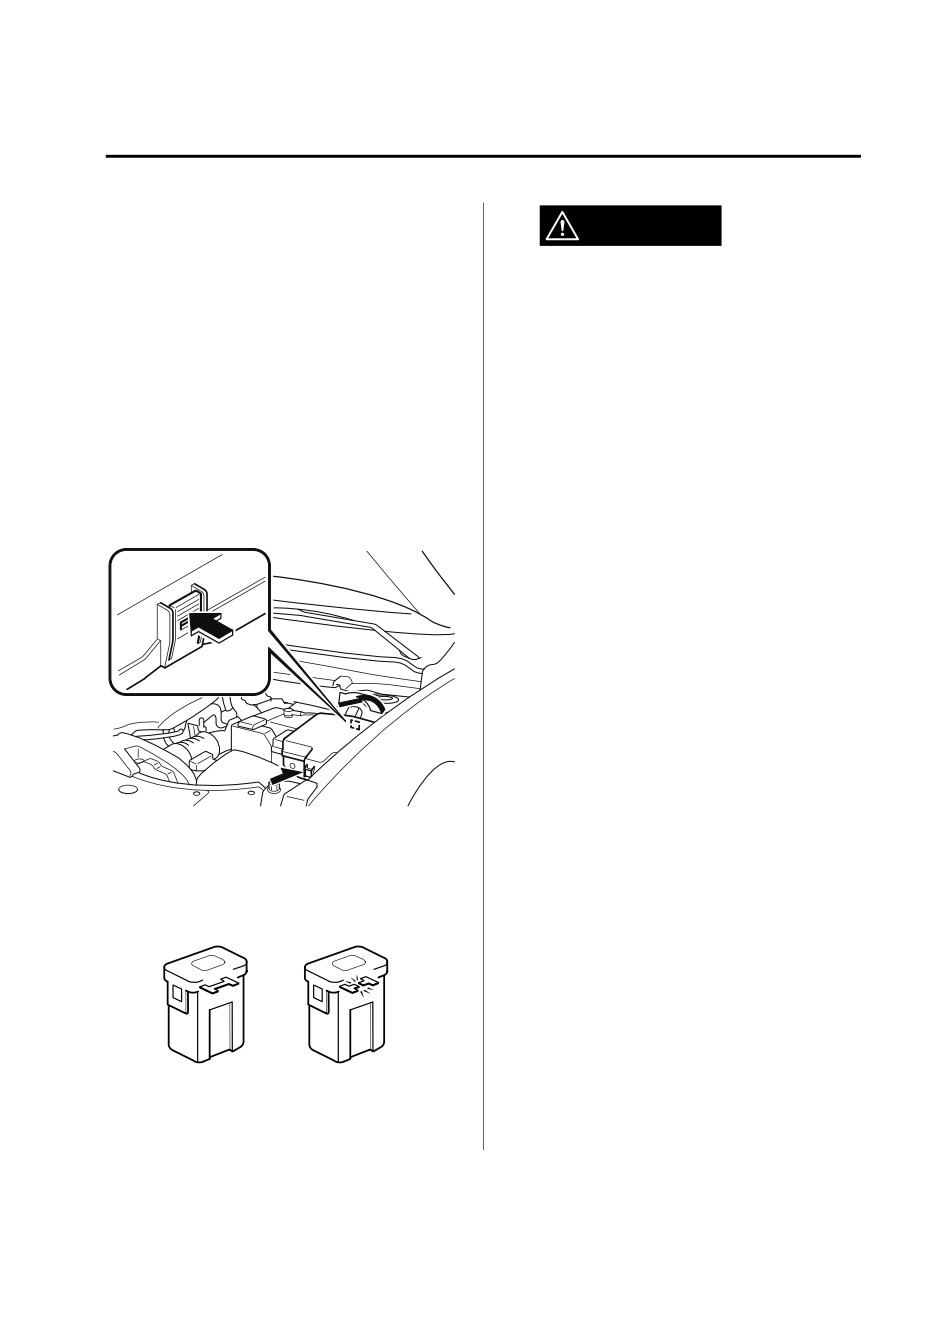
Replacing the fuses under the hood
Do not replace the main fuse by
If the headlights or other electrical
yourself. Have an Authorized Mazda
components do not work and the fuses in
Dealer perform the replacement:
the cabin are normal, inspect the fuse
Replacing the fuse by yourself is
block under the hood.
dangerous because the MAIN fuse is a
If a fuse is blown, it must be replaced.
high current fuse. Incorrect
Follow these steps:
replacement could cause an electrical
shock or a short circuit resulting in a
1. Make sure the ignition is switched off,
fire.
and other switches are off.
4. Reinstall the cover and make sure that
2. Remove the fuse block cover.
it is securely installed.
3. If any fuse but the MAIN fuse is
blown, replace it with a new one of the
same amperage rating.
Normal
Blown
6-47
Maintenance and Care
Owner Maintenance
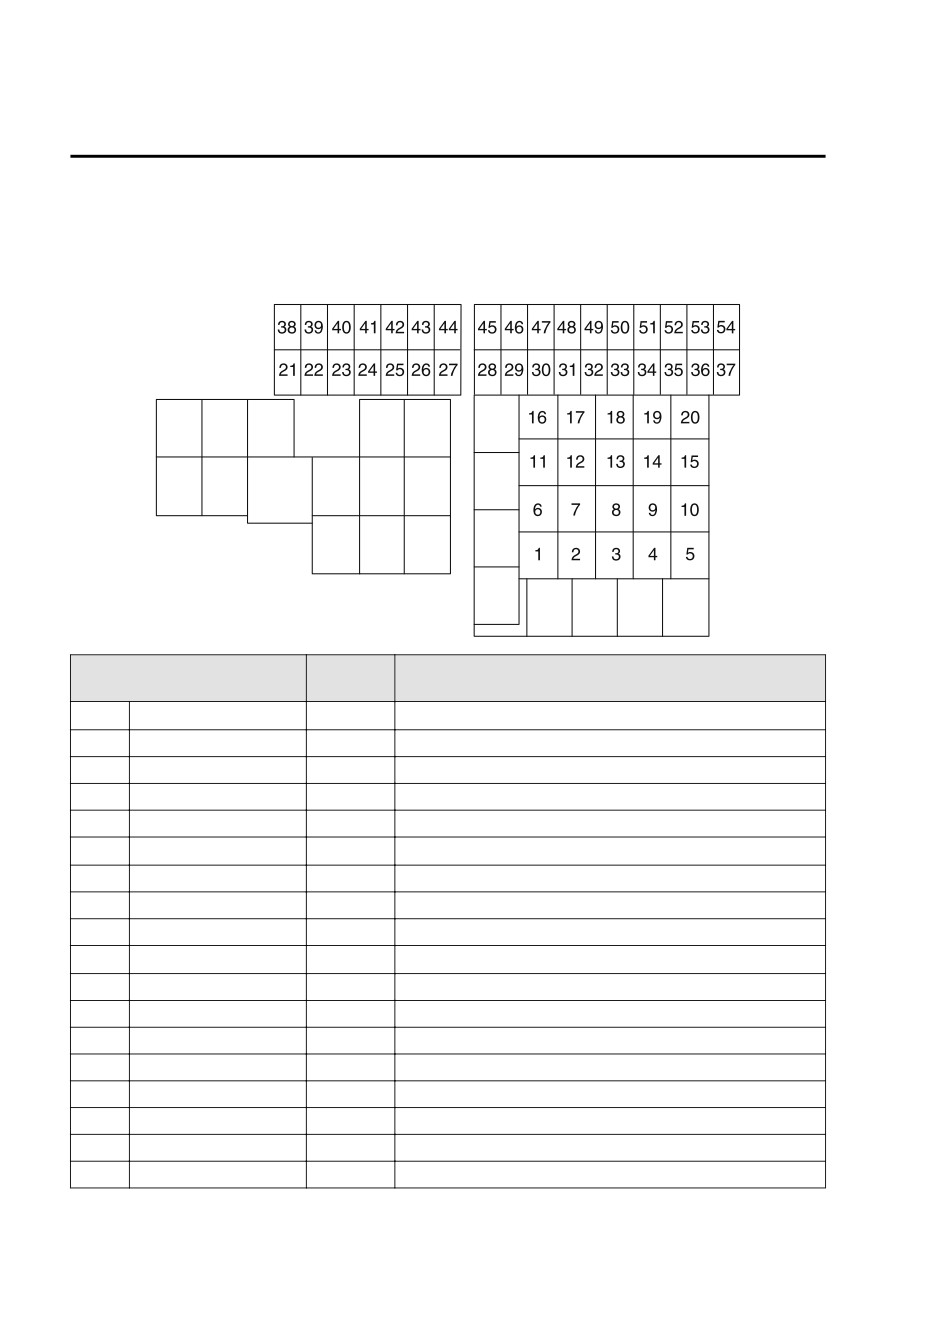
▼ Fuse Panel Description
Fuse block (Engine compartment)
FUSE
DESCRIPTION
PROTECTED COMPONENT
RATING
1
WIPER.DEI
20 A
Windshield wiper de-icer*
2
IG2
30 A
For protection of various circuits
3
INJECTOR
30 A
Engine control system
4
―
―
―
5
P.WINDOW1
30 A
―
6
P.SEAT RL
30 A
Power seat*
7
―
―
―
8
EVVT
20 A
Engine control system
9
DEFOG
40 A
Rear window defogger
10
ST.HEATER2
20 A
Heated steering wheel*
11
R.HEATER
40 A
Air conditioner
12
EPB L
20 A
Electric Parking Brake (EPB) (LH)
13
AUDIO
40 A
Audio system
14
EPB R
20 A
Electric Parking Brake (EPB) (RH)
15
ENG.MAIN
40 A
Engine control system
16
ABS/DSC M
50 A
ABS, Dynamic stability control system
17
CABIN.+B
50 A
For protection of various circuits
18
WIPER
20 A
Front window wiper and washer
6-48
*Some models.
Maintenance and Care
Owner Maintenance
FUSE
DESCRIPTION
PROTECTED COMPONENT
RATING
19
HEATER
40 A
Air conditioner
20
―
―
―
21
ENGINE.IG1
7.5 A
Engine control system
22
C/U IG1
15 A
For protection of various circuits
23
H/L LOW L
15 A
Headlight low beam (LH)
24
H/L LOW R1
15 A
―
25
ENGINE3
15 A
Engine control system
26
ENGINE2
15 A
Engine control system
27
ENGINE1
15 A
Engine control system
28
AT
15 A
Transaxle control system, Ignition switch
29
H/CLEAN
20 A
―
30
A/C
7.5 A
Air conditioner
31
AT PUMP
15 A
―
32
STOP
10 A
Brake lights
33
R.WIPER
15 A
Rear window wiper, Theft-deterrent system*
34
H/L HI
20 A
Headlight high beam
35
H/L LOW R2
15 A
Headlight low beam (RH)
36
FOG
15 A
Fog lights*
37
ENG.+B
7.5 A
Engine control system
38
AUDIO2
7.5 A
Audio system*
39
INTERIOR
10 A
For protection of various circuits
40
METER2
15 A
―
41
METER1
10 A
Instrument cluster
42
SRS1
7.5 A
Air bag
43
AUDIO4
10 A
Audio system*
44
AUDIO1
25 A
Audio system
45
ABS/DSC S
30 A
ABS, Dynamic stability control system
46
VMC
15 A
Gateway system*
47
ST.HEATER
15 A
Audio system
48
TAIL
15 A
Parking lights
49
FUEL PUMP2
25 A
Fuel system
50
HAZARD
25 A
Hazard warning flashers, Turn signal lights, Taillights
51
DRL
15 A
Daytime running lights
52
R.OUTLET2
15 A
Accessory sockets*
53
HORN
15 A
Horn
*Some models.
6-49
Maintenance and Care
Owner Maintenance
FUSE
DESCRIPTION
PROTECTED COMPONENT
RATING
54
ROOM
25 A
For protection of various circuits
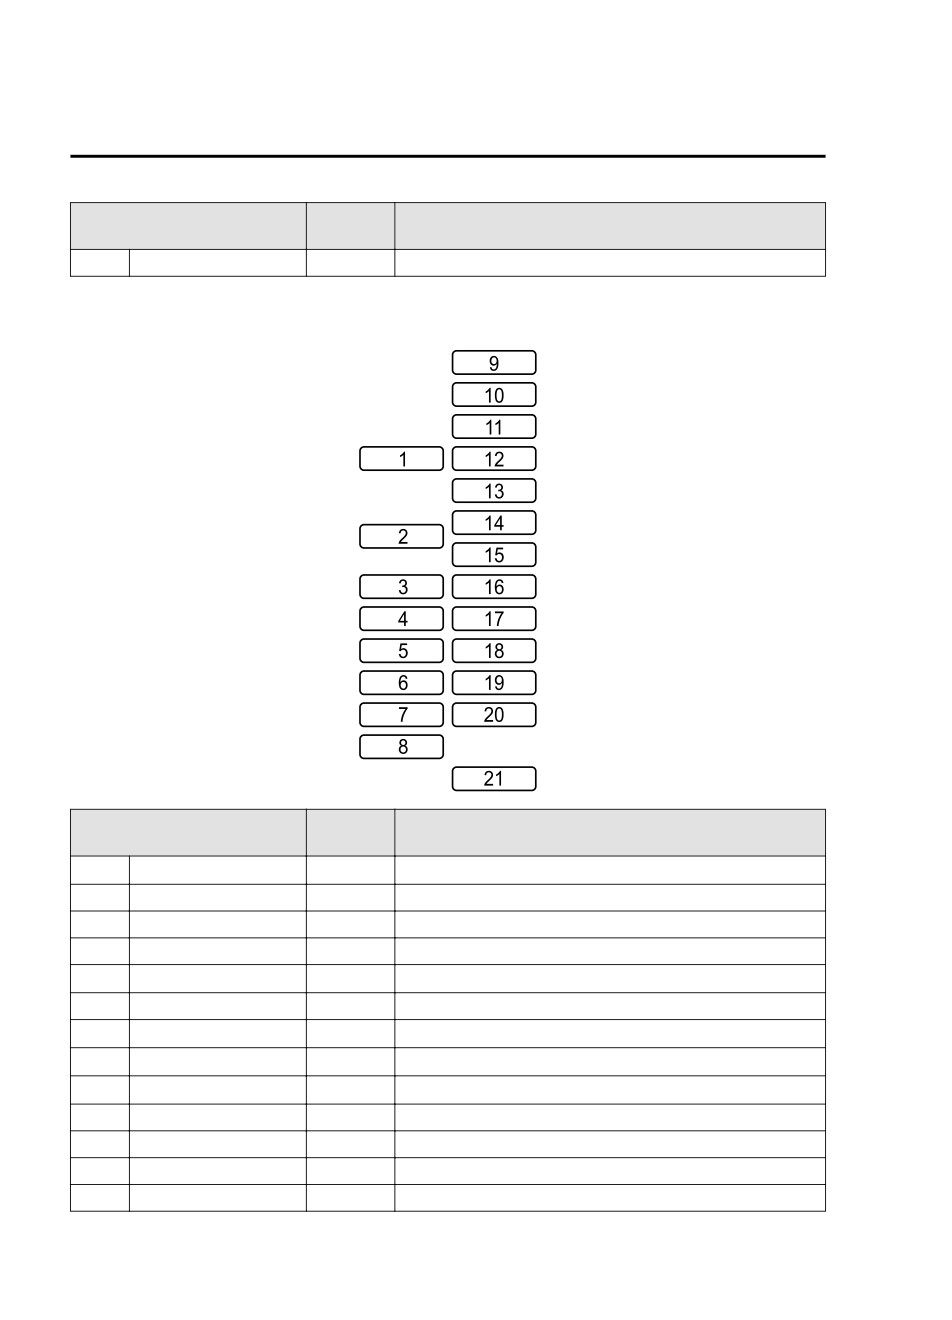
Fuse block (Left side)
FUSE
DESCRIPTION
PROTECTED COMPONENT
RATING
1
P.SEAT D
30 A
Power seat*
2
P.WINDOW3
30 A
Power windows
3
R.OUTLET3
15 A
Accessory sockets
4
P.WINDOW2
25 A
Power windows
5
PLG
20 A
Power liftgate*
6
D.LOCK
25 A
Power door locks
7
SEAT WARM
20 A
Seat warmer*
8
SRS2/ESCL
15 A
Trailer hitch*
9
SUNROOF
10 A
Moonroof*
10
INTERIOR2
15 A
Audio system
11
ENG+BB
7.5 A
Engine control system
12
MIRROR
7.5 A
Power control mirror
13
AT IND
7.5 A
AT shift indicator
6-50
*Some models.

Maintenance and Care
Owner Maintenance
FUSE
DESCRIPTION
PROTECTED COMPONENT
RATING
14
F.OUTLET
15 A
Accessory sockets
15
R.OUTLET1
15 A
Accessory sockets*
16
USB
15 A
USB power outlet*
17
M.DEF
7.5 A
Mirror defogger*
18
R.SEAT.WARM
20 A
Seat warmer*
19
AUDIO3
15 A
Audio system
20
P.SEAT RR
30 A
Power seat*
21
P.SEAT P
30 A
Power seat*
*Some models.
6-51
Maintenance and Care
Appearance Care
and color base coat of the vehicle's
Exterior Care
paintwork.
The paintwork on your Mazda represents
the latest technical developments in
When insects stick to the paint surface and
composition and methods of application.
decompose, corrosive compounds form.
These can erode the clear and color base
Environmental hazards, however, can
coat of the vehicle's paintwork if they are
harm the paint's protective properties, if
not removed.
proper care is not taken.
Tree sap will harden and adhere
Here are some examples of possible
permanently to the paint finish. If you
damage, with tips on how to prevent them.
scratch the sap off while it is hard, some
vehicle paint could come off with it.
Etching Caused by Acid Rain or
Industrial Fallout
Prevention
Occurrence
It is necessary to have your Mazda washed
and waxed to preserve its finish according
Industrial pollutants and vehicle emissions
to the instructions in this section. This
drift into the air and mix with rain or dew
should be done as soon as possible.
to form acids. These acids can settle on a
vehicle's finish. As the water evaporates,
Bird droppings can be removed with a soft
the acid becomes concentrated and can
sponge and water. If you are traveling and
damage the finish.
these are not available, a moistened tissue
And the longer the acid remains on the
may also take care of the problem. The
surface, the greater the chance is for
cleaned area should be waxed according to
damage.
the instructions in this section.
Prevention
Insects and tree sap are best removed with
a soft sponge and water or a commercially
It is necessary to wash and wax your
available chemical cleaner.
vehicle to preserve its finish according to
the instructions in this section. These steps
Another method is to cover the affected
should be taken immediately after you
area with dampened newspaper for 1 to 2
suspect that acid rain has settled on your
hours. After removing the newspaper,
vehicle's finish.
rinse off the loosened debris with water.
Damage Caused by Bird Dropping,
Water Marks
Insects, or Tree Sap
Occurrence
Occurrence
Rain, fog, dew, and even tap water can
Bird droppings contain acids. If these are
contain harmful minerals such as salt and
not removed they can eat away the clear
lime. If moisture containing these minerals
settles on the vehicle and evaporates, the
6-52
Maintenance and Care
Appearance Care
minerals will concentrate and harden to
Chipped paint can lead to rust forming
form white rings. The rings can damage
on your Mazda. Before this happens,
your vehicle's finish.
repair the damage by using Mazda
touch-up paint according to the
Prevention
instructions in this section. Failure to
It is necessary to wash and wax your
repair the affected area could lead to
vehicle to preserve its finish according to
serious rusting and expensive repairs.
the instructions in this section. These steps
should be taken immediately after you find
Follow all label and container directions
water marks on your vehicle's finish.
when using a chemical cleaner or polish.
Paint Chipping
Read all warnings and cautions.
Occurrence
▼ Maintaining the Finish
Paint chipping occurs when gravel thrown
Washing
in the air by another vehicle's tires hits
your vehicle.
CAUTION
How to avoid paint chipping
¾ When the ignition is switched ON and
Keeping a safe distance between you and
the wiper lever is in the AUTO position,
the vehicle ahead reduces the chances of
the windshield wipers may operate
having your paint chipped by flying
automatically in the following cases:
gravel.
¾ The area of the windshield above the
NOTE
rain sensor is touched or wiped with a
The paint chipping zone varies with the
cloth.
speed of the vehicle. For example, when
¾ The windshield or the rain sensor area
traveling at 90 km/h (56 mph), the paint
in the cabin is hit.
chipping zone is 50 m (164 ft).
When the ignition is switched ON and
In low temperatures a vehicle's finish
the wiper lever is in the AUTO position,
hardens. This increases the chance of
do not touch the windshield or the
paint chipping.
windshield wipers Otherwise, the
windshield wipers will operate
automatically which could catch your
fingers or damage the windshield wipers.
When removing ice or snow, or cleaning
the windshield, always make sure the
wiper lever is in the OFF position.
6-53
Maintenance and Care
Appearance Care
¾ Do not spray water in the engine
Scratches are more noticeable on
compartment. Otherwise, it could result
vehicles with darker paint finishes.
in engine-starting problems or damage
To minimize scratches on the vehicle's
to electrical parts.
paint finish:
¾ When washing and waxing the vehicle,
be careful not to apply excessive force to
Rinse off any dirt or other foreign matter
any single area of the vehicle roof.
using lukewarm or cold water before
Otherwise, you could dent the vehicle.
washing.
¾ (Vehicles with hands-free liftgate)
Use plenty of lukewarm or cold water
When washing the vehicle, turn off the
and a soft cloth when washing the
hands-free liftgate using the Mazda
vehicle. Do not use a nylon cloth.
Connect or do not bring the transmitter
Rub gently when washing or drying the
into the area around the liftgate.
vehicle.
Otherwise, the liftgate could open
Take your vehicle only to a car wash
unexpectedly resulting in an accident.
that keeps its brushes well maintained.
Refer to Power Liftgate on page 3-20.
Do not use abrasive cleansers or wax
that contain abrasives.
To help protect the finish from rust and
deterioration, wash your Mazda
CAUTION
thoroughly and frequently, at least once a
month, with lukewarm or cold water.
¾ Do not use steel wool, abrasive cleaners,
or strong detergents containing highly
If the vehicle is washed improperly, the
alkaline or caustic agents on
paint surface could be scratched. Here are
chrome-plated or anodized aluminum
some examples of how scratching could
parts. This may damage the protective
occur.
coating; also, cleaners and detergents
may discolor or deteriorate the paint.
Scratches occur on the paint surface when:
The vehicle is washed without first
Pay special attention to removing salt, dirt,
mud, and other foreign material from the
rinsing off dirt and other foreign matter.
underside of the fenders, and make sure
The vehicle is washed with a rough, dry,
the drain holes in the lower edges of the
or dirty cloth.
The vehicle is washed at a car wash that
doors and rocker panels are clean.
uses brushes that are dirty or too stiff.
Insects, tar, tree sap, bird droppings,
Cleansers or wax containing abrasives
industrial fallout, and similar deposits can
are used.
damage the finish if not removed
NOTE
immediately. When prompt washing with
Mazda is not responsible for scratches
caused by automatic car washes or
improper washing.
6-54
Maintenance and Care
Appearance Care
plain water is ineffective, use a mild soap
a sufficient space (30 cm (12 in) or more)
made for use on vehicles.
between the nozzle and the vehicle. In
addition, do not spend too much time
Thoroughly rinse off all soap with
spraying the same area of the vehicle, and
lukewarm or cold water. Do not allow
be very careful when spraying between
soap to dry on the finish.
gaps in doors and around windows.
Waxing
After washing the vehicle, dry it with a
clean chamois to prevent water spots from
Your vehicle needs to be waxed when
forming.
water no longer beads on the finish.
Always wash and dry the vehicle before
WARNING
waxing it. In addition to the vehicle body,
wax the metal trim to maintain its luster.
Dry off brakes that have become wet by
1. Use wax which contains no abrasives.
driving slowly, releasing the accelerator
Wax containing abrasives will remove
pedal and lightly applying the brakes
paints and could damage bright metal
several times until the brake performance
parts.
returns to normal:
2. Use a good grade of natural wax for
Driving with wet brakes is dangerous.
metallic, mica, and solid colors.
Increased stopping distance or the vehicle
3. When waxing, coat evenly with the
pulling to one side when braking could
sponge supplied or a soft cloth.
result in a serious accident. Light braking
4. Wipe off the wax with a soft cloth.
will indicate whether the brakes have been
affected.
CAUTION
When using an automatic car wash
(Vehicles with hands-free liftgate)
Retract the door mirrors.
When waxing the vehicle, turn off the
The automatic car wash brushes could
hands-free liftgate using the Mazda
reduce the paint luster or hasten paint
Connect or do not bring the transmitter
deterioration.
into the area around the liftgate. The
When using a high water pressure car
liftgate could open unexpectedly resulting
wash
in an accident.
Refer to Power Liftgate on page 3-20.
High water temperature and high water
pressure car washers are available
NOTE
depending on the type of car wash
A spot remover to remove oil, tar, and
machine. If the car washer nozzle is put
similar materials will usually also take off
too close to the vehicle, the force of the
the wax. Rewax these areas even if the rest
spray could damage or deform the
of the vehicle does not need it.
molding, affect the sealability of parts, and
allow water to penetrate the interior. Keep
6-55
Maintenance and Care
Appearance Care
▼ Repairing Damage to the Finish
▼ Underbody Maintenance
Deep scratches or chips on the finish
Road chemicals and salt used for ice and
should be repaired promptly. Exposed
snow removal and solvents used for dust
metal quickly rusts and can lead to major
control may collect on the underbody. If
repairs.
not removed, they will speed up rusting
and deterioration of such underbody parts
CAUTION
as fuel lines, frame, floor pan, and exhaust
system, even though these parts may be
If your Mazda is damaged and needs metal
coated with anti-corrosive material.
parts repaired or replaced, make sure the
body shop applies anti-corrosion materials
Thoroughly flush the underbody and
to all parts, both repaired and new. This
wheel housings with lukewarm or cold
will prevent them from rusting.
water at the end of each winter. Try also to
do this every month.
▼ Bright-Metal Maintenance
Use tar remover to remove road tar and
Pay special attention to these areas
insects. Never do this with a knife or
because they easily hide mud and dirt. It
similar tool.
will do more harm than good to wet
To prevent corrosion on bright-metal
down the road grime without removing
surfaces, apply wax or chrome
it.
preservative and rub it to a high luster.
During cold weather or in coastal areas,
The lower edges of doors, rocker panels,
cover bright-metal parts with a coating
and frame members have drain holes that
of wax or preservative heavier than
should not be clogged. Water trapped there
usual. It would also help to coat them
will cause rusting.
with noncorrosive petroleum jelly or
some other protective compound.
WARNING
CAUTION
Dry off brakes that have become wet by
driving slowly, releasing the accelerator
Do not use steel wool, abrasive cleaners, or
pedal and lightly applying the brakes
strong detergents containing highly
several times until the brake performance
alkaline or caustic agents on
returns to normal:
chrome-plated or anodized aluminum
Driving with wet brakes is dangerous.
parts. This may result in damage to the
Increased stopping distance or the vehicle
protective coating and cause discoloration
pulling to one side when braking could
or paint deterioration.
result in a serious accident. Light braking
will indicate whether the brakes have been
affected.
6-56
Maintenance and Care
Appearance Care
▼ Aluminum Wheel Maintenance
If plastic parts such as the bumpers
become inadvertently exposed to
A protective coating is provided over the
chemical agents or fluids such as
aluminum wheels. Special care is needed
gasoline, oil, engine coolant, or battery
to protect this coating.
fluid, it could cause discoloration,
staining, or paint peeling. Wipe off any
CAUTION
such chemical agents or fluids using a
soft cloth immediately.
Do not use any detergent other than mild
High water temperature and high water
detergent. Before using any detergent,
pressure car washers are available
verify the ingredients. Otherwise, the
depending on the type of high pressure
product could discolor or stain the
car washer device. If the car washer
aluminum wheels.
nozzle is put too close to the vehicle or
aimed at one area for an extended period
NOTE
of time, it could deform plastic parts or
Do not use a wire brush or any abrasive
damage the paint.
cleaner, polishing compound, or solvent
Do not use wax containing compounds
on aluminum wheels. They may damage
(polish). Otherwise, it could result in
the coating.
paint damage.
Always use a sponge or soft cloth to
In addition, do not use an electrical or
clean the wheels.
air tool to apply wax. Otherwise, the
Rinse the wheels thoroughly with
frictional heat generated could result in
lukewarm or cold water. Also, be sure to
deformation of plastic parts or paint
clean the wheels after driving on dusty
damage.
or salted roads to help prevent
corrosion.
Avoid washing your vehicle in an
automatic car wash that uses high-speed
or hard brushes.
▼ Plastic Part Maintenance
When cleaning the plastic lenses of the
lights, do not use gasoline, kerosene,
rectified spirit, paint, thinner, highly
acidic detergents, or strongly alkaline
detergents. Otherwise, these chemical
agents can discolor or damage the
surfaces resulting in a significant loss in
functionality. If plastic parts become
inadvertently exposed to any of these
chemical agents, flush with water
immediately.
6-57
Maintenance and Care
Appearance Care
off thoroughly and make sure there is
Interior Care
no remaining moisture on them.
WARNING
WARNING
Do not spray water into the vehicle cabin:
If a seat belt appears frayed or has
Spraying water into the vehicle cabin is
abrasions, have it replaced by an
dangerous as electrical devices such as the
Authorized Mazda Dealer:
audio and switches could get wet resulting
If a seat belt is used under such a condition,
in a malfunction or vehicle fire.
it cannot function at its full capacity which
could result in serious injury or death.
NOTE
Use a mild detergent to remove soiling
Do not wipe the interior using alcohol,
from a seat belt:
chlorine bleach, or organic solvents
If organic solvents are used for cleaning the
such as thinner, benzene, and gasoline.
seat belts or they become stained or
Otherwise, it may cause discoloration or
bleached, there is the possibility of them
stains.
becoming weakened and as a result, they
Rubbing hard with a stiff brush or cloth
may not function at their full capacity
may cause damage.
which could cause serious injury or death.
If the vehicle interior becomes soiled by
any of the following, wipe it off
NOTE
immediately using a soft cloth.
Clean seat belts diligently if they get dirty.
Leaving it uncleaned could cause
Leaving them uncleaned will make it
discoloration, stains, cracks, or peeling of
difficult to clean them later, and it may
the coating, and it will make it hard to
affect the smooth retracting of the seat
wipe off later.
belt.
Beverage or fragrance
▼ Vinyl Upholstery Maintenance
Grease or oil
Remove dust and dirt from the vinyl
Soiling
upholstery using a brush or vacuum.
▼ Seat Belt Maintenance
Remove soiling from vinyl upholstery
using a leather and vinyl upholstery
1. Clean the soiled area by lightly
cleaner.
dabbing it with a soft cloth soaked in a
mild detergent (approx. 5%) diluted
▼ Upholstery Maintenance
with water.
1. Clean the soiled area by lightly
2. Wipe off the remaining detergent using
dabbing it with a soft cloth soaked in a
a cloth soaked in clean water and
mild detergent (approx. 5%) diluted
wrung out well.
with water.
3. Before retracting seat belts which have
been pulled out for cleaning, dry them
6-58
Maintenance and Care
Appearance Care
2. Wipe off the remaining detergent using
If the leather upholstery gets wet,
a cloth soaked in clean water and
promptly remove moisture with a dry
wrung out well.
cloth. Remaining moisture on the
surface may cause deterioration such as
▼ Leather Upholstery Maintenance*
hardening and shrinkage.
1. Remove dust and sand using a vacuum
Exposure to direct sunlight for long
cleaner.
periods may cause deterioration and
2. Wipe off the soiled area with a soft
shrinkage. When parking the car under
cloth and a suitable, special cleaner or
direct sunlight for long periods, shade
a soft cloth soaked in a mild detergent
the interior using sunshades.
(about 5%) diluted with water.
Do not leave vinyl products on the
3. Wipe off the remaining detergent using
leather upholstery for long periods.
a cloth soaked in clean water and
They may affect the leather quality and
wrung out well.
coloring. If the cabin temperature
4. Remove moisture with a dry, soft cloth
becomes hot, the vinyl may deteriorate
and allow the leather to further dry in a
and adhere to the genuine leather.
well-ventilated, shaded area. If the
▼ Plastic Part Maintenance
leather gets wet such as from rain,
remove the moisture and dry it as soon
as possible.
CAUTION
NOTE
Do not use polishing agents.
Because genuine leather is a natural
Depending on the product ingredients,
material, its surface is not uniform and
they could cause discoloration, stains,
it may have natural scars, scratches,
cracks or peeling of the coating.
and wrinkles.
▼ Instrument Panel Top Maintenance
To maintain the quality for as long as
possible, periodical maintenance, about
1. Wipe the soiled area with a soft cloth
twice a year, is recommended.
soaked in a mild detergent (approx.
If the leather upholstery comes into
5%) diluted with water.
contact with any of the following, clean
2. Wipe off the remaining detergent using
it immediately.
a cloth soaked in clean water and
Leaving it uncleaned could cause
wrung out well.
premature wear, mold, or stains.
▼ Panel Maintenance
Sand or dirt
Grease or oil, such as hand cream
If a panel becomes soiled, wipe it off with
Alcohol, such as in cosmetic or hair
a soft cloth soaked in clean water and
dressing items
thoroughly wrung out.
If some areas require further cleaning, use
the following procedure:
*Some models.
6-59
Maintenance and Care
Appearance Care
1. Wipe the soiled area with a soft cloth
¾ When washing the inside of the window
soaked in a mild detergent (approx.
glass, use a soft cloth dampened in
5 %) diluted with water.
lukewarm water, gently wiping the
2. Wipe off the remaining detergent using
thermal filaments and the antenna lines.
a cloth soaked in clean water and
Use of glass cleaning products could
wrung out well.
damage the thermal filaments and the
antenna lines.
NOTE
Be particularly careful when cleaning
▼ Cleaning the Floor Mats
shiny surface panels and metallic parts
Rubber floor mats should be cleaned with
such as plating as they can be scratched
mild soap and water only.
easily.
▼ Active Driving Display
WARNING
Maintenance*
The dust-proof sheet has a coating. When
Do not use rubber cleaners, such as tire
cleaning, do not use a hard or
cleaner or tire shine, when cleaning rubber
rough-surface cloth, or cleaning detergent.
floor mats:
In addition, if a chemical solvent gets on
Cleaning the rubber floor mats with rubber
the active driving display, wipe it off
cleaning products makes the floor mats
immediately. The dust-proof sheet could
slippery.
be damaged and the surface coating could
This may cause an accident when
be scratched. Use a fine, soft cloth such as
depressing the accelerator or brake pedal
those used for cleaning eyeglasses.
or when getting in or out of the vehicle.
NOTE
After removing the floor mats for
Use of compressed air when cleaning the
cleaning, always reinstall them securely
dust-proof sheet is recommended.
(page 3-49).
▼ Cleaning the Window Interiors
If the windows become covered with an
oily, greasy, or waxy film, clean them with
glass cleaner. Follow the directions on the
container.
CAUTION
¾ Do not scrape or scratch the inside of the
window glass. It could damage the
thermal filaments and the antenna lines.
6-60
*Some models.
If Trouble Arises
7
Helpful information on what to do if a problem arises with the vehicle.
Parking in an Emergency
7-2
Warning/Indicator Lights and
Parking in an Emergency
7-2
Warning Sounds
7-28
If a Warning Light Turns On or
Flashes
7-28
Flat Tire
7-3
Message Indicated on
Spare Tire and Tool Storage
7-3
Display
7-41
Changing a Flat Tire
7-9
Message Indicated in Multi-
information Display
7-43
Battery Runs Out
7-19
Warning Sound is Activated
7-45
Jump-Starting
7-19
When Liftgate Cannot be
Emergency Starting
7-22
Opened
7-50
Starting a Flooded Engine
7-22
When Liftgate Cannot be
Push-Starting
7-22
Opened
7-50
Overheating
7-23
Active Driving Display Does Not
Overheating
7-23
Operate*
7-51
If the Active Driving Display Does
Emergency Towing
7-25
Not Operate
7-51
Towing Description
7-25
Towing Hooks (Mexico)
7-26
*Some models.
7-1
If Trouble Arises
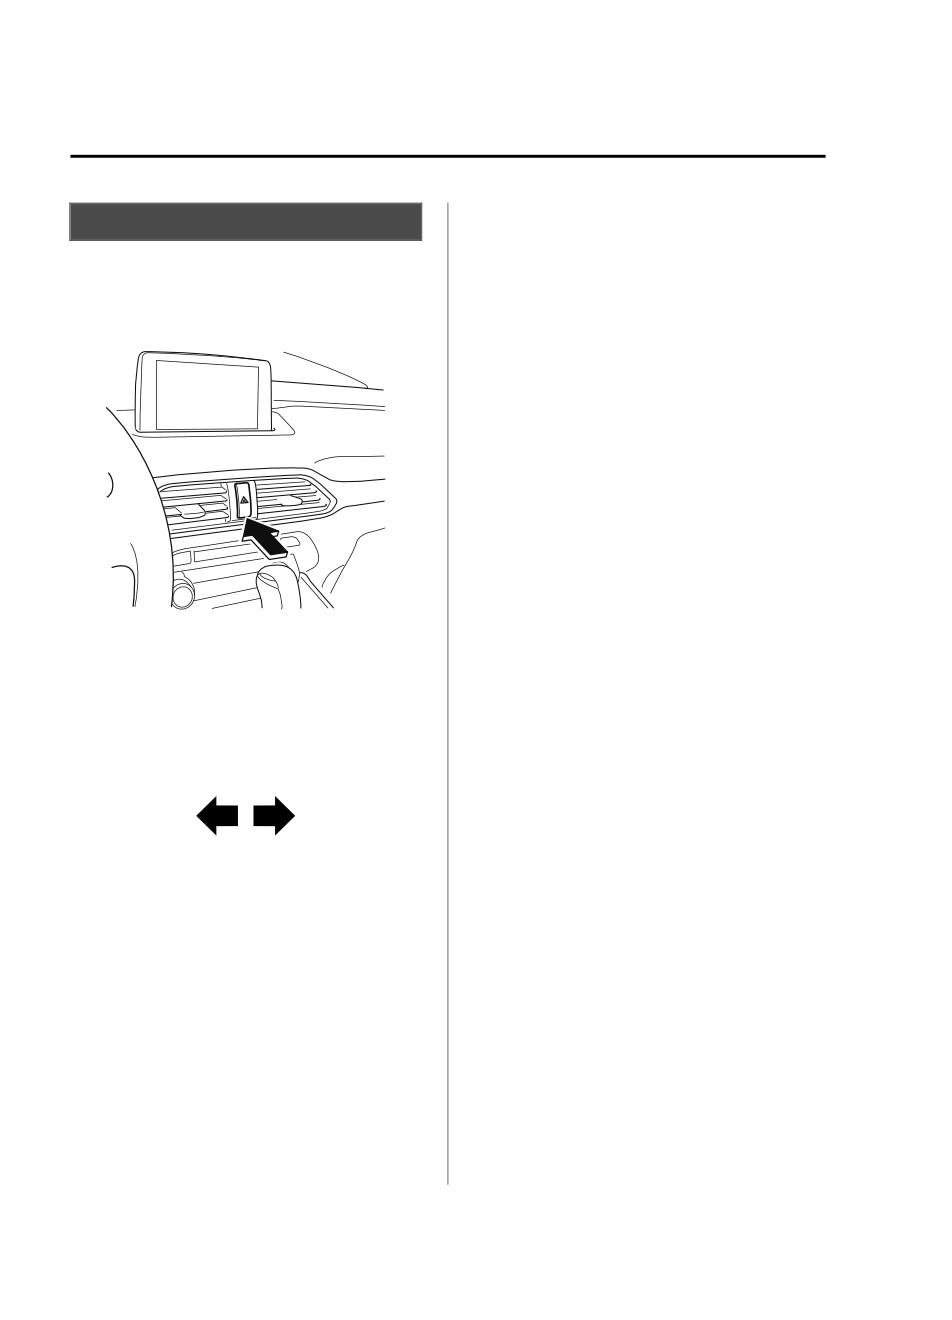
Parking in an Emergency
Parking in an Emergency
The hazard warning lights should always
be used when you stop on or near a
roadway in an emergency.
The hazard warning lights warn other
drivers that your vehicle is a traffic hazard
and that they must take extreme caution
when near it.
Depress the hazard warning flasher and all
the turn signals will flash. The hazard
warning indicator lights in the instrument
cluster flash simultaneously.
NOTE
The turn signals do not work when the
hazard warning lights are on.
Check local regulations about the use of
hazard warning lights while the vehicle
is being towed to verify that it is not in
violation of the law.
7-2
If Trouble Arises
Flat Tire
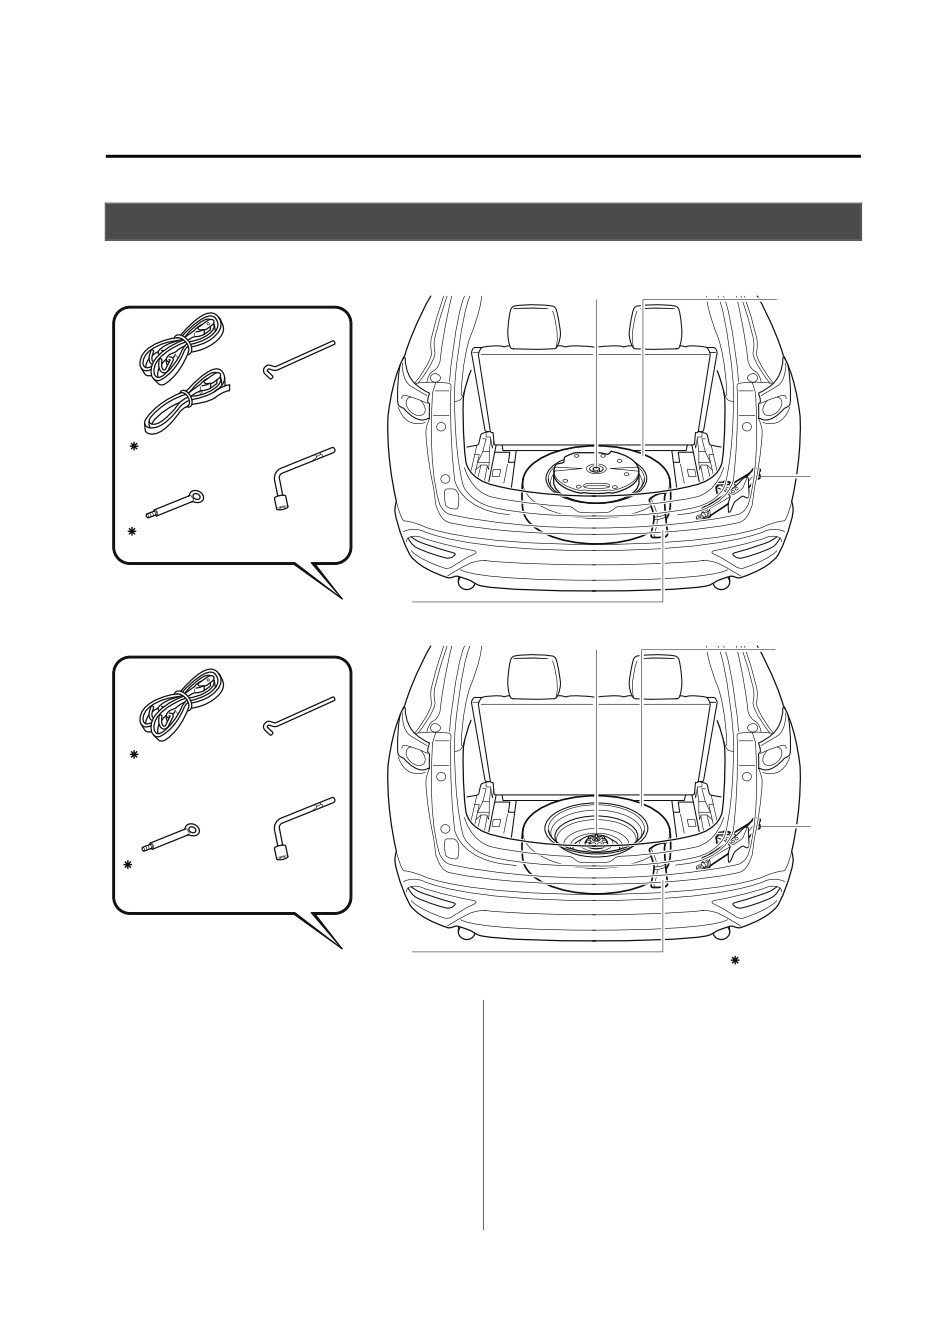
Spare Tire and Tool Storage
Spare tire and tools are stored in the locations illustrated in the diagram.
With sub-woofer
Spare tire hold-down bolt
Spare tire
Jack lever
Flat tire belt
Jack
Lug wrench
Towing eyelet
Tool bag
Without sub-woofer
Spare tire hold-down bolt
Spare tire
Flat tire belt
Jack lever
Jack
Towing eyelet
Lug wrench
Tool bag
Some models.
▼ Jack
To remove the jack
1. Set the third-row seatbacks to their
on-road positions.
7-3
If Trouble Arises
Flat Tire
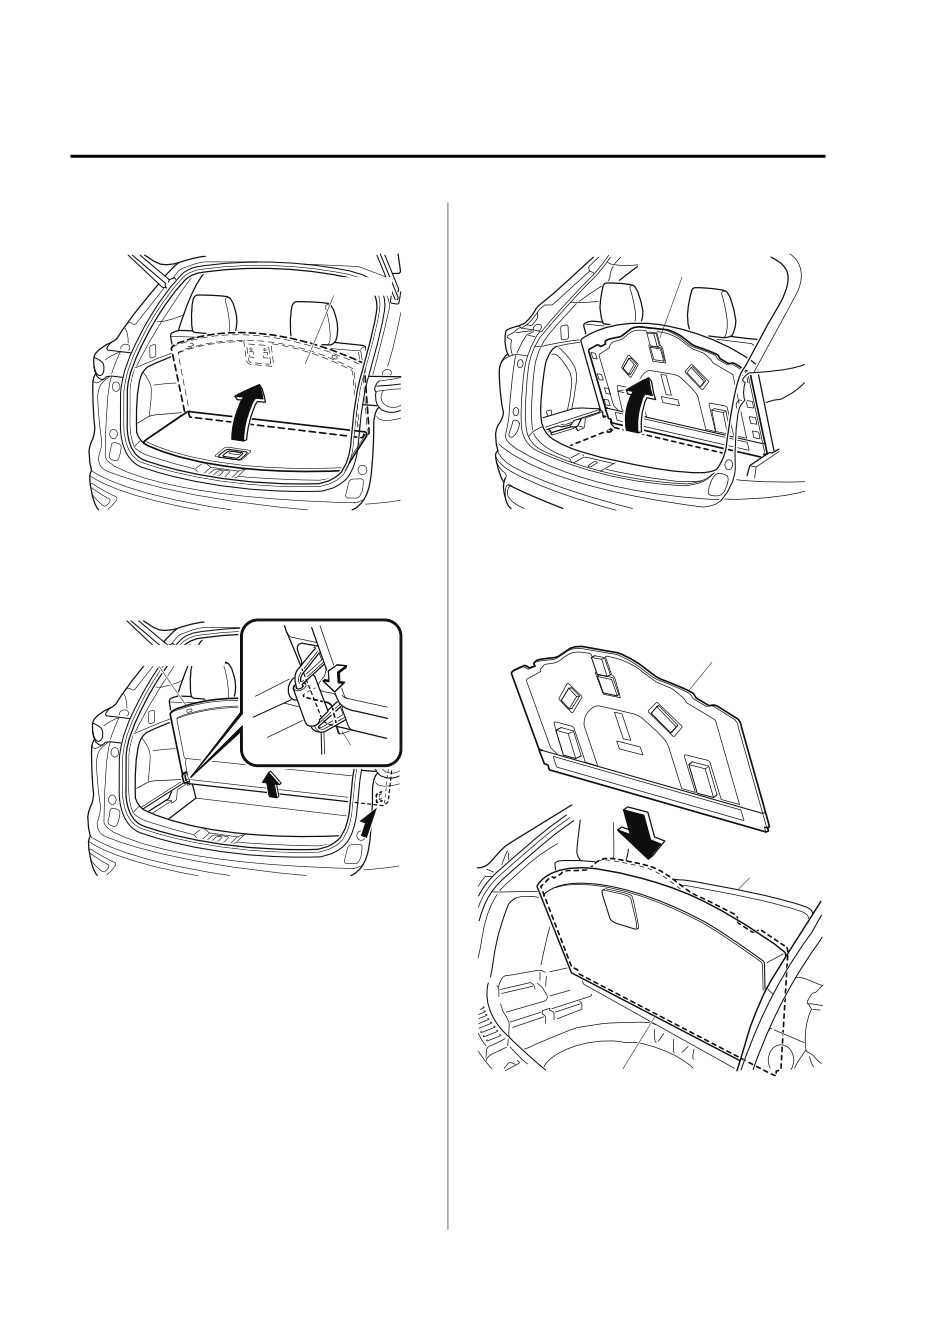
2. Raise the luggage board.
1. Raise the luggage mat.
Luggage mat
Luggage Board
3. Raise the luggage board a little while
2. Remove the luggage mat.
pulling it towards you, and then insert
3. Insert the luggage mat between the
the bottom edge into the holders.
luggage board and the third-row
seatbacks.
Luggage Board
Luggage mat
Holder
Third-row
seatback
4.
(Vehicles with luggage mat)
Store the luggage mat between the
third-row seatbacks and the luggage
board.
Luggage board
7-4
If Trouble Arises
Flat Tire
NOTE
7. Turn the wing bolt and jack screw
When inserting the luggage mat,
counterclockwise.
support the luggage board with one
hand so that it does not come off
Wing bolt
Jack screw
the holders.
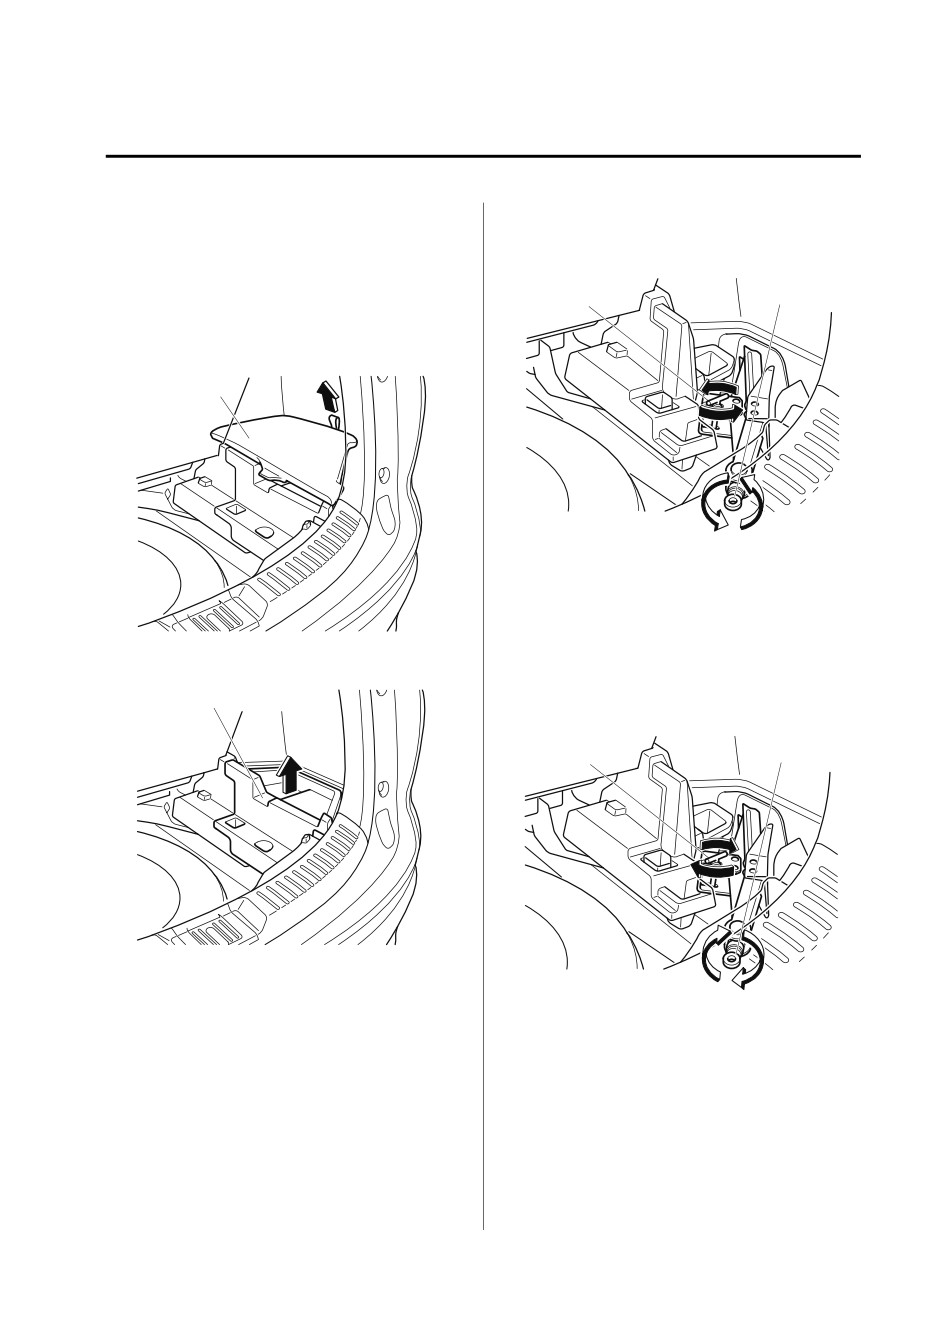
5. Remove the cover on the right side.
Cover
To secure the jack
1. Insert the wing bolt into the jack with
the jack screw pointing back and turn
6. Remove the cargo sub compartment.
the wing bolt clockwise to temporarily
tighten it.
Cargo sub compartment
2. Tighten the jack screw clockwise.
Wing bolt
Jack screw
3. Turn the wing bolt completely to
secure the jack.
NOTE
If the jack is not completely secured, it
could rattle while driving. Make sure
the jack screw is sufficiently tightened.
Maintenance
Always keep the jack clean.
7-5
Большое спасибо!
Ваше мнение очень важно для нас.
Нет комментариевНе стесняйтесь поделиться с нами вашим ценным мнением.
Текст