Mazda CX-9 (2022 year). Manual in english — page 19
If Trouble Arises
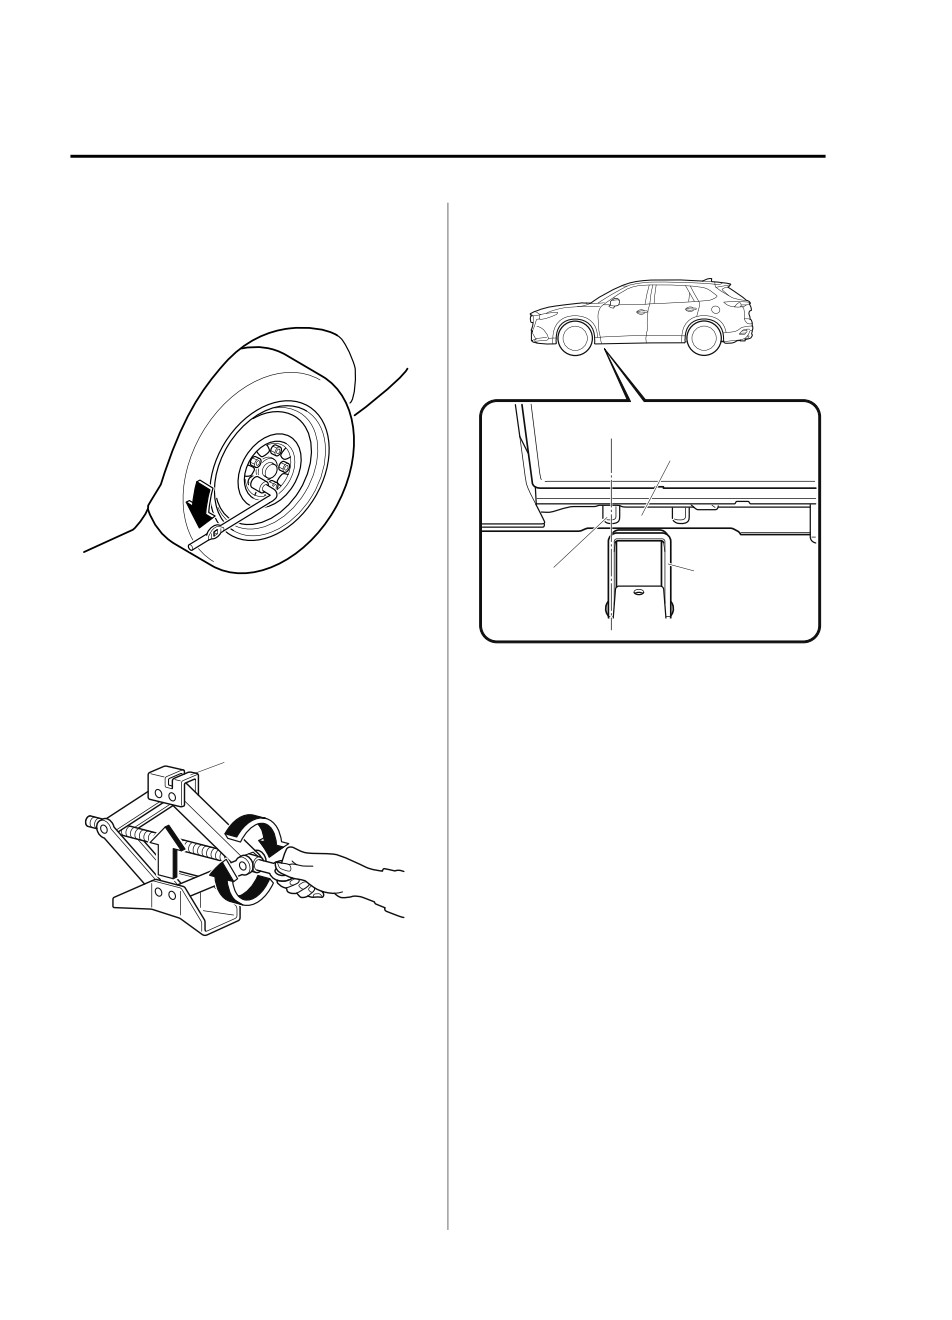
Flat Tire
Make sure the moving parts are kept
¾ Avoid driving over obstacles. Also, do
free from dirt or rust.
not drive through an automatic car
Make sure the screw thread is
wash. This tire's diameter is smaller
adequately lubricated.
than a conventional tire, so the ground
clearance is reduced.
▼ Spare Tire
¾ Do not use a tire chain on this tire
Your Mazda has a temporary spare tire.
because it will not fit properly.
The temporary spare tire is lighter and
¾ Do not use your temporary spare tire
smaller than a conventional tire, and is
on any other vehicle, it has been
designed only for emergency use and
designed only for your Mazda.
should be used only for VERY short
¾ Use only one temporary spare tire on
periods. Temporary spare tires should
your vehicle at the same time.
NEVER be used for long drives or
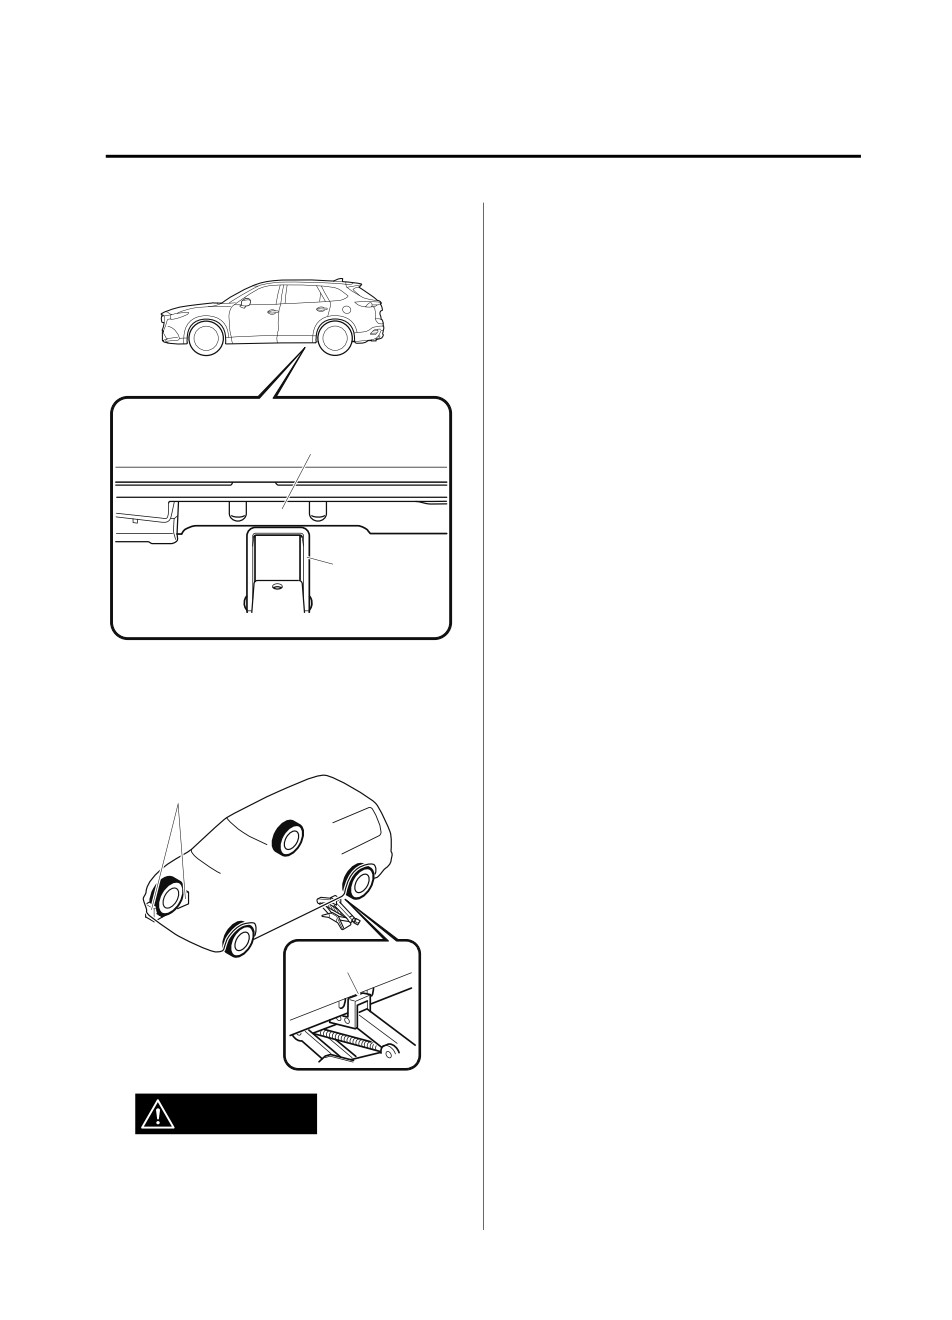
To remove the spare tire
extended periods.
NOTE
WARNING
(Vehicles with sub-woofer)
Because the sub-woofer is not operational
Do not install the temporary spare tire on
when the sub-woofer connector is
the front wheels (driving wheels):
disconnected, no sound is output from the
Driving with the temporary spare tire on
sub-woofer.
one of the front driving wheels is
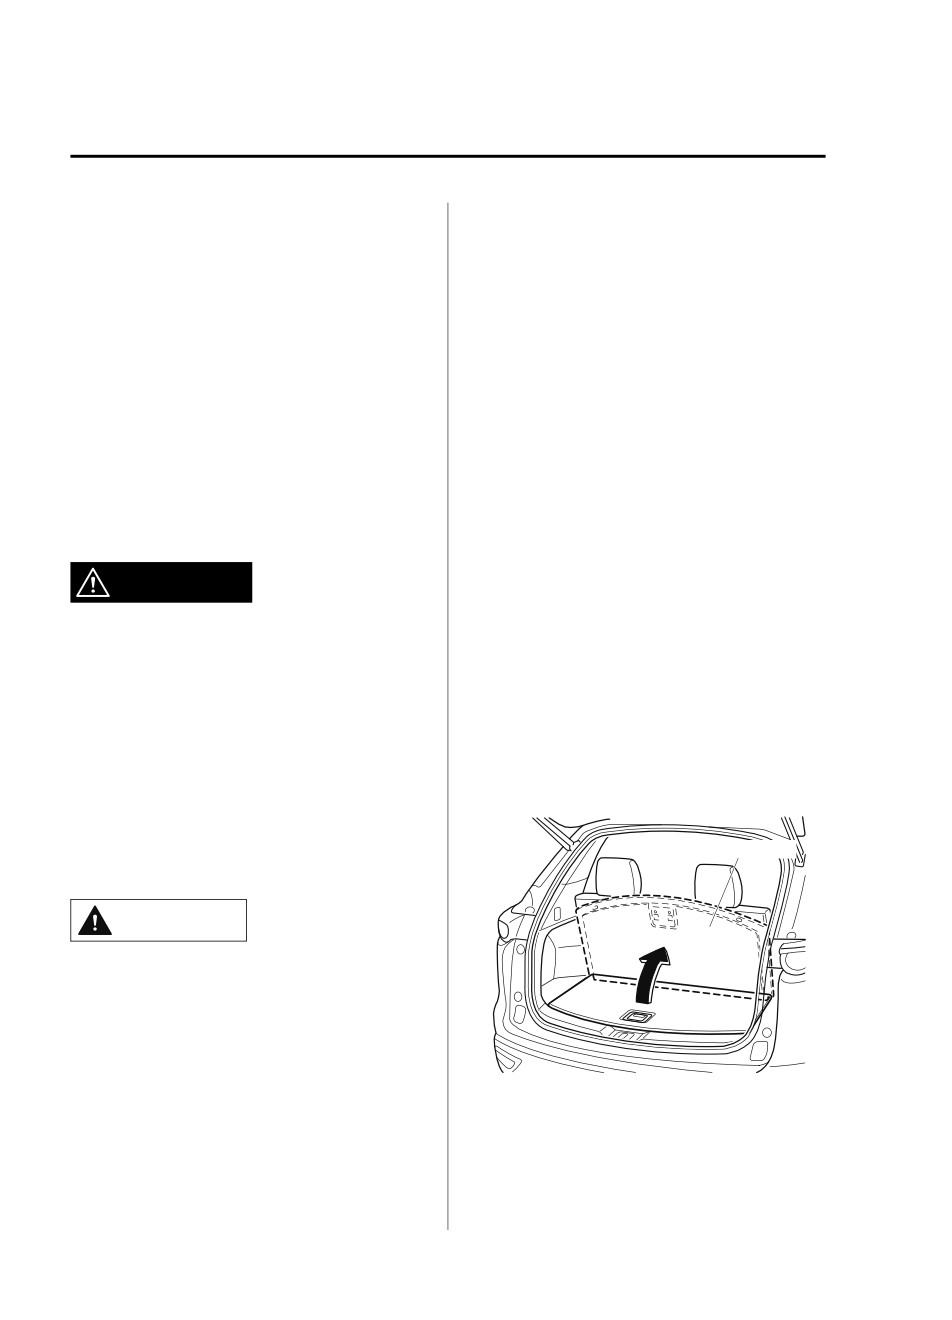
1. Set the third-row seatbacks to their
dangerous. Handling will be affected. You
on-road positions.
could lose control of the vehicle, especially
2. Raise the luggage board.
on ice or snow bound roads, and have an
accident. Move a regular tire to the front
wheel and install the temporary spare tire
Luggage Board
to the rear.
CAUTION
¾ When using the temporary spare tire,
driving stability may decrease compared
to when using only the conventional tire.
Drive carefully.
¾ To avoid damage to the temporary spare
tire or to the vehicle, observe the
following precautions:
¾ Do not exceed 80 km/h (50 mph).
7-6
If Trouble Arises
Flat Tire
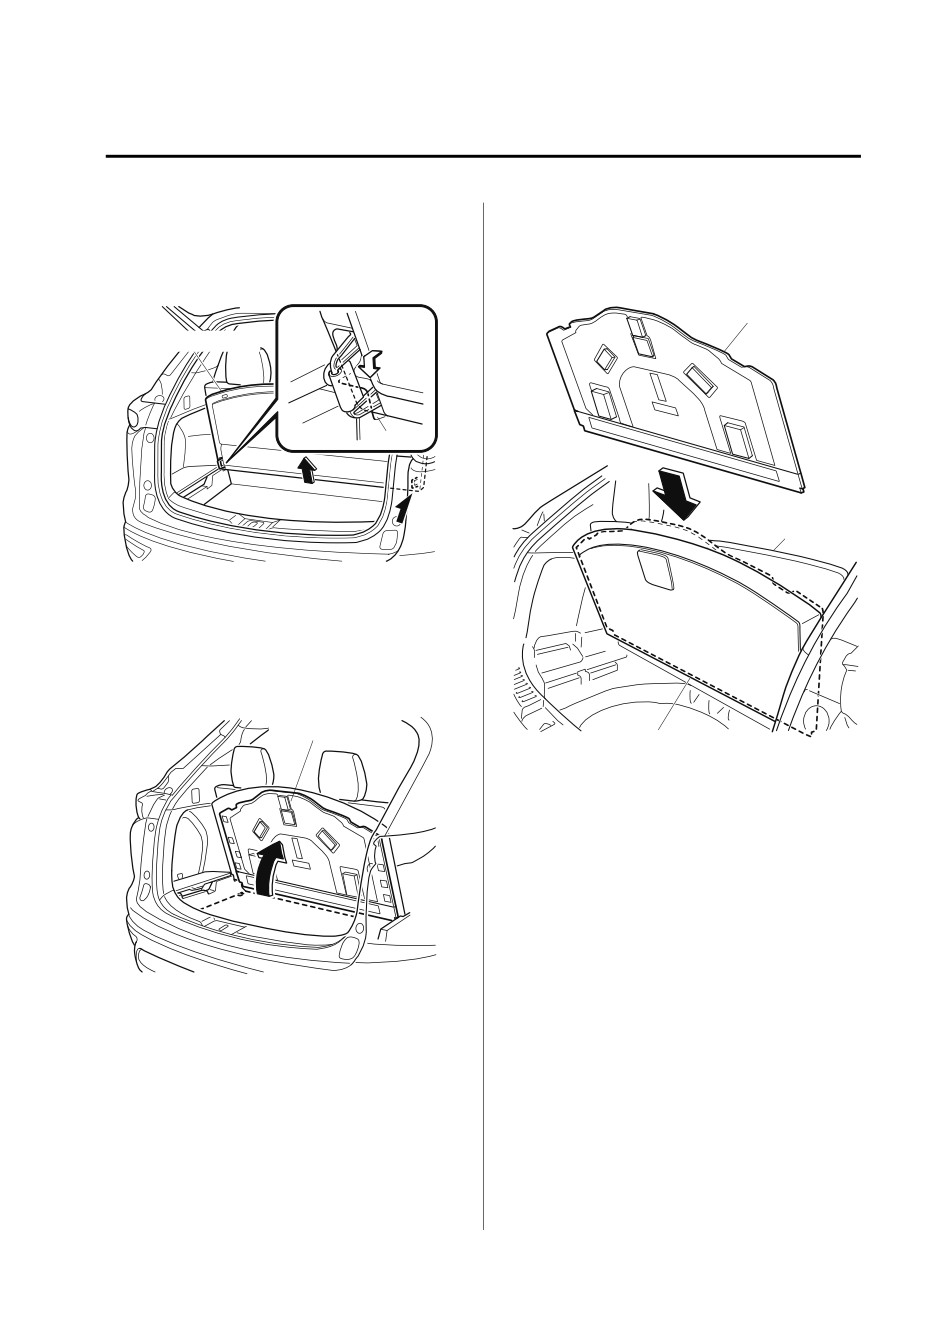
3. Raise the luggage board a little while
3. Insert the luggage mat between the
pulling it towards you, and then insert
luggage board and the third-row
the bottom edge into the holders.
seatbacks.
Luggage mat
Luggage Board
Holder
Third-row
seatback
4.
(Vehicles with luggage mat)
Store the luggage mat between the
third-row seatbacks and the luggage
board.
1. Raise the luggage mat.
Luggage mat
Luggage board
NOTE
When inserting the luggage mat,
support the luggage board with one
hand so that it does not come off
the holders.
5.
Remove the tool bag.
6.
(Vehicles with sub-woofer)
2. Remove the luggage mat.
7-7
If Trouble Arises
Flat Tire
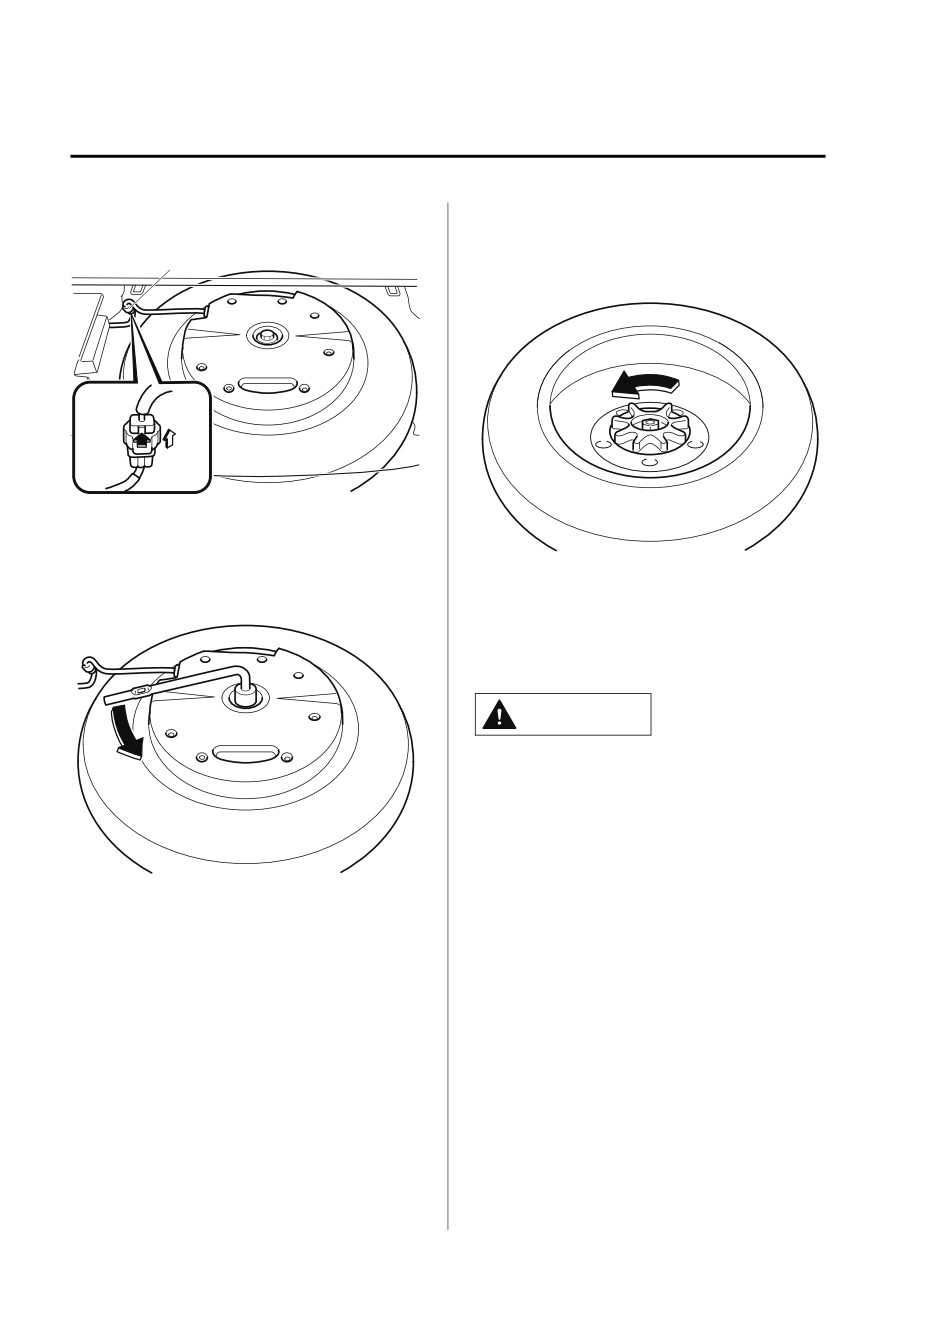
Disconnect the sub-woofer connector.
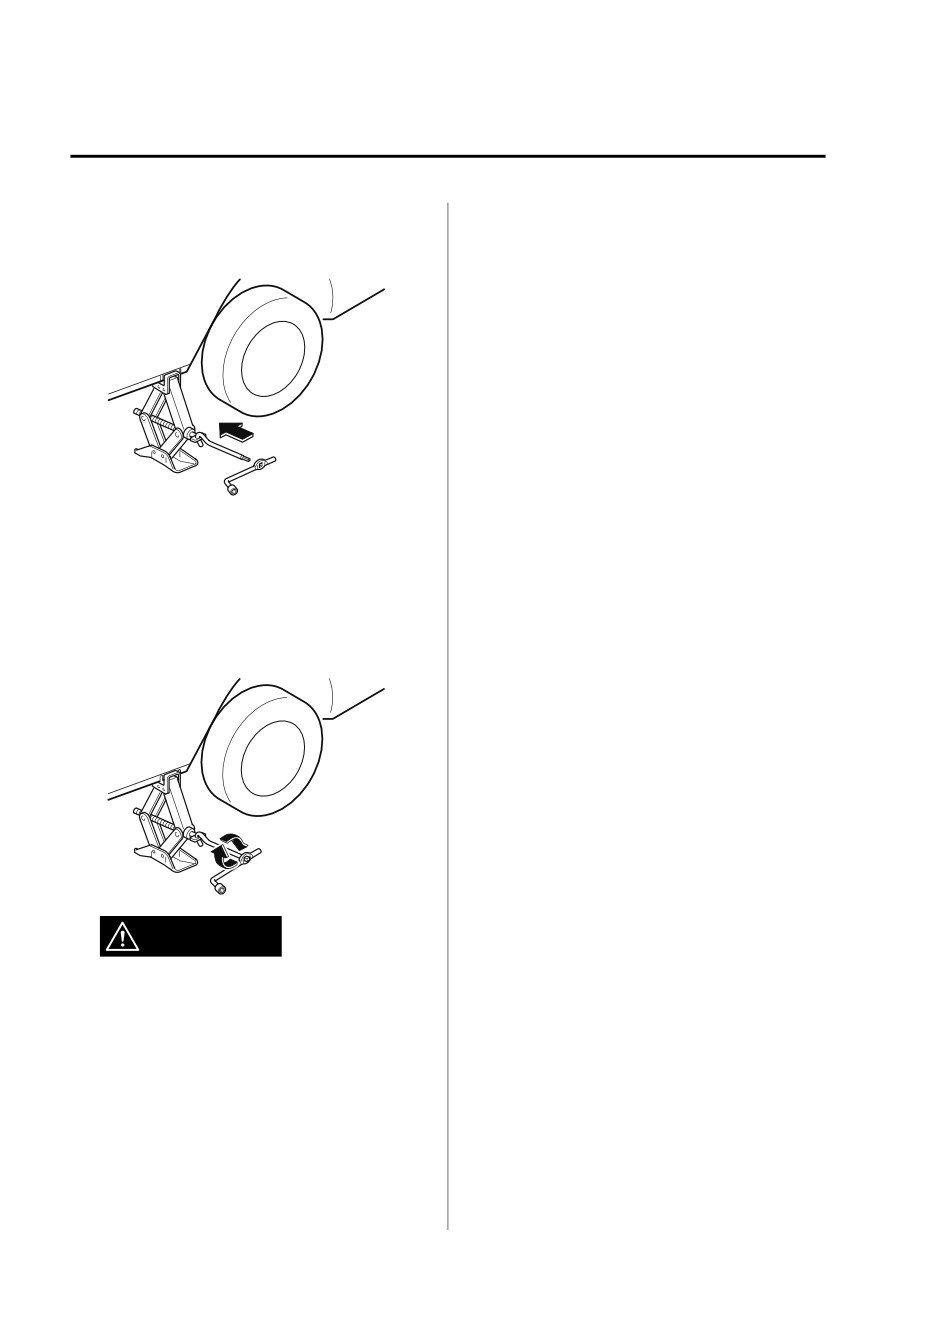
Turn the hold-down bolt
counterclockwise and remove the spare
Connector
tire.
7.
(Vehicles with sub-woofer)
Turn the hold-down bolt
counterclockwise and remove the
sub-woofer and the spare tire.
To secure the spare tire
Store the spare tire in the reverse order of
removal. After storing, verify that the
spare tire is stored securely.
CAUTION
(Vehicles with sub-woofer)
¾ Secure the sub-woofer in its correct
position. If the sub-woofer is not installed
to the correct position, it may move while
the vehicle is driven which may damage
(Vehicles without sub-woofer)
the sub-woofer or the wiring harness.
¾ Store the tool bag on the right side of the
vehicle. If the tool bag is stored on the left
side of the vehicle, it may move while the
vehicle is driven which may damage the
wiring harness.
Refer to Spare Tire and Tool Storage on
page 7-3.
7-8
If Trouble Arises
Flat Tire
2.
Shift into Park (P) and turn off the
Changing a Flat Tire
engine.
3.
Turn on the hazard warning flasher.
NOTE
4.
Have passengers get out of the vehicle
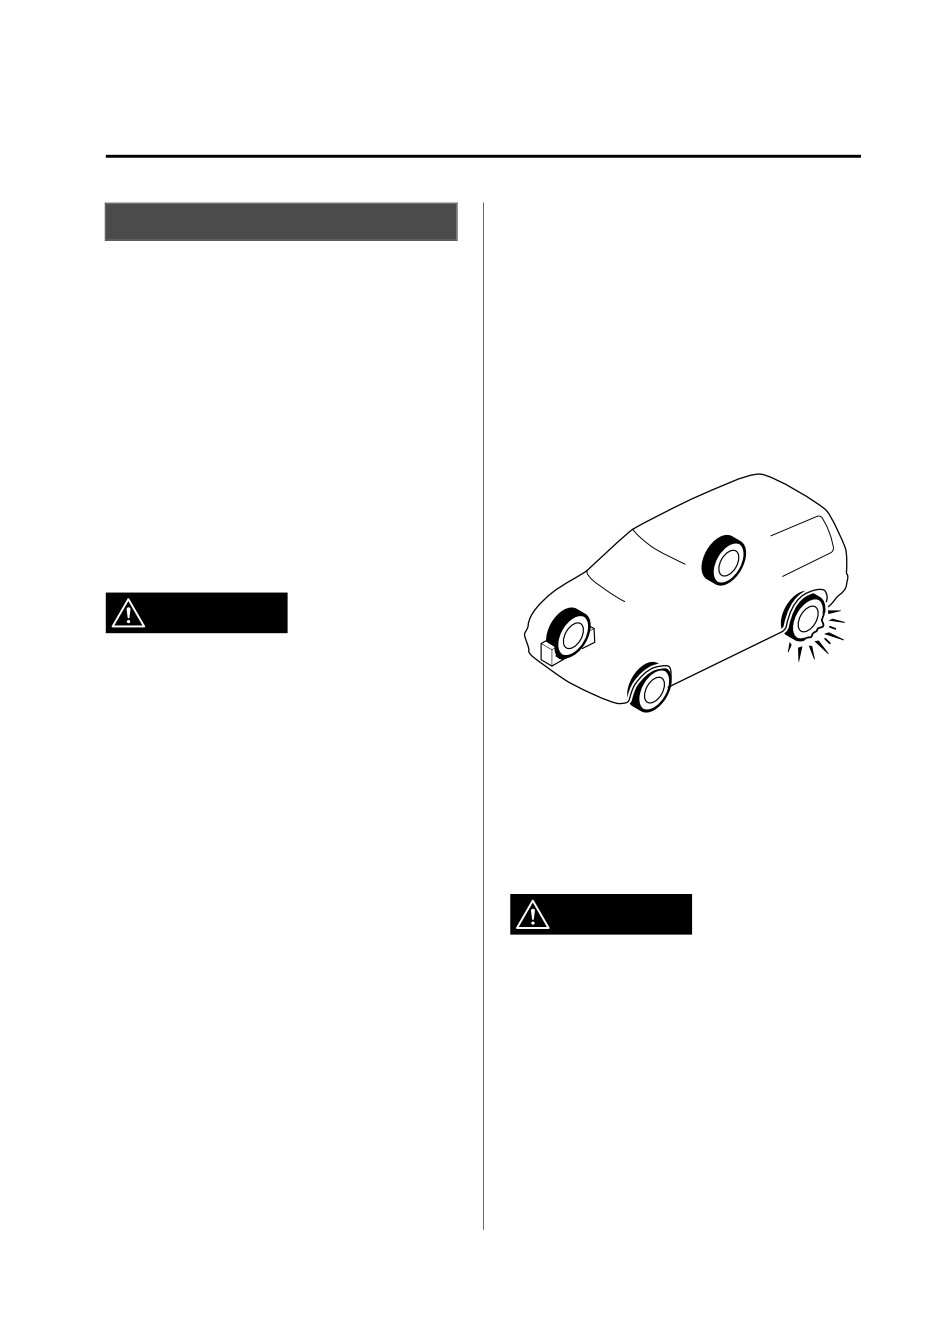
If the following occurs while driving, it
and away from the vehicle and traffic.
could indicate a flat tire.
5.
Remove any luggage, the jack, tools,
Steering becomes difficult.
and spare tire (page 7-3).
The vehicle begins to vibrate
6.
Block the wheel diagonally opposite
excessively.
the flat tire. When blocking a wheel,
The vehicle pulls in one direction.
place a tire block both in front and
behind the tire.
If you have a flat tire, drive slowly to a
level spot that is well off the road and out
of the way of traffic to change the tire.
Stopping in traffic or on the shoulder of a
busy road is dangerous.
WARNING
Be sure to follow the directions for
changing a tire:
Changing a tire is dangerous if not done
properly. The vehicle can slip off the jack
NOTE
and seriously injure someone.
When blocking a tire, use rocks or
No person should place any portion of their
wood blocks of sufficient size if
body under a vehicle that is supported by a
possible to hold the tire in place.
jack.
▼
Removing a Flat Tire
Never allow anyone inside a vehicle
supported by a jack:
WARNING
Allowing someone to remain in a vehicle
supported by a jack is dangerous. The
When jacking-up a vehicle, always shift the
occupant could cause the vehicle to fall
selector lever to P, apply the parking brake,
resulting in serious injury.
and place wheel blocks in the position
diagonally opposed to the jack:
NOTE
Changing a flat tire without using wheel
Make sure the jack is well lubricated
blocks is dangerous because the vehicle
before using it.
may move and fall off the jack even with
1. Park on a hard, level surface off the
the select lever is in P, which could result in
right-of-way and firmly set the parking
an accident.
brake.
7-9
If Trouble Arises
Flat Tire
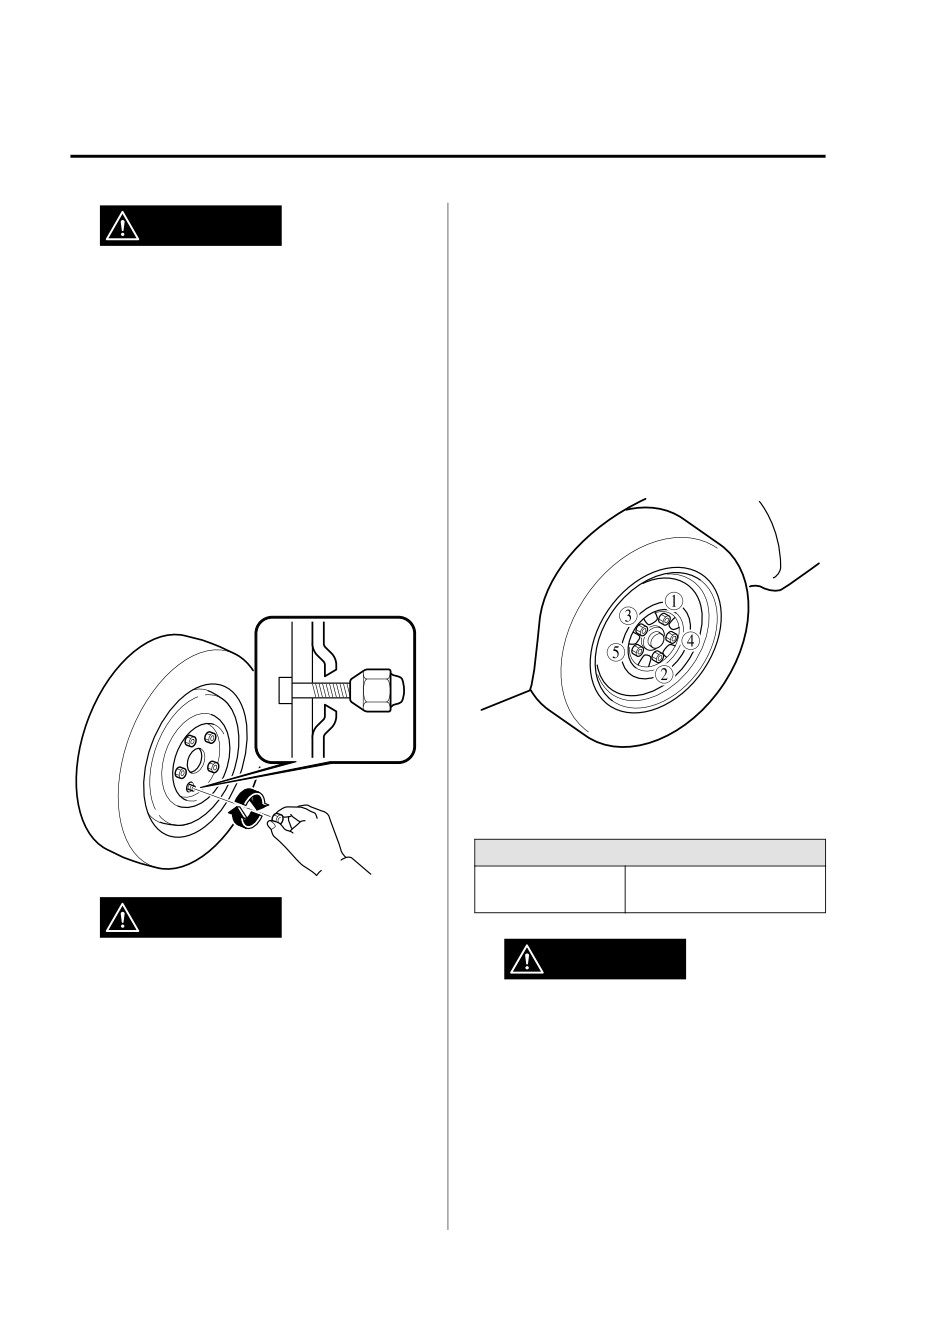
1. Loosen the lug nuts by turning them
the designated jack-up position guide
counterclockwise one turn each, but do
projection closest to the vehicle front.
not remove any lug nuts until the tire
has been raised off the ground.
Jacking
position
Guide
Jacking head
2. Place the jack on the ground.
projection
3. Turn the jack screw in the direction
shown in the figure and adjust the jack
head so that it is close to the jack-up
NOTE
position.
Always set the jack into the designated
jack-up position shown in the figure
correctly.
Jack head
(Jacking-up the vehicle rear)
Set the groove on the top of the jack
head at a right angle between the
4. Set the jack to the designated jack-up
position closest to the tire being
removed.
(Jacking-up the vehicle front)
Set the groove on the top of the jack
head at a right angle into the center of
7-10
If Trouble Arises
Flat Tire
designated jack-up position guide
Attempting to jack the vehicle in
projections.
positions other than those
recommended in this manual is
dangerous. The vehicle could slip off
the jack and seriously injure or even kill
someone. Use only the front and rear
jacking positions recommended in this
manual.
Jacking
Do not jack up the vehicle in a position
position
other than the designated jack-up
position or place any objects on or
under the jack:
Jacking up the vehicle in a position
other than the designated jack-up
Jacking head
position or placing objects on or under
the jack is dangerous as it could deform
the vehicle body or the vehicle could fall
off the jack resulting in an accident.
5.
Continue raising the jack head
gradually by rotating the screw with
Use only the jack provided with your
your hand until the jack head is
Mazda:
inserted into the jack-up position.
Using a jack that is not designed for
your Mazda is dangerous. The vehicle
Tire blocks
could slip off the jack and seriously
injure someone.
Never place objects under the jack:
Jacking the vehicle with an object
under the jack is dangerous. The jack
could slip and someone could be
Jacking position
seriously injured by the jack or the
falling vehicle.
NOTE
When raising the jack head into the
jacking position and aligning the
WARNING
groove in the jack head with the rail
under the vehicle body, the top of the
jack head contacts the vehicle's
Use only the front and rear jacking
underbody without the rail contacting
positions recommended in this manual:
the bottom of the groove.
7-11
If Trouble Arises
Flat Tire
6.
Insert the jack lever and attach the lug
Starting the engine or shaking the
wrench to tire jack.
vehicle while it is jacked up is
dangerous as it could cause the vehicle
to fall off the jack resulting in an
accident.
Never go under the vehicle while it is
jacked up:
Going under the vehicle while it is
jacked up is dangerous as it could result
in death or serious injury if the vehicle
were to fall off the jack.
8. Remove the lug nuts by turning them
7.
Turn the jack handle clockwise and
counterclockwise; then remove the
raise the vehicle high enough so that
wheel and center cap.
the spare tire can be installed. Before
removing the lug nuts, make sure your
▼ Locking Lug Nuts
Mazda is firmly in position and that it
If your vehicle has Mazda optional
cannot slip or move.
antitheft wheel lug nuts, each wheel will
have one locking lug nut that locks the
wheel and tire, and you must use a special
key to unlock the locking lug nut. This key
is stored in the glove compartment.
Register the key and lug nuts with the lock
manufacturer by filling out the card
provided in the glove compartment and
mailing it in the accompanying envelope.
If you lose this key, consult an Authorized
Mazda Dealer or use the lock
manufacturer's order form, which is with
WARNING
the registration card.
Accessory wheel locks cannot be used on
Do not jack up the vehicle higher than
steel wheels. This includes situations when
is necessary:
the spare tire is installed. When installing
Jacking up the vehicle higher than is
necessary is dangerous as it could
destabilize the vehicle resulting in an
accident.
Do not start the engine or shake the
vehicle while it is jacked up:
7-12
If Trouble Arises
Flat Tire
a spare tire, original lug nut must be used
▼ Mounting the Spare Tire
in place of the wheel lock.
Antitheft lug nut
Special key
NOTE
The number and shape of the flat tire belt
differ depending on the vehicle
specification.
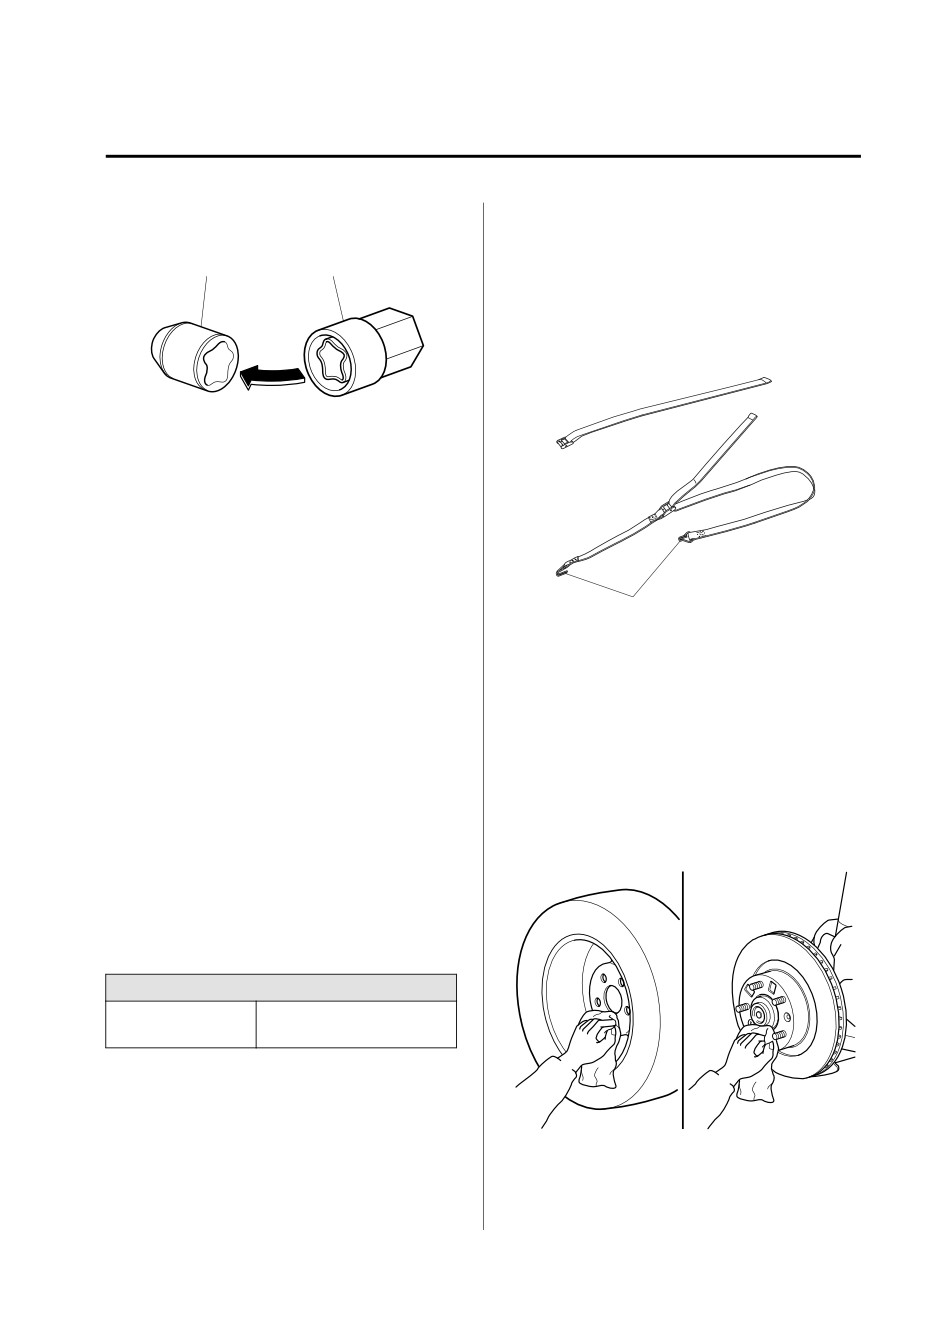
To remove an antitheft lug nut
1. Obtain the special key for the antitheft
lug nut.
2. Place the special key on top of the
antitheft lug nut, and be sure to hold
the key square to it. If you hold the key
at an angle, you may damage both key
and nut. Do not use a power impact
Belt clips
wrench.
The flat tire belts with the clips are for
3. Place the lug wrench on top of the key
securing a flat tire.
and apply pressure. Turn the wrench
The flat tire belts without the clips are
counterclockwise.
for securing the sub-woofer.
To install the antitheft lug nut
1. Remove dirt and grime from the
1. Place the special key on top of the nut,
mounting surfaces of the wheel and
and be sure to hold the key square to it.
hub, including the hub bolts, with a
If you hold the key at an angle, you
cloth.
may damage both key and nut. Do not
use a power impact wrench.
2. Place the lug wrench on top of the
special key, apply pressure, and turn it
clockwise.
Nut tightening torque
108―147 (12―14,
N·m (kgf·m, ft·lbf)
80―108)
7-13
If Trouble Arises
Flat Tire
Applying oil or grease to lug nuts and
WARNING
bolts is dangerous. The lug nuts could
loosen while driving and cause the tire
Make sure the mounting surfaces of the
to come off, resulting in an accident. In
wheel, hub and lug nuts are clean
addition, lug nuts and bolts could be
before changing or replacing tires:
damaged if tightened more than
When changing or replacing a tire, not
necessary.
removing dirt and grime from the
4. Turn the lug wrench counterclockwise
mounting surfaces of the wheel, hub
and lower the vehicle.
and hub bolts is dangerous. The lug
5. Use the lug wrench to tighten the nuts
nuts could loosen while driving and
in the order shown.
cause the tire to come off, resulting in
an accident.
2. Mount the spare tire.
3. Install the lug nuts with the beveled
edge inward; tighten them by hand.
If you are unsure of how tight the nuts
should be, have them inspected at an
Authorized Mazda Dealer.
Nut tightening torque
108―147 (12―14,
N·m (kgf·m, ft·lbf)
80―108)
WARNING
WARNING
Do not apply oil or grease to lug nuts
and bolts and do not tighten the lug
Always securely and correctly tighten
nuts beyond the recommended
the lug nuts:
tightening torque:
Improperly or loosely tightened lug
nuts are dangerous. The wheel could
wobble or come off. This could result in
loss of vehicle control and cause a
serious accident.
7-14
If Trouble Arises
Flat Tire
Be sure to reinstall the same nuts you
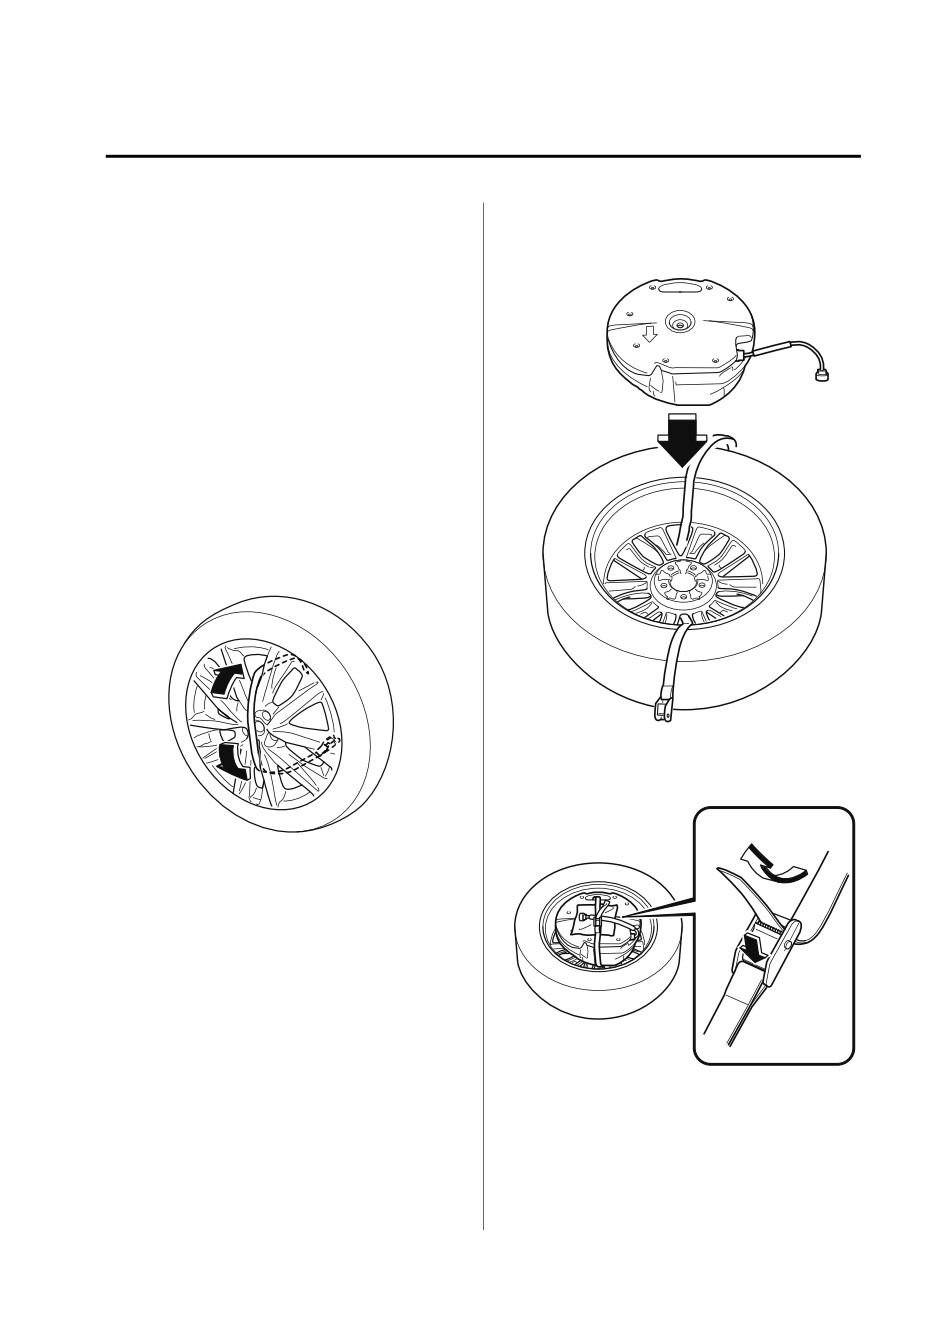
2. Install the sub-woofer to the flat
removed or replace them with metric
tire.
nuts of the same configuration:
Because the wheel studs and lug nuts
on your Mazda have metric threads,
using a non-metric nut is dangerous.
On a metric stud, it would not secure
the wheel and would damage the stud,
which could cause the wheel to slip off
and cause an accident.
6.
(Vehicles with sub-woofer)
Secure the sub-woofer to the flat tire
using the flat tire belt.
1. Pass the flat tire belt through the
wheel of the flat tire.
3. Pass the flat tire belt through the
buckle.
7-15
If Trouble Arises
Flat Tire
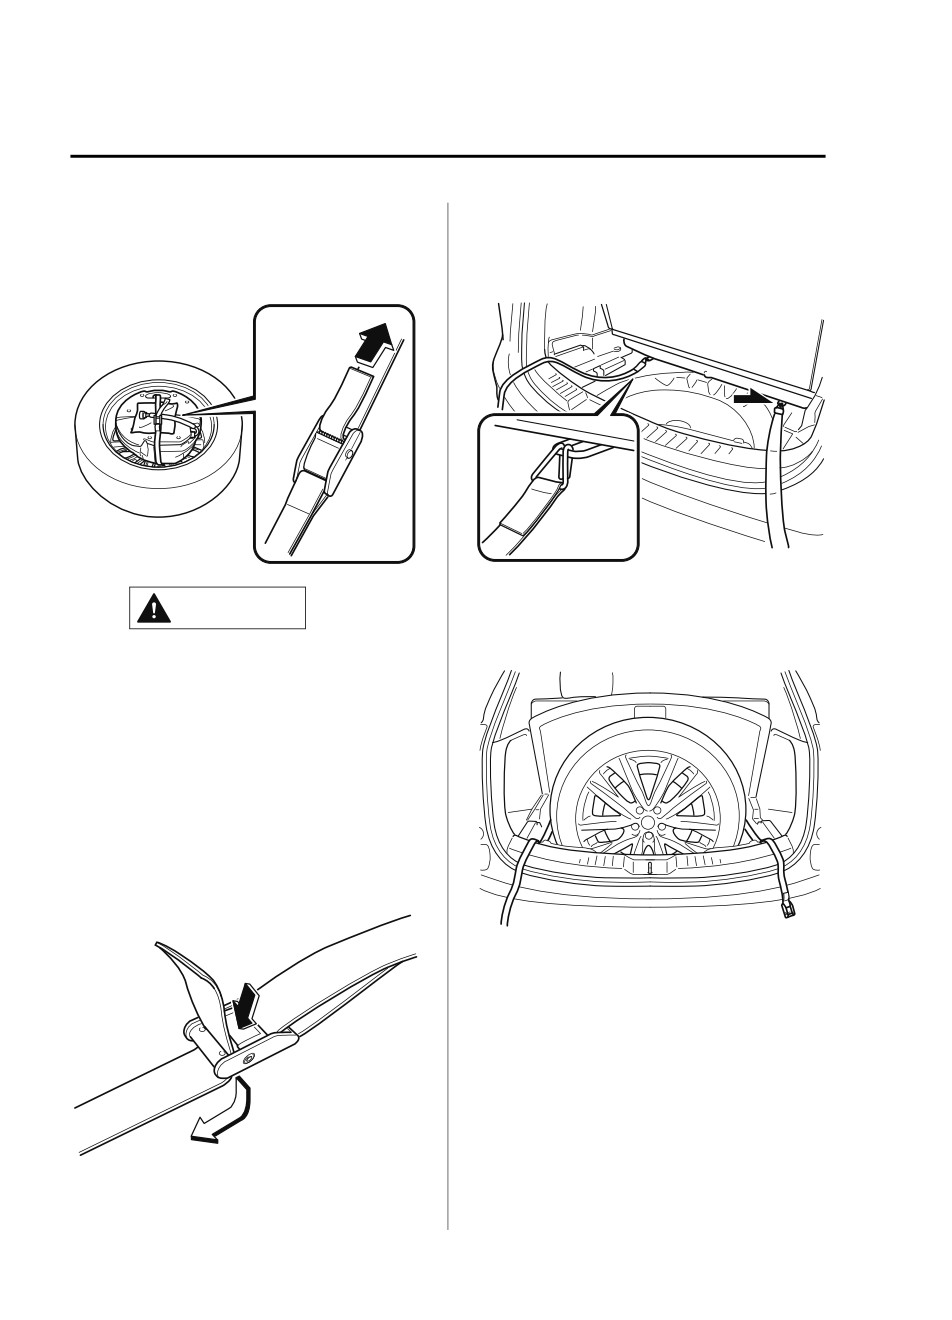
4. Pull the end of the flat tire belt and
2. Hook the clips of the flat tire belts
secure the sub-woofer and the
to the hooks under the third-row
wiring harness to the flat tire.
seat.
3. Place the flat tire in the luggage
CAUTION
compartment so that it leans
against the luggage board.
When pulling the flat tire belt, wrap
the buckle with a cloth. If the buckle
directly contacts the sub-woofer,
the sub-woofer may be damaged.
7.
(Vehicles except for Mexico)
Secure the flat tire in the luggage
compartment using the flat tire belt.
1. Pull the flat tire belts out of the
buckle to separate them into two
belts.
7-16
If Trouble Arises
Flat Tire
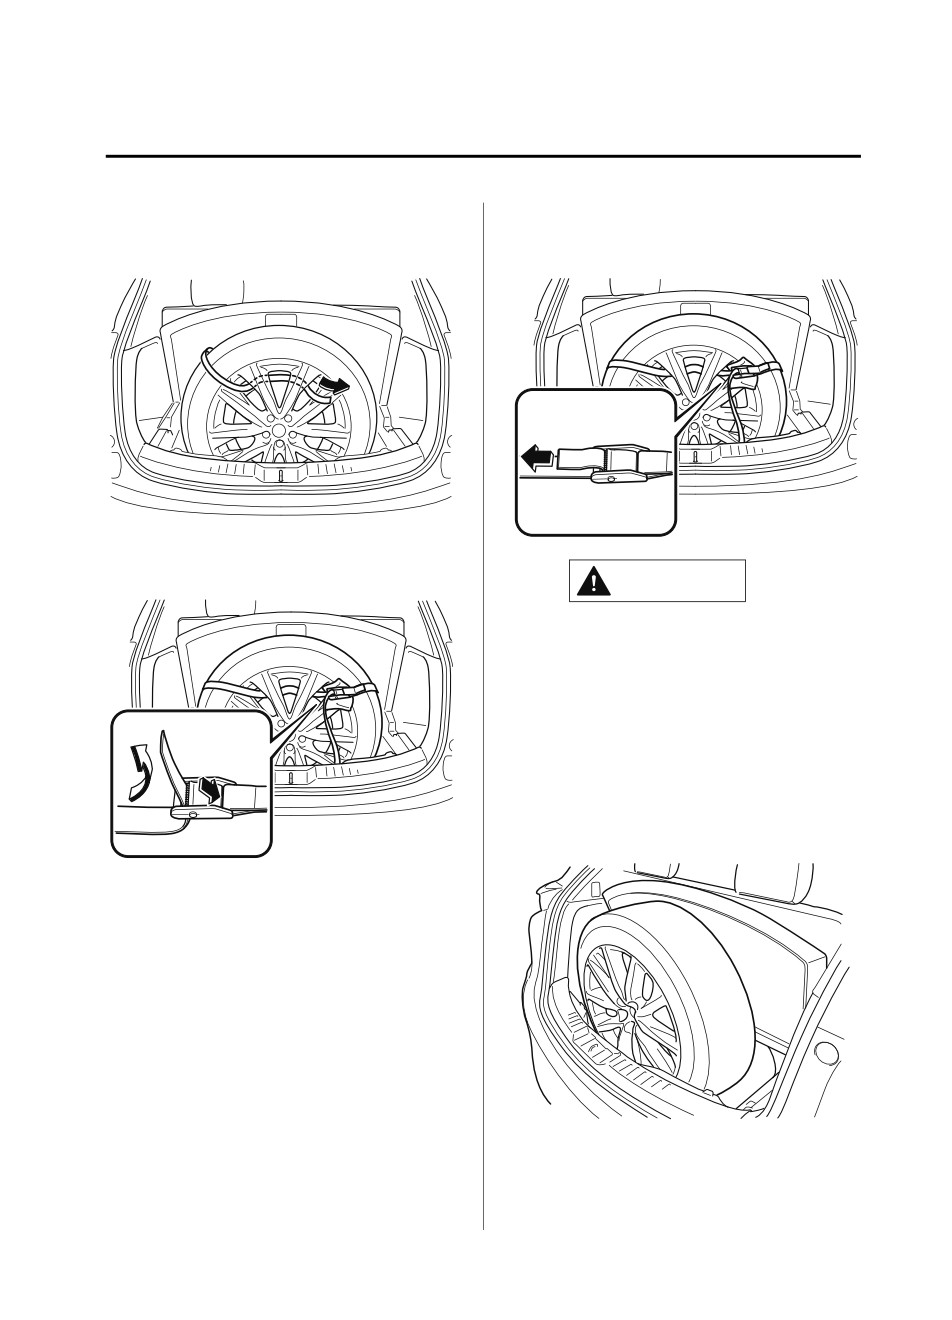
4. Pass the flat tire belts through the
the flat tire belts and secure the flat
wheel of the flat tire.
tire.
5. Pass the flat tire belts through the
buckle.
CAUTION
When pulling the flat tire belts,
wrap the buckle with a cloth. If the
buckle directly contacts the
aluminum wheel, the wheel may be
damaged.
8.
(Vehicles for Mexico)
Place the flat tire in the luggage
compartment so that it leans against
the luggage board.
6. While pressing the flat tire against
the third-row seat, pull the ends of
7-17
If Trouble Arises
Flat Tire
CAUTION
Tuck a cloth between the flat tire and
the vehicle trim. If the flat tire directly
contacts the vehicle trim, the trim may
be damaged.
9. Slowly close the liftgate while making
sure that the liftgate trim does not
contact the flat tire.
NOTE
If the liftgate trim contacts the flat tire,
adjust the position of the flat tire.
10. Make sure that the liftgate closes
securely.
11. Check the tire inflation pressure.
Refer to the specification charts on
page 9-7.
12. Have the flat tire repaired or replaced
as soon as possible.
WARNING
Do not drive with any tires that have
incorrect air pressure:
Driving on tires with incorrect air pressure
is dangerous. Tires with incorrect pressure
could affect handling and result in an
accident. When you check the regular tires'
air pressure, check the spare tire, too.
NOTE
To prevent the jack and tool from rattling,
store them properly.
7-18
If Trouble Arises
Battery Runs Out
Jump-Starting
Jump-starting is dangerous if done incorrectly. So follow the procedure carefully. If you feel
unsure about jump-starting, we strongly recommend that you have a competent service
technician do the work.
WARNING
Follow These Precautions Carefully:
To ensure safe and correct handling of the battery, read the following precautions carefully
before using the battery or inspecting it.
Keep flames and sparks away from open battery cells and do not allow metal tools to
contact the positive (
) or negative (
) terminal of the battery when working near a battery.
Do not allow the positive (
) terminal to contact the vehicle body:
Flames and sparks near open battery cells are dangerous. Hydrogen gas, produced during
normal battery operation, could ignite and cause the battery to explode. An exploding battery
can cause serious burns and injuries. Keep all flames including cigarettes and sparks away
from open battery cells.
Keep all flames and sparks away from open battery cells because hydrogen gas is
produced from open battery cells while charging the battery or adding battery fluid:
Flames and sparks near open battery cells are dangerous. Hydrogen gas, produced during
normal battery operation, could ignite and cause the battery to explode. An exploding battery
can cause serious burns and injuries. Keep all flames including cigarettes and sparks away
from open battery cells.
Do not jump-start a frozen battery or one with a low fluid level:
Jump-starting a frozen battery or one with a low fluid level is dangerous. It may rupture or
explode, causing serious injury.
Connect the negative cable to a good ground point away from the battery:
Connecting the end of the second jumper cable to the negative (
) terminal of the discharged
battery is dangerous.
A spark could cause the gas around the battery to explode and injure someone.
7-19
If Trouble Arises
Battery Runs Out
Route the jumper cables away from parts that will be moving:
Connecting a jumper cable near or to moving parts (cooling fans, belts) is dangerous. The
cable could get caught when the engine starts and cause serious injury.
CAUTION
Use only a 12 V booster system. You can damage a 12 V starter, ignition system, and other
electrical parts beyond repair with a 24 V power supply (two 12 V batteries in series or a 24 V
motor generator set).
1. Move the booster vehicle so that its battery is as close as possible to your vehicle's
battery.
2. Make sure that the power such as for the headlights and air conditioner is turned off.
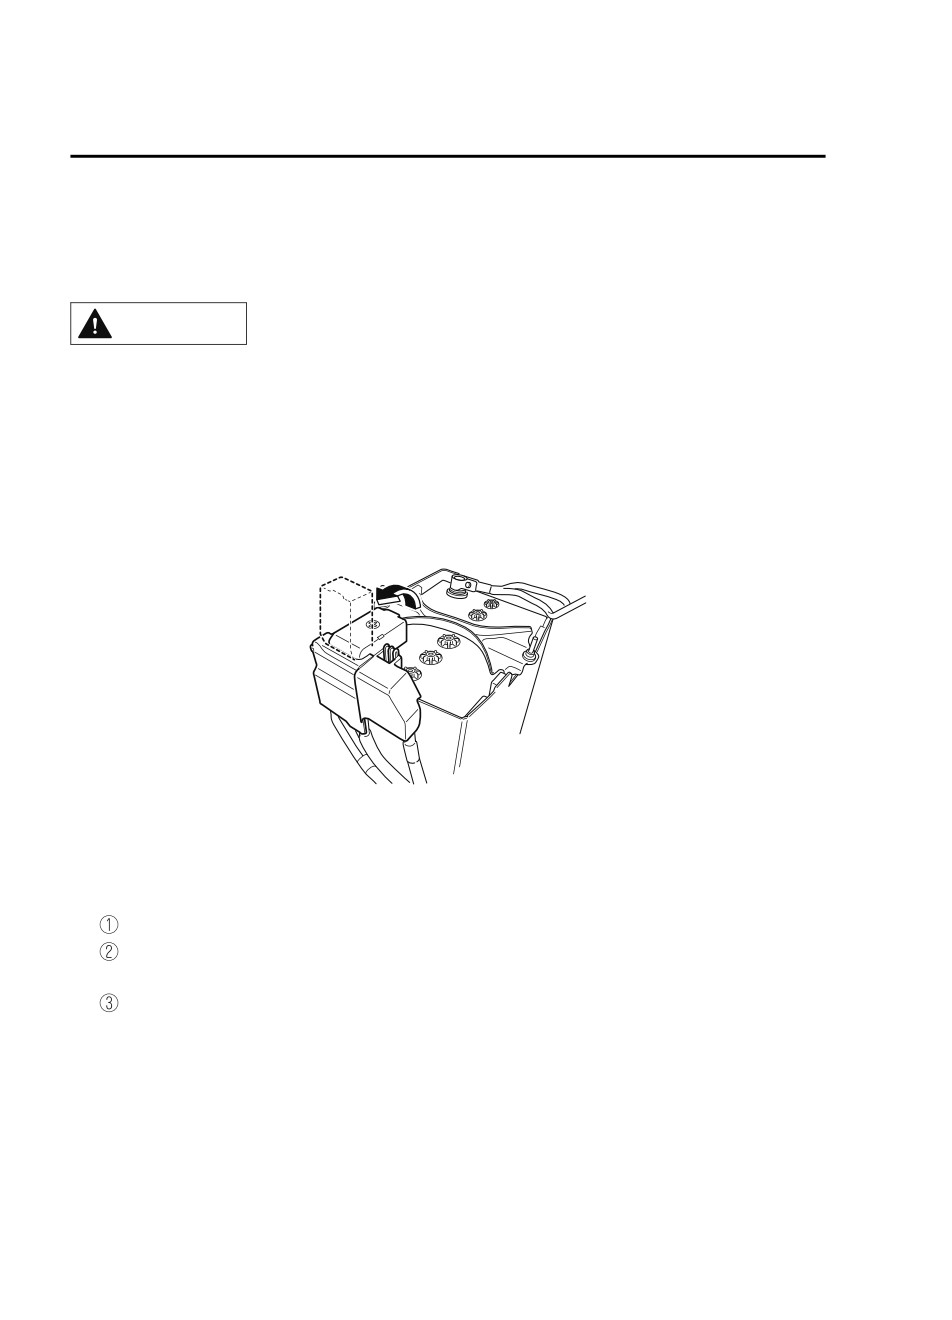
3. Remove the battery cover.
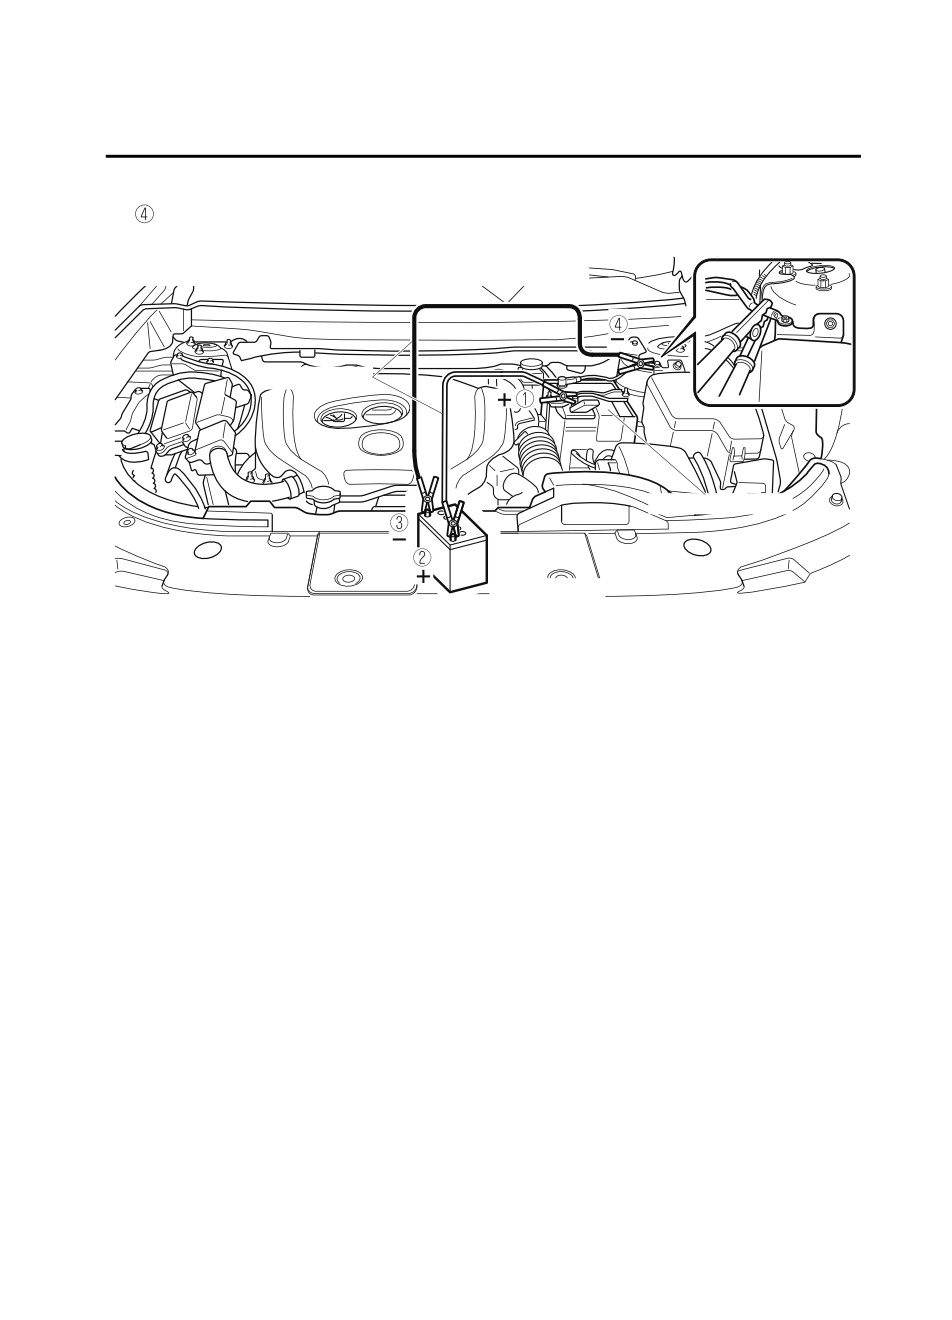
4. Turn off the booster vehicle's engine and connect the jumper cables in the following
order.
Make sure that the jumper cables are securely connected so that they do not disconnect
due to engine vibrations.
1st lead
Positive (+) terminal on the discharged battery
Positive (+) terminal on booster vehicle's battery
2nd lead
Negative (-) terminal on booster vehicle's battery
7-20
If Trouble Arises
Battery Runs Out
Location shown in the figure (do not connect to the negative (-) terminal of the
battery)
Connect cables in numerical order and disconnect in reverse order.
Jumper cables
Discharged battery
Booster battery
5. Start the booster vehicle's engine and rev the engine.
6. Start the engine of your vehicle. Run the engines for about 3 minutes to temporarily
charge the battery of your vehicle.
7. Disconnect the jumper cables in the reverse order of their connection.
8. Install the battery cover.
9. Have your vehicle inspected by an Authorized Mazda Dealer as soon as possible.
7-21
If Trouble Arises
Emergency Starting
Starting a Flooded Engine
Push-Starting
If the engine fails to start, it may be
Do not push-start your Mazda.
flooded (excessive fuel in the engine).
WARNING
Follow this procedure:
Never tow a vehicle to start it:
1. If the engine does not start within 5
Towing a vehicle to start it is dangerous.
seconds on the first try, wait 10
The vehicle being towed could surge
seconds and try again.
forward when its engine starts, causing the
2. Make sure the parking brake is on.
2 vehicles to collide. The occupants could
3. Depress the accelerator all the way and
be injured.
hold it there.
4. Depress the brake pedal, then press the
NOTE
push button start. If the engine starts,
You cannot start a vehicle with an
release the accelerator immediately
automatic transaxle by pushing it.
because the engine will suddenly rev
up.
5. If the engine fails to start, crank it
without depressing the accelerator.
If the engine still does not start using the
previous procedure, have your vehicle
inspected by an Authorized Mazda Dealer.
7-22
If Trouble Arises
Overheating
If the temperature gauge indicates
Overheating
overheating or the high engine coolant
If the temperature gauge indicates
temperature warning light turns on:
overheating or the high engine coolant
temperature warning light turns on, the
1.
Drive safely to the side of the road and
vehicle loses power, or you hear a loud
park off the right-of-way.
knocking or pinging noise, the engine is
2.
Shift into park (P).
probably too hot.
3.
Apply the parking brake.
4.
Turn off the air conditioner.
WARNING
5.
Check whether coolant or steam is
escaping from the engine
compartment.
Pull over to a safe location, then switch
If steam is coming from the engine
the ignition off and make sure the fan is
compartment:
not running before attempting to work
Do not go near the front of the vehicle.
near the cooling fan:
Stop the engine.
Working near the cooling fan when it is
Wait until the steam dissipates, then
running is dangerous. The fan could
open the hood and start the engine.
continue running indefinitely even if the
engine has stopped and the engine
If neither coolant nor steam is
compartment temperature is high. You
escaping:
could be hit by the fan and seriously
Open the hood and idle the engine
injured.
until it cools.
CAUTION
Do not remove either cooling
If the cooling fan does not operate
system cap when the engine and radiator
while the engine is running, the engine
are hot:
temperature will increase. Stop the
When the engine and radiator are hot,
engine and call an Authorized Mazda
scalding coolant and steam may shoot out
Dealer.
under pressure and cause serious injury.
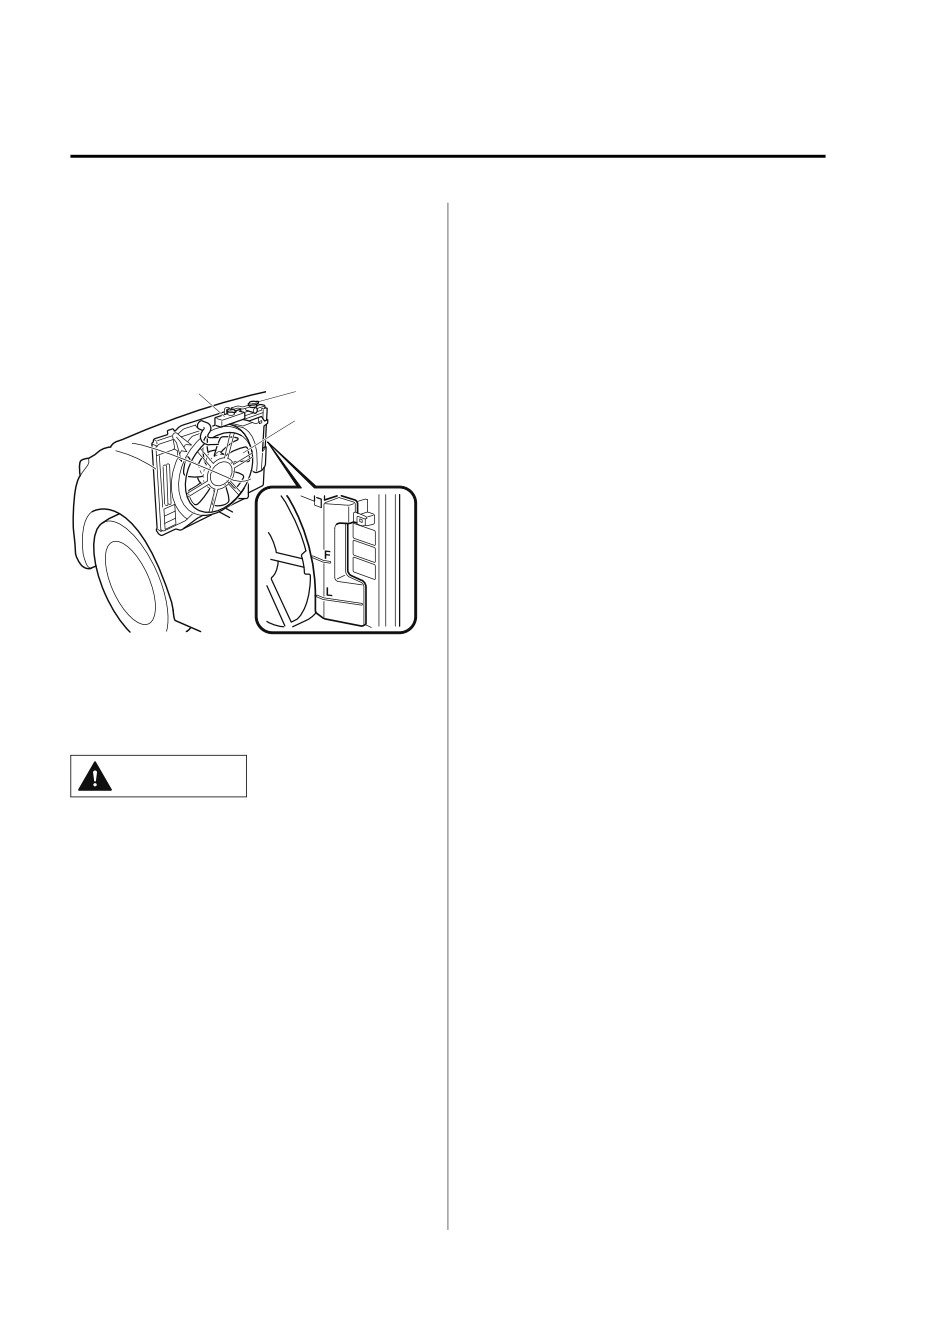
6.
Make sure the cooling fan is operating,
then turn off the engine after the
Open the hood ONLY after steam is no
temperature has decreased.
longer escaping from the engine:
7.
When cool, check the coolant level.
Steam from an overheated engine is
dangerous. The escaping steam could
seriously burn you.
7-23
If Trouble Arises
Overheating
If it is low, look for coolant leaks from
the radiator and hoses.
If you find a leak or other damage, or if
coolant is still leaking:
Stop the engine and call an Authorized
Mazda Dealer.
Cooling system cap
Coolant reservoir
Cooling fan
If you find no problems, the engine is
cool, and no leaks are obvious:
Carefully add coolant as required (page
6-22).
CAUTION
If the engine continues to overheat or
frequently overheats, have the cooling
system inspected. The engine could be
seriously damaged unless repairs are
made. Consult an Authorized Mazda
Dealer.
7-24
If Trouble Arises
Emergency Towing
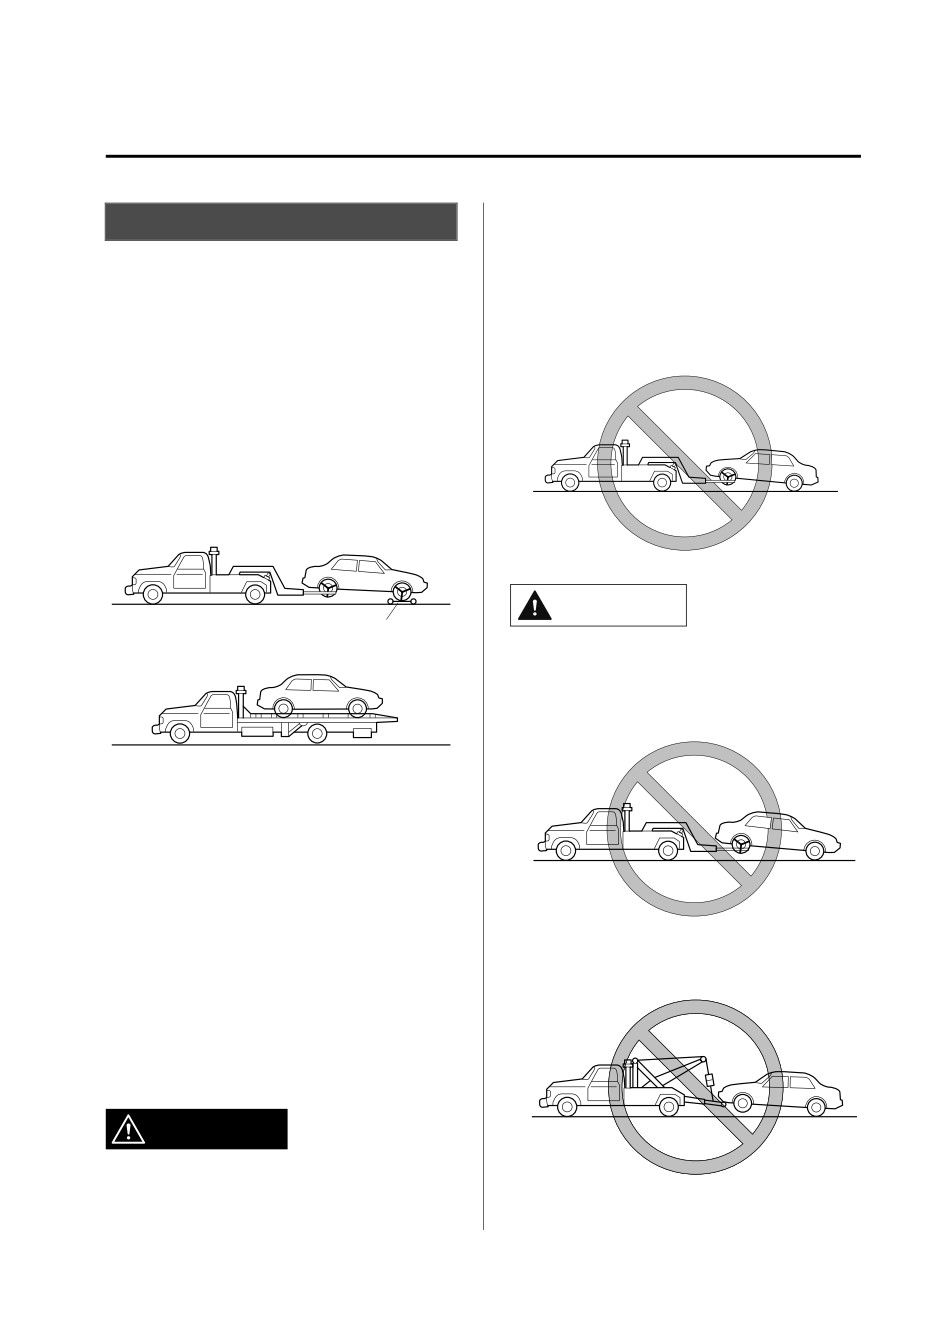
Towing an AWD vehicle with either the
Towing Description
front or rear wheels on the ground is
We recommend that towing be done only
dangerous as the drive train could be
by an Authorized Mazda Dealer or a
damaged, or the vehicle could trail away
commercial tow-truck service.
from the tow truck and cause an accident.
If the drive train has been damaged,
Proper lifting and towing are necessary to
transport the vehicle on a flatbed truck.
prevent damage to the vehicle. Particularly
when towing an AWD vehicle, where all
the wheels are connected to the drive train,
proper transporting of the vehicle is
absolutely essential to avoid damaging the
drive system. Government and local laws
must be followed.
CAUTION
Wheel dollies
¾ Do not tow the vehicle pointed backward
with driving wheels on the ground. This
may cause internal damage to the
transaxle.
A towed FWD vehicle should have its
drive wheels (front wheels) off the ground.
If excessive damage or other conditions
prevent this, use wheel dollies.
When towing a FWD vehicle with the rear
wheels on the ground, release the parking
¾ Do not tow with sling-type equipment.
brake.
This could damage your vehicle. Use
Refer to Electric Parking Brake (EPB) on
wheel-lift or flatbed equipment.
page 4-80.
A towed AWD vehicle must have all its
wheels off the ground.
WARNING
Always tow an AWD vehicle with all four
wheels off the ground:
7-25
If Trouble Arises
Emergency Towing
¾ If the parking brake cannot be released
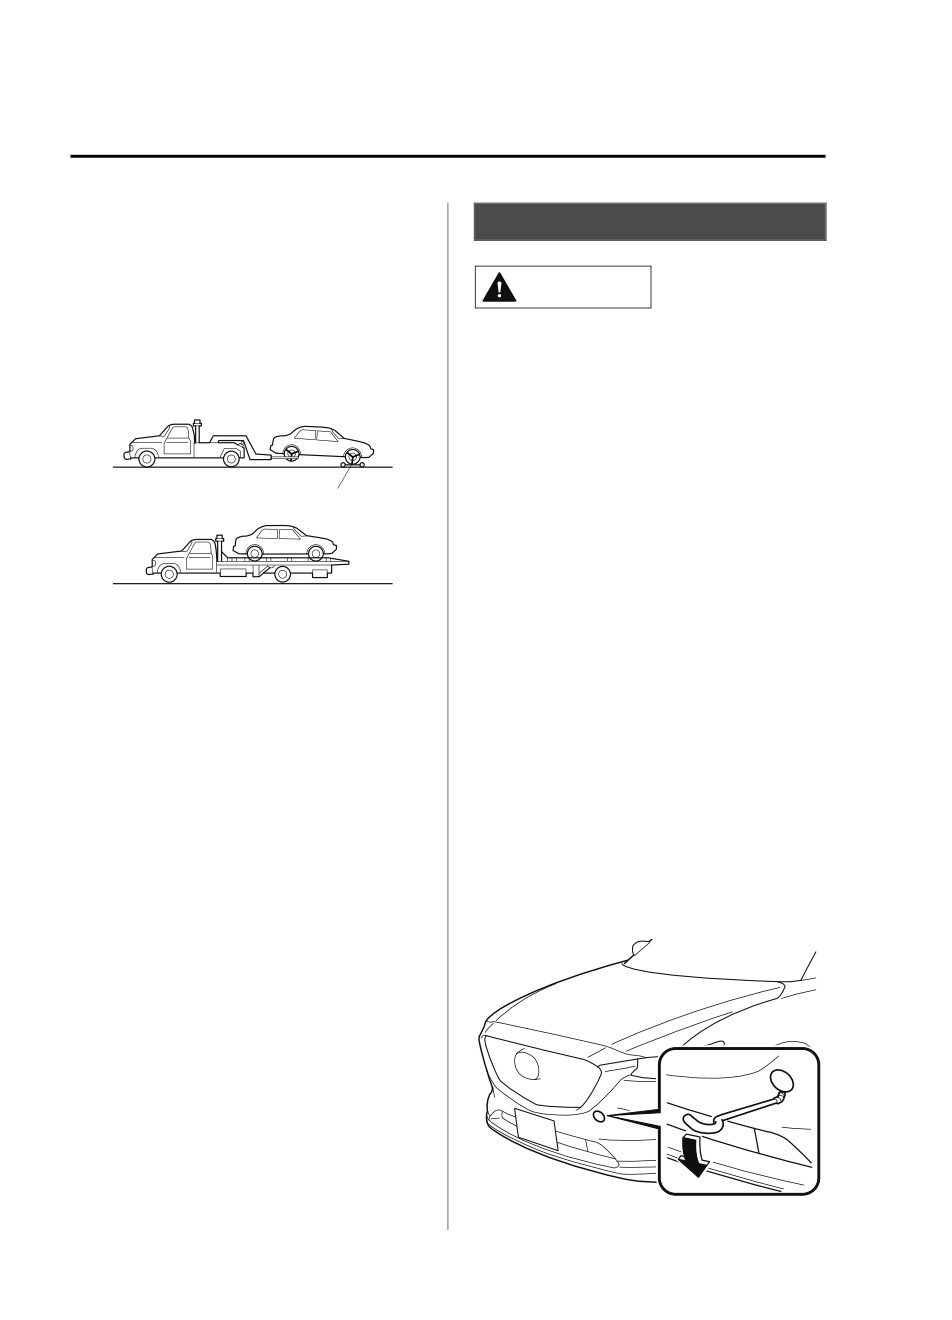
Towing Hooks (Mexico)
when towing the vehicle, transport the
vehicle with all front and rear wheels
raised off the ground as shown in the
CAUTION
figure. If the vehicle is towed without
raising the wheels off the ground, the
¾ The towing eyelet should be used in an
brake system could be damaged.
emergency (to get the vehicle out of a
ditch or a snow bank, for example).
¾ When using the towing eyelets, always
pull the cable or chain in a straight
direction with respect to the eyelet. Never
apply a sideways force.
Wheel dollies
NOTE
When towing with chain or cable, wrap
the chain or cable with a soft cloth near
the bumper to prevent damage to the
bumper.
▼ Towing Hooks
1. Remove the towing eyelet and the lug
wrench from the luggage compartment
(page 7-3).
2. Wrap a flathead screwdriver or similar
tool with a soft cloth to prevent
damage to a painted bumper, and open
the cap located on the front or rear
bumper.
Front
7-26
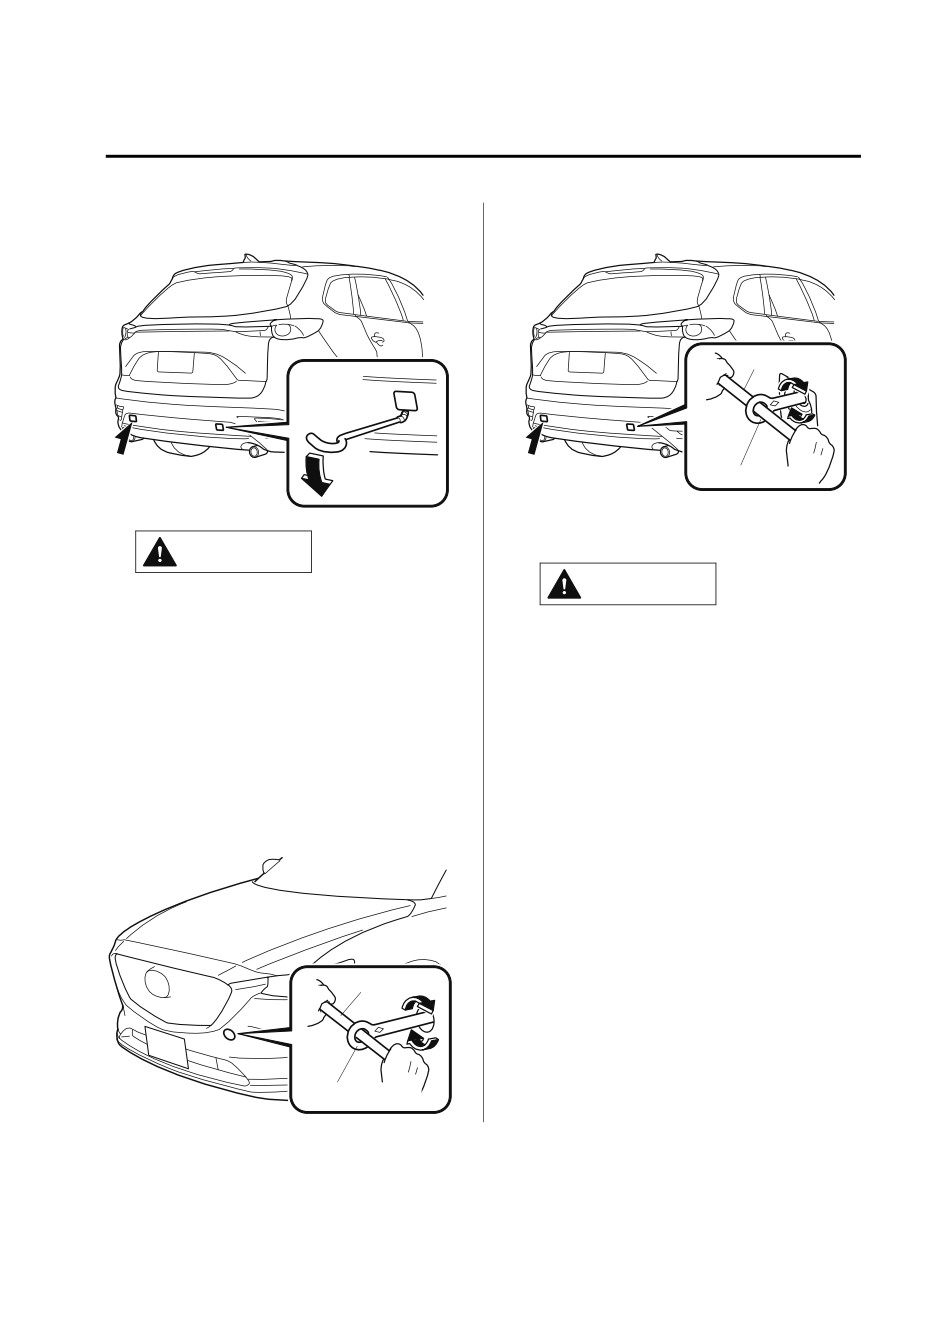
If Trouble Arises
Emergency Towing
Rear
Rear
Lug wrench
Towing eyelet
4.
Hook the towing rope to the towing
eyelet.
CAUTION
CAUTION
Do not use excessive force as it may
damage the cap or scratch the painted
¾ If the towing eyelet is not securely
bumper surface.
tightened, it may loosen or
disengage from the bumper when
NOTE
towing the vehicle. Make sure that
Remove the cap completely and store it
the towing eyelet is securely
so as not to lose it.
tightened to the bumper.
3.
Securely install the towing eyelet using
¾ Be careful not to damage the towing
the lug wrench.
eyelet and towing hook, vehicle body,
Front
or transaxle system when towing
under the following conditions:
¾ Do not tow a vehicle heavier than
yours.
¾ Do not suddenly accelerate your
vehicle as it will apply a severe
Lug wrench
shock to the towing eyelet and
towing hook or rope.
¾ Do not attach any rope other than
to the towing eyelet and towing
hook.
Towing eyelet
7-27
If Trouble Arises
Warning/Indicator Lights and Warning Sounds
If a Warning Light Turns On or Flashes
If any warning light turns on/flashes, take appropriate action for each light. There is no
problem if the light turns off, however if the light does not turn off or turns on/flashes again,
consult an Authorized Mazda Dealer.
The details for some warnings can be viewed on the center display or multi-information
display (Type A/Type B) in the instrument cluster.
Center display
Mazda Connect (Type A)
1. If the warning light is turned on, select the
icon on the home screen to display the
Applications screen.
2. Select “Vehicle Status Monitor”.
3. Select “Warning Guidance” to display the current warnings.
4. Select the applicable warning to view the warning details.
Mazda Connect (Type B)
1. Select “Information” on the home screen.
2. Select “Vehicle Status Monitor”.
3. Select the applicable warning to view the warning details.
NOTE
You can also display the currently occurring warning by sliding the commander knob to the
left while on the home screen of the center display.
Multi-information display (Type A/Type B)
1. Press the INFO switch on the steering switch to display the warning indication screen.
Refer to Multi-information Display (Type A) on page 4-13.
Refer to Multi-information Display (Type B) on page 4-30.
▼ Stop Vehicle in Safe Place Immediately
If any of the following warning lights turns on, the system may have a malfunction. Stop the
vehicle in a safe place immediately and contact an Authorized Mazda Dealer.
7-28
If Trouble Arises
Warning/Indicator Lights and Warning Sounds
Signal
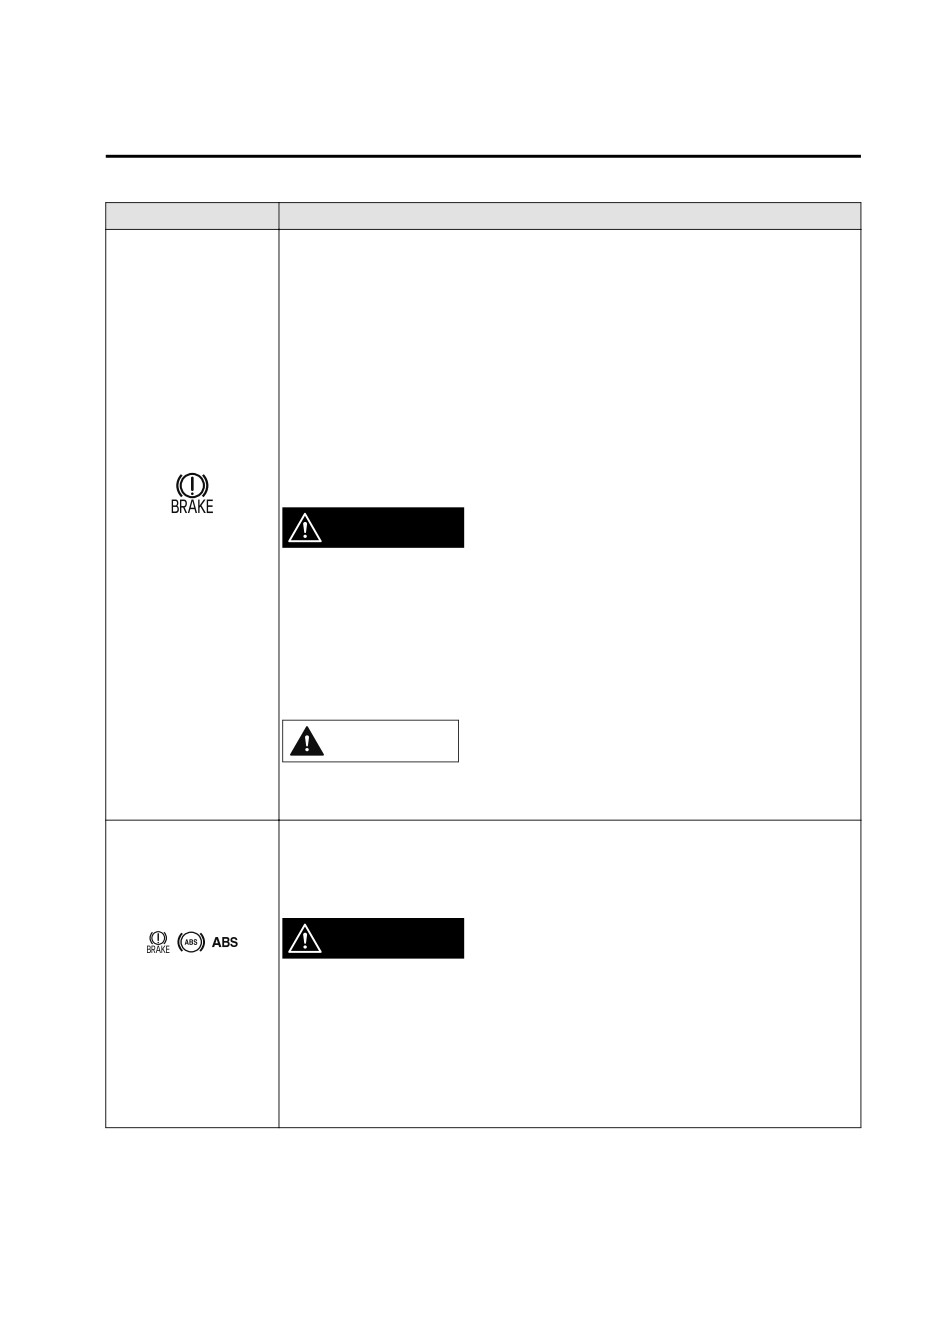
Warning
This warning has the following functions:
Parking brake warning/Warning light inspection
The light illuminates when the parking brake is applied with the ignition switched to
START or ON. It turns off when the parking brake is released.
When the light turns on
If the brake system warning light remains turned on even though the parking brake is
released, the brake fluid may be low or there could be a problem with the brake sys-
tem. Park the vehicle in a safe place immediately and contact an Authorized Mazda
Dealer.
When the light is flashing
The light flashes if the Electric Parking Brake (EPB) has a malfunction.
If the light remains flashing even if the Electric Parking Brake (EPB) switch is oper-
ated, consult an Authorized Mazda Dealer as soon as possible.
Brake System Warning
WARNING
Indication/Warning
Light
Do not drive with the brake system warning light illuminated. Contact an Authorized
Mazda Dealer to have the brakes inspected as soon as possible:
Driving with the brake system warning light illuminated is dangerous. It indicates that
your brakes may not work at all or that they could completely fail at any time. If this
light remains illuminated, after checking that the parking brake is fully released, have
the brakes inspected immediately.
CAUTION
In addition, the effectiveness of the braking may diminish so you may need to depress
the brake pedal more strongly than normal to stop the vehicle.
If the electronic brake force distribution control unit determines that some compo-
nents are operating incorrectly, the control unit may illuminate the brake system
warning light and the ABS warning light simultaneously. The problem is likely to be
the electronic brake force distribution system.
WARNING
Electronic Brake Force
Distribution System
Do not drive with both the ABS warning light and brake warning light illuminated.
Warning
Have the vehicle towed to an Authorized Mazda Dealer to have the brakes inspected as
soon as possible:
Driving when the brake system warning light and ABS warning light are illuminated
simultaneously is dangerous.
When both lights are illuminated, the rear wheels could lock more quickly in an emer-
gency stop than under normal circumstances.
7-29
If Trouble Arises
Warning/Indicator Lights and Warning Sounds
Signal
Warning
If the warning light illuminates while driving, it indicates a malfunction of the alter-
nator or of the charging system.
Drive to the side of the road and park off the right-of-way. Consult an Authorized
Mazda Dealer.
Charging System Warn-
ing Indication/Warning
CAUTION
Light
Do not continue driving when the charging system warning light is illuminated be-
cause the engine could stop unexpectedly.
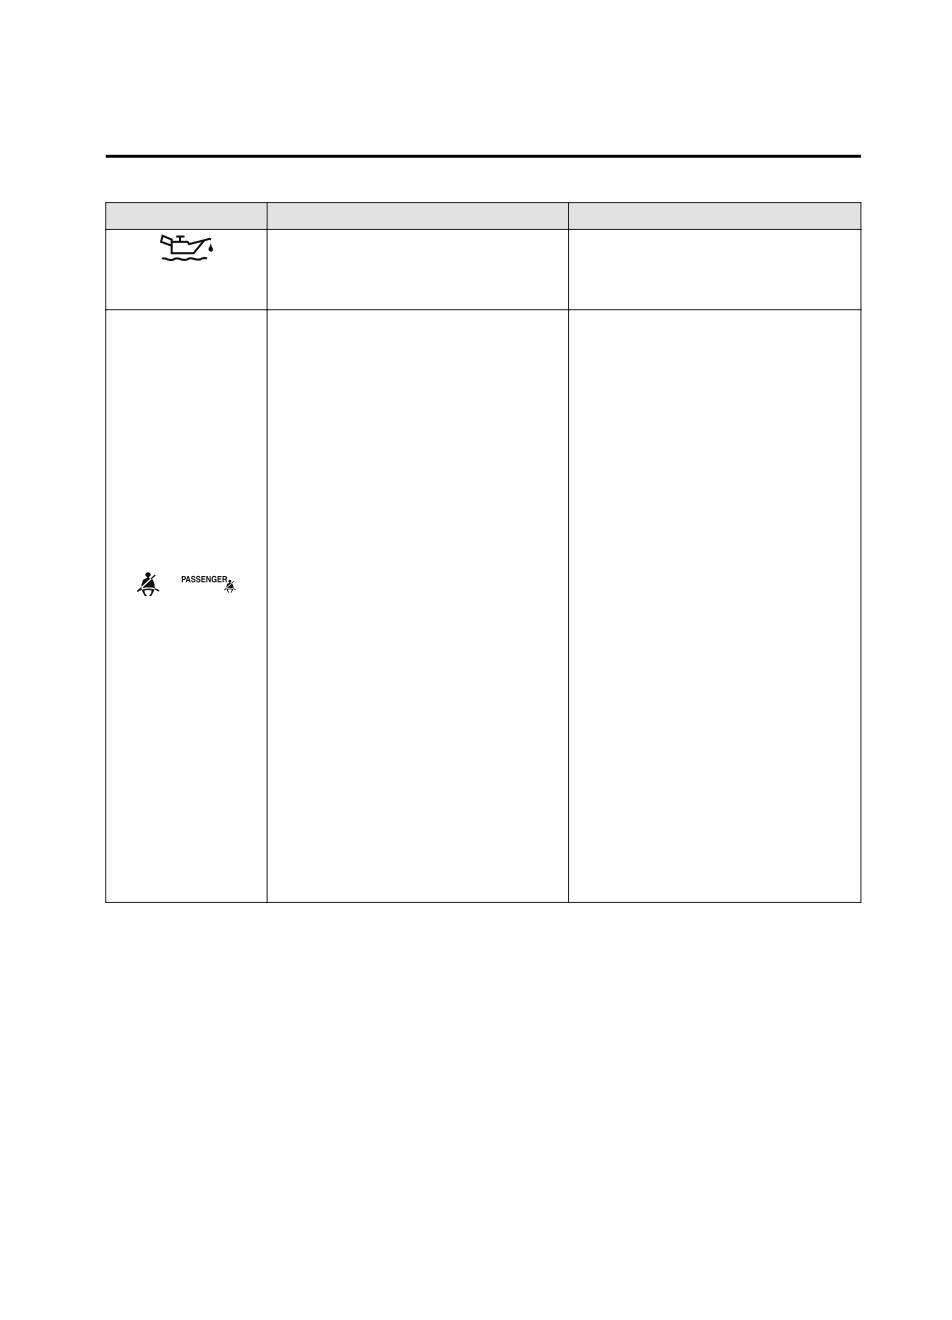
This warning light indicates low engine oil pressure.
CAUTION
Do not run the engine if the oil pressure is low. Otherwise, it could result in extensive
engine damage.
If the light illuminates or the warning indication is displayed while driving:
1. Drive to the side of the road and park off the right-of-way on level ground.
2. Turn off the engine and wait 5 minutes for the oil to drain back into the oil pan.
3. Inspect the engine oil level (page 6-21). If it's low, add the appropriate amount of
Engine Oil Warning
engine oil while being careful not to overfill.
Light
CAUTION
Do not run the engine if the oil level is low. Otherwise, it could result in extensive
engine damage.
4. Start the engine and check the warning light.
If the light remains illuminated even though the oil level is normal or after adding oil,
stop the engine immediately and have your vehicle towed to an Authorized Mazda
Dealer.
The light flashes when the engine coolant temperature is extremely high, and illumi-
nates when the engine coolant temperature increases further.
Handling Procedure
Flashing light
Drive slowly to reduce engine load until you can find a safe place to stop the vehicle
and wait for the engine to cool down.
Illuminated light
(Red)
This indicates the possibility of overheating. Park the vehicle in a safe place immedi-
High Engine Coolant
ately and stop the engine.
Temperature Warning
Refer to Overheating on page 7-23.
Indication/Warning
Light
CAUTION
Do not drive the vehicle with the high engine coolant temperature warning light illumi-
nated. Otherwise, it could result in damage to the engine.
7-30
If Trouble Arises
Warning/Indicator Lights and Warning Sounds
Signal
Warning
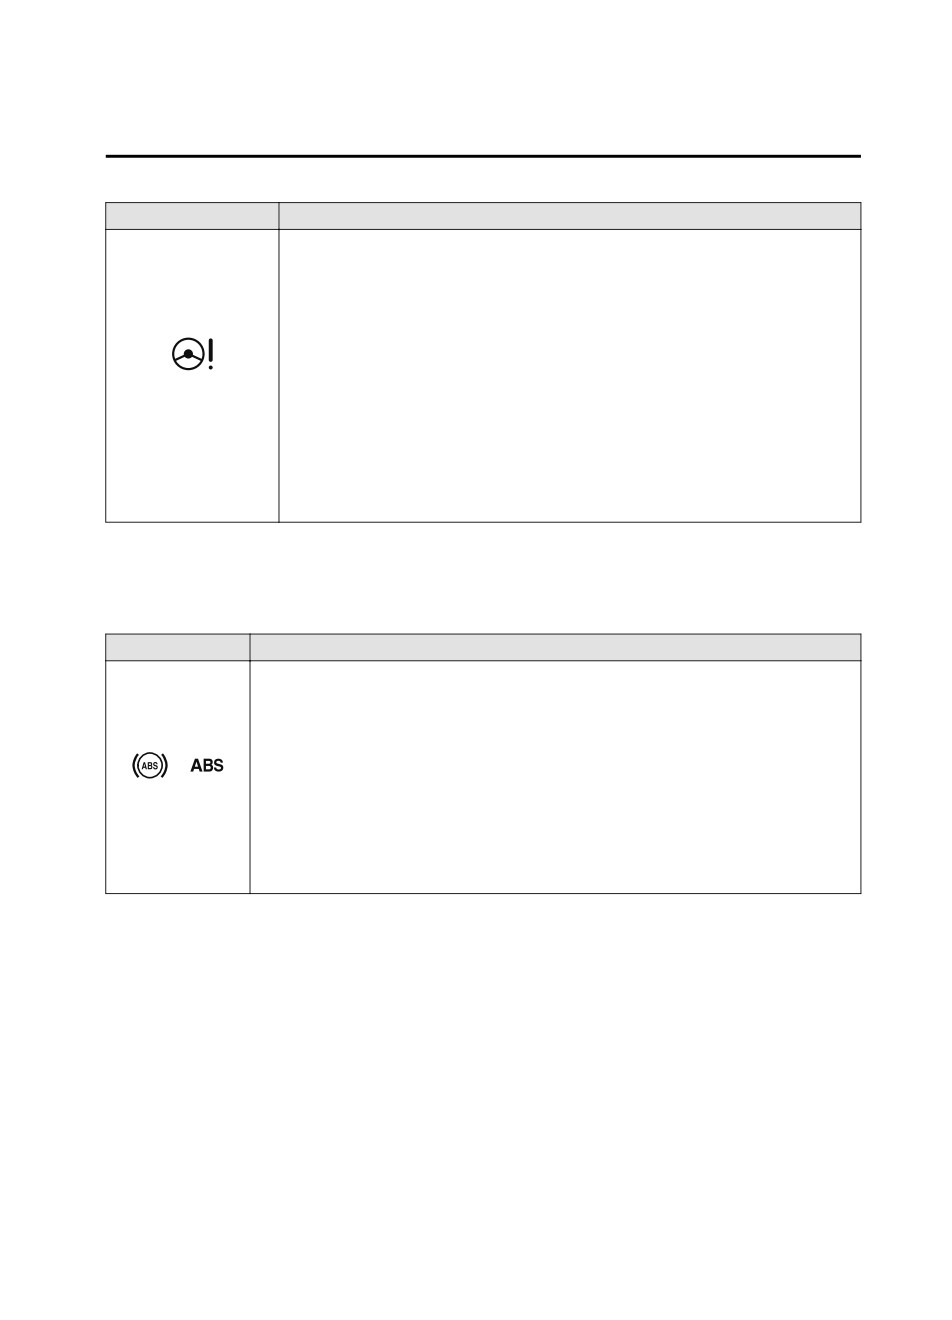
The message is displayed if the electric power steering has a malfunction.
If the message is displayed, stop the vehicle in a safe place and do not operate the
steering wheel. There is no problem if the message in the display turns off after a
while. Contact an Authorized Mazda Dealer if the message is displayed continuously.
NOTE
If the message is displayed, the power steering will not operate normally. In this
Power Steering Mal-
case, the steering wheel can still be operated, however, the operation may feel
function Indication
heavy compared to normal, or the steering wheel could vibrate when turning.
Repeatedly jerking the steering wheel left and right while the vehicle is stopped or
moving extremely slowly will cause the power steering system to go into protective
mode which will make the steering feel heavy, but this does not indicate a problem.
If this occurs, park the vehicle safely and wait several minutes for the system to
return to normal.
▼ Contact Authorized Mazda Dealer and Have Vehicle Inspected
If any of the following warning lights or the indicator light turns on/flashes, the system may
have a malfunction. Contact an Authorized Mazda Dealer to have your vehicle inspected.
Signal
Warning
If the ABS warning light stays on while you're driving, the ABS control unit has detected
a system malfunction. If this occurs, your brakes will function normally as if the vehicle
had no ABS.
Should this happen, consult an Authorized Mazda Dealer as soon as possible.
NOTE
ABS Warning Light
When the engine is jump-started to charge the battery, uneven rpm occurs and the ABS
warning light may illuminate. If this occurs, it is the result of the weak battery and does
not indicate an ABS malfunction.
Recharge the battery.
The brake assist system does not operate while the ABS warning light is illuminated.
7-31
If Trouble Arises
Warning/Indicator Lights and Warning Sounds
Signal
Warning
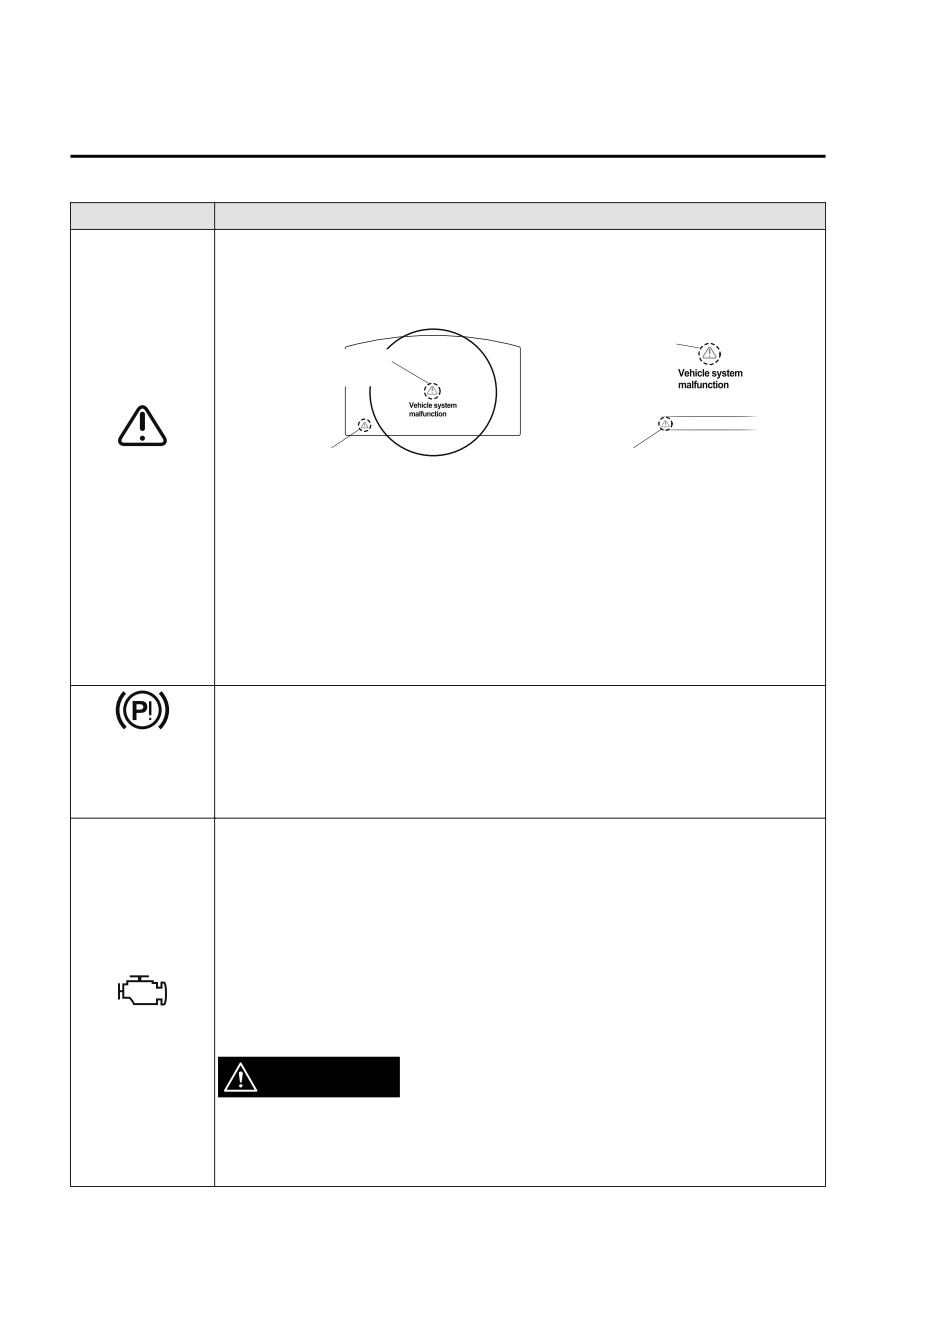
Displays when notification of the system malfunctions is required.
Check the message indicated in the display and consult an Authorized Mazda Dealer.
Multi-information Display
Type A
Type B
Master warning
Master warning
indication
indication
Master
Master
Master Warning In-
warning light
warning light
dication/Warning
Indication in display and master warning light in instrument cluster are illuminated at
Light
same time.
This indicates a malfunction with the vehicle system. Check the message indicated in the
display and consult an Authorized Mazda Dealer.
For details, refer to the explanations for the warning/indicator lights, in the warning/indi-
cator lights section, which match the symbol in the upper part of the display.
If a message is not indicated in the display, operate the INFO switch to display the “Warn-
ing” screen.
Refer to Message Indicated in Multi-information Display (Type A) on page 4-13.
Refer to Message Indicated in Multi-information Display (Type B) on page 4-30.
Electric Parking
The warning light illuminates when the system has a malfunction. Have your vehicle in-
Brake (EPB) Warn-
spected at an Authorized Mazda Dealer.
ing Indication/
Warning Light
If this light illuminates while driving, the vehicle may have a problem. It is important to
note the driving conditions when the light illuminated and consult an Authorized Mazda
Dealer.
The check engine light may illuminate in the following cases:
The engine's electrical system has a problem.
The emission control system has a problem.
The fuel tank level being very low or approaching empty.
The fuel-filler cap is missing or not tightened securely.
If the check engine light remains on, or it flashes continuously , do not drive at high
Check Engine Light
speeds and consult an Authorized Mazda Dealer as soon as possible.
WARNING
If the check engine light turns on, do not disconnect the battery cables.
If the battery cables are disconnected and then reconnected, the engine could be damaged
and catch on fire.
7-32
If Trouble Arises
Warning/Indicator Lights and Warning Sounds
Signal
Warning
The indication illuminates when the transaxle has a problem.
CAUTION
Automatic Trans-
axle Warning Indi-
If the automatic transaxle warning indication illuminates, the transaxle has an electrical
cation
problem. Continuing to drive your Mazda in this condition could cause damage to your
transaxle. Consult an Authorized Mazda Dealer as soon as possible.
“4WD system malfunction” is displayed
The indication is displayed under the following conditions. The system may have a mal-
function. Have the vehicle checked at an Authorized Mazda Dealer.
When there is a malfunction in the AWD system.
When there is a large difference between the tire size of the front and rear wheels.
“4WD system high-load” is displayed
AWD Warning Indi-
cation*
The indication is displayed under the following conditions. Park the vehicle in a safe place
and check that the warning indication light turns off, and then drive the vehicle. Contact
an Authorized Mazda Dealer if the indication is continuously displayed.
When the differential oil temperature is excessively high.
When there is a large difference between the front and rear wheel rotation, such as
when trying to remove the vehicle from mud.
If the light stays on, the TCS, DSC or the brake assist system may have a malfunction and
(Turns on)
they may not operate correctly. Take your vehicle to an Authorized Mazda Dealer.
TCS/DSC Indicator
Light
A system malfunction is indicated if the warning light constantly flashes, constantly illu-
minates or does not illuminate at all when the ignition is switched ON. If any of these oc-
cur, consult an Authorized Mazda Dealer as soon as possible. The system may not operate
in an accident.
Air Bag/Front Seat
WARNING
Belt Pretensioner
System Warning
Light
Never tamper with the air bag/pretensioner systems and always have an Authorized Mazda
Dealer perform all servicing and repairs:
Self-servicing or tampering with the systems is dangerous. An air bag/pretensioner could
accidentally activate or become disabled causing serious injury or death.
*Some models.
7-33
If Trouble Arises
Warning/Indicator Lights and Warning Sounds
Signal
Warning
If the tire pressure monitoring system has a malfunction, the tire pressure warning light
flashes. Have your vehicle checked by an Authorized Mazda Dealer as soon as possible.
WARNING
If the tire pressure monitoring system warning light illuminates or flashes, or the tire pres-
sure warning beep sound is heard, decrease vehicle speed immediately and avoid sudden
maneuvering and braking:
If the tire pressure monitoring system warning light illuminates or flashes, or the tire pres-
sure warning beep sound is heard, it is dangerous to drive the vehicle at high speeds, or
(Flashing)
perform sudden maneuvering or braking. Vehicle drivability could worsen and result in an
Tire Pressure Moni-
accident.
toring System
To determine if you have a slow leak or a flat, pull over to a safe position where you can
Warning Light
check the visual condition of the tire and determine if you have enough air to proceed to a
place where air may be added and the system monitored again by an Authorized Mazda
Dealer or a tire repair station.
Do not ignore the TPMS Warning Light:
Ignoring the TPMS warning light is dangerous, even if you know why it is illuminated. Have
the problem taken care of as soon as possible before it develops into a more serious situa-
tion that could lead to tire failure and a dangerous accident.
“Keyless System Malfunction” is displayed
This message is displayed if the advanced keyless entry & push button start system has a
problem.
Contact an Authorized Mazda Dealer.
CAUTION
If the message is indicated, or the push button start indicator light (amber) flashes, the en-
gine may not start. If the engine cannot be started, try starting it using the emergency oper-
ation for starting the engine, and have the vehicle inspected at an Authorized Mazda Deal-
er as soon as possible.
Refer to Emergency Operation for Starting the Engine on page 4-9.
(Amber)
KEY Warning Indi-
“Ignition is On” is displayed
cation
This message is displayed when the driver's door is opened without switching the ignition
off.
“Key Not Detected” is displayed
This message is displayed when any of the following operations is performed with the key
out of the operational range or placed in areas inside the cabin where it is difficult for the
key to be detected.
The push button start is pressed with the ignition switched off
The ignition is switched on
All doors are closed without switching the ignition off
7-34
If Trouble Arises
Warning/Indicator Lights and Warning Sounds
Signal
Warning
The light remains turned on if there is a problem with the system. Have your vehicle in-
spected at an Authorized Mazda Dealer.
(Amber)
NOTE
High Beam Control
If the Forward Sensing Camera (FSC) field of view is impaired during bad weather condiఆ
System (HBC)
tions (such as rain, fog, and snow) and when the windshield is dirty, the warning indicaఆ
Warning Indication/
tion/warning light for the High Beam Control System (HBC) may display/turn on. Howevఆ
Warning Light*
er, this does not indicate a problem.
The Warning indication turns on if there is any malfunction in the Blind Spot Monitoring
(BSM). Have your vehicle inspected by an Authorized Mazda Dealer.
Blind Spot Monitor-
NOTE
ing (BSM) Warning
If the vehicle is driven on a road with less traffic and few vehicles that the radar sensors
Indication*
can detect, the system may pause. However, it does not indicate a malfunction.
A problem in the system may be indicated under the following conditions.
Have your vehicle inspected at an Authorized Mazda Dealer.
The light does not turn on when the ignition is switched ON.
The light remains on even when the Blind Spot Monitoring (BSM) system can be oper-
ated.
Blind Spot Monitor-
It turns on while driving the vehicle.
ing (BSM) OFF In-
dicator Light*
NOTE
If the vehicle is driven on a road with less traffic and few vehicles that the radar sensors
can detect, the system may pause (The Blind Spot Monitoring (BSM) OFF indicator light
in the instrument cluster illuminates). However, it does not indicate a malfunction.
(Amber)
The message is displayed when the system has a malfunction. Have your vehicle inspect-
Driver Attention
ed at an Authorized Mazda Dealer.
Alert (DAA) Warn-
ing Indication*
(Amber)
Mazda Radar Cruise
The message is displayed when the system has a malfunction. Have your vehicle inspect-
Control with Stop &
ed at an Authorized Mazda Dealer.
Go function
(MRCC with Stop
& Go function)
Warning Indication*
*Some models.
7-35
If Trouble Arises
Warning/Indicator Lights and Warning Sounds
Signal
Warning
The message is displayed when the system has a malfunction. Have your vehicle inspect-
ed at an Authorized Mazda Dealer.
The system does not operate when the warning message is displayed.
Lane-keep Assist
CAUTION
System (LAS) &
Lane Departure
¾ Always use tires for all wheels that are of the specified size, and the same manufacture,
Warning System
brand, and tread pattern. In addition, do not use tires with significantly different wear
(LDWS) Warning
patterns on the same vehicle. If such improper tires are used, the system may not operate
Indication*
normally.
¾ When an emergency spare tire is used, the system may not operate normally.
This light illuminates if there is a malfunction in the LED headlight. Have your vehicle
LED Headlight
inspected by an Authorized Mazda Dealer.
Warning Light
▼ Taking Action
Take the appropriate action and verify that the warning light turns off.
Signal
Warning
Action to be taken
Verify the reason why the warning light is
illuminated on the center display.
If the reason why the warning light is illu-
minated is due to a dirty windshield, clean
(Amber)
The light turns on if the windshield or the
the windshield.
radar sensor are dirty, or there is a malfunc-
Smart Brake Support/
If the warning light is illuminated because
Smart City Brake Sup-
tion in the system.
of a dirty radar sensor, clean the front em-
port (SBS/SCBS)
blem.
Warning Indication*
For any other reasons, have the vehicle in-
spected at an Authorized Mazda Dealer.
The light turns on when the remaining fuel
is about 9.0 L (2.3 US gal, 1.9 Imp gal).
NOTE
Low Fuel Warning In-
Add fuel.
The light illumination timing may vary beఆ
dication/Warning
cause fuel inside the fuel tank moves
Light
around according to the driving conditions
and the vehicle posture.
If the check fuel cap warning light illumi-
Stop the engine and reinstall the fuel-filler
Check Fuel Cap Warn-
nates while driving, the fuel-filler cap may
cap.
not be installed properly.
Refer to Refueling on page 3-30.
ing Indication/Warning
Light
7-36
*Some models.
If Trouble Arises
Warning/Indicator Lights and Warning Sounds
Signal
Warning
Action to be taken
This warning light indicates that the engine
Add 1 L (0.3 US gal, 0.2 Imp gal) of en-
oil level is around the MIN mark (page
Engine Oil Level
gine oil (page 6-20).
6-21).
Warning Light
Except Mexico
The seat belt warning light turns on if the
driver or front passenger's seat is occupied
and the seat belt is not fastened with the ig-
nition switched ON.
If the driver or front passenger's seat belt is
unfastened (only when the front passenger's
seat is occupied) and if the vehicle is driven
at about 20 km/h (12 mph) or faster, or
about 10 km/h (6 mph) or faster for a con-
tinuous 30 seconds, with the seat belt unfas-
tened, the warning light flashes for a certain
period. After a short time, the warning light
stops flashing, but remains illuminated.
Fasten the seat belts.
Seat Belt Warning
NOTE
Light (Front seat)
The warning light flashes for about 6
seconds if the driver's seat belt is not fasఆ
tened when the ignition is switched ON.
To allow the front passenger occupant
classification sensor to function properly,
do not place and sit on an additional seat
cushion on the front passenger's seat.
The sensor may not function properly beఆ
cause the additional seat cushion could
cause sensor interference.
If a small child is seated on the front pasఆ
senger's seat, the warning light may not
operate.
7-37
Большое спасибо!
Ваше мнение очень важно для нас.
Нет комментариевНе стесняйтесь поделиться с нами вашим ценным мнением.
Текст