KIA Borrego (2017 year). Instruction — part 8

Features of your vehicle
Horn
CAUTION
CAUTION
Do not install any grip to oper-
Do not strike the horn severely
ate the steering wheel. This
to operate it, or hit it with your
causes damage to the heated
fist. Do not press on the horn
steering wheel system.
with a sharp-pointed object.
OHM046036L
To sound the horn, press the horn
symbol on your steering wheel.
Check the horn regularly to be sure it
operates properly.
✽ NOTICE
To sound the horn, press the area
indicated by the horn symbol on
your steering wheel
(see illustra-
tion). The horn will operate only
when this area is pressed.
4 41

Features of your vehicle
MIRRORS
Inside rearview mirror
Day/night rearview mirror
Electrochromic mirror (ECM)
(if equipped)
(if equipped)
Adjust the rearview mirror so that the
center view through the rear window
is seen. Make this adjustment before
you start driving.
WARNING - Rear visibility
Do not place objects in the rear
seat or cargo area which would
interfere with your vision
through the rear window.
Indicator
Sensor
OHM048037
OHM048038
WARNING
Make this adjustment before you
The electric rearview mirror automat-
Do not adjust the rearview mir-
start driving and while the day/night
ically controls the glare from the
ror while the vehicle is moving.
lever is in the day position (1).
headlights of the vehicles behind you
This could result in loss of con-
in nighttime or low light driving condi-
trol, and an accident which
Pull the day/night lever toward you
tions. The sensor mounted in the mir-
could cause death, serious
(2) to reduce the glare from the
ror senses the light level around the
injury or property damage.
headlights of the vehicles behind you
vehicle, and automatically controls
during night driving.
the headlight glare from the vehicles
Remember that you lose some
behind you.
WARNING
rearview clarity in the night position.
When the engine is running, the glare
Do not modify the inside mirror
is automatically controlled by the sen-
and don’t install a wide mirror. It
sor mounted in the rearview mirror.
could result in injury, during an
accident or deployment of the
air bag.
4 42

Features of your vehicle
Whenever the shift lever is shifted
To operate the electric rearview mirror:
Outside rearview mirror
into reverse (R), the mirror will auto-
•
The mirror defaults to the ON posi-
Be sure to adjust the mirror angles
matically go to the brightest setting in
tion whenever the ignition switch is
before driving.
order to improve the drivers view
turned on.
behind the vehicle.
Your vehicle is equipped with both
•
Press the ON/OFF button (1) to
left-hand and right-hand outside
turn the automatic dimming func-
rearview mirrors. The mirrors can be
CAUTION
tion off. The mirror indicator light
adjusted remotely with the remote
will turn off.
When cleaning the mirror, use a
switch. The mirror heads can be fold-
paper towel or similar material
Press the ON/OFF button (1) to
ed back to prevent damage during an
dampened with glass cleaner.
turn the automatic dimming func-
automatic car wash or when passing
Do not spray glass cleaner
tion on. The mirror indicator light
through a narrow street.
directly on the mirror. It may
will illuminate.
cause the liquid cleaner to enter
WARNING - Rearview
the mirror housing.
mirrors
• The outside rearview mirror is
convex. Objects seen in the
mirror are closer than they
appear.
• Use your interior rearview
mirror or direct observation to
determine the actual distance
of following vehicles when
changing lanes.
4 43

Features of your vehicle
Remote control
CAUTION
WARNING
Do not scrape ice off the mirror
Do not adjust or fold the outside
face; this may damage the sur-
rearview mirrors while the vehi-
face of the glass. If ice should
cle is moving.This could result in
restrict the movement of the
loss of control, and an accident
mirror, do not force the mirror
which could cause death, seri-
for adjustment. To remove ice,
ous injury or property damage.
use a deicer spray, or a sponge
or soft cloth with warm water.
CAUTION
OHM048040
If the mirror is jammed with ice,
The electric remote control mirror
do not adjust the mirror by force.
switch allows you to adjust the posi-
Use an approved spray de-icer
tion of the left and right outside
(not radiator antifreeze) to
rearview mirrors. To adjust the posi-
release the frozen mechanism or
tion of either mirror the ignition
move the vehicle to a warm
switch should be in the ACC position.
place and allow the ice to melt.
Push the switch (1) to R or L to select
the right side mirror or the left side
mirror, then press a corresponding
point on the mirror adjustment con-
trol to position the selected mirror up,
down, left or right.
After the adjustment, put the switch
into the neutral (center) position to
prevent inadvertent adjustment.
4 44

Features of your vehicle
Reverse parking aid function
Neutral : When the remote control
CAUTION
(if equipped)
out-side rearview mirror
•
The mirrors stop moving when
switch is placed in the mid-
dle position, the outside
they reach the maximum
rearview mirrors will not
adjusting angles, but the
operate while the vehicle is
motor continues to operate
moving backward.
while the switch is pressed.
Do not press the switch longer
than necessary, the motor
✽ NOTICE
may be damaged.
The outside rearview mirrors will
•
Do not attempt to adjust the
automatically revert to their original
outside rearview mirror by
positions under the following condi-
hand. Doing so may damage
tions:
the parts.
1. Ignition switch is in the LOCK
OHM048032N
position.
2. Shift lever is moved to any posi-
While the vehicle is moving back-
ward, the outside rearview mirror(s)
tion except R.
will move downward to aid reverse
3. Remote control outside rearview
parking. According to the position of
mirror switch is placed in the
the outside rearview mirror switch
middle position.
(1), the outside rearview mirror(s) will
operate as follows:
L/R : When the remote control out-
side rearview mirror switch is
selected to the L
(left) or R
(right) position, both outside
rearview mirrors will move
downward.
4 45

Features of your vehicle
Folding the outside rearview mirror
CAUTION
•
The electric type outside
rearview mirror operates even
though the ignition switch is
in
the LOCK position.
However, to prevent unneces-
sary battery discharge, do not
adjust the mirrors longer than
necessary while the engine is
not running.
OHM048041
•
In case it is an electric type
outside rearview mirror, don’t
Electric type
OHM048220N
fold it by hand. It could cause
To fold the outside rearview mirror,
Manual type
motor failure.
press the button.
To fold the outside rearview mirror,
To unfold it, press the button again.
grasp the housing of the mirror and
then fold it toward the rear of the
vehicle.
4 46

Features of your vehicle
INSTRUMENT CLUSTER
Gasoline Engine
■ Type A
1. Tachometer
2. Speedometer
3. Engine coolant temperature gauge
4. Fuel gauge
■ Type B
5. LCD display
6. Warning and indicator lights
❈ The actual cluster in the vehicle may
differ from the illustration.
For more details, refer to the
"Gauges" in this chapter.
OHM046561L/OHM046564L
4 47

Features of your vehicle
Diesel Engine
■ Type A
1. Tachometer
2. Speedometer
3. Engine coolant temperature gauge
4. Fuel gauge
■ Type B
5. LCD display
6. Warning and indicator lights
❈ The actual cluster in the vehicle may
differ from the illustration.
For more details, refer to the
"Gauges" in this chapter.
OHM046562L/OHM046563L
4 48

Features of your vehicle
Instrument Cluster Control
The brightness of the instrument
LCD Display Control
panel illumination is changed by
Adjusting Instrument Cluster
rotating the control knob when the
Illumination (if equipped)
ignition switch or Engine Start/Stop
button is ON, or the tail lights are
turned on.
OHM046345L
The LCD display modes can be
OHM048044N
changed by using the control buttons
on the steering wheel.
WARNING
Never adjust the instrument
(1)
: MODE button for change the
cluster while driving. This could
LCD MODES
result in loss of control and lead
(2)
/
: MOVE scroll switch for
to an accident that may cause
select the items
death, serious injury, or property
(3) OK : SET/RESET button for set
damage.
the items or reset the items
❈ For the LCD modes, refer to “LCD
Display” in this chapter.
4 49
Features of your vehicle
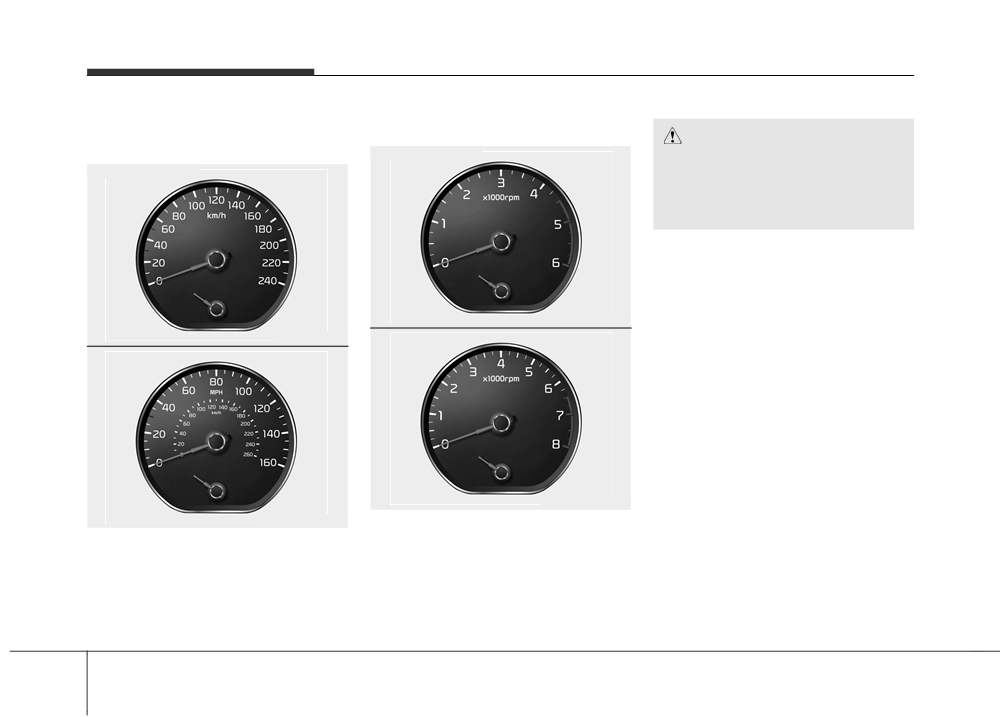
Gauges
Tachometer
CAUTION
Speedometer
■ Diesel
Do not operate the engine with-
■ Type A (km/h)
in the tachometer's RED ZONE.
This may cause severe engine
damage.
OHM046551
OHM046548
■ Gasoline
■ Type B (MPH, km/h)
OHM046550
OHM046549
The tachometer indicates the
The speedometer indicates the
approximate number of engine revo-
speed of the vehicle and is calibrated
lutions per minute (rpm).
in miles per hour (mph) and/or kilo-
Use the tachometer to select the cor-
meters per hour (km/h).
rect shift points and to prevent lug-
ging and/or over-revving the engine.
4 50

Features of your vehicle
Engine Coolant Temperature
Gauge
CAUTION
WARNING
If the gauge pointer moves
Never remove the radiator cap
■ Type A
beyond the normal range area
when the engine is hot. The
toward the “130 or H” position, it
engine coolant is under pressure
indicates overheating that may
and could severely burn. Wait
damage the engine.
until the engine is cool before
Do not continue driving with an
adding coolant to the reservoir.
overheated engine. If your vehi-
cle overheats, refer to “If the
Engine Overheats” in chapter 7.
OHM046552
■ Type B
OHM046553
This gauge indicates the tempera-
ture of the engine coolant when the
ignition switch or Engine Start/Stop
button is ON.
4 51

Features of your vehicle
Fuel Gauge
✽ NOTICE
CAUTION
• The fuel tank capacity is given in
■ Type A
Avoid driving with a extremely
chapter 9.
low fuel level. Running out of fuel
• The fuel gauge is supplemented by
could cause the engine to misfire
a low fuel warning light, which
damaging the catalytic converter.
will illuminate when the fuel tank
is nearly empty.
• On inclines or curves, the fuel
gauge pointer may fluctuate or the
low fuel warning light may come
on earlier than usual due to the
OHM046554
movement of fuel in the tank.
■ Type B
WARNING - Fuel Gauge
Running out of fuel can expose
vehicle occupants to danger.
You must stop and obtain addi-
tional fuel as soon as possible
after the warning light comes
on or when the gauge indicator
comes close to the “0 or E
OHM046555
(Empty)” level.
This gauge indicates the approxi-
mate amount of fuel remaining in the
fuel tank.
4 52
Features of your vehicle
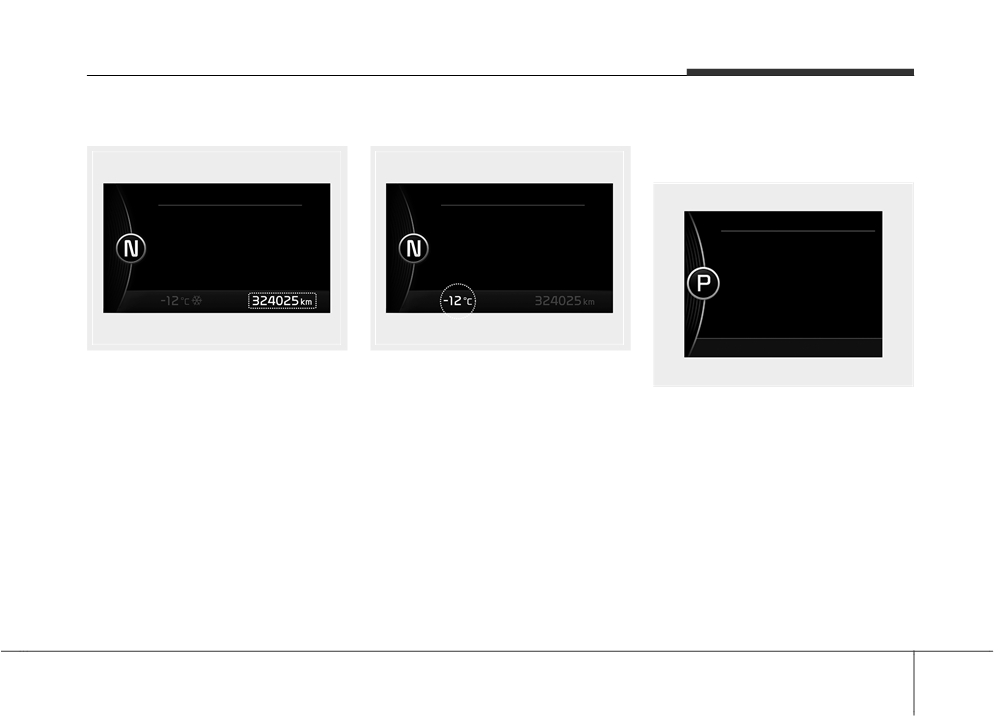
Odometer
Outside Temperature Gauge
Transaxle Shift Indicator
Automatic Transaxle Shift Indicator
(if equipped)
OHM046538
OHM046537
The odometer Indicates the total dis-
This gauge indicates the current out-
tance that the vehicle has been driv-
side air temperatures by 1°C (1°F).
OQL045110
en and should be used to determine
- Temperature range : -40°C ~ 85°C
This indicator displays which auto-
when periodic maintenance should
(-40°F ~ 185°F)
matic transaxle shift lever is selected.
be performed.
The outside temperature on the dis-
- Odometer range : 0 ~ 1,599,999
play may not change immediately
• Park : P
kilometers or 0 ~ 999,999 miles.
like a general thermometer to pre-
• Reverse : R
vent the driver from being inattentive.
• Neutral : N
The temperature unit can be
changed by using the "User Settings"
• Drive : D
mode of the LCD display.
• Sports Mode
❈ For more details, refer to "LCD
- 5 automatic transaxle shift :
Display" in this chapter.
1, 2, 3, 4, 5
- 8 automatic transaxle shift :
1, 2, 3, 4, 5, 6, 7, 8
4 53

Features of your vehicle
LCD DISPLAY (IF EQUIPPED)
LCD Modes
Modes
Symbol
Explanation
This mode displays driving information like the tripmeter, fuel economy, and so on.
Trip Computer
For more details, refer to “Trip Computer” in this chapter.
Turn By Turn
This mode displays the state of the navigation.
(if equipped)
LDWS
This mode displays the state of the Lane Departure Warning System (LDWS).
(if equipped)
For more details, refer to "Lane Departure Warning System (LDWS)" in chapter 6.
A/V
This mode displays the state of the A/V system.
(if equipped)
This mode informs of service interval (mileage or days) and pressure status of each tire.
This mode informs of warning messages related to washer fluid or malfunction of
Service
Blind Spot Detection system (BSD) and so on.
When the any door is not closed securely, this symbol illuminated.
User Settings
On this mode, you can change settings of the doors, lamps and so on.
❈ For controlling the LCD modes, refer to "LCD Display Control" in this chapter.
4 54

Features of your vehicle
Trip modes (Trip computer)
Trip modes
Fuel Economy
The trip computer is a microcomput-
■ Type A
FUEL ECONOMY
er-controlled driver information sys-
tem that displays information related
• Distance To Empty
to driving.
• Average Fuel Economy
• Instant Fuel Economy
✽ NOTICE
Some driving information stored in
OHM046503L
the trip computer
(for example
TRIP A
■ Type B
Average Vehicle Speed) resets if the
• Tripmeter [A]
battery is disconnected.
• Average Vehicle Speed [A]
• Elapsed Time [A]
TRIP B
OHM046502L
• Tripmeter [B]
• Average Vehicle Speed [B]
• Elapsed Time [B]
Digital speedometer
To change the trip mode, scroll the
MOVE scroll switch (
/
) in the
trip computer mode.
4 55

Features of your vehicle
Distance To Empty (1)
Average Fuel Economy (2)
Automatic reset
• The distance to empty is the esti-
• The average fuel economy is calcu-
To make the average fuel economy
mated distance the vehicle can be
lated by the total driving distance
be reset automatically whenever
driven with the remaining fuel.
and fuel consumption since the last
refueling, select the "Fuel economy
average fuel economy reset.
auto reset" mode in User Setting
- Distance range: 1~9,999 km or
1~9,999 mi.
- Fuel economy range: 0.0 ~ 99.9
menu of the LCD display (Refer to
"LCD Display").
L/100km or MPG
• If the estimated distance is below 1
km (1 mi.), the trip computer will dis-
• The average fuel economy can be
• OFF - You may set to default manu-
ally by using the trip switch reset but-
play "---" as distance to empty.
reset both manually and automati-
cally.
ton.
• When driving - The vehicle will auto-
✽ NOTICE
matically set to default once 4 hours
•
If the vehicle is not on level ground
Manual reset
pass after the Ignition is in OFF.
or the battery power has been
To clear the average fuel economy
• When refueling
- After refueling
interrupted, the distance to empty
manually, press the OK button
more than 6 liters and driving over
function may not operate correctly.
(reset) on the steering wheel for
1km/h, the vehicle will reset to
•
The distance to empty may differ
more than 1 second when the aver-
default automatically.
from the actual driving distance as
age fuel economy is displayed.
it is an estimate of the available
driving distance.
✽ NOTICE
•
The trip computer may not regis-
The average fuel economy is not dis-
ter additional fuel if less than 6
played for more accurate calculation
liters
(1.6 gallons) of fuel are
if the vehicle does not drive more than
added to the vehicle.
10 seconds or 50 meters (0.03 miles)
•
The fuel economy and distance to
since the ignition switch or Engine
empty may vary significantly based
Start/Stop button is turned to ON.
on driving conditions, driving
habits, and condition of the vehicle.
4 56

Features of your vehicle
Instant Fuel Economy (3)
Trip A/B
Tripmeter (1)
• This mode displays the instant fuel
• The tripmeter is the total driving
■ Type A
economy during the last few sec-
distance since the last tripmeter
onds when the vehicle speed is
reset.
more than 10 km/h (6.2 MPH).
- Distance range: 0.0 ~ 9999.9 km
- Fuel economy range: 0.0 ~ 30
or mi.
L/100km or 0.0 ~ 50.0 MPG
• To reset the tripmeter, press the
OK button (reset) on the steering
OHM046500L
wheel for more than
1 second
■ Type B
when the tripmeter is displayed.
OHM046501L
4 57
Большое спасибо!
Ваше мнение очень важно для нас.
Нет комментариевНе стесняйтесь поделиться с нами вашим ценным мнением.
Текст