Jeep Wagoneer (2022 year). Manual in english — page 9
STARTING AND OPERATING
141
NOTE:
The Quadra-Trac I system is not appropriate for
conditions where 4WD LOW range is recom
-
Q
UADRA
-T
RAC
II O
PERATING
I
NSTRUCTIONS
/P
RECAUTIONS
—
I
F
E
QUIPPED
The Quadra-Trac II transfer case is fully automatic
in the normal driving 4WD AUTO mode. The
Quadra-Trac II transfer case provides three
positions:
4WD AUTO
N (Neutral)
4WD LOW
When additional traction is required, the 4WD LOW
position can be used for increased torque at the
wheels. Driving in the 4WD LOW position on dry,
hard-surfaced roads may cause increased tire
wear and damage to driveline components.
When operating your vehicle in 4WD LOW, the
engine speed is approximately three times that of
the 4WD AUTO position at a given road speed. Take
care not to overspeed the engine and do not
exceed 25 mph (40 km/h).
Proper operation of four-wheel drive vehicles
depends on tires of equal size, type, and
circumference on each wheel. Any difference will
adversely affect shifting and cause damage to the
transfer case.
Because four-wheel drive provides improved
traction, there is a tendency to exceed safe turning
and stopping speeds. Do not go faster than road
conditions permit.
S
HIFT
P
OSITIONS
For additional information on the appropriate use
of each four-wheel drive system mode position,
see the information below:
4WD AUTO
This range is the default operating mode for daily
use.
N (NEUTRAL)
This range disengages the driveline from the
powertrain. It is used for towing your vehicle
4WD LOW
This range is for low speed four-wheel drive. It
provides an additional gear reduction which allows
for increased torque to be delivered to both the
front and rear wheels while providing maximum
pulling power for loose, slippery road surfaces. Do
not exceed 25 mph (40 km/h).
WARNING!
You or others could be injured or killed if you
leave the vehicle unattended with the transfer
case in the N (Neutral) position without first fully
engaging the parking brake. The transfer case N
(Neutral) position disengages both the front and
rear drive shafts from the powertrain and will
allow the vehicle to roll, even if the transmission
is in PARK. The parking brake should always be
applied when the driver is not in the vehicle.
4
142
STARTING AND OPERATING
S
HIFTING
P
ROCEDURES
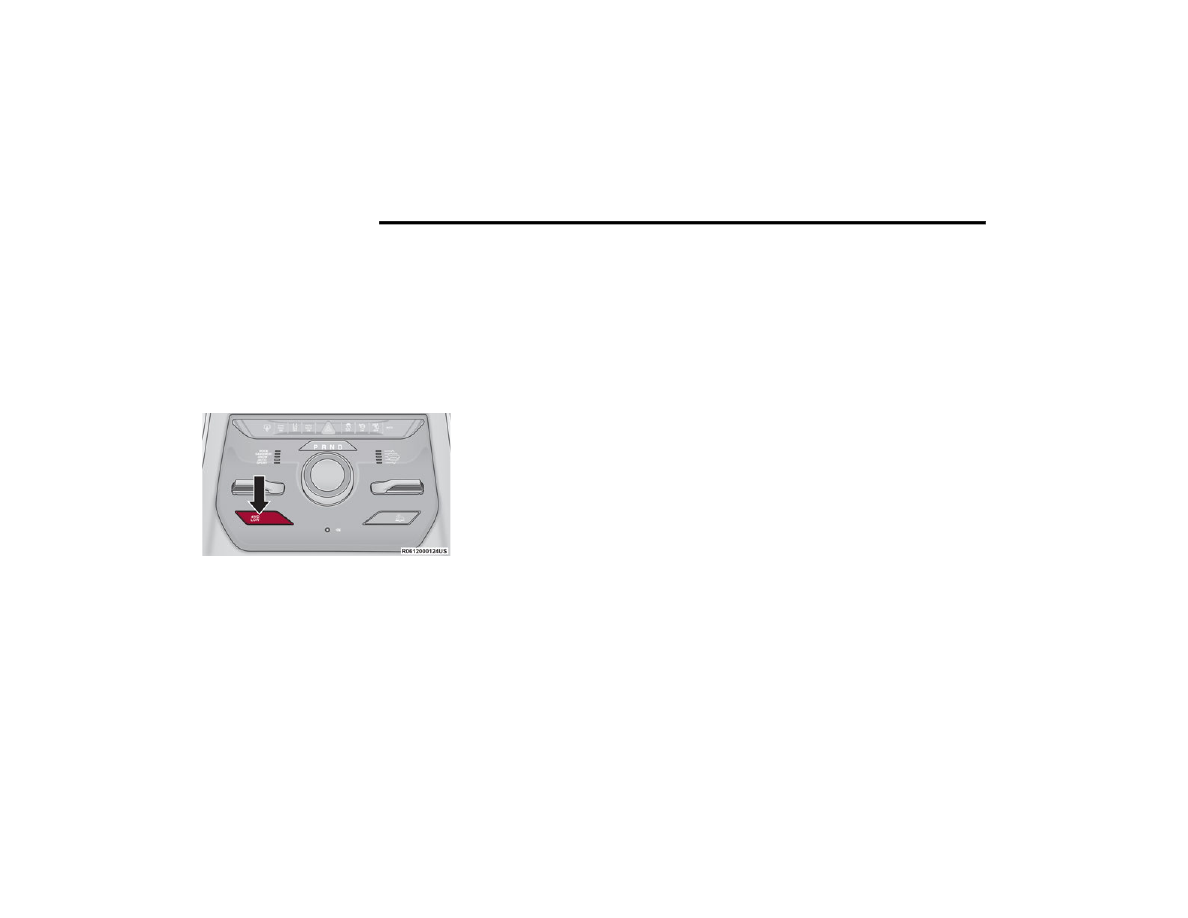
4WD AUTO To 4WD LOW
With the vehicle at speeds of 0 to 3 mph (0 to
5 km/h), the ignition switch in the ON position or
the engine running, shift the transmission into
NEUTRAL (N), and push and hold the 4WD LOW
button once on the transfer case switch until the
4WD LOW indicator light begins to flash in the
instrument cluster. The 4WD LOW light will remain
on solid when the shift is complete.
4WD LOW Button
NOTE:
If shift conditions/interlocks are not met a
message will show on the instrument cluster
display with instructions required to complete the
4WD LOW To 4WD AUTO
With the vehicle at speeds of 0 to 3 mph (0 to
5 km/h), the ignition switch in the ON position or
the engine running, shift the transmission into
NEUTRAL (N), and push the 4WD LOW button once
on the transfer case switch until the 4WD LOW
indicator light begins to flash in the instrument
cluster. The 4WD LOW light will go out when the
shift is complete.
NOTE:
If shift conditions/interlocks are not met a
message will show on the instrument cluster
display with instructions required to complete
Shifting into or out of 4WD LOW is possible with
the vehicle completely stopped; however, diffi
-
culty may occur due to the mating clutch teeth
not being properly aligned. Several attempts
may be required for clutch teeth alignment and
shift completion to occur. The preferred
method is with the vehicle rolling 0 to 3 mph
(0 to 5 km/h). If the vehicle is moving faster
than 3 mph (5 km/h), the transfer case will not
allow the shift.
Q
UADRA
-D
RIVE
II S
YSTEM
—
I
F
E
QUIPPED
The Quadra-Drive II System features two torque
transfer couplings. The couplings include an
Electronic Limited-Slip Differential (ELSD) rear axle
and the Quadra-Trac II transfer case. The ELSD
axle is fully automatic and requires no driver input
to operate. Under normal driving conditions, the
unit functions as a standard axle, balancing torque
evenly between left and right wheels. With a
traction difference between left and right wheels,
the coupling will sense a speed difference. As one
wheel begins to spin faster than the other, torque
will automatically transfer from the wheel that has
less traction, to the wheel that has traction. While
the transfer case and axle coupling differ in design,
their operation is similar. Follow the Quadra-Trac II
transfer case shifting information, preceding this
section, for shifting this system.
SELEC-TERRAIN — IF EQUIPPED
S
ELEC
-T
ERRAIN
M
ODE
S
ELECTION
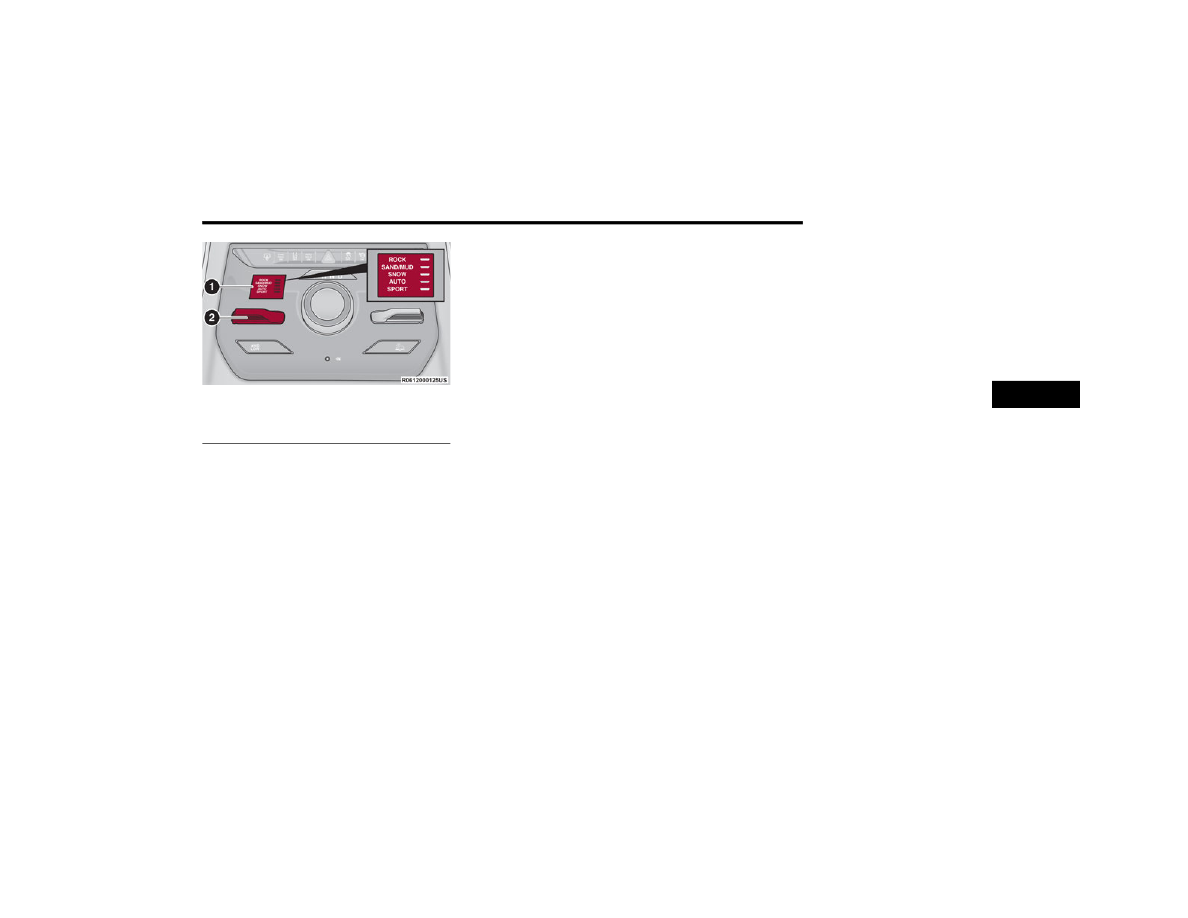
Selec-Terrain combines the capabilities of the
vehicle control systems, along with driver input, to
provide the best performance for all terrains. Tap
the toggle up or down to cycle through the
positions.
STARTING AND OPERATING
143
Selec-Terrain
Selec-Terrain consists of the following positions:
ROCK (if equipped) – Off-road calibration is only
available in 4WD LOW. The vehicle is raised (if
equipped with Air Suspension) for improved
ground clearance. Traction-based tuning with
improved steerability for use on high traction
off-road surfaces. Use for low speed obstacles
such as large rocks, deep ruts, etc. If equipped
with air suspension, the vehicle level will change
to Off-Road 2 (OR2). If the Selec-Terrain switch
is in ROCK mode, and the transfer case is
switched from 4WD LOW to 4WD AUTO, the
Selec-Terrain system will return to AUTO.
SAND (if equipped) – Off-road calibration for use
on low traction surfaces such as sand or wet
grass. Driveline is maximized for traction. Some
binding may be felt on less forgiving surfaces.
The electronic brake controls are set to limit
traction control management of throttle and
wheel spin. If equipped with air suspension, the
default ride height for SAND is Normal Ride
Height (NRH).
MUD (if equipped) – Off-road calibration for use
on low traction surfaces such as mud. Driveline
is maximized for traction. Some binding may be
felt on less forgiving surfaces. The electronic
brake controls are set to limit traction control
management of throttle and wheel spin. If
equipped with air suspension, the level will
change to Off-Road 1 (OR1).
SNOW – Tuning set for additional stability in
inclement weather. Use on and off road on loose
traction surfaces such as snow. When in SNOW
mode (depending on certain operating condi
-
tions), the transmission may use SECOND gear
(rather than FIRST gear) during launches, to
minimize wheel slippage. If equipped with air
suspension, the default ride height for SNOW is
Normal Ride Height (NRH).
AUTO – Fully automatic full-time four-wheel
drive operation can be used on and off road.
Balances traction with seamless steering feel to
provide improved handling and acceleration
over two-wheel drive vehicles. If equipped with
air suspension, the level will change to Normal
Ride Height (NRH).
SPORT – This mode alters the transmission's
automatic shift schedule for sportier driving.
Upshift speeds are increased to make full use of
available engine power. Steering efforts are
modified for sporty driving. If equipped with air
suspension, the level will change to Aero Height.
I
NSTRUMENT
C
LUSTER
D
ISPLAY
M
ESSAGES
When the appropriate conditions exist, a message
will appear in the instrument cluster
QUADRA-LIFT — IF EQUIPPED
D
ESCRIPTION
The Quadra-Lift air suspension system provides
full-time load leveling capability along with the
benefit of vehicle height adjustment by a toggle
switch. The vehicle will automatically raise and
lower the ride height to adapt to the appropriate
driving conditions. At higher speeds, the vehicle
will lower to an aerodynamic ride height and when
operating in off-road modes (if equipped), the
vehicle will raise the ride height accordingly. The
buttons near the terrain switch in the center
console area can be used to set preferred ride
height to match the appropriate conditions.
1 — Selec-Terrain Positions
2 — Selec-Terrain Toggle
4
144
STARTING AND OPERATING
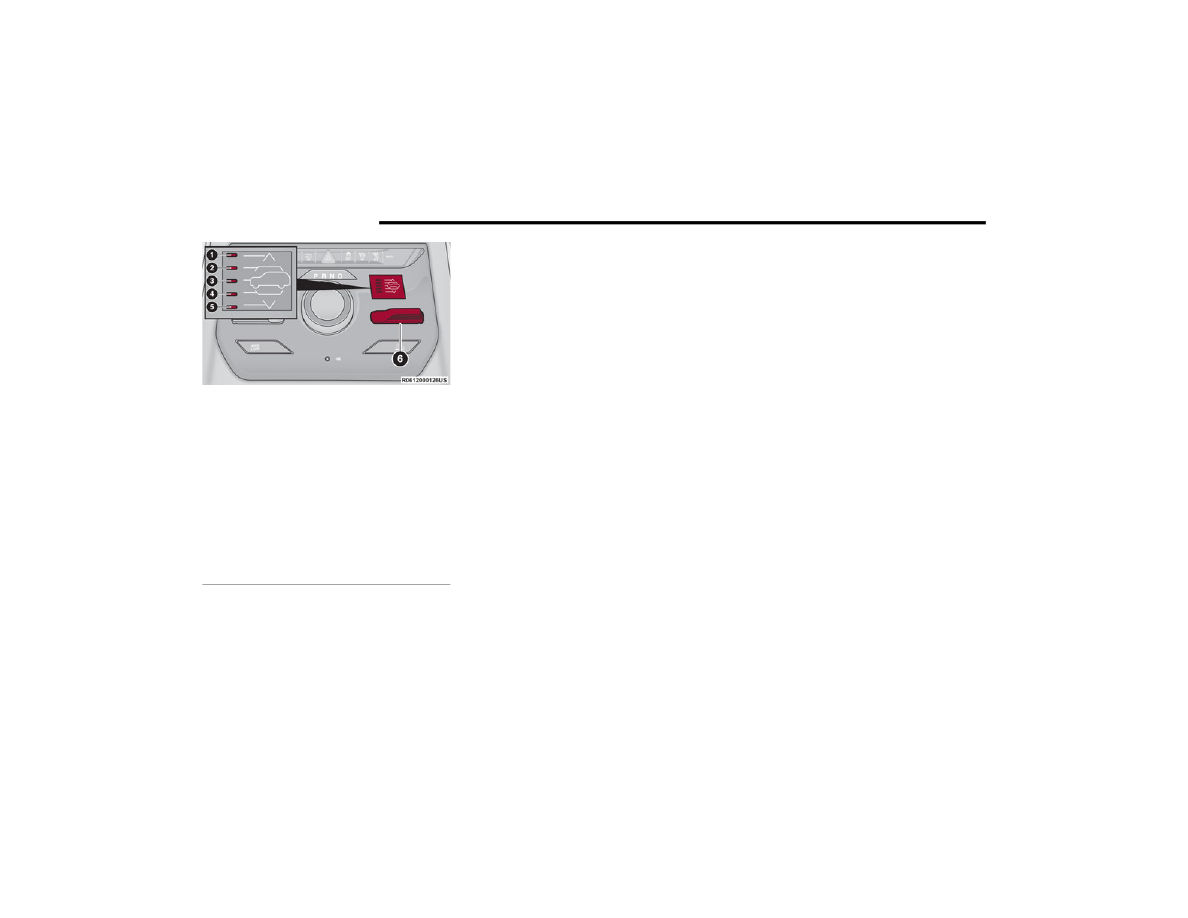
Quadra-Lift Switch
Normal Ride Height (NRH) – This is the standard
position of the suspension and is meant for
normal driving.
Off-Road 1 (OR1) (Raises the vehicle approxi
-
mately 1.2 inches [30 mm]) – This is the
primary position for all off-road driving until OR2
is needed. A smoother and more comfortable
ride will result. Push the toggle switch forward
once from the NRH position while the vehicle
speed is below 38 mph (61 km/h). When in the
OR1 position, if the vehicle speed remains
between 40 mph (64 km/h) and 50 mph
(80 km/h) for greater than 20 seconds or if the
vehicle speed exceeds 50 mph (80 km/h), the
vehicle will be automatically lowered to NRH
page 212. OR1 is unavailable on 4x2 air
suspension vehicles.
Off-Road 2 (OR2) (Raises the vehicle approxi
-
mately 2.0 inches [51 mm]) – This position is
intended for off-roading use only where
maximum ground clearance is required. To
enter OR2, push the toggle switch forward twice
from the NRH position or once from the OR1
position while vehicle speed is below 20 mph
(32 km/h). While in OR2, if the vehicle speed
exceeds 25 mph (40 km/h) the vehicle height
will be automatically lowered to OR1
page 212. OR2 is unavailable on 4x2 air
suspension vehicles.
Aero Height (Lowers the vehicle approximately
-0.6 inches [-15 mm]) – This position provides
improved aerodynamics by lowering the vehicle.
The vehicle will automatically enter Aero Height
when the vehicle speed remains between
62 mph (100 km/h) and 66 mph (106 km/h)
for greater than 20 seconds or if the vehicle
speed exceeds 66 mph (106 km/h). The vehicle
will return to Default Ride Height from Aero
Height if the vehicle speed remains between
30 mph (48 km/h) and 35 mph (56 km/h) for
greater than 20 seconds or if the vehicle speed
falls below 30 mph (48 km/h). The vehicle will
enter Aero Height, regardless of vehicle speed if
the vehicle is in “SPORT” mode.
Entry/Exit Height (Lowers the vehicle approxi
-
mately -1.6 inches [-40 mm]) – This position
lowers the vehicle for easier passenger entry
and exit as well as lowering the rear of the
vehicle for easier loading and unloading of
cargo. To enter Entry/Exit Height, push the
toggle switch down twice from NRH while the
vehicle speed is below 6 mph (10 km/h). To exit
Entry/Exit Height, push the UP button once
while in Entry/Exit Height or drive the vehicle
over 4 mph (6 km/h).
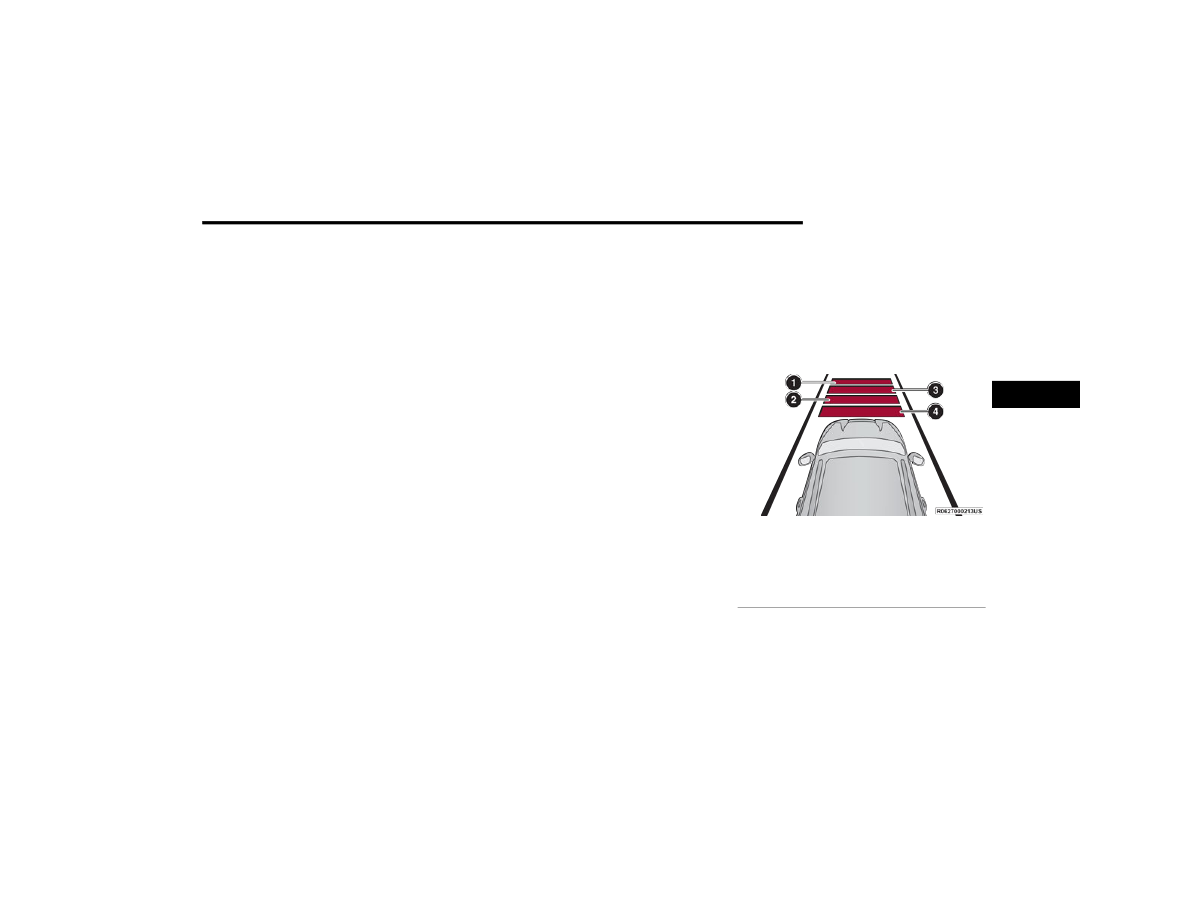
1 — Off-Road 2 Indicator Lamp (Customer
Selectable, 4x4 only)
2 — Off-Road 1 Indicator Lamp (Customer
Selectable, 4x4 only)
3 — Normal Ride Height Indicator Lamp
(Customer Selectable)
4 — Aero Height Indicator Lamp (Customer
Selectable)
5 — Entry/Exit Height Indicator Lamp (Customer
Selectable)
6 — Toggle Switch
STARTING AND OPERATING
145
NOTE:
Automatic lowering of the vehicle into Entry/Exit
Height can be enabled through the Uconnect
Touchscreen Radio. If this feature is enabled, the
vehicle will only lower if the gear selector is in
PARK, the terrain switch is in AUTO, the transfer
case is in AUTO and the vehicle level is either in
Normal or Aero Height. The vehicle will not auto
-
matically lower if the air suspension level is in OR2
or OR1. When towing, the automatic Entry/Exit
feature may be disabled through the Uconnect
Touchscreen Radio to prevent vehicle and trailer
movement when gear selector is moved to PARK.
The Selec-Terrain switch will automatically change
the vehicle to the proper height based on the
position of the Selec-Terrain switch. The height can
be changed from the default Selec-Terrain setting
by normal use of the air suspension buttons
The system requires that the engine be running for
all changes. When lowering the vehicle all of the
doors, including the liftgate, must be closed. If a
door is opened at any time while the vehicle is
lowering the change will not be completed until the
open door(s) is/are closed.
The Quadra-Lift air suspension system uses a
lifting and lowering pattern which keeps the
headlights from incorrectly shining into oncoming
traffic. When raising the vehicle, the rear of the
vehicle will move up first and then the front. When
lowering the vehicle, the front will move down first
and then the rear.
After the engine is turned off, it may be noticed that
the air suspension system operates briefly; this is
normal. The system is correcting the position of the
vehicle to ensure a proper appearance.
To assist with changing a spare tire, the
Quadra-Lift air suspension system has a feature
which allows the automatic leveling to be disabled
NOTE:
Default Ride Height:
Select Aero Height or Normal Ride Height as the
default for all vehicle speeds and operation.
This is the selected height that the suspension
will level for speed changes (ex. raising from
Entry/Exit Height at speed, lowering from Off
Road Height at speed, etc.).
Default ride height can be changed by manually
adjusting the ride height switch to Normal Ride
Height or Aero Ride Height and stay in the selected
height for 2.5 seconds. It will be stored as the
default ride height and the height will be main
-
tained until a new default ride height is selected.
If equipped with a Uconnect Touchscreen Radio,
all enabling/disabling of air suspension features
must be done through the radio
A
IR
S
USPENSION
M
ODES
The Air Suspension system has multiple modes to
protect the system in unique situations:
Tire/Jack Mode
To assist with changing a spare tire, the air
suspension system has a feature which allows the
automatic leveling to be disabled
Tire/Jack mode is used for connecting a trailer with
NOTE:
This mode is intended to be enabled with the
engine running.
Auto Entry/Exit Mode
To assist in entering and exiting the vehicle, the air
suspension system has a feature which
automatically lowers the vehicle to Entry/Exit
WARNING!
The air suspension system uses a high pressure
volume of air to operate the system. To avoid
personal injury or damage to the system, see an
authorized dealer for service.
4
146
STARTING AND OPERATING
NOTE:
This mode is intended to be enabled with the engine
running. When towing, the automatic Entry/Exit
feature may be disabled through the Uconnect Touch
-
screen Radio to prevent vehicle and trailer movement
when the gear selector is moved to PARK.
Transport Mode
To assist with flat bed towing, the air suspension
system has a feature which will put the vehicle into
Entry/Exit Height and disable the automatic load
NOTE:
This mode is intended to be enabled with engine
running.
Suspension Display Messages Mode
The “Suspension Display Messages” setting allows
you to only display suspension warnings instead of
all suspension messages (i.e., “Normal Height
NOTE:
This mode is intended to be enabled with the
engine running.
Wheel Alignment Mode
Before performing a wheel alignment this mode
must be enabled which will move the vehicle to
Normal Ride Height and disable the air suspension
NOTE:
This mode is intended to be enabled with the
engine running.
If equipped with a Uconnect Touchscreen Radio,
all enabling/disabling of air suspension features
must be done through the radio
I
NSTRUMENT
C
LUSTER
D
ISPLAY
M
ESSAGES
When the appropriate conditions exist, a message
will appear in the instrument cluster
O
PERATION
The indicator lamps 1 through 5 will illuminate to
show the current position of the vehicle. Flashing
indicator lamps will show a position which the
system is working to achieve. When raising, if
multiple indicator lamps are flashing while raising,
the highest flashing indicator lamp is the position
the system is working to achieve. When lowering, if
multiple indicators are flashing while lowering the
lowest solid indicator lamp is the position the
system is working to achieve.
Toggle up once moves the suspension one
position higher from the current position,
assuming all conditions are met (i.e., engine
running, speed below threshold, etc.). Toggle up
can be pushed multiple times. Each toggle up will
raise the requested level by one position up to a
maximum position of OR2 or the highest position
allowed based on current conditions (i.e., vehicle
speed, etc.).
Toggle down once moves the suspension one
position lower from the current level, assuming all
conditions are met (i.e., engine running, doors
closed, speed below threshold, etc.). Toggle down
can be pushed multiple times. Each toggle down
will lower the requested level by one position down
to a minimum of Park mode or the lowest position
allowed based on current conditions (i.e., vehicle
speed, etc.)
Automatic height changes will occur based on
vehicle speed and the current vehicle height. The
indicator lamps and instrument cluster display
messages will operate the same for automatic
changes and user requested changes.
Off-Road 2 (OR2) – Indicator lamps 1 through 5
will be illuminated.
Off-Road 1 (OR1) – Indicator lamps 2 through 5
will be illuminated.
Normal Ride Height (NRH) – Indicator lamps 3
through 5 will be illuminated.
Aero Height – Indicator lamps 4 and 5 will be
illuminated.
Entry/Exit Height – Indicator lamp 5 will be illu
-
minated.
Transport Mode – No indicator lamps will be illu
-
minated. Driving or deselecting the mode in the
Uconnect system will disable Transport mode.

STARTING AND OPERATING
147
Tire/Jack Mode – Indicator lamps 1 and 5 will be
illuminated. Driving or deselecting the mode in
the Uconnect system will disable Tire/Jack mode.
Wheel Alignment Mode – Indicator lamps 4 and
5 will be illuminated. Driving or deselecting the
mode in the Uconnect system will disable Wheel
Alignment mode.
FUEL SAVER TECHNOLOGY 5.7L AND 6.4L
ONLY — IF EQUIPPED
This feature offers improved fuel economy by
shutting off four of the engine's eight cylinders
during light load and cruise conditions. The system
is automatic with no driver inputs or additional
driving skills required.
NOTE:
This system may take some time to return to full
functionality after a battery disconnect.
POWER STEERING
The electric power steering system is designed to
provide vehicle response and increased ease of
maneuverability in tight spaces. The system will
vary its assist to provide light efforts while parking
and good feel while driving. If the electric power
steering system experiences a fault that prevents
it from providing assist, you will still have the ability
to steer the vehicle manually.
If the Electric Power Steering warning
icon is displayed and the “SERVICE
POWER STEERING” or the “POWER
STEERING ASSIST OFF – SERVICE
SYSTEM” message is displayed within the
instrument cluster display, this indicates the
vehicle needs to be taken to an authorized dealer
NOTE:
Even if the power steering assistance is no
longer operational, it is still possible to steer
the vehicle. Under these conditions there will
be a substantial increase in steering effort,
especially at low speeds and during parking
maneuvers.
If the condition persists, see an authorized
dealer for service.
If the Steering icon is displayed and the “POWER
STEERING SYSTEM OVER TEMP” message is
displayed on the instrument cluster screen, they
indicate that extreme steering maneuvers may
have occurred which caused an over temperature
condition in the electric power steering system.
Once driving conditions are safe, pull over and let
the vehicle idle for a few moments until the icon
and message turn off.
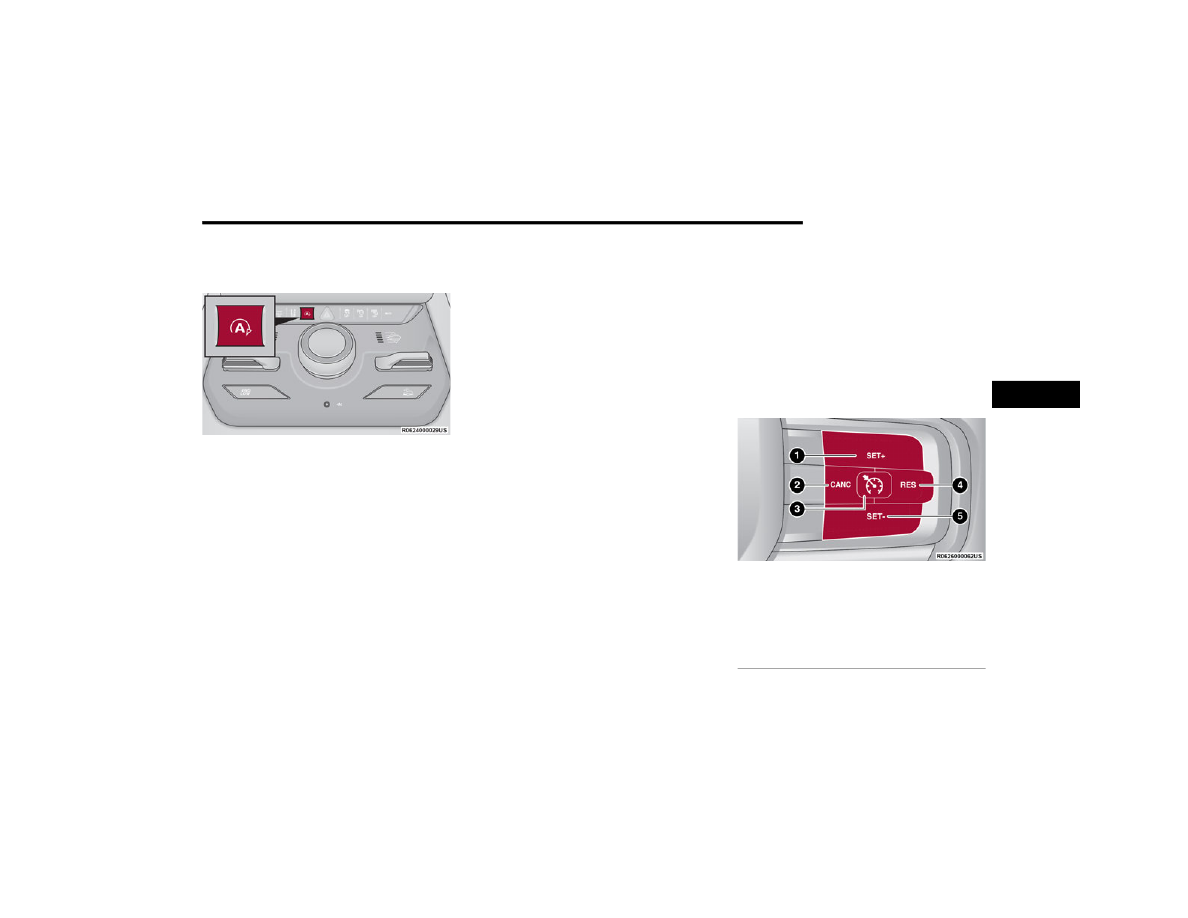
STOP/START SYSTEM — IF EQUIPPED
The Stop/Start function is developed to reduce
fuel consumption. The system will stop the engine
automatically during a vehicle stop if the required
conditions are met. Releasing the brake pedal or
pressing the accelerator pedal will automatically
This vehicle has been upgraded with a heavy-duty
starter, enhanced battery, and other upgraded
engine parts, to handle the additional engine
starts.
A
UTOSTOP
M
ODE
The Stop/Start feature is enabled after every
normal customer engine start. At that time, the
system will go into STOP/START READY and if all
other conditions are met, can go into a STOP/
START AUTOSTOP ACTIVE Autostop mode.
To Activate The Autostop Mode, The Following
Must Occur:
The system must be in STOP/START READY
state. A “STOP/START READY” message will be
displayed in the instrument cluster display
WARNING!
Continued operation with reduced assist could
pose a safety risk to yourself and others. Service
should be obtained as soon as possible.
4
148
STARTING AND OPERATING
The vehicle must be completely stopped.
The gear selector must be in a forward gear and
the brake pedal pressed.
The engine will shut down, the tachometer will
move to the zero position, and the Stop/Start
telltale will illuminate indicating you are in
Autostop. Customer settings will be maintained
upon return to an engine-running condition.
P
OSSIBLE
R
EASONS
T
HE
E
NGINE
D
OES
N
OT
A
UTOSTOP
Prior to engine shut down, the system will check
many safety and comfort conditions to see if they
are fulfilled. Detailed information about the
operation of the Stop/Start system may be viewed
in the instrument cluster display Stop/Start
Screen. In the following situations, the engine will
not stop:
Driver’s seat belt is not buckled.
Driver’s door is not closed.
Battery temperature is too warm or cold.
Battery charge is low.
The vehicle is on a steep grade.
Cabin heating or cooling is in process and an
acceptable cabin temperature has not been
achieved.
HVAC is set to full defrost mode at a high blower
speed.
HVAC is set to MAX A/C.
Engine has not reached normal operating
temperature.
The transmission is not in a forward gear.
Hood is open.
Vehicle is in Part-Time 4WD, 4WD Lock, 4WD
LOW, or an off-road Selec-Terrain mode.
Brake pedal is not pressed with sufficient pres
-
sure.
Accelerator pedal input.
Engine temperature is too high.
5 mph (8 km/h) threshold has not been
achieved from previous Autostop.
Steering angle is beyond threshold.
It may be possible for the vehicle to be driven
several times without the Stop/Start system going
into a STOP/START READY state under more
extreme conditions of the items listed above.
T
O
S
TART
T
HE
E
NGINE
W
HILE
I
N
A
UTOSTOP
M
ODE
While in a forward gear, the engine will start when
the brake pedal is released or the throttle pedal is
pressed. The transmission will automatically
re-engage upon engine restart.
Conditions That Will Cause The Engine To Start
Automatically While In Autostop Mode:
The transmission selector is moved out of
DRIVE.
To maintain cabin temperature comfort.
HVAC is set to full defrost mode.
HVAC system temperature or fan speed is
manually adjusted.
Battery voltage drops too low.
Stop/Start OFF switch is pushed.
A Stop/Start system error occurs.
Part-Time 4WD, 4WD Lock, 4WD LOW, or an
off-road Selec-Terrain mode is selected.
An off-road Selec-Terrain mode is selected.
Steering angle is beyond threshold.
STARTING AND OPERATING
149
T
O
M
ANUALLY
T
URN
O
FF
T
HE
S
TOP
/
S
TART
S
YSTEM
Stop/Start OFF Switch
Push the Stop/Start OFF switch (located on the
switch bank). The light on the switch will illuminate.
The “STOP/START OFF” message will appear in the
instrument cluster display and the Autostop mode
NOTE:
The Stop/Start system will reset itself back to the
ON mode every time the ignition is turned OFF and
back ON.
T
O
M
ANUALLY
T
URN
O
N
T
HE
S
TOP
/
S
TART
S
YSTEM
Push the Stop/Start OFF switch (located on the
switch bank). The light on the switch will turn off.
S
YSTEM
M
ALFUNCTION
If there is a malfunction in the Stop/Start system,
the system will not shut down the engine. A
"SERVICE STOP/START SYSTEM" message and a
yellow Stop/Start telltale will appear in the
If the “SERVICE STOP/START SYSTEM” message
appears in the instrument cluster display, have the
system checked by an authorized dealer.
CRUISE CONTROL SYSTEMS — IF EQUIPPED
Your vehicle may be equipped with the Cruise
Control system, or the Adaptive Cruise Control
(ACC) system:
Cruise Control will keep your vehicle at a
constant preset speed.
Adaptive Cruise Control (ACC) will adjust the
vehicle speed up to the preset speed to main
-
tain a distance with the vehicle ahead.
NOTE:
In vehicles NOT equipped with the Active Driving
Assist (ADA) system:
Fixed Speed Cruise Control can be used without
ACC enabled, and functions as normal cruise
control.
If ACC is not enabled, Fixed Speed Cruise
Control will not detect vehicles directly ahead of
you. Always be aware of the feature selected.
Only one Cruise Control feature can operate at a
time. For example, if Fixed Speed Cruise Control
is enabled, Adaptive Cruise Control will be
unavailable, and vice versa.
C
RUISE
C
ONTROL
When engaged, the Cruise Control takes over
accelerator operations at speeds greater than
20 mph (32 km/h).
The Cruise Control buttons are located on the right
side of the steering wheel.
Cruise Control Buttons
1 — SET (+)/Accel
2 — CANC/Cancel
3 — On/Off
4 — RES/Resume
5 — SET (-)/Decel
4
150
STARTING AND OPERATING
To Activate
Push the on/off button to activate the Cruise
Control. “CRUISE CONTROL READY” will appear in
the instrument cluster display to indicate the
Cruise Control is on. To turn the system off, push
the on/off button a second time. “CRUISE
CONTROL OFF” will appear in the instrument
cluster display to indicate the Cruise Control is off.
The system should be turned off when not in use.
To Set A Desired Speed
Turn the Cruise Control on. When the vehicle has
reached the desired speed, push the SET (+) or
SET (-) button and release. Release the
accelerator and the vehicle will operate at the
selected speed. Once a speed has been set, a
message “CRUISE CONTROL SET TO MPH (km/h)”
will appear indicating what speed was set. A
cruise indicator lamp, along with set speed will
also appear and stay on in the instrument cluster
when the speed is set.
To Vary The Speed Setting
To Increase Or Decrease The Set Speed
When the Cruise Control is set, you can increase
speed by pushing the SET (+) button, or decrease
speed by pushing the SET (-) button.
U.S. Speed (mph)
Pushing the SET (+), or SET (-) button once will
result in a 1 mph speed adjustment. Each
subsequent tap of the button results in an
adjustment of 1 mph.
If the button is continually pushed, the set
speed will continue to adjust in 5 mph incre
-
ments until the button is released. The new set
speed is reflected in the instrument cluster
display.
Metric Speed (km/h)
Pushing the SET (+), or SET (-) button once will
result in a 1 km/h speed adjustment. Each
subsequent tap of the button results in an
adjustment of 1 km/h.
If the button is continually pushed, the set
speed will continue to adjust in 10 km/h incre
-
ments until the button is released. The new set
speed is reflected in the instrument cluster
display.
To Accelerate For Passing
Press the accelerator as you would normally. When
the pedal is released, the vehicle will return to the
set speed.
USING CRUISE CONTROL ON HILLS
The transmission may downshift on hills to
maintain the vehicle set speed.
NOTE:
The Cruise Control system maintains speed up and
down hills. A slight speed change on moderate hills
is normal.
On steep hills, a greater speed loss or gain may
occur so it may be preferable to drive without
Cruise Control.
WARNING!
Cruise Control can be dangerous where the
system cannot maintain a constant speed. Your
vehicle could go too fast for the conditions, and
you could lose control and have an accident. Do
not use Cruise Control in heavy traffic or on
roads that are winding, icy, snow-covered or
slippery.
WARNING!
Leaving the Cruise Control system on when not
in use is dangerous. You could accidentally set
the system or cause it to go faster than you
want. You could lose control and have an
accident. Always ensure the system is OFF when
you are not using it.
STARTING AND OPERATING
151
(Continued)
To Resume Speed
To resume a previously set speed, push the RES
button and release. Resume can be used at any
speed above 20 mph (32 km/h).
To Deactivate
A tap on the brake pedal, pushing the CANC button,
or normal brake pressure while slowing the vehicle
will deactivate the Cruise Control system without
erasing the set speed from memory.
The following conditions will also deactivate the
Cruise Control without erasing the set speed from
memory:
Vehicle parking brake is applied
Stability event occurs
Gear selector is moved out of DRIVE
Engine overspeed occurs
Pushing the on/off button or placing the ignition in
the OFF position, will also erase the set speed from
memory.
A
DAPTIVE
C
RUISE
C
ONTROL
(ACC)
Adaptive Cruise Control (ACC) increases the driving
convenience provided by Cruise Control while
traveling on highways and major roadways.
However, it is not a safety system and not designed
to prevent collisions. The Cruise Control function
ACC will allow you to keep Cruise Control engaged in
light to moderate traffic conditions without the
constant need to reset your Cruise Control. ACC
utilizes a radar sensor and a forward facing camera
designed to detect a vehicle directly ahead of you.
NOTE:
If the ACC sensor detects a vehicle ahead, ACC
will apply limited braking or acceleration (not to
exceed the original set speed) automatically to
maintain a preset following distance, while
matching the speed of the vehicle ahead.
Any chassis/suspension or tire size modifica
-
tions to the vehicle will affect the performance
of the Adaptive Cruise Control and Forward Colli
-
sion Warning system.
In vehicles NOT equipped with the Active Driving
Assist system, Fixed Speed Cruise Control (ACC
not enabled) will not detect vehicles directly
ahead of you. Always be aware of the feature
WARNING!
Cruise Control can be dangerous where the
system cannot maintain a constant speed. Your
vehicle could go too fast for the conditions, and
you could lose control and have an accident. Do
not use Cruise Control in heavy traffic or on roads
that are winding, icy, snow-covered or slippery.
WARNING!
Adaptive Cruise Control (ACC) is a conve
-
nience system. It is not a substitute for active
driver involvement. It is always the driver’s
responsibility to be attentive of road, traffic,
and weather conditions, vehicle speed,
distance to the vehicle ahead and, most
importantly, brake operation to ensure safe
operation of the vehicle under all road condi
-
tions. Your complete attention is always
required while driving to maintain safe control
of your vehicle. Failure to follow these warn
-
ings can result in a collision and death or
serious personal injury.
The ACC system:
Does not react to pedestrians, oncoming
vehicles, and stationary objects (e.g., a
stopped vehicle in a traffic jam or a
disabled vehicle).
Cannot take street, traffic, and weather
conditions into account, and may be
limited upon adverse sight distance
conditions.
Does not always fully recognize complex
driving conditions, which can result in
wrong or missing distance warnings.
4

152
STARTING AND OPERATING
Adaptive Cruise Control (ACC) Operation
The buttons on the right side of the steering wheel
operate the ACC system.
Adaptive Cruise Control Buttons
Driving Assist Menu
The instrument cluster display will show the
current system settings for Adaptive Cruise Control
(ACC), Active Lane Management (ALM), and the
Active Driving Assist (ADA) system. The information
it displays depends on ACC, ALM, and ADA system
statuses.
Push the Adaptive Cruise Control (ACC) on/off
button once and the following will appear in the
instrument cluster display:
Adaptive Cruise Control Off
When ACC is deactivated, the display will read
“Adaptive Cruise Control Off”.
Adaptive Cruise Control Ready
When ACC is activated but the vehicle speed
setting has not been selected, the display will read
“Adaptive Cruise Control Ready.”
Adaptive Cruise Control Set
When the SET (+) or the SET (-) button is pushed,
the display will read “ACC SET”.
When ACC is set, the set speed will show in the
instrument cluster display.
Will bring the vehicle to a complete stop
and hold the vehicle in the stop position
for approximately 10 minutes when
following a vehicle ahead. If the vehicle
ahead does not start moving within
10 minutes, the parking brake will be acti
-
vated, and the ACC system will be
cancelled.
You should switch off the ACC system:
When driving in fog, heavy rain, heavy
snow, sleet, heavy traffic, and complex
driving situations (i.e., in highway
construction zones).
When entering a turn lane or highway off
ramp; when driving on roads that are
winding, icy, snow-covered, slippery, or
have steep uphill or downhill slopes.
When towing a trailer up or down steep
slopes.
When circumstances do not allow safe
driving at a constant speed.
WARNING!
1 — Distance Increase Button
2 — Adaptive Cruise Control (ACC) On/Off
3 — CANC/Cancel
4 — Distance Decrease Button
5 — SET (+)/Accel
6 — Fixed Speed Cruise Control On/Off
(If Equipped)
7 — RES/Resume
8 — SET (-)/Decel
STARTING AND OPERATING
153
The ACC screen may display once again if any of
the following ACC activity occurs:
System Cancel
Driver Override
System Off
ACC Proximity Warning
ACC Unavailable Warning
The instrument cluster display will return to the last
display selected after five seconds of no ACC
display activity.
Activating Adaptive Cruise Control (ACC)
The minimum set speed for the ACC system is
20 mph (32 km/h).
When the system is turned on and in the ready
state, the instrument cluster display will read “ACC
Ready.”
When the system is off, the instrument cluster
display will read “Adaptive Cruise Control (ACC)
Off.”
NOTE:
You cannot engage ACC under the following condi
-
tions:
When in 4WD Low
When the brakes are applied
When the parking brake is applied
When the automatic transmission is in PARK,
REVERSE or NEUTRAL
When the brakes are overheated
When the driver’s door is open at low speeds
When the driver’s seat belt is unbuckled at low
speeds
When there is a stationary vehicle in front of
your vehicle in close proximity
When ESC Full Off mode is active
To Activate/Deactivate
Push and release the Adaptive Cruise Control
(ACC) on/off button. The ACC menu in the
instrument cluster displays “ACC Ready.”
To turn the system off, push and release the
Adaptive Cruise Control (ACC) on/off button again.
At this time, the system will turn off and the
instrument cluster displays “Adaptive Cruise
Control (ACC) Off.”
To Set A Desired Speed
When the vehicle reaches the speed desired, push
the SET (+) button or the SET (-) button and
release. The instrument cluster display will show
the set speed.
NOTE:
Fixed Speed Cruise Control (if equipped) can be
used without ACC enabled. To change between the
different modes, push the ACC on/off button which
turns the ACC and the Fixed Speed Cruise Control
off. Pushing the Fixed Speed Cruise Control on/off
button will result in turning on (changing to) Fixed
Speed Cruise Control mode.
If ACC is set when the vehicle speed is below
20 mph (32 km/h), the set speed will default to
20 mph (32 km/h).
WARNING!
Leaving the Adaptive Cruise Control (ACC)
system on when not in use is dangerous. You
could accidentally set the system or cause it to
go faster than you want. You could lose control
and have a collision. Always leave the system off
when you are not using it.
WARNING!
In Fixed Speed Cruise Control mode, the system
will not react to vehicles ahead. In addition, the
proximity warning does not activate and no
alarm will sound even if you are too close to the
vehicle ahead since neither the presence of the
vehicle ahead nor the vehicle-to-vehicle distance
is detected. Be sure to maintain a safe distance
between your vehicle and the vehicle ahead.
Always be aware which mode is selected.
4
154
STARTING AND OPERATING
NOTE:
Fixed Speed Cruise Control cannot be set below
20 mph (32 km/h).
If either system is set when the vehicle speed is
above 20 mph (32 km/h), the set speed shall be
the current speed of the vehicle.
NOTE:
Keeping your foot on the accelerator pedal can
cause the vehicle to continue to accelerate
beyond the set speed. If this occurs, the
message “DRIVER OVERRIDE” will display in the
instrument cluster display.
If you continue to accelerate beyond the set
speed while ACC is enabled, the system will not
be controlling the distance between your vehicle
and the vehicle ahead. The vehicle speed will
only be determined by the position of the accel
-
erator pedal.
To Cancel
The following conditions cancel the ACC or Fixed
Speed Cruise Control systems:
The brake pedal is applied
The CANC (cancel) button is pushed
The Anti-Lock Brake System (ABS) activates
The gear selector is removed from the DRIVE
position
The Electronic Stability Control/Traction Control
System (ESC/TCS) activates
The vehicle parking brake is applied
The Trailer Sway Control (TSC) activates
The driver switches ESC to Full Off mode
The braking temperature exceeds normal range
(overheated)
The following conditions will only cancel the ACC
system:
Driver seat belt is unbuckled at low speeds
Driver door is opened at low speeds
To Turn Off
The system will turn off and erase the set speed in
memory if:
The Adaptive Cruise Control (ACC) on/off button
is pushed
The Fixed Speed Cruise Control (if equipped)
on/off button is pushed
The ignition is placed in the OFF position
4WD Low is engaged
To Resume
If there is a set speed in memory, push the RES
(resume) button and remove your foot from the
accelerator pedal. The instrument cluster display
will show the last set speed.
Resume can be used at any speed above 20 mph
(32 km/h) when only Fixed Speed Cruise Control is
being used.
Resume can be used at any speed above 0 mph
(0 km/h) when ACC is active.
NOTE:
While in ACC mode, when the vehicle comes to
a complete stop longer than two seconds, the
driver will either have to push the RES (resume)
button or press the accelerator pedal to reen
-
gage the ACC system.
ACC cannot be resumed if there is a stationary
vehicle in front of your vehicle in close proximity.
WARNING!
The Resume function should only be used if
traffic and road conditions permit. Resuming a
set speed that is too high or too low for
prevailing traffic and road conditions could
cause the vehicle to accelerate or decelerate too
sharply for safe operation. Failure to follow these
warnings can result in a collision and death or
serious personal injury.
STARTING AND OPERATING
155
To Vary The Speed Setting
To Increase Or Decrease The Set Speed
After setting a speed, you can increase the set
speed by pushing the SET (+) button, or decrease
speed by pushing the SET (-) button.
U.S. Speed (mph)
Pushing the SET (+), or SET (-) button once will
result in a 1 mph speed adjustment. Each
subsequent tap of the button results in an
adjustment of 1 mph.
If the button is continually pushed, the set
speed will continue to adjust in 5 mph incre
-
ments until the button is released. The new set
speed is reflected in the instrument cluster
display.
Metric Speed (km/h)
Pushing the SET (+), or SET (-) button once will
result in a 1 km/h speed adjustment. Each
subsequent tap of the button results in an
adjustment of 1 km/h.
If the button is continually pushed, the set
speed will continue to adjust in 10 km/h incre
-
ments until the button is released. The new set
speed is reflected in the instrument cluster
display.
NOTE:
When you override and push the SET (+) button or
SET (-) button, the new set speed will be the current
speed of the vehicle.
When ACC Is Active
When you use the SET (-) button to decelerate, if
the engine’s braking power does not slow the
vehicle sufficiently to reach the set speed, the
brake system will automatically slow the
vehicle.
The ACC system decelerates the vehicle to a full
stop when following the vehicle in front. If your
vehicle follows the vehicle in front to a standstill,
after two seconds the driver will either have to
push the RES (resume) button, or apply the
accelerator pedal to reengage the ACC to the
existing set speed.
The ACC system maintains set speed when
driving uphill and downhill. However, a slight
speed change on moderate hills is normal. In
addition, downshifting may occur while climbing
uphill or descending downhill. This is normal
operation and necessary to maintain set speed.
When driving uphill and downhill, the ACC
system will cancel if the braking temperature
exceeds normal range (overheated).
Setting The Following Distance In ACC
The specified following distance for ACC can be set
by varying the distance setting between four bars
(longest), three bars (long), two bars (medium) and
one bar (short). Using this distance setting and the
vehicle speed, ACC calculates and sets the
distance to the vehicle ahead. This distance
setting appears in the instrument cluster display.
Distance Settings
1 — Longest Distance Setting (Four Bars)
2 — Medium Distance Setting (Two Bars)
3 — Long Distance Setting (Three Bars)
4 — Short Distance Setting (One Bar)
4
156
STARTING AND OPERATING
To increase the distance setting, push the
Distance Increase button and release. Each time
the button is pushed, the distance setting
increases by one bar (longer).
To decrease the distance setting, push the
Distance Decrease button and release. Each time
the button is pushed, the distance setting
decreases by one bar (shorter).
If there is no vehicle ahead, the vehicle will
maintain the set speed. If a slower moving vehicle
is detected in the same lane, the instrument
cluster display will show the ACC Set With Target
Detected Indicator Light, and the system will adjust
the vehicle speed automatically to maintain the
distance setting, regardless of the set speed.
The vehicle will then maintain the set distance
until:
The vehicle ahead accelerates to a speed above
the set speed.
The vehicle ahead moves out of your lane or
view of the sensor.
The distance setting is changed.
The maximum braking applied by ACC is limited;
however, the driver can always apply the brakes
manually, if necessary.
NOTE:
The brake lights will illuminate whenever the ACC
system applies the brakes.
A Proximity Warning will alert the driver if ACC
predicts that its maximum braking level is not
sufficient to maintain the set distance. If this occurs,
a visual alert “BRAKE!” will flash in the instrument
cluster display and a chime will sound while ACC
continues to apply its maximum braking capacity.
NOTE:
The “BRAKE!” screen in the instrument cluster
display is a warning for the driver to take action
and does not necessarily mean that the Forward
Collision Warning system is applying the brakes
autonomously.
Overtake Aid
When driving with Adaptive Cruise Control (ACC)
engaged and following a vehicle, the system will
provide an additional acceleration up to the ACC
set speed to assist in passing the vehicle. This
additional acceleration is triggered when the driver
utilizes the left turn signal and will only be active
when passing on the left hand side.
ACC Operation At Stop
If the ACC system brings your vehicle to a standstill
while following a vehicle ahead, your vehicle will
resume motion, without any driver interaction, if
the vehicle ahead starts moving within two
seconds of your vehicle coming to a standstill.
If the vehicle in front does not start moving within
two seconds of your vehicle coming to a standstill,
the driver will either have to push the RES (resume)
button, or apply the accelerator pedal to reengage
the ACC to the existing set speed.
NOTE:
If your vehicle is at a standstill for longer than
two seconds, the system will hold brake pres
-
sure for up to 10 minutes. If no driver action is
taken after the 10 minutes, the Electric Park
Brake will be applied and the ACC system will
cancel.
While ACC is holding your vehicle at a standstill
(or the vehicle is traveling below 3 mph (5 km/h),
and the driver seat belt is unbuckled or the driver
door is opened, the Electric Park Brake will be
applied and the ACC system will cancel.
WARNING!
When the ACC system is resumed, the driver
must ensure that there are no pedestrians,
vehicles or objects in the path of the vehicle.
Failure to follow these warnings can result in a
collision and death or serious personal injury.
Нет комментариевНе стесняйтесь поделиться с нами вашим ценным мнением.
Текст