Jeep Wagoneer (2022 year). Manual in english — page 8
GETTING TO KNOW YOUR INSTRUMENT PANEL
125
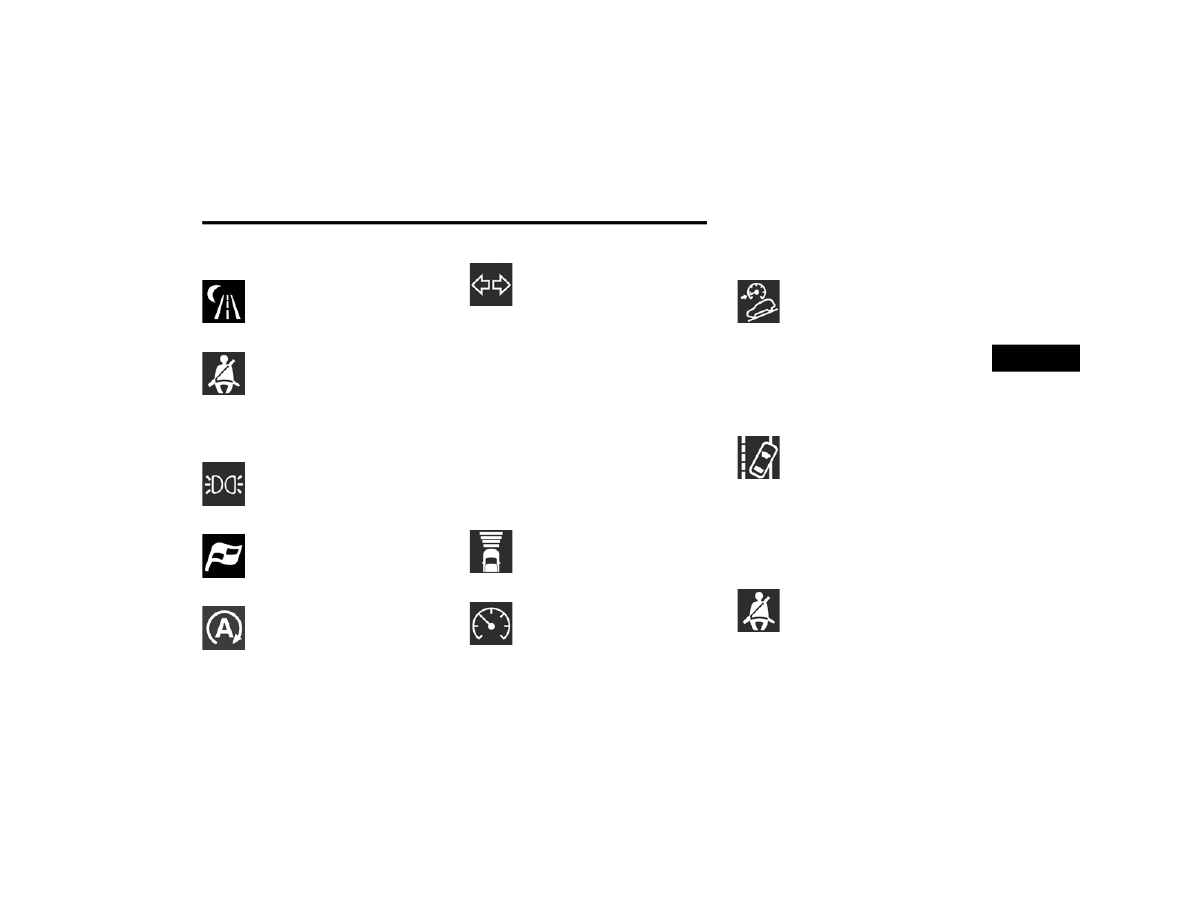
Night Vision Active Indicator Light —
If Equipped
This light alerts the driver that the Night
Vision Warning System status is Active
Rear Seat Belt Fastened Indicator Light
This light indicates when a rear seat belt
has been buckled in the second row. A
telltale will display in the upper right
corner of the instrument cluster display
to correspond to the specific seating position once
the seat belt has been buckled
Parking/Headlights On Indicator Light
This indicator light will illuminate when
the parking lights or headlights are
Sport Mode Indicator Light
This light will turn on when Sport Mode is
active.
Stop/Start Active Indicator Light
This indicator light will illuminate when
the Stop/Start function is in “Autostop”
Turn Signal Indicator Lights
When the left or right turn signal is
activated, the turn signal indicator will
flash independently and the
corresponding exterior turn signal
lamps will flash. Turn signals can be activated
when the multifunction lever is moved down (left)
or up (right).
NOTE:
A continuous chime will sound if the vehicle is
driven more than 1 mile (1.6 km) with either
turn signal on.
Check for an inoperative outside light bulb if
either indicator flashes at a rapid rate.
W
HITE
I
NDICATOR
L
IGHTS
Adaptive Cruise Control (ACC) Ready Light —
If Equipped
This light will turn on when ACC has
been turned on, but is not set
Cruise Control Ready Indicator Light
This indicator light will illuminate when
the cruise control is ready, but not set
Hill Descent Control (HDC) Indicator Light —
If Equipped
This indicator shows when the HDC
feature is turned on. The lamp will be on
solid when HDC is armed. HDC can only
be armed when the transfer case is in
the 4WD Low position and the vehicle speed is less
then 30 mph (48 km/h). If these conditions are not
met while attempting to use the HDC feature, the
HDC indicator light will flash on/off.
Active Lane Management Indicator Light —
If Equipped
When the Active Lane Management
system is ON, but not armed, the Active
Lane Management indicator light
illuminates solid white. This occurs
when only left, right, or neither lane line has been
detected. If a single lane line is detected, the
system is ready to provide only visual warnings if
an unintentional lane departure occurs on the
Rear Seat Belt Reminder Indicator Light
This light indicates when a rear seat belt
is unbuckled in the second row. When
the ignition is first placed in the ON/RUN
position, and if a seat belt in the second
row is unbuckled, a light corresponding to the
specific seat will turn on in the upper right portion
of the instrument cluster display, momentarily
3
126
GETTING TO KNOW YOUR INSTRUMENT PANEL
replacing the configurable corner information. If a
second row seat belt that was buckled at the start
of the trip is unbuckled, the Rear Seat Belt
Reminder Light will change from the buckled to the
unbuckled symbol, and a chime will sound
Rear Seat Unoccupied Indicator Light
This light indicates when the rear
passenger seats are unoccupied, and
will illuminate in the upper right portion
of the instrument cluster display,
momentarily replacing the configurable corner
information.
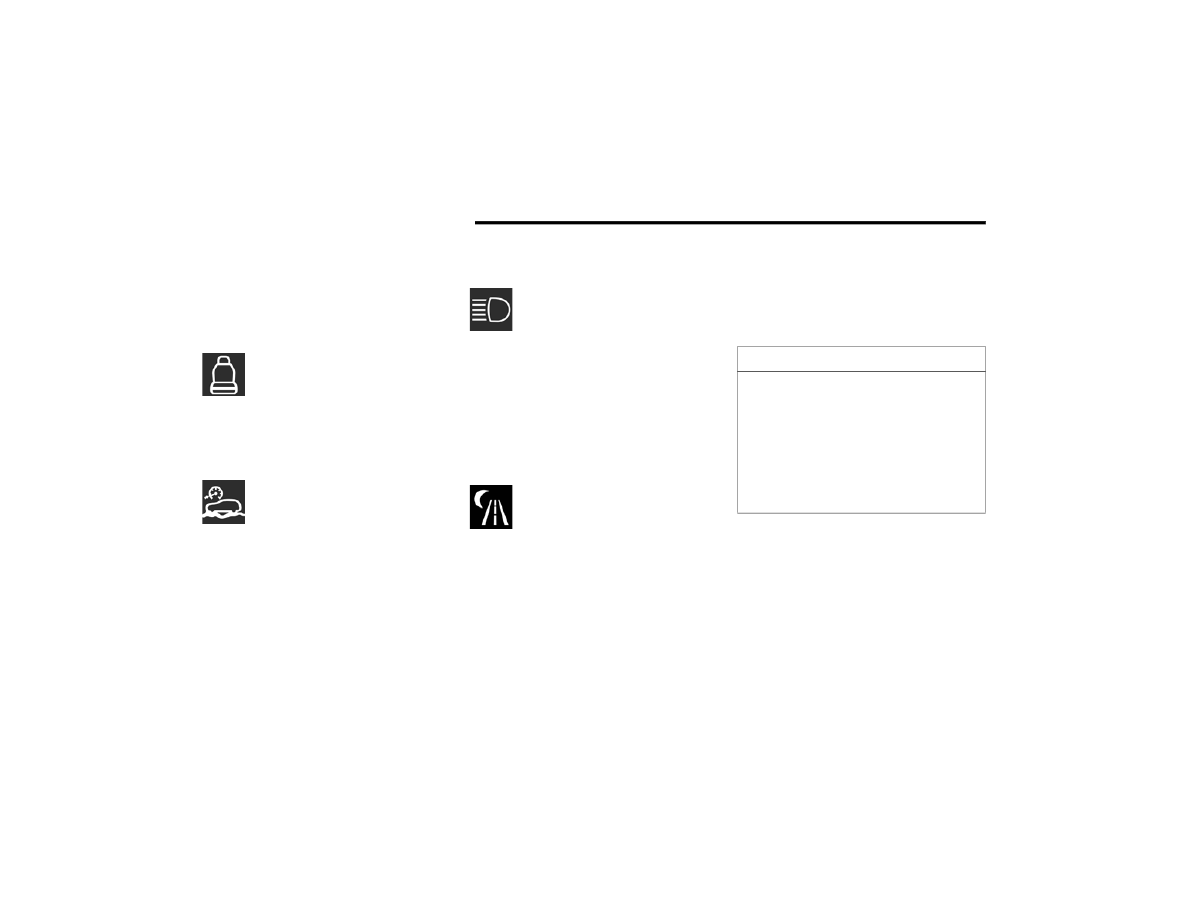
Selec-Speed Control Indicator Light —
If Equipped
This light will turn on when Selec-Speed
Control is activated.
To activate Selec-Speed Control, ensure
the vehicle is 4WD Low and push the
button on the Instrument Panel.
NOTE:
If the vehicle is not in 4WD Low, “To Enter
Selec-Speed Shift to 4WD Low” will appear in the
instrument cluster display.
B
LUE
I
NDICATOR
L
IGHTS
High Beam Indicator Light
This indicator light will illuminate to
indicate that the high beam headlights
are on. With the low beams activated,
push the multifunction lever forward
(toward the front of the vehicle) to turn on the high
beams. Pull the multifunction lever rearward (toward
the rear of the vehicle) to turn off the high beams. If
the high beams are off, pull the lever toward you for
a temporary high beam on, “flash to pass” scenario.
G
RAY
I
NDICATOR
L
IGHTS
Night Vision Suppressed Indicator Light —
If Equipped
This light alerts the driver that the Night
Vision Warning System status is
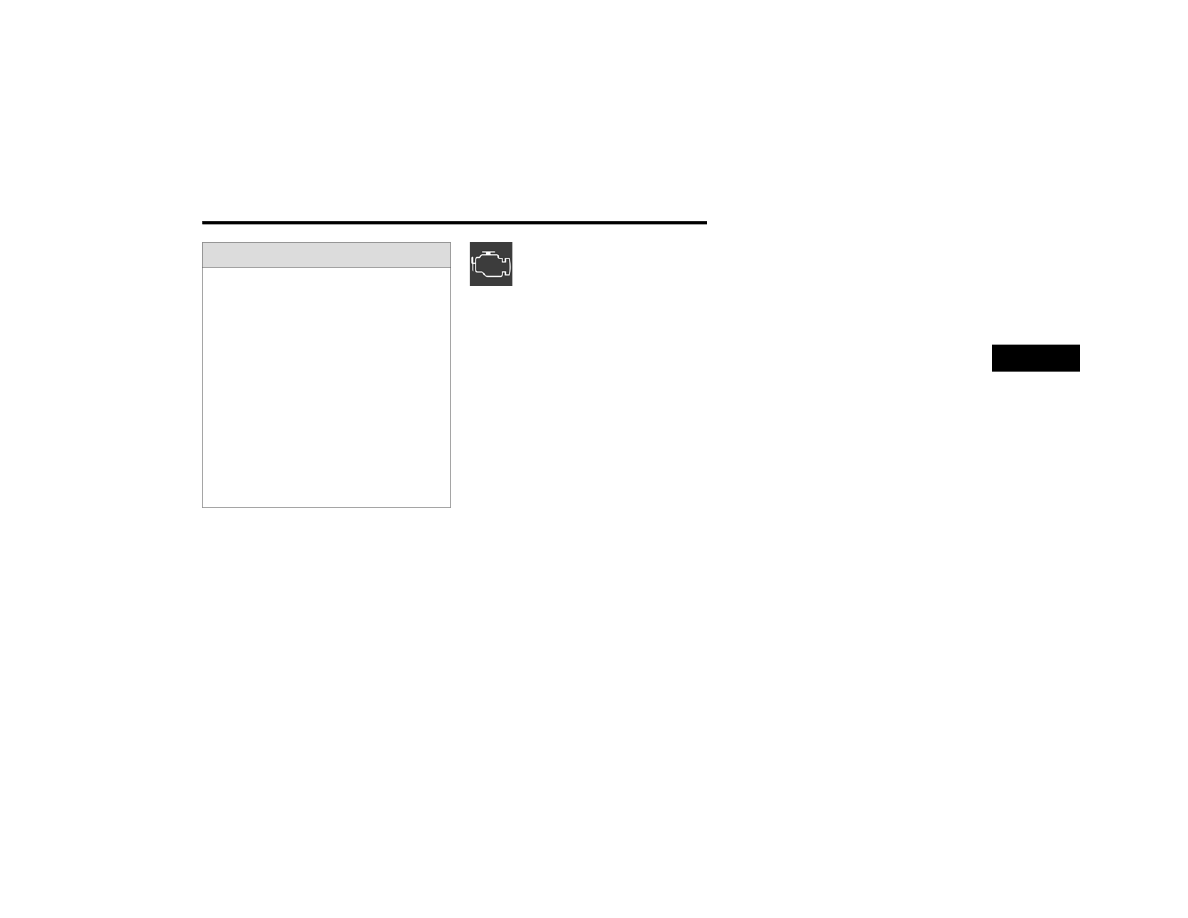
ONBOARD DIAGNOSTIC SYSTEM — OBD II
Your vehicle is equipped with a sophisticated
Onboard Diagnostic system called OBD II. This
system monitors the performance of the emissions,
engine, and transmission control systems. When
these systems are operating properly, your vehicle
will provide excellent performance and fuel
economy, as well as engine emissions well within
current government regulations.
If any of these systems require service, the OBD II
system will turn on the Malfunction Indicator Light
(MIL). It will also store diagnostic codes and other
information to assist your service technician in
making repairs. Although your vehicle will usually
be driveable and not need towing, see an
authorized dealer for service as soon as possible.
O
NBOARD
D
IAGNOSTIC
S
YSTEM
(OBD II) C
YBERSECURITY
Your vehicle is required to have OBD II and a
connection port to allow access to information
related to the performance of your emissions
controls. Authorized service technicians may need
to access this information to assist with the
diagnosis and service of your vehicle and
CAUTION!
Prolonged driving with the MIL on could cause
further damage to the emission control
system. It could also affect fuel economy and
driveability. The vehicle must be serviced
before any emissions tests can be performed.
If the MIL is flashing while the vehicle is
running, severe catalytic converter damage
and power loss will soon occur. Immediate
service is required.
GETTING TO KNOW YOUR INSTRUMENT PANEL
127
EMISSIONS INSPECTION AND
MAINTENANCE PROGRAMS
In some localities, it may be a legal requirement to
pass an inspection of your vehicle's emissions
control system. Failure to pass could prevent
vehicle registration.
For states that require an Inspection
and Maintenance (I/M), this check
verifies the Malfunction Indicator Light
(MIL) is functioning and is not on when
the engine is running, and that the OBD II system
is ready for testing.
Normally, the OBD II system will be ready. The OBD
II system may not be ready if your vehicle was
recently serviced, recently had a depleted battery
or a battery replacement. If the OBD II system
should be determined not ready for the I/M test,
your vehicle may fail the test.
Your vehicle has a simple ignition actuated test,
which you can use prior to going to the test station.
To check if your vehicle's OBD II system is ready,
you must do the following:
1. Cycle the ignition switch to the ON position,
but do not crank or start the engine.
NOTE:
If you crank or start the engine, you will have to
start this test over.
2. As soon as you cycle the ignition switch to the
ON position, you will see the Malfunction
Indicator Light (MIL) symbol come on as part of
a normal bulb check.
3. Approximately 15 seconds later, one of two
things will happen:
The MIL will flash for about 10 seconds and
then return to being fully illuminated until
you turn OFF the ignition or start the engine.
This means that your vehicle's OBD II
system is not ready and you should not
proceed to the I/M station.
The MIL will not flash at all and will remain
fully illuminated until you place the ignition
in the off position or start the engine. This
means that your vehicle's OBD II system is
ready and you can proceed to the I/M
station.
If your OBD II system is not ready, you should see
an authorized dealer or repair facility. If your
vehicle was recently serviced or had a battery
failure or replacement, you may need to do nothing
more than drive your vehicle as you normally would
in order for your OBD II system to update. A
recheck with the above test routine may then
indicate that the system is now ready.
Regardless of whether your vehicle's OBD II system
is ready or not, if the MIL is illuminated during
normal vehicle operation you should have your
vehicle serviced before going to the I/M station.
The I/M station can fail your vehicle because the
MIL is on with the engine running.
WARNING!
ONLY an authorized service technician should
connect equipment to the OBD II connection
port in order to read the VIN, diagnose, or
service your vehicle.
If unauthorized equipment is connected to the
OBD II connection port, such as a
driver-behavior tracking device, it may:
Be possible that vehicle systems,
including safety related systems, could be
impaired or a loss of vehicle control could
occur that may result in an accident
involving serious injury or death.
Access, or allow others to access, infor
-
mation stored in your vehicle systems,
including personal information.
3
128
(Continued)
STARTING AND OPERATING
STARTING THE ENGINE
Before starting your vehicle, adjust your seat,
adjust the inside and outside mirrors, fasten your
seat belt, and if present, instruct all other
occupants to buckle their seat belts.
A
UTOMATIC
T
RANSMISSION
The gear selector must be in the NEUTRAL (N) or
PARK (P) position before you can start the engine.
Apply the brakes before shifting into any driving
gear.
K
EYLESS
E
NTER
‘
N
G
O
™ — I
GNITION
This feature allows the driver to operate the
ignition switch with the push of a button, as long as
the Remote Start/Keyless Enter ‘n Go™ key fob is
in the passenger compartment.
WARNING!
Before exiting a vehicle, always come to a
complete stop, then shift the automatic trans
-
mission into PARK and apply the parking
brake.
Always make sure the keyless ignition node is
in the OFF position, key fob is removed from
the vehicle and vehicle is locked.
Never leave children alone in a vehicle, or with
access to an unlocked vehicle. Leaving chil
-
dren in a vehicle unattended is dangerous for
a number of reasons. A child or others could
be seriously or fatally injured. Children should
be warned not to touch the parking brake,
brake pedal or the gear selector.
Do not leave the key fob in or near the vehicle,
or in a location accessible to children, and do
not leave the ignition of a vehicle equipped
with Keyless Enter ‘n Go™ in the ON/RUN
position. A child could operate power
windows, other controls, or move the vehicle.
Do not leave children or animals inside parked
vehicles in hot weather. Interior heat build-up
may cause serious injury or death.
WARNING!
CAUTION!
Damage to the transmission may occur if the
following precautions are not observed:
Do not shift from REVERSE (R), PARK, or
NEUTRAL into any forward gear when the
engine is above idle speed.
Shift into PARK only after the vehicle has
come to a complete stop.
Shift into or out of REVERSE only after the
vehicle has come to a complete stop and the
engine is at idle speed.
Before shifting into any gear, make sure your
foot is firmly on the brake pedal.
STARTING AND OPERATING
129
(Continued)
N
ORMAL
S
TARTING
To Turn On The Engine Using The ENGINE START/
STOP Button
1. The transmission must be in PARK (P).
2. Press and hold the brake pedal while pushing
the ENGINE START/STOP button once.
3. The system takes over and attempts to start
the vehicle. If the vehicle fails to start, the
starter will disengage automatically after 10
seconds.
4. If you wish to stop the cranking of the engine
prior to the engine starting, push the ENGINE
START/STOP button again.
To Turn Off The Engine Using The ENGINE START/
STOP Button
1. Place the gear selector in PARK, then push
and release the ENGINE START/STOP button.
2. The ignition will return to the OFF position.
3. If the gear selector is not in PARK, the ENGINE
START/STOP button must be held for two
seconds or three short pushes in a row with
the vehicle speed above 5 mph (8 km/h)
before the engine will shut off. The ignition will
remain in the ON/RUN position until the gear
selector is in PARK and the button is pushed
twice to the OFF position.
4. If the gear selector is not in PARK and the
ENGINE START/STOP button is pushed once
with the vehicle speed above 5 mph (8 km/h),
the instrument cluster will display a “Vehicle
Not In Park” message and the engine will
remain running. Never leave a vehicle out of
the PARK position, or it could roll.
NOTE:
If the gear selector is not in PARK, and the ENGINE
START/STOP button is pushed once with the
vehicle speed below 5 mph (8 km/h), the engine
will shut off and the ignition will remain in the ON/
RUN position. If vehicle speed drops below
1.2 mph (1.9 km/h), the vehicle may AutoPark
ENGINE START/STOP Button Functions — With
Driver’s Foot OFF The Brake Pedal (In PARK Or
NEUTRAL Position)
The ENGINE START/STOP button operates similar
to an ignition switch. It has two positions: OFF, and
RUN. To change the ignition positions without
starting the vehicle and use the accessories, follow
these directions:
1. Start with the ignition in the OFF position.
2. Push the ENGINE START/STOP button once to
place the ignition in the ON/RUN position.
3. Push the ENGINE START/STOP button a
second time to return the ignition to the OFF
position.
NOTE:
Only press one pedal at a time while driving the
vehicle. Torque performance of the vehicle could
be reduced if both pedals are pressed at the same
time. If pressure is detected on both pedals simul
-
taneously, a warning message will display in the
A
UTO
P
ARK
AutoPark is a supplemental feature to assist in
placing the vehicle in PARK (P) should the
situations on the following pages occur. It is a
back-up system and should not be relied upon as
the primary method by which the driver shifts the
vehicle into PARK.
The conditions under which AutoPark will engage
are outlined on the following pages.
WARNING!
Driver inattention could lead to failure to place
the vehicle in PARK. ALWAYS DO A VISUAL
CHECK that your vehicle is in PARK by verifying
that a solid (not blinking) “P” is indicated in
the instrument cluster display and on the gear
selector. If the "P" indicator is blinking, your
vehicle is not in PARK. As an added precau
-
tion, always apply the parking brake when
exiting the vehicle.
4
130
STARTING AND OPERATING
If the vehicle is not in PARK and the driver turns off
the engine, the vehicle may AutoPark.
AutoPark will engage when all of these conditions
are met:
Vehicle is equipped with an 8-speed transmission
Vehicle is not in PARK
Vehicle speed is 1.2 mph (1.9 km/h) or less
Ignition is switched from RUN to OFF
NOTE:
For Keyless Enter ‘n Go™ equipped vehicles, the
engine will turn off and the ignition switch will
change to ON/RUN position. After 30 minutes the
ignition switches to OFF automatically, unless the
driver turns the ignition switch OFF.
If the vehicle is not in PARK and the driver exits the
vehicle with the engine running, the vehicle may
AutoPark.
AutoPark will engage when all of these conditions
are met:
Vehicle is equipped with an 8-speed transmission
Vehicle is not in PARK
Vehicle speed is 1.2 mph (1.9 km/h) or less
Driver’s seat belt is unbuckled
Driver’s door is ajar
Brake pedal is not pressed
The message “AutoPark Engaged Shift to P then
Shift to Gear” will display in the instrument cluster.
NOTE:
In some cases the ParkSense graphic will be
displayed in the instrument cluster. In these cases,
the gear selector must be returned to “P” to select
desired gear.
If the driver shifts into PARK while moving, the
vehicle may AutoPark.
AutoPark will engage ONLY when vehicle speed is
1.2 mph (1.9 km/h) or less.
The message “Vehicle Speed is Too High to Shift to
P” will be displayed in the instrument cluster if
vehicle speed is above 1.2 mph (1.9 km/h).
4WD LOW — If Equipped
AutoPark will be disabled when operating the
vehicle in 4WD LOW.
The message “AutoPark Disabled” will be
displayed in the instrument cluster.
Additional customer warnings will be given when
both of these conditions are met:
Vehicle is not in PARK
Driver’s door is ajar
The message “AutoPark Not Engaged” will be
displayed in the instrument cluster. A warning
chime will continue until you shift the vehicle into
PARK or the driver’s door is closed.
ALWAYS DO A VISUAL CHECK that your vehicle is in
PARK by looking for the "P" in the instrument
cluster display and on the gear selector. As an
added precaution, always apply the parking brake
when exiting the vehicle.
AutoPark is a supplemental feature. It is not
designed to replace the need to shift your
vehicle into PARK. It is a back up system and
should not be relied upon as the primary
method by which the driver shifts the vehicle
into PARK.
WARNING!
WARNING!
If vehicle speed is above 1.2 mph (1.9 km/h),
the transmission will default to NEUTRAL until
the vehicle speed drops below 1.2 mph
(1.9 km/h). A vehicle left in the NEUTRAL
position can roll. As an added precaution,
always apply the parking brake when exiting the
vehicle.

STARTING AND OPERATING
131
(Continued)
I
F
E
NGINE
F
AILS
T
O
S
TART
If the engine fails to start after you have followed the
“Normal Starting” procedure and has not
experienced an extended park condition (i.e., parked
for more than 30 days), it may be flooded. Push the
accelerator pedal all the way to the floor and hold it
there while the engine is cranking. This should clear
any excess fuel in case the engine is flooded. The
starter motor will engage automatically, run for 10
seconds, and then disengage. Once this occurs,
release the accelerator pedal and the brake pedal,
wait 10 to 15 seconds, then repeat the “Normal
Starting” procedure.
C
OLD
W
EATHER
O
PERATION
(B
ELOW
–22°F O
R
−30°C)
To ensure reliable starting at these temperatures,
use of an externally powered electric engine block
heater (available from an authorized dealer) is
recommended.
A
FTER
S
TARTING
The idle speed is controlled automatically, and it
will decrease as the engine warms up.
ENGINE BLOCK HEATER — IF EQUIPPED
The engine block heater warms the engine, and
permits quicker starts in cold weather. Connect the
cord to a standard 110-115 Volt AC electrical
outlet with a grounded, three-wire extension cord.
The engine block heater must be plugged in at
least one hour to have an adequate warming effect
on the engine.
The engine block heater cord is coiled and
strapped right behind the engine air cleaner filter
assembly from the manufacturer.
ENGINE BREAK-IN RECOMMENDATIONS
An initial break-in period is recommended for the
powertrain (engine, transmission, axle, etc.) in your
vehicle. Following the guidelines below will
contribute to improved longevity, fuel economy,
and performance.
Drive moderately during the first 100 miles
(160 km). After that, for the first 500 miles
(800 km), avoid long periods at constant speed.
WARNING!
Never pour fuel or other flammable liquid into
the throttle body air inlet opening in an
attempt to start the vehicle. This could result
in flash fire causing serious personal injury.
Do not attempt to push or tow your vehicle to
get it started. Vehicles equipped with an auto
-
matic transmission cannot be started this
way. Unburned fuel could enter the catalytic
converter and once the engine has started,
ignite and damage the converter and vehicle.
If the vehicle has a discharged battery,
booster cables may be used to obtain a start
from a booster battery or the battery in
another vehicle. This type of start can be
CAUTION!
To prevent damage to the starter, do not
continuously crank the engine for more than 10
seconds at a time. Wait 10 to 15 seconds before
trying again.
WARNING!
WARNING!
Remember to disconnect the engine block
heater cord before driving. Damage to the
110-115 Volt electrical cord could cause
electrocution.
4
132
STARTING AND OPERATING
Varying speed, engine RPM, and throttle position is
desirable.
Avoid high performance, severe off-road, and
towing for the first 500 miles (800km).
NOTE:
A new engine may consume some oil during its first
few thousand miles (km) of operation. This should
be considered a normal part of the break-in and
not interpreted as a problem. For engines not
equipped with an oil level sensor, please check
your oil level frequently during the break-in period.
Add manufacturer-approved oil as required
PARKING BRAKE
E
LECTRIC
P
ARK
B
RAKE
(EPB)
Your vehicle is equipped with an EPB that offers
simple operation, and some additional features
that make the parking brake more convenient and
useful.
The parking brake is primarily intended to prevent
the vehicle from rolling while parked. Before
leaving the vehicle, make sure that the parking
brake is applied. Also, be certain to leave the
transmission in PARK.
You can engage the parking brake in two ways:
Manually, by applying the EPB switch.
Automatically, by enabling the Auto Park Brake
feature in the customer programmable features
section of the Uconnect settings.
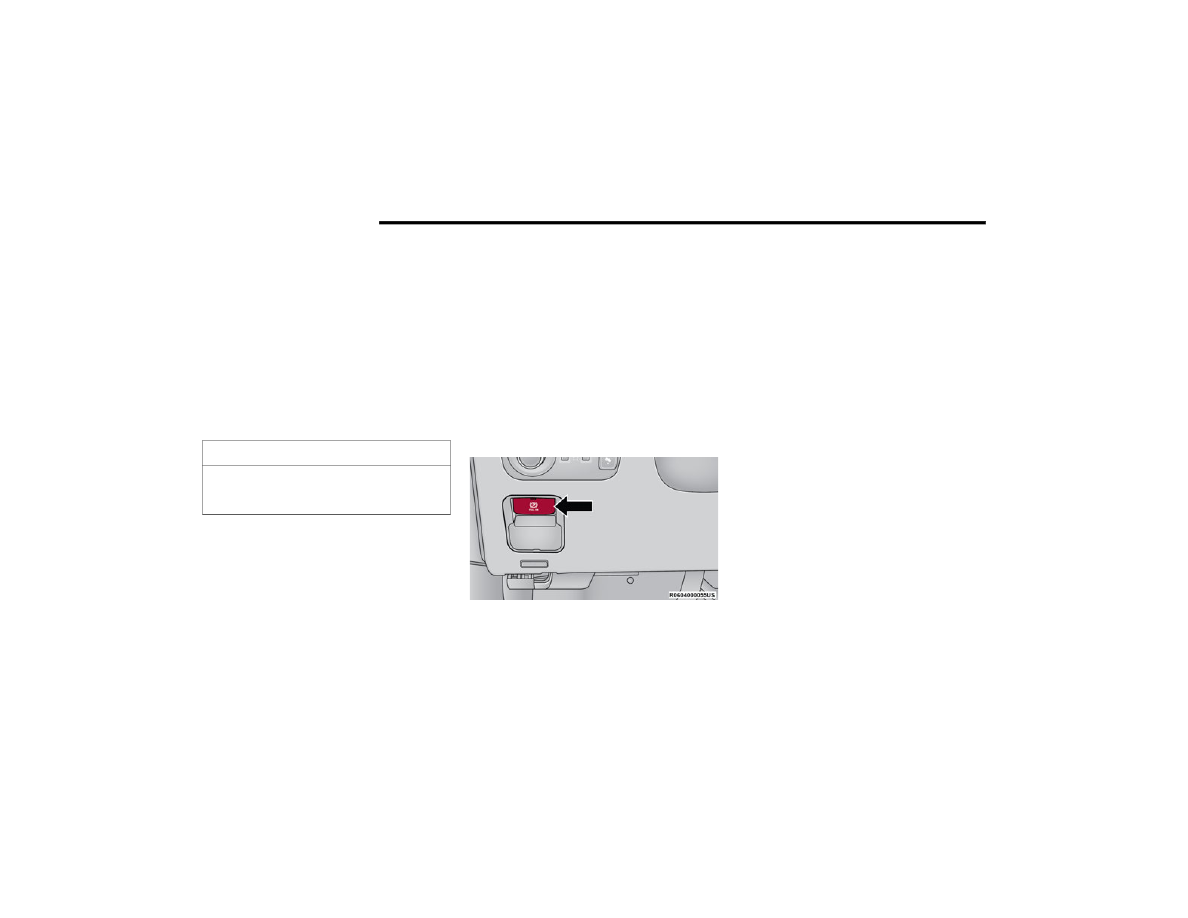
The EPB switch is located on the instrument panel
to the left of the steering wheel (below the
headlamp switch).
Electric Park Brake Switch
To apply the parking brake manually, pull up on the
switch momentarily. You may hear a sound from
the back of the vehicle while the parking brake
engages. Once the parking brake is fully engaged,
the BRAKE telltale light in the instrument cluster
and an indicator on the switch will illuminate. If
your foot is on the brake pedal while you apply the
parking brake, you may notice a small amount of
brake pedal movement. The parking brake can be
applied even when the ignition switch is OFF but
the BRAKE telltale light will not illuminate,
however, it can only be released when the ignition
is in the ON/RUN position.
NOTE:
The EPB fault light will illuminate if the EPB switch
is held for longer than 20 seconds in either the
released or applied position. The light will extin
-
guish upon releasing the switch.
If the Auto Park Brake feature is enabled, the
parking brake will automatically engage whenever
the transmission is placed in PARK. If your foot is
on the brake pedal, you may notice a small amount
of brake pedal movement while the parking brake
is engaging.
The parking brake will release automatically when
the ignition is ON, the transmission is in DRIVE or
REVERSE, the driver’s seat belt is buckled, and an
attempt is made to drive away.
CAUTION!
Never use Non-Detergent Oil or Straight Mineral
Oil in the engine or damage may result. ONLY

STARTING AND OPERATING
133
(Continued)
To release the parking brake manually, the ignition
switch must be in the ON/RUN position. Put your
foot on the brake pedal, then push the EPB switch
down momentarily. You may hear a sound from the
back of the vehicle while the parking brake
disengages. You may also notice a small amount of
movement in the brake pedal. Once the parking
brake is fully disengaged, the BRAKE telltale light
in the instrument cluster and the LED indicator on
the switch will extinguish.
NOTE:
When parking on a hill, it is important to turn the
front wheels toward the curb on a downhill grade
and away from the curb on an uphill grade. Apply
the parking brake before placing the gear selector
in PARK, otherwise the load on the transmission
locking mechanism may make it difficult to move
the gear selector out of PARK.
If exceptional circumstances should make it
necessary to engage the parking brake while the
vehicle is in motion, maintain upward pressure on
the EPB switch for as long as engagement is
desired. The BRAKE telltale light will illuminate,
and a continuous chime will sound. The rear stop
lamps will also be illuminated automatically while
the vehicle remains in motion.
To disengage the parking brake while the vehicle is
in motion, release the switch. If the vehicle is
brought to a complete stop using the parking
brake, when the vehicle reaches approximately
3 mph (5 km/h), the parking brake will remain
engaged.
WARNING!
Never use the PARK position as a substitute
for the parking brake. Always apply the
parking brake fully when parked to guard
against vehicle movement and possible injury
or damage.
When exiting the vehicle, always turn the igni
-
tion off, secure the key fob, and lock your
vehicle.
Never leave children alone in a vehicle, or with
access to an unlocked vehicle. Allowing chil
-
dren to be in a vehicle unattended is
dangerous for a number of reasons. A child or
others could be seriously or fatally injured.
Children should be warned not to touch the
parking brake, brake pedal or the gear
selector.
Do not leave the key fob in or near the vehicle,
or in a location accessible to children, and do
not leave a vehicle equipped with Keyless
Enter ‘n Go™ in the ON/RUN position. A child
could operate power windows, other controls,
or move the vehicle.
Be sure the parking brake is fully disengaged
before driving; failure to do so can lead to a
brake failure and a collision.
Always fully apply the parking brake when
leaving your vehicle, or it may roll and cause
damage or injury. Also be certain to leave the
transmission in PARK. Failure to do so may
allow the vehicle to roll and cause damage or
injury.
WARNING!
CAUTION!
If the Brake System Warning Light remains on
with the parking brake released, a brake system
malfunction is indicated. Have the brake system
serviced by an authorized dealer immediately.
WARNING!
Driving the vehicle with the parking brake
engaged, or repeated use of the parking brake
to slow the vehicle, may cause serious damage
to the brake system. Be sure the parking brake
is fully disengaged before driving; failure to do
so can lead to brake failure and a collision.
4
134
STARTING AND OPERATING
In the unlikely event of a malfunction of the EPB
system, a yellow EPB fault light will illuminate. This
may be accompanied by the BRAKE telltale light
flashing. In this event, urgent service of the EPB
system is required. Do not rely on the parking
brake to hold the vehicle stationary.
Auto Park Brake
The EPB can be programmed to be applied
automatically whenever the vehicle is at a
standstill and the transmission is placed in PARK.
Auto Park Brake is enabled and disabled by
customer selection through the customer
programmable features section of the Uconnect
Any single Auto Park Brake application can be
bypassed by pushing the EPB switch to the release
position while the transmission is placed in PARK.
SafeHold
SafeHold is a safety feature of the EPB system that
will engage the parking brake automatically if the
vehicle is left unsecured while the ignition is in ON/
RUN.
The parking brake will automatically engage if all of
the following conditions are met:
The vehicle is at a standstill.
There is no attempt to press the brake pedal or
accelerator pedal.
The seat belt is unbuckled.
The driver’s door is open.
SafeHold can be temporarily bypassed by pushing
the EPB switch while the driver’s door is open.
Once manually bypassed, SafeHold will be enabled
again once the vehicle reaches 12 mph (20 km/h)
or the ignition is turned to the OFF position and
back to ON again.
Hold ‘N Go — If Equipped
Hold ‘N Go is a comfort feature that allows the
driver to remove their foot from the brake pedal
once the vehicle has come to a stop. The vehicle
must be held at a standstill for a predetermined
amount of time by hydraulic braking. The EPB will
then engage and continue to hold the vehicle at a
stop until the driver applies the accelerator pedal.
Hold ‘N Go can be activated or deactivated by
pushing the AUTO HOLD button located on the
switch bank.
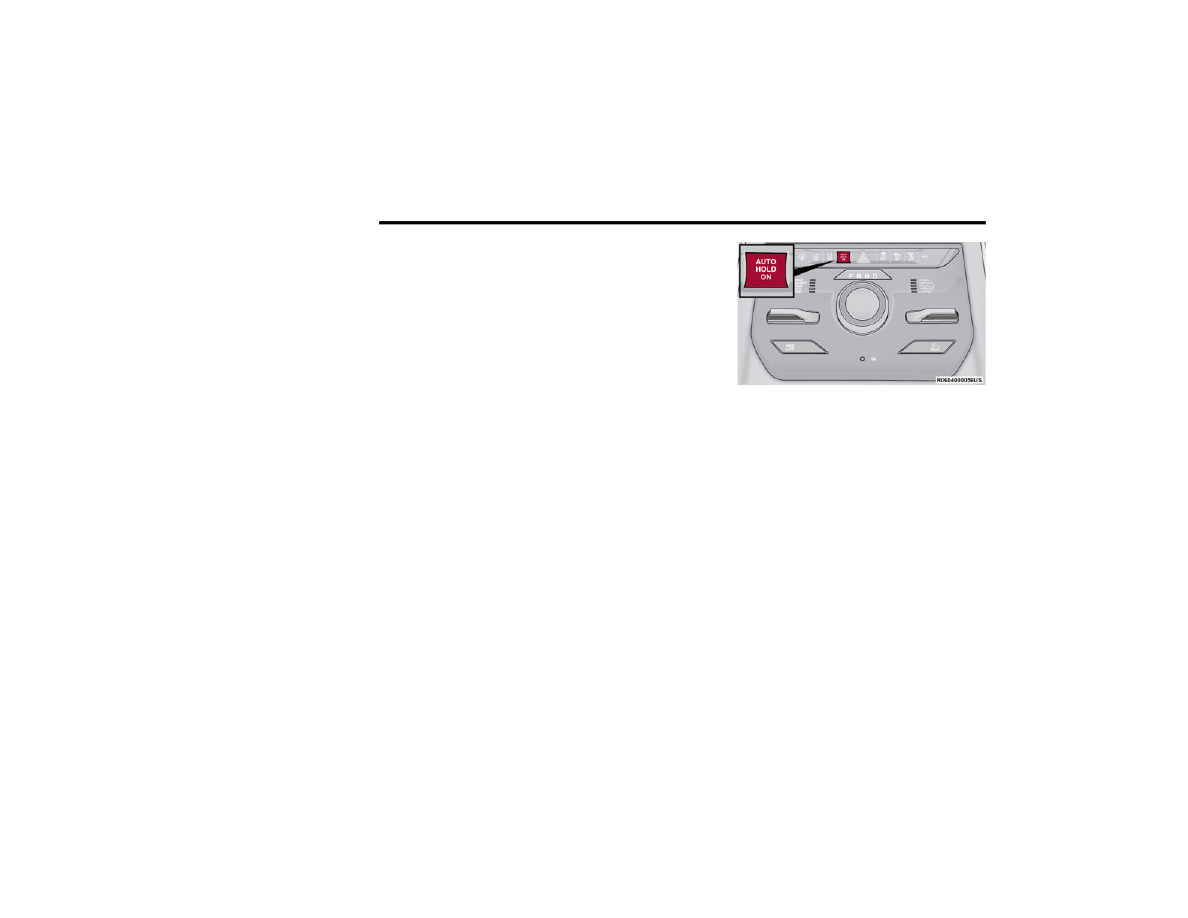
AUTO HOLD Switch
The following conditions must be met for Hold ‘N
Go to activate:
Driver’s door is closed
Driver's seat belt is fastened
Vehicle is at a standstill
Forward gear is selected
ACC is not engaged
EPB is not applied
ParkSense Active Park Assist System auto
parking maneuver is not activated
STARTING AND OPERATING
135
(Continued)
(Continued)
Brake Maintenance Mode
We recommend having your brakes serviced by an
authorized dealer. You should only make repairs
for which you have the knowledge and the right
equipment. You should only enter Brake
Maintenance mode during brake service.
When servicing your rear brakes, it may be
necessary for you or your technician to push the
rear piston into the rear caliper bore. With the EPB
system, this can only be done after retracting the
EPB actuator. Fortunately, actuator retraction can
be done easily by entering the Brake Maintenance
mode through the Uconnect Settings in your
vehicle. This menu-based system will guide you
through the steps necessary to retract the EPB
actuator in order to perform rear brake service.
Maintenance mode has requirements that must be
met in order to be activated:
The vehicle must be at a standstill.
The parking brake must be unapplied.
The transmission must be in PARK or NEUTRAL.
While in Maintenance mode, the EPB fault lamp
will flash continuously while the ignition is ON.
When brake service work is complete, the following
steps must be followed to reset the parking brake
system to normal operation:
Ensure the vehicle is at a standstill.
Press the brake pedal with moderate force.
Apply the EPB switch.
AUTOMATIC TRANSMISSION
You must press and hold the brake pedal while
shifting out of PARK.
WARNING!
You can be badly injured working on or around a
motor vehicle. Do only that service work for
which you have the knowledge and the right
equipment. If you have any doubt about your
ability to perform a service job, take your vehicle
to a competent mechanic.
WARNING!
Never use the PARK (P) position as a substi
-
tute for the parking brake. Always apply the
parking brake fully when exiting the vehicle to
guard against vehicle movement and possible
injury or damage.
Your vehicle could move and injure you and
others if it is not in PARK. Check by trying to
move the transmission gear selector out of
PARK with the brake pedal released. Make
sure the transmission is in PARK before
exiting the vehicle.
The transmission may not engage PARK if the
vehicle is moving. Always bring the vehicle to a
complete stop before shifting to PARK, and
verify that the transmission gear position indi
-
cator solidly indicates PARK without blinking.
Ensure that the vehicle is completely stopped,
and the PARK position is properly indicated,
before exiting the vehicle.
It is dangerous to shift out of PARK or
NEUTRAL (N) if the engine speed is higher
than idle speed. If your foot is not firmly
pressing the brake pedal, the vehicle could
accelerate quickly forward or in reverse. You
could lose control of the vehicle and hit
someone or something. Only shift into gear
when the engine is idling normally and your
foot is firmly pressing the brake pedal.
WARNING!
4
136
STARTING AND OPERATING
I
GNITION
P
ARK
I
NTERLOCK
This vehicle is equipped with an Ignition Park
Interlock which requires the transmission to be in
PARK (P) before the ignition can be turned to the
OFF position. This helps the driver avoid
inadvertently leaving the vehicle without placing
the transmission in PARK. This system also locks
the transmission in PARK whenever the ignition is
in the OFF position.
NOTE:
The transmission is NOT locked in PARK when the
ignition is in the ON/RUN position (even though the
engine will be off). Ensure that the transmission is
in PARK, and the ignition is OFF (not in ON/RUN
position) before exiting the vehicle.
B
RAKE
/T
RANSMISSION
S
HIFT
I
NTERLOCK
(BTSI) S
YSTEM
This vehicle is equipped with a BTSI system that
holds the transmission gear selector in PARK
unless the brakes are applied. To shift the
transmission out of PARK, the engine must be
running and the brake pedal must be pressed. The
brake pedal must also be pressed to shift from
NEUTRAL into DRIVE or REVERSE when the vehicle
is stopped or moving at low speeds.
8-S
PEED
A
UTOMATIC
T
RANSMISSION
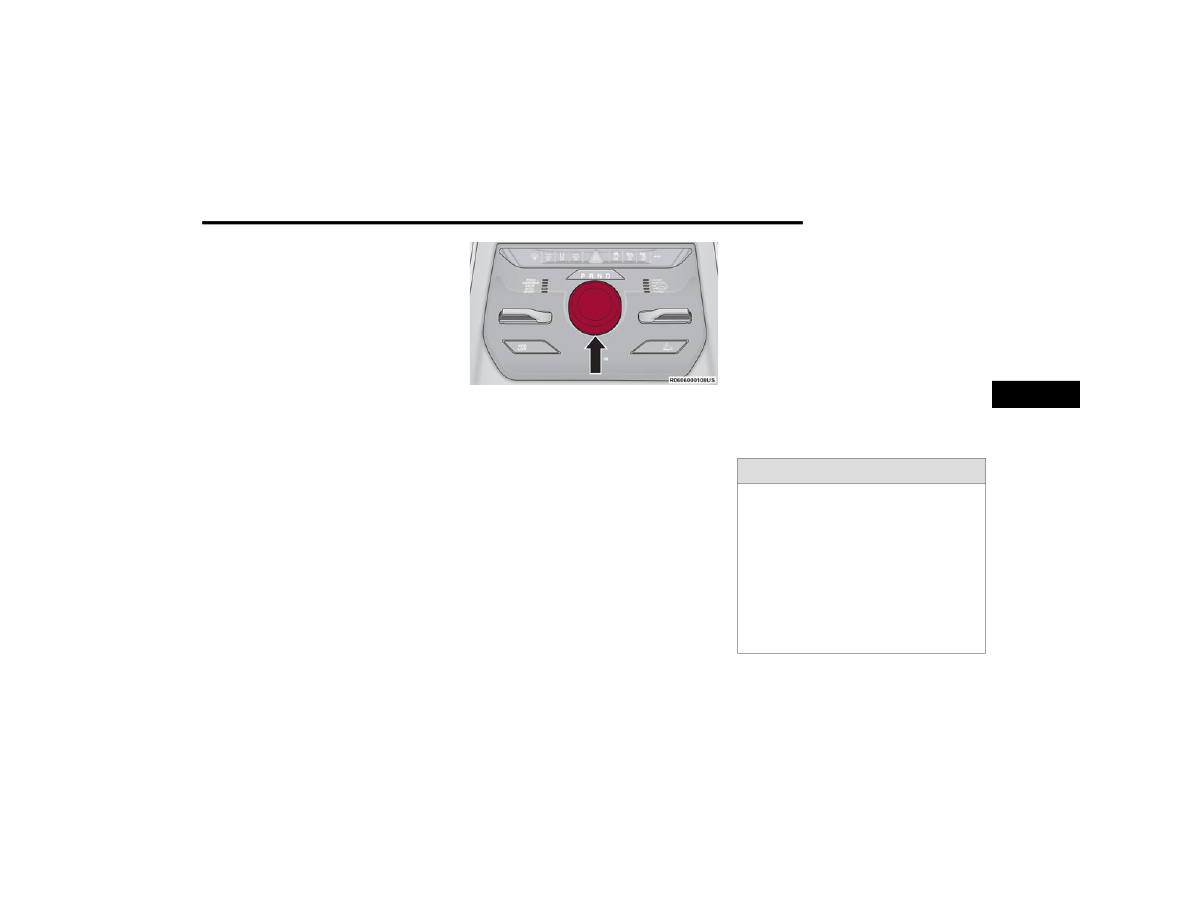
The transmission is controlled using a rotary
electronic gear selector located on the center
console. The transmission gear range (PRND) is
displayed both above the gear selector and in the
instrument cluster. To select a gear range, simply
rotate the gear selector. You must press the brake
pedal to shift the transmission out of PARK (or
NEUTRAL, when the vehicle is stopped or moving at
low speeds). To shift past multiple gear ranges at
once (such as PARK to DRIVE), simply rotate the
gear selector to the appropriate detent. Select the
DRIVE range for normal driving.
Unintended movement of a vehicle could
injure those in or near the vehicle. As with all
vehicles, you should never exit a vehicle while
the engine is running. Before exiting a vehicle,
always come to a complete stop, then apply
the parking brake, shift the transmission into
PARK, and turn the ignition OFF. When the
ignition is in the OFF position, the transmis
-
sion is locked in PARK, securing the vehicle
against unwanted movement.
When exiting the vehicle, always make sure
the ignition is in the OFF position, remove the
key fob from the vehicle, and lock the vehicle.
Never leave children alone in a vehicle, or with
access to an unlocked vehicle. Allowing chil
-
dren to be in a vehicle unattended is
dangerous for a number of reasons. A child or
others could be seriously or fatally injured.
Children should be warned not to touch the
parking brake, brake pedal or the transmis
-
sion gear selector.
Do not leave the key fob in or near the vehicle
(or in a location accessible to children), and do
not leave the ignition in the ON/RUN position.
A child could operate power windows, other
controls, or move the vehicle.
WARNING!
CAUTION!
Damage to the transmission may occur if the
following precautions are not observed:
Shift into or out of PARK or REVERSE (R) only
after the vehicle has come to a complete stop.
Do not shift between PARK, REVERSE,
NEUTRAL, or DRIVE (D) when the engine is
above idle speed.
Before shifting into any gear, make sure your
foot is firmly pressing the brake pedal.
STARTING AND OPERATING
137
(Continued)
NOTE:
In the event of a mismatch between the gear
selector position and the actual transmission gear
(for example, driver selects PARK while driving),
the position indicator will blink continuously until
the selector is returned to the proper position, or
the requested shift can be completed.
The electronically controlled transmission adapts
its shift schedule based on driver inputs, along
with environmental and road conditions. The
transmission electronics are self-calibrating;
therefore, the first few shifts on a new vehicle may
be somewhat abrupt. This is a normal condition,
and precision shifts will develop within a few
hundred miles (kilometers).
Only shift from DRIVE to PARK or REVERSE when
the accelerator pedal is released and the vehicle is
stopped. Be sure to keep your foot on the brake
pedal when shifting between these gears.
The transmission gear selector has only PARK,
REVERSE, NEUTRAL, and DRIVE positions.
Manual downshifts can be made using the
Electronic Range Select (ERS) shift control.
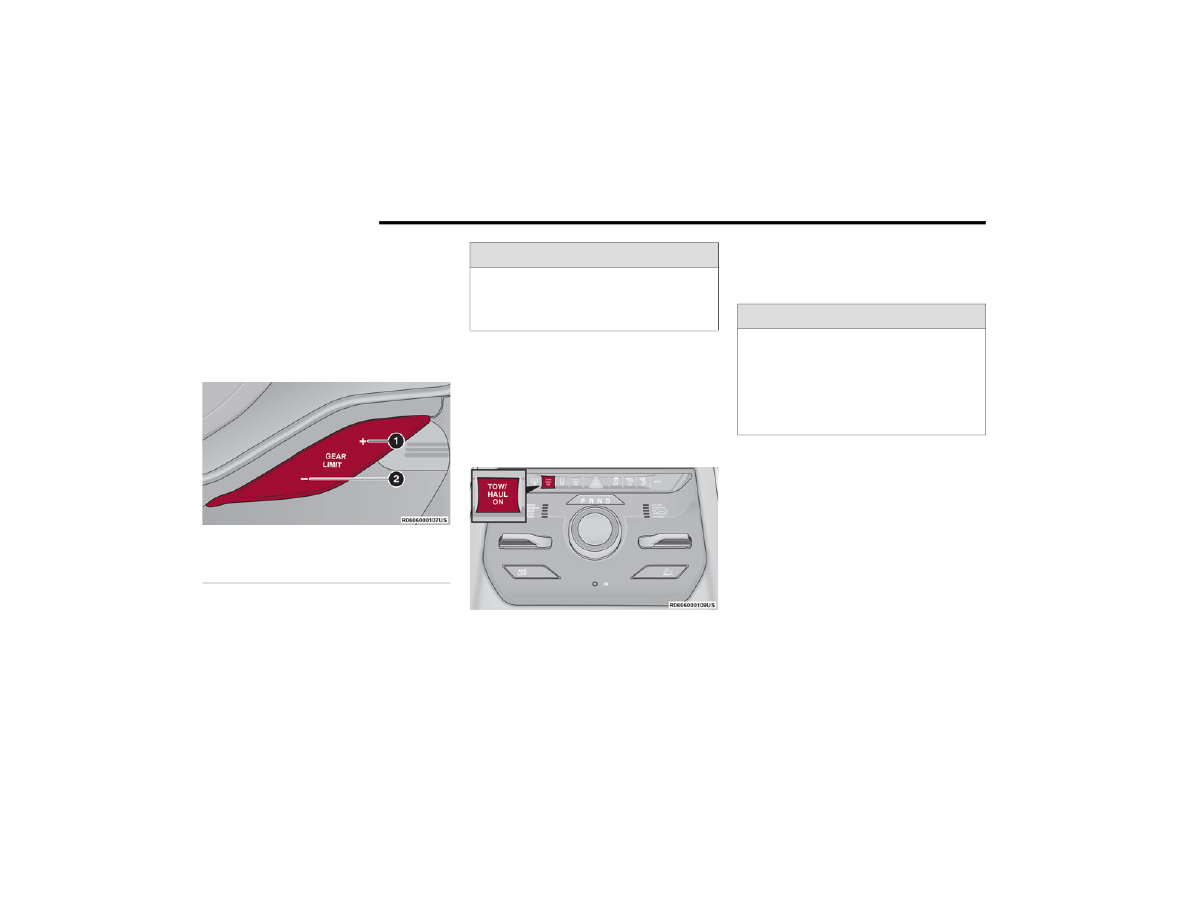
Pushing the GEAR “-”/GEAR “+” switches (on the
steering wheel) while in the DRIVE position will
select the highest available transmission gear,
and will display that gear limit in the instrument
cluster as 1, 2, 3, etc. Some models will display
both the selected gear limit, and the actual
current gear, while in ERS mode.
Transmission Gear Selector
Gear Ranges
Do not press the accelerator pedal when shifting
from PARK (P) or NEUTRAL (N) into another gear
range.
NOTE:
After selecting any gear range, wait a moment to
allow the selected gear to engage before acceler
-
ating. This is especially important when the engine
is cold.
PARK (P)
This range supplements the parking brake by
locking the transmission. The engine can be
started in this range. Never attempt to use PARK
while the vehicle is in motion. Apply the parking
brake when exiting the vehicle in this range.
When parking on a hill, apply the parking brake
before shifting the transmission to PARK. As an
added precaution, turn the front wheels toward the
curb on a downhill grade and away from the curb
on an uphill grade.
When exiting the vehicle, always:
Apply the parking brake.
Shift the transmission into PARK.
Turn the ignition OFF.
Remove the key fob from the vehicle.
NOTE:
On four-wheel drive vehicles be sure that the
transfer case is in a drive position.
WARNING!
Never use the PARK (P) position as a substi
-
tute for the parking brake. Always apply the
parking brake fully when exiting the vehicle to
guard against vehicle movement and possible
injury or damage.
Your vehicle could move and injure you and
others if it is not in PARK. Check by trying to
move the transmission gear selector out of
PARK with the brake pedal released. Make
sure the transmission is in PARK before
exiting the vehicle.
4

138
STARTING AND OPERATING
(Continued)
The following indicators should be used to ensure
that you have properly engaged the transmission
into the PARK position:
Look at the transmission gear position display
and verify that it indicates the PARK position (P),
and is not blinking.
With the brake pedal released, verify that the
gear selector will not move out of PARK.
REVERSE (R)
This range is for moving the vehicle backward.
Shift into REVERSE only after the vehicle has come
to a complete stop.
NEUTRAL (N)
Use this range when the vehicle is standing for
prolonged periods with the engine running. Apply
the parking brake and shift the transmission into
PARK (P) if you must exit the vehicle.
The transmission may not engage PARK if the
vehicle is moving. Always bring the vehicle to a
complete stop before shifting to PARK, and
verify that the transmission gear position indi
-
cator solidly indicates PARK without blinking.
Ensure that the vehicle is completely stopped,
and the PARK position is properly indicated,
before exiting the vehicle.
It is dangerous to shift out of PARK or
NEUTRAL (N) if the engine speed is higher
than idle speed. If your foot is not firmly
pressing the brake pedal, the vehicle could
accelerate quickly forward or in reverse. You
could lose control of the vehicle and hit
someone or something. Only shift into gear
when the engine is idling normally and your
foot is firmly pressing the brake pedal.
Unintended movement of a vehicle could
injure those in or near the vehicle. As with all
vehicles, you should never exit a vehicle while
the engine is running. Before exiting a vehicle,
always come to a complete stop, then apply
the parking brake, shift the transmission into
PARK, and turn the ignition OFF. When the
ignition is in the OFF position, the transmis
-
sion is locked in PARK, securing the vehicle
against unwanted movement.
WARNING!
When exiting the vehicle, always make sure
the ignition is in the OFF position, remove the
key fob from the vehicle, and lock the vehicle.
Never leave children alone in a vehicle, or with
access to an unlocked vehicle. Allowing chil
-
dren to be in a vehicle unattended is
dangerous for a number of reasons. A child or
others could be seriously or fatally injured.
Children should be warned not to touch the
parking brake, brake pedal or the transmis
-
sion gear selector.
Do not leave the key fob in or near the vehicle
(or in a location accessible to children), and do
not leave the ignition in the ON/RUN position.
A child could operate power windows, other
controls, or move the vehicle.
CAUTION!
Before moving the transmission gear selector
out of PARK, you must start the engine, and
also press the brake pedal. Otherwise,
damage to the gear selector could result.
DO NOT race the engine when shifting from
PARK or NEUTRAL into another gear range, as
this can damage the drivetrain.
WARNING!
WARNING!
Do not coast in NEUTRAL and never turn off the
ignition to coast down a hill. These are unsafe
practices that limit your response to changing
traffic or road conditions. You might lose control
of the vehicle and have a collision.
STARTING AND OPERATING
139
DRIVE (D)
This range should be used for most city and
highway driving. It provides the smoothest upshifts
and downshifts, and the best fuel economy. The
transmission automatically upshifts through all
forward gears.
When frequent transmission shifting occurs (such
as when operating the vehicle under heavy loading
conditions, in hilly terrain, traveling into strong
head winds, or while towing a heavy trailer), use
the Electronic Range Select (ERS) shift control to
page 139. Under these
conditions, using a lower gear will improve
performance and extend transmission life by
reducing excessive shifting and heat build-up.
During cold temperatures, transmission operation
may be modified depending on engine and
transmission temperature as well as vehicle
speed. This feature improves warm-up time of the
engine and transmission to achieve maximum
efficiency. Engagement of the torque converter
clutch is inhibited until the transmission fluid is
warm. Normal operation will resume once the
transmission temperature has risen to a suitable
level.
Transmission Limp Home Mode
Transmission function is monitored electronically
for abnormal conditions. If a condition is detected
that could result in transmission damage,
Transmission Limp Home mode is activated. In this
mode, the transmission may operate only in
certain gears, or may not shift at all. Vehicle
performance may be severely degraded and the
engine may stall. In some situations, the
transmission may not re-engage if the engine is
turned off and restarted. The Malfunction Indicator
Light (MIL) may be illuminated. A message in the
instrument cluster will inform the driver of the
more serious conditions, and indicate what actions
may be necessary.
In the event of a momentary problem, the
transmission can be reset to regain all forward
gears by performing the following steps:
NOTE:
In cases where the instrument cluster message
indicates the transmission may not re-engage after
engine shutdown, perform this procedure only in a
desired location (preferably, at an authorized
dealer).
1. Stop the vehicle.
2. Shift the transmission into PARK (P), if
possible. If not, shift the transmission to
NEUTRAL (N).
3. Push and hold the ignition switch until the
engine turns off.
4. Wait approximately 30 seconds.
5. Restart the engine.
6. Shift into the desired gear range. If the
problem is no longer detected, the
transmission will return to normal operation.
NOTE:
Even if the transmission can be reset, we
recommend that you visit an authorized dealer at
your earliest possible convenience. An authorized
dealer has diagnostic equipment to assess the
condition of your transmission.
If the transmission cannot be reset, authorized
dealer service is required.
Electronic Range Select (ERS) Operation
The ERS shift control allows the driver to limit the
highest available gear when the transmission is in
DRIVE and ERS mode is not active. For example, if
you set the transmission gear limit to FOURTH
gear, the transmission will not shift above FOURTH
gear (except to prevent engine overspeed), but will
shift through the lower gears normally.
CAUTION!
Towing the vehicle, coasting, or driving for any
other reason with the transmission in NEUTRAL
can cause severe transmission damage.
For Recreational Towing see
For Towing A Disabled Vehicle see
4
140
STARTING AND OPERATING
You can switch between DRIVE and ERS mode at
any vehicle speed. When the transmission gear
selector is in DRIVE, the transmission will operate
automatically, shifting between all available gears.
Tapping the “-” button (on the steering wheel) will
activate ERS mode, display the current gear in the
instrument cluster, and set that gear as the top
available gear. Once in ERS mode, tapping the “-”
or “+” button will change the top available gear.
Electronic Range Select (ERS)
To exit ERS mode, simply push and hold the “+”
button until the gear limit display disappears from
the instrument cluster.
When to Use TOW/HAUL Mode
Select TOW/HAUL mode when driving in conditions
such as: driving in hilly areas, towing a trailer,
carrying a heavy load, etc. This mode will improve
performance and reduce the potential for
transmission overheating or failure due to
excessive shifting.
TOW/HAUL Switch
The TOW/HAUL Indicator Light will illuminate in the
instrument cluster to indicate that TOW/HAUL
mode has been activated. Pushing the switch a
second time restores normal operation. Normal
operation is always the default at engine start-up.
If TOW/HAUL mode is desired, the switch must be
pushed each time the engine is started.
FOUR-WHEEL DRIVE OPERATION
Q
UADRA
-T
RAC
I O
PERATING
I
NSTRUCTIONS
/P
RECAUTIONS
—
I
F
E
QUIPPED
The Quadra-Trac I is a single-speed (HI range only)
transfer case, which provides convenient full-time
four-wheel drive. No driver interaction is required.
The Brake Traction Control (BTC) System, which
combines standard ABS and Traction Control,
provides resistance to any wheel that is slipping to
allow additional torque transfer to wheels with
traction.
1 — Shift Up “+”
2 — Shift Down “–”
WARNING!
Do not downshift for additional engine braking
on a slippery surface. The drive wheels could
lose their grip and the vehicle could skid,
causing a collision or personal injury.
WARNING!
Do not use the “TOW/HAUL” feature when
driving in icy or slippery conditions. The
increased engine braking can cause the rear
wheels to slide, and the vehicle to swing around
with the possible loss of vehicle control, which
may cause an accident possibly resulting in
personal injury or death.
Нет комментариевНе стесняйтесь поделиться с нами вашим ценным мнением.
Текст