Jeep Wagoneer (2022 year). Manual in english — page 15

MULTIMEDIA
237
Audio
When the Audio button is pressed on the touchscreen, the system displays options related to the vehicle’s sound system. These settings can change the audio
location within the vehicle, adjust the bass or treble levels, and auto-play settings from an audio device or smartphone.
NOTE:
Depending on the vehicle’s options, feature settings may vary.
Setting Name
Description
Balance/Fade
This setting will adjust audio levels from specific speakers in the front/back
and left/right of the vehicle. The Speaker icon can be moved to set audio
location.
Equalizer
This setting will adjust the “Bass”, “Mid”, and “Treble” ranges of the audio.
Speed Adjusted Volume
This setting will adjust audio volume as speeds increase. At a higher setting,
the volume will increase more as the vehicle speeds up. The available settings
are “Off”, “1”, “2”, and “3”.
Surround Sound
This setting will turn the Surround Sound system on or off.
AUX Volume Offset
This setting will tune the audio levels from a device connected through the
AUX port. The available settings are “+” and “-”.
Auto Play
This setting will automatically begin playing audio from a connected device.
Auto-On Radio
This setting will automatically turn the radio on when the vehicle is started.
The available settings are “Off”, “On”, and “Recall Last”. With Recall Last, the
system resumes the previous task before vehicle shut off.
Radio off With Door
This setting will keep the radio on when a door is opened or until the Radio Off
Delay time is reached. The available settings are “On” and “Off”.
Volume Adjustment
This setting will allow you to set the audio volume levels for each option
(Media, Phone, Navigation, etc.). You can set the volume between 0 and 38.
5

238
MULTIMEDIA
Notifications
When the Notifications button is pressed on the touchscreen, the system displays the options related to Notifications for the system.
NOTE:
Depending on the vehicle’s options, feature settings may vary.
Setting Name
Description
Notifications Sounds
Turn this setting on or off to hear notification sounds throughout your system.
App Drawer Favoriting Pop-ups
This setting turns the App Favorited pop-up on or off.
App Drawer Unfavoriting Pop-ups
This setting turns the App Unfavorited pop-up on or off.
New Text Message Pop-ups
This setting turns receiving/storing a pop-up for new text messages of any
connected phone on or off.
Missed Calls Message
This setting turns receiving/storing a pop-up for missed calls of any connected
phone on or off.
Navigation Pop-ups
This setting turns receiving/storing predictive Navigation pop-ups on or off.
SiriusXM® Travel Link Weather Alerts
This setting turns receiving notifications for SiriusXM® Travel Link Weather
Alerts on or off.
MULTIMEDIA
239
SiriusXM® Setup
Accessibility — If Equipped
When the SiriusXM® Setup button is pressed on the touchscreen, the system displays an option related to SiriusXM® satellite radio. These settings can be
used to skip specific radio channels and restart favorite songs from the beginning.
NOTE:
A subscription to SiriusXM® satellite radio is required for these settings to be functional.
Depending on the vehicle’s options, feature settings may vary.
Setting Name
Description
SiriusXM® Account, Profile, And Settings
This setting will redirect you to the SiriusXM® settings menu within the
SiriusXM® menu.
Block Explicit
This setting will skip over content labeled as explicit. The available settings
are “On” and “Off”.
After pressing the Accessibility button on the touchscreen, the following setting will be available:
NOTE:
Depending on the vehicle’s options, feature settings may vary.
Setting Name
Description
Video Button Readback
This setting will turn the Video Button Readback feature on or off.
5
240
MULTIMEDIA
Software Updates
System Information
When the Software Updates button is pressed on the touchscreen, the system will display the setting related to updating the Uconnect software.
NOTE:
Depending on the vehicle’s options, feature settings may vary.
Setting Name
Description
Software Downloads over Wi-Fi
This setting will allow software updates to happen over Wi-Fi. Selectable
options are “On” and “Off”.
After pressing the System Information button on the touchscreen, the following settings will be available:
NOTE:
Depending on the vehicle’s options, feature settings may vary.
Setting Name
Description
Version Information
When this feature is selected, a Version Information screen will appear,
displaying information about the version of your radio.
License Information
When this feature is selected, a License Information screen will appear,
displaying the licensing information of your radio.

MULTIMEDIA
241
Reset
When the Reset button is pressed on the touchscreen, the system displays the options related to resetting the Uconnect system back to its default settings.
These settings can clear personal data and reset selected settings from other menus.
NOTE:
Depending on the vehicle’s options, feature settings may vary.
Setting Name
Description
Restart Radio
This setting will reboot the radio.
Reset Apps Drawer To Default Order
This setting will return the apps drawer to the default order. The available
options are “Yes” and “Cancel”. The X button can also be pressed to cancel
the screen.
Restore Settings to Default
This setting will return all the previously changed settings to their factory
default.
Clear Personal Data
This setting will display a pop-up that gives you the option to clear all personal
data from the system, including Bluetooth® devices and presets.
Reset Wi-Fi Password For Projection
This setting will allow you to reset the vehicle’s Wi-Fi password for smartphone
projection. The available options are “Yes” and “Cancel”. The X button can
also be pressed to cancel the screen.
Reset Performance Values
This setting will reset the performance values from your vehicle.
Factory Reset
This setting will restore the radio to its factory default settings.
5
242
MULTIMEDIA
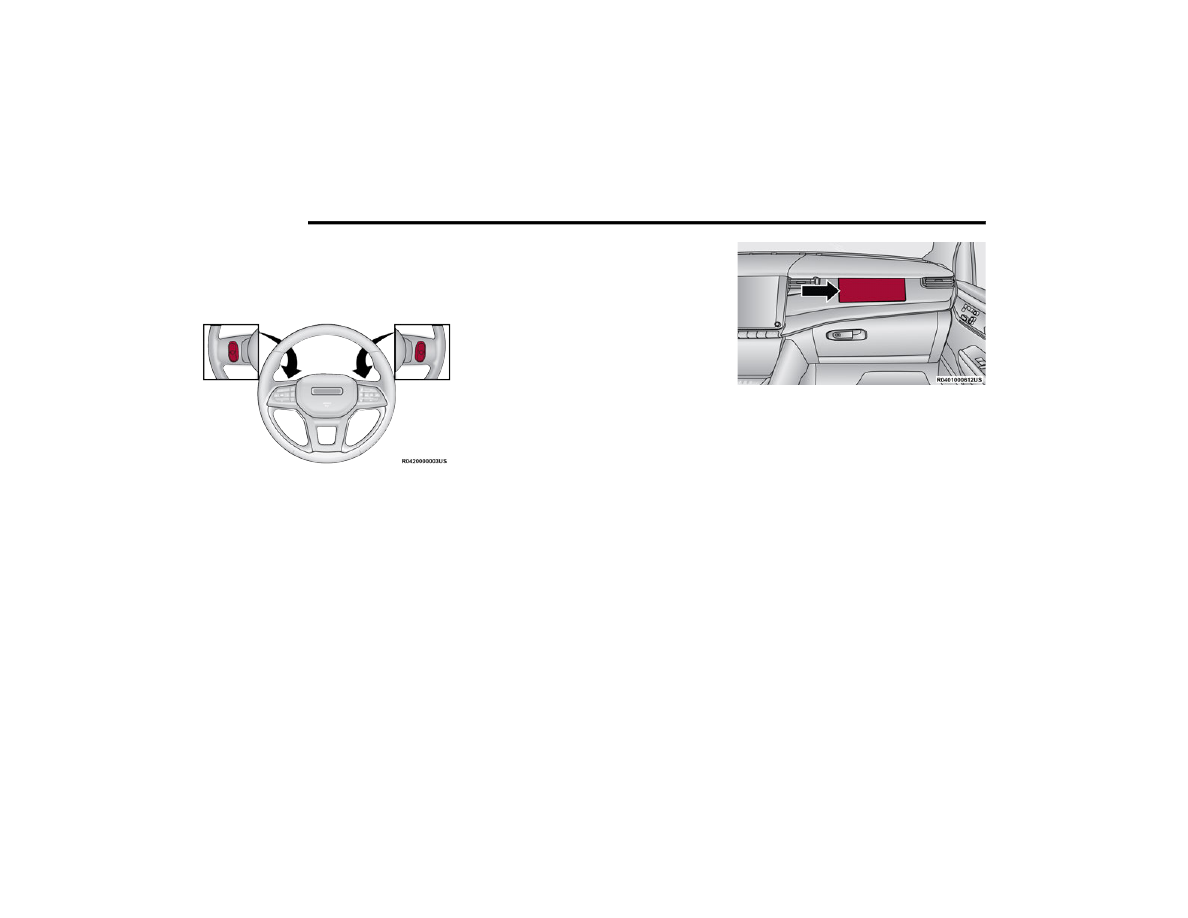
STEERING WHEEL AUDIO CONTROLS
The Remote Sound System controls are located on
the rear surface of the steering wheel. Reach
behind the wheel to access the switches.
Steering Wheel Audio Controls
The right-hand control is a rocker-type switch with
a push button in the center and controls the
volume and mode of the sound system. Pushing
the top of the rocker switch increases the volume,
and pushing the bottom of the rocker switch
decreases the volume.
Pushing the center button makes the radio switch
between the various modes available (AM/FM/
SXM or Media, etc.)
The left-hand control is a rocker-type switch with a
push button in the center. The function of the
left-hand control is different depending on which
mode you are in.
The following describes the left-hand control
operation in each mode.
R
ADIO
O
PERATION
Pushing the top of the switch will “Seek” up for the
next listenable station, and pushing the bottom of
the switch will “Seek” down for the next listenable
station.
The button located in the center of the left-hand
control will tune to the next preset station that you
have programmed in the radio preset button.
M
EDIA
M
ODE
Pushing the top of the switch once goes to the next
track on the selected media (AUX/USB/Bluetooth®).
Pushing the bottom of the switch once goes to the
beginning of the current track, or to the beginning of
the previous track if it is within eight seconds after
the current track begins to play.
PASSENGER SCREEN — IF EQUIPPED
Your vehicle may be equipped with a Passenger
Screen located above the glove compartment on
the passenger side of the vehicle. From the
Passenger Screen, you will be able to access
similar features seen within the Uconnect radio,
such as media functions, Rear Seat
Entertainment, Navigation, and device
management.
Passenger Screen Location
To begin using the Passenger Screen, push the
Power button in the center stack, or press the
Power button under the Controls tab within the
Uconnect system. The Passenger Screen can be
turned off by accessing the Control screen and
pressing the Power Off button.
You must link Bluetooth® headphones to the
Passenger Screen to begin listening to the
system’s audio
NOTE:
The Passenger Screen will need to be turned On
each time the vehicle is started, and the system
will display the Home Screen upon boot up.
Passenger Screen images are for illustration
purposes only and may not reflect exact soft
-
ware for your vehicle.
MULTIMEDIA
243
P
ASSENGER
S
CREEN
P
ERMISSIONS
Through the Uconnect system, features within the
Passenger Screen can be activated and
deactivated through Passenger Screen
Permissions. To access Permissions, press the
Vehicle button in the Menu Bar and select the
Settings tab. Then, press the Passenger Screen
settings menu. Press the On button for the
Passenger Screen Permission setting to activate
permissions.
Passenger Screen Permissions
By default, the Passenger Screen Permissions
setting is set to Off, and the driver will need to give
permission for the different features.
When permissions is turned On, you can
individually select the permissions for the
followings:
Navigation
Device Manager
Rear Seat Entertainment — If Equipped
Passenger Screen Permissions can also be
activated through the Controls screen, under the
Vehicle button in the Menu Bar. If “Deny Passenger
Screen Permissions” is turned On, the setting will
switch itself to Off.
H
OME
S
CREEN
Passenger Screen Home Screen
When the Passenger Screen is started up and no
other media was running during the last ignition
cycle, the Home Screen will display. Here, you can
select from the features of the Passenger Screen.
On the left side of the screen, you can access
Notifications and system Controls.
The Notification button (the bell) will take you to
the Notification screen, identical to what is seen in
the main radio.
You can cycle between the features by swiping left
or right on the touchscreen. When accessing a
feature, press the Home/Apps button on the left
side to access the feature view and select a
different feature.
The available features are:
Audio
Video & Images
HDMI
Rear Seat Entertainment — If Equipped
Navigation
Devices
Cameras
1 — Home Screen Button
2 — Notification Button
3 — Controls Button
4 — Feature Cards
5
244
MULTIMEDIA
Controls Screen
From the Controls Screen, you can adjust the
daytime/nighttime brightness of the screen,
change headphone volume, and power off the
Passenger Screen.
To change the brightness, adjust the slider up or
down, or press the Up or Down Arrow button
located next to the slider. “Up” will increase
brightness; “Down” will decrease brightness.
Daytime and nighttime brightness levels will vary,
and the adjustment maximum/minimum will differ
depending on the time of day.
To change the headphone volume, adjust the
slider up or down, or press the Up or Down Arrow
button located next to the slider. “Up” will increase
the volume; “Down” will decrease the volume.
NOTE:
Headphone volume can also be manually adjusted
from the headphones. Changing the headphone
volume manually will not reflect in the headphone
volume slider on the Passenger Screen.
If the Screen Off button is pressed, the Passenger
Screen will continue to operate, but the screen will
go dark. Tap the screen again to return to the
display. While the screen is off, audio will continue
to play from the Passenger Screen.
The Power Off button will fully shut down the
Passenger Screen. No audio or video will play
from it.
Passenger Screen Controls Screen
A
UDIO
A
ND
V
IDEO
Passenger Screen Audio Feature
Audio allows you to listen to your favorite radio
station, a connected USB device, or connected
media device. You can directly change the source
on the Home Screen by pressing the Source button
in the feature. You can also expand it by pressing
the Full Screen View button.
To change the media source, press the Source
button and then press on the desired source. The
available sources are:
1 — Screen Off
2 — Brightness
3 — Pair/Unpair Headphones
4 — Headphone Volume
5 — Power Off
6 — Mute
1 — All Sources Tab
2 — Now Playing Tab
3 — Browse Tab
MULTIMEDIA
245
Live Radio (FM, AM, SXM)
Bluetooth®
USB 1
USB 2
AUX
Disc — If Equipped
AV 1 — If Equipped
AV 2 — If Equipped
Rear Screen 1 Listen In — If Equipped
Rear Screen 2 Listen In — If Equipped
NOTE:
Audio devices connected via Bluetooth® must
be done through the Device Manager in the
radio. For more information on pairing a device,
see the Uconnect Owner’s Manual Supplement.
If the driver is listening to “Live Radio”, the
option will not be available in the Passenger
Screen. Select “Now Playing On Radio” to listen
to the currently playing station. If the driver
selects a radio station while the Passenger
Screen is playing live radio content, the feed will
end on the Passenger Screen and control will be
given to the Uconnect system.
On the Preset menu, you will be able to listen to
saved radio presets. Press the desired preset to
begin listening.
The Browse tab will let you browse through different
radio stations or audio saved onto a USB or audio
device. Press “Browse” and select from the different
folders. You can scroll up and down to view the
options within those folders. Press on the desired
radio station or audio track to begin playing it.
Passenger Screen Radio Mode
When the USB source is selected, you can chose a
video file to play if saved to a USB device. Press
“Browse” and locate the folder with the video file.
Press the video file name, and it will begin to play
on the Passenger Screen.
NOTE:
Not all video files will be supported from a USB.
Certain video files may require digital rights to view
or play. These may be unavailable for playback on
the Passenger Screen.
R
EAR
S
EAT
E
NTERTAINMENT
WITH
A
MAZON
F
IRE
TV B
UILT
-
IN
—
I
F
E
QUIPPED
Rear Seat Entertainment will let you control and
listen in to the content being played on the rear
entertainment screens. You can view the contents
of the rear screens, lock the rear screens, change
the source of the rear screens, or turn the rear
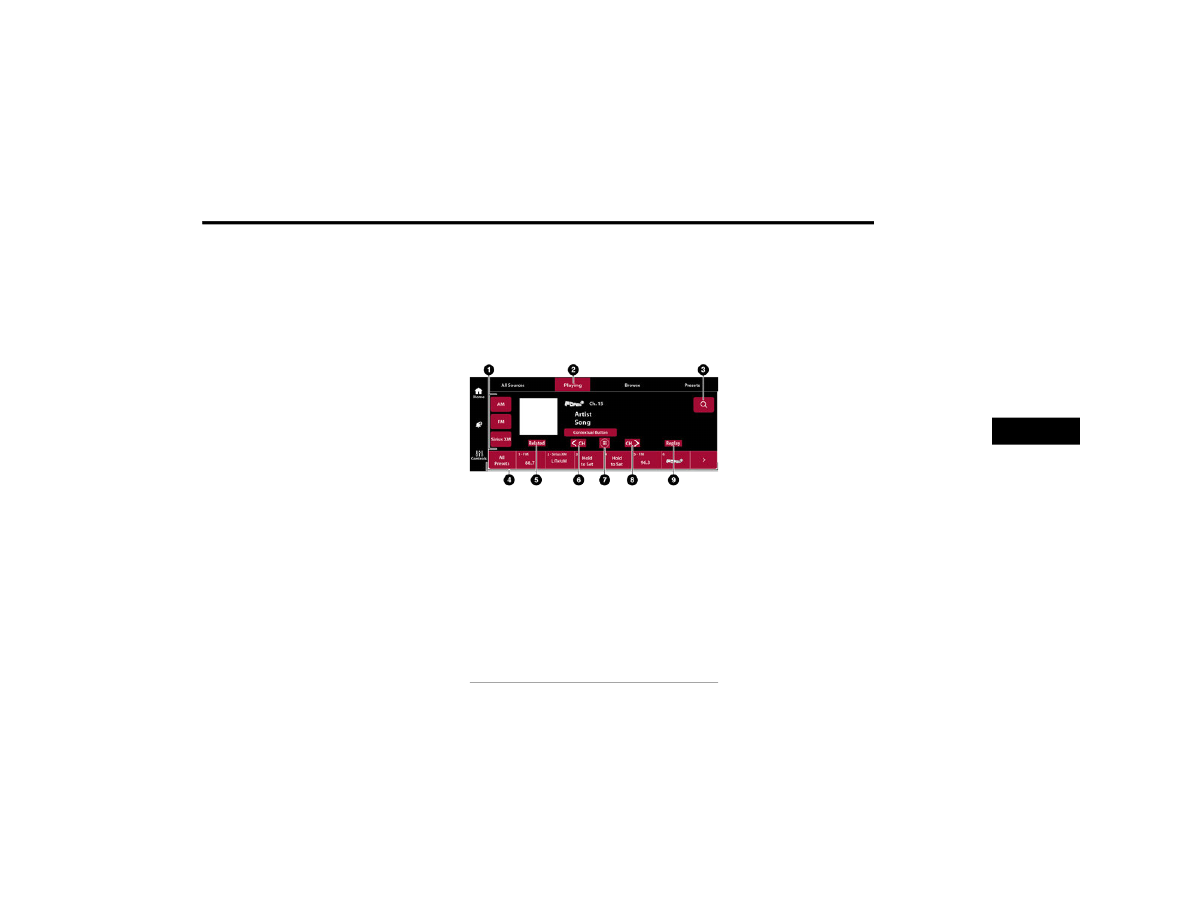
You can access the Headphone pairing screen for
Passenger Display by pressing the Headphone
button of the right side of the screen.
1 — Source Buttons
2 — Now Playing Tab
3 — Search Button
4 — Radio Presets
5 — Related Button
6 — Seek Down Button
7 — Direct Tune Button
8 — Seek Up Button
9 — Replay Button
5
246
MULTIMEDIA
HDMI P
ROJECTING
HDMI lets you connect a device to the provided
HDMI port, using an HDMI cable, and project the
device directly to the Passenger Screen. To begin,
plug a a device into the HDMI port. Then, press the
HDMI button on the touchscreen.
HDMI will continue to show the menu bar and
Headphone Paring button.
NOTE:
The HDMI Card will not automatically launch
when a new device is connected. The HDMI
Card will show a device connected, and the Card
will need to be pressed.
If the user disconnects a device from the HDMI
port while the HDMI Card is in full screen, the
system will close HDMI and reload the Home
Screen.
D
EVICE
M
ANAGER
Device Manager
Device Manager provides an easy place to view all
the devices connected to the Uconnect system and
lets you pair the Driver’s smartphone to the
Uconnect system. You will also pair Bluetooth®
headphones to the Passenger Screen from this
screen.
For more information on pairing your smartphone,
see your Uconnect Owner’s Manual Supplement.
To pair a set of Bluetooth® Headphones:
1. If viewing Device Manager in full screen,
press the Add Device button. If viewing Device
Manager on the Home Screen, press “Pair
Bluetooth® headphones”.
2. From the pop-up, press “Search For
Headphones”. The system will begin searching
for the Bluetooth® signal of your headphones.
3. Select the name of your headphones from the
list of possible devices. The system will
connected to the headphones.
NOTE:
The Passenger Screen will connect to previously
paired Bluetooth® headphones after Passenger
Screen activation.
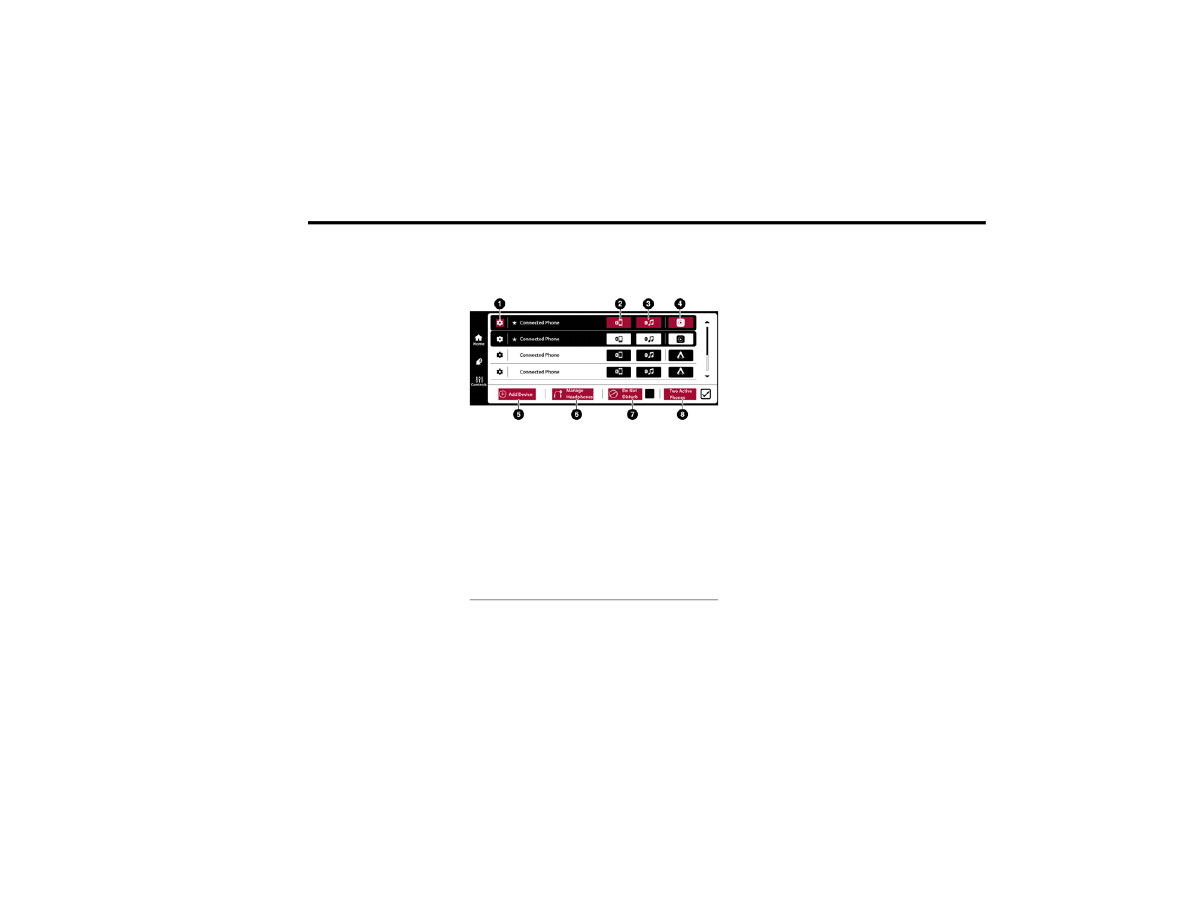
1 — Device Settings
2 — Phone Connection
3 — Media Connection
4 — Apple CarPlay®/Android Auto™ Connection
5 — Add Device
6 — Manage Headphones
7 — Do Not Disturb
8 — Two Active Phones
MULTIMEDIA
247
Removing Bluetooth® Headphones
1. From the Controls screen, press the Manage
Headphones button.
2. Press the Settings button (gear icon) next to
the set of headphones you wish to remove.
3. Press “Delete Device”; the Bluetooth®
headphones will be removed from the system.
N
AVIGATION
Navigation allows you to assist the driver in
searching for destinations using Uconnect’s
built-in Navigation system. For information on the
full functionality of Navigation, refer to your
Uconnect Owner’s Manual Supplement.
When a new route is selected from the Passenger
Screen, a confirmation will be sent to the driver.
The driver will be able to confirm or deny the route.
NOTE:
Using Navigation on the Passenger Screen will not
affect the Navigation screen in the Uconnect
system. The Driver can continue to use Navigation
while the Passenger Screen can “suggest” new
routes or stops.
C
AMERA
Camera will display the equipped vehicle camera
feed. When selected, press the desired Camera
button. The feed from that camera will display in
the center of the touchscreen. Press the X button
or Back Arrow button to return to the Home Screen.
NOTE:
The Passenger Screen will lose access to a camera
if the driver chooses to view it on the Uconnect
system or if a condition would activate the camera
on the Uconnect system (the rearview camera
being activated when the vehicle is shifted into
REVERSE).
3RD PARTY APPS — IF EQUIPPED
If equipped, your vehicle may contain some 3rd
party apps, which will further enhance your
Uconnect system.
McIntosh
McIntosh is a 3rd party app that complements your
Uconnect system’s media player. For the app to be
effective, there must be audio playback in the
Uconnect media player. McIntosh can control the
playback of audio as well as display the output
level decibel meters.
To launch the app, begin playing audio and follow
these steps:
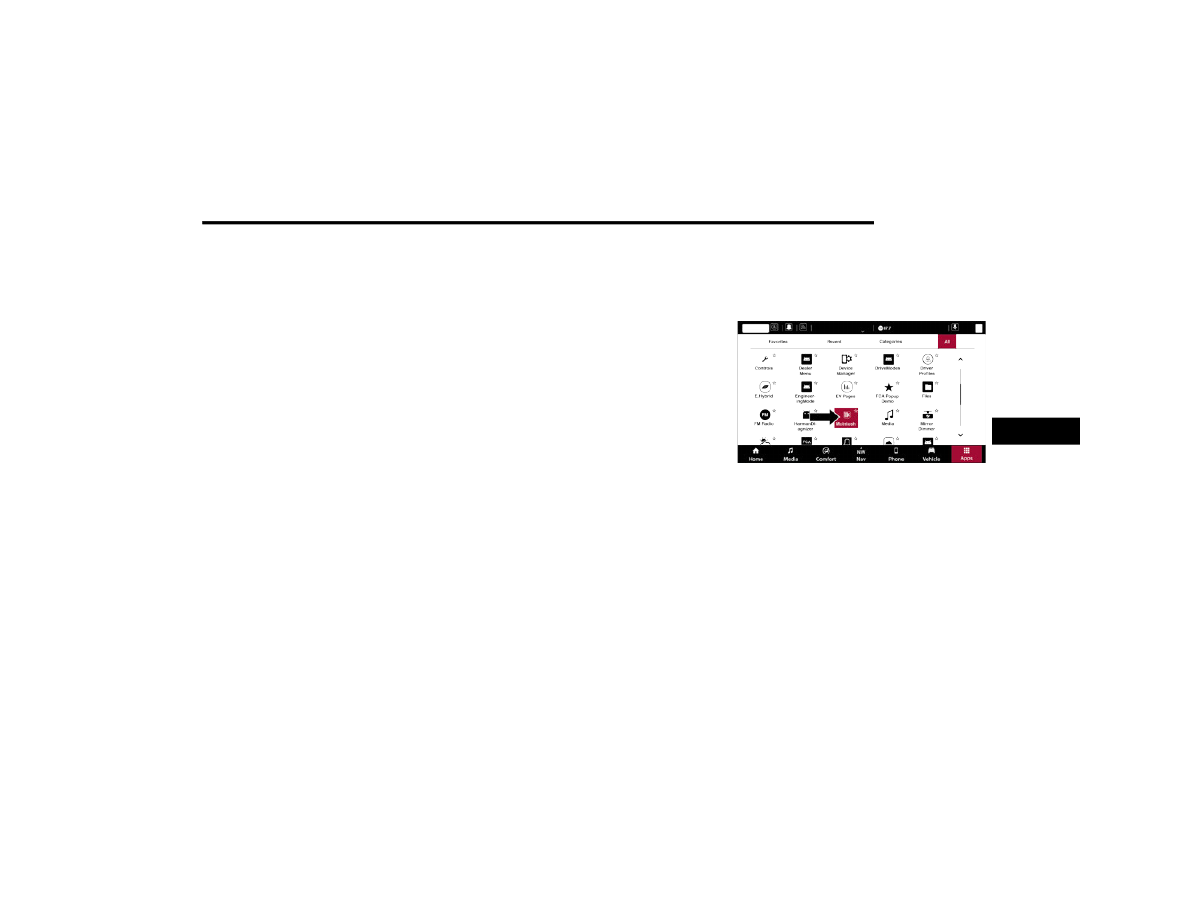
1. Press the Apps button.
2. Press the McIntosh app.
McIntosh
The McIntosh app will allow you to perform the
following when listening to music.
NOTE:
The seek feature will not work while using
Bluetooth®.
5
248
MULTIMEDIA
NOTE:
You cannot change the audio source within the
app. To do so, press the Media button and then
press the Sources button.
To exit the app, press any of the buttons on the
bottom menu bar.
For more information on McIntosh, please visit
.
REAR SEAT ENTERTAINMENT WITH
AMAZON FIRETV BUILT-IN — IF EQUIPPED
O
VERVIEW
Rear Seat Entertainment is designed to give your
family years of enjoyment.
There are multiple ways to interact with your Rear
Seat Entertainment system:
Stream your favorite shows with Amazon FireTV
Plug and play a variety of standard video games
or devices into the HDMI port
Listen to audio over wireless headphones (not
included, customer will have to provide there
own)
Plug and play a variety of devices into the Video
USB port
Please review this Owner's Manual to become
familiar with its features and operation.
Skip Backward
Press to skip
backward. Press and
hold to fast rewind.
Play/Pause
Press to play/pause
the track.
Skip Forward
Press to skip forward.
Press and hold to fast
forward.
Repeat
Press to repeat track.
Press again to repeat
playlist. Press again to
turn off (works only
with a USB device).
Change Channel Down
Press to change
channel down. Press
and hold to seek
channel down. While
using AM/FM, pressing
the channel down will
change the frequency
by 0.2. Pressing and
holding in AM/FM will
seek channels.
Change Channel Up
Press to change
channel up. Press and
hold to seek channel
up. While using AM/
FM, pressing the
channel up will change
the frequency by 0.2.
Pressing and holding in
AM/FM will seek
channels.
MULTIMEDIA
249
G
ETTING
S
TARTED
Rear Seat Entertainment for Uconnect 5/5 NAV
There are four different ways to operate the
features of Rear Seat Entertainment:
Rear Seat Entertainment Remote Control
Front radio screen
Passenger screen
Individual Rear Seat Entertainment Touch
-
screens
For information on the front media hub USB/AUX
ports
A
CCESSING
R
EAR
S
EAT
E
NTERTAINMENT
WITH
A
MAZON
F
IRE
TV
B
UILT
-
IN
FROM
THE
R
ADIO
You can access your Rear Seat Entertainment
system by following the steps below:
Option 1
1. Press the Media button.
2. Press the Rear Seat button icon.
Option 2
1. Press the Apps button on the bottom of the
touchscreen.
2. Press the Rear Seat Entertainment with Amazon
FireTV Built-in button on the touchscreen. You
may need to navigate to different pages in the
Apps drawer to find the Rear Seat Entertainment
with Amazon FireTV Built-in button.
A
CCESSING
R
EAR
S
EAT
E
NTERTAINMENT
WITH
A
MAZON
F
IRE
TV
B
UILT
-
IN
FROM
THE
R
EAR
S
CREENS
You can also access your Rear Seat Entertainment
system by following the screens from the steps below:
Option 1
Pushing the power button on the Rear Seat
Entertainment remote.
Option 2
Swiping on either of the Rear Seat Entertain
-
ment touchscreens.
NOTE:
While accessing on the rear screens, the system
will launch with the integrated Amazon FireTV.
A
CCESSING
R
EAR
S
EAT
E
NTERTAINMENT
WITH
A
MAZON
F
IRE
TV
B
UILT
-
IN
FROM
THE
P
ASSENGER
S
CREEN
— I
F
E
QUIPPED
You can also access Rear Seat Entertainment
content from the Passenger Screen.
Follow the steps below:
1. Access the Home screen for the Passenger
Screen.
2. Cycle between the features on the Home
screen and select Rear Seat Entertainment.
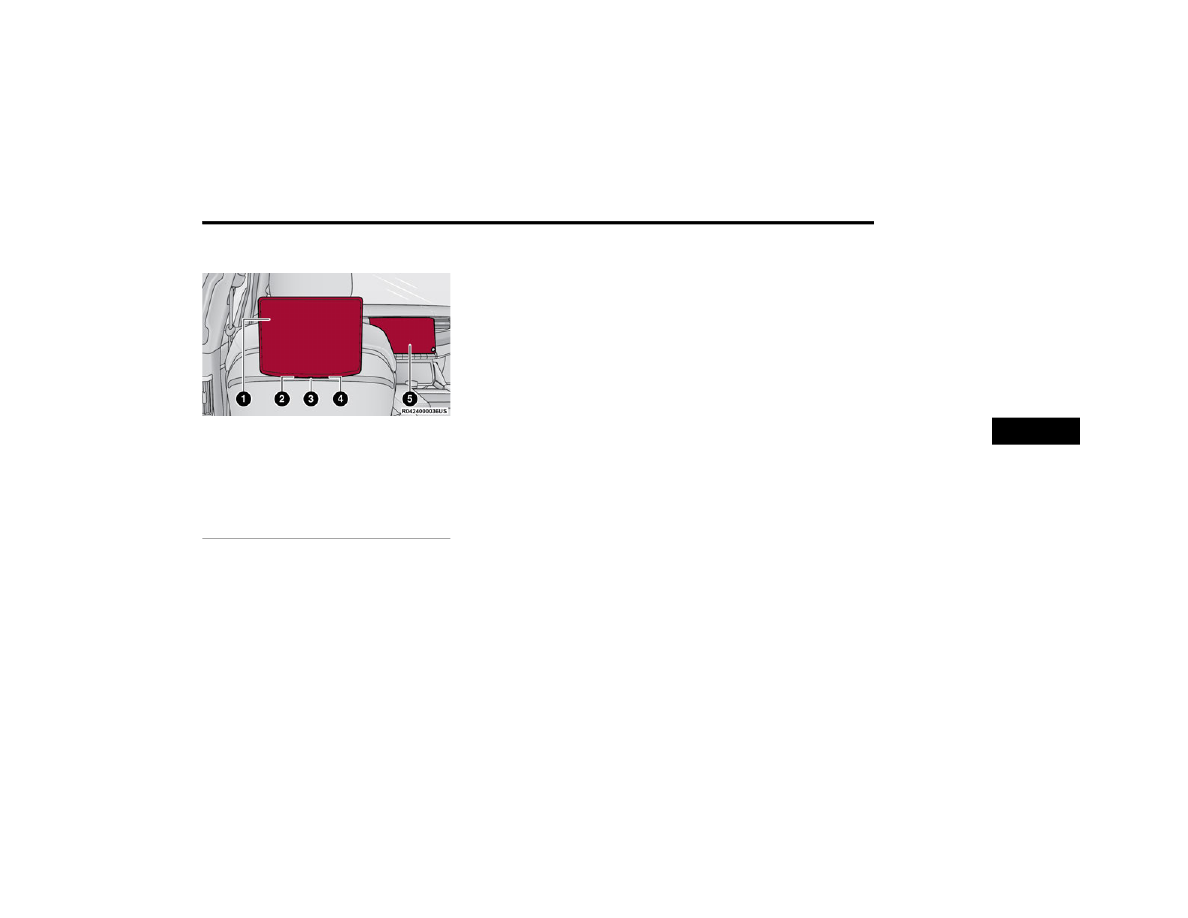
1 — Rear Seat Entertainment Touchscreen
(Rear Touchscreen)
2 — AUX Port
3 — USB C Charging Port
4 — HDMI Port
5 — Uconnect System (Front Touchscreen)
5
250
MULTIMEDIA
F
IRST
T
IME
S
TARTING
U
P
(U
SING
THE
R
EAR
S
CREENS
)
Boot Up Screen
When turning on the system for the first time from
the rear screens, a boot up screen will appear on
the system displaying the Amazon FireTV logo.
During this boot up sequence, language options
will be available for the system.
Remote Pairing
After the boot up sequence is complete, the
system will then give the option to pair the Rear
Seat Entertainment remote (included with the
system).
Follow the on-screen instructions for how to pair
the remote with the system.
NOTE:
If remote pairing fails, on-screen instructions will
appear for trying to pair the remote again.
Connecting to a Network
During the start up process, the system will then
connect a network. If Wi-Fi is activated in the
vehicle, that is one of the options for a network for
the system.
Another option for a network for the system is Wi-Fi
Hotspot on your mobile phone. If Wi-Fi Hotspot is
activated on your phone, it will show as a possible
network for the system on the screen.
NOTE:
When a network is connected to the system for the
first time an over-the-air software update will take
place using the Wi-Fi connection. After this first
time update, updates will only accrue when one is
available.
Account Sign-in
The next step will be the option to sign in to your
Amazon account.
There are two options to sign into the system:
I already have an Amazon account: Sign in with
an already existing Amazon account
I am new to Amazon: Create a new Amazon
Account
If “I am new to Amazon” is selected, follow the
on-screen steps to set up an Amazon account with
the system.
App Content
During the process, streaming services and TV
services can be selected to focus on what you plan
to watch the most. These streaming services and
TV services will show in the Apps and Channels
categories on the Rear Seat Entertainment Home
screen.
Parental Controls
Another feature that will appear during this first
time set up is parental controls.
When the parental controls page appears, it will
give the options to “Enable Parental Controls” and
“No Parental Controls”. If “Enable Parental
Controls” is selected, follow the on-screen steps to
set up parental controls for the system.
R
EAR
S
CREEN
F
LY
-
OUT
M
ENU
Accessing the rear screen fly-out menu will give
more options for Rear Seat Entertainment.
To access the rear screen fly-out menu, swipe up or
down on the screen. The menu can also be
accessed by pushing the Gear/Settings button on
the Rear Seat Entertainment remote.
Some options in the fly-out menu are listed below:
Power — This will power the screen off.
On-Screen Remote — This will bring up the
on-screen remote to use with the system.
Back — This will let you go back a page.
Home — This will take you to the Home screen.
Gear/Settings — This will let you access certain
settings in the system. For more setting options,
select “Settings” within the on-screen Gear/
Settings menu.
Car — This will bring up the car menu. From here
you can adjust rear climate controls and the Are
We There Yet? app.
MULTIMEDIA
251
P
ARENTAL
C
ONTROLS
(U
SING
THE
R
EAR
S
CREENS
)
If parental controls were not set during the first
time start up of the system, they can be set by
following the steps below:
1. Push the Gear/Settings button on the remote
or swipe up or down on the screen.
2. Then select the “Gear/Settings” icon on the
screen.
3. Then select “Settings” on the screen
4. While in the Settings, select “Preferences”.
5. Then select “Parental Controls”, from here you
can turn Parental Controls on or off and set up
a PIN for the controls using the remote.
P
AIRING
T
HE
R
EMOTE
(U
SING
THE
R
EAR
S
CREENS
)
If a Rear Seat Entertainment remote needs to be
paired and was not paired during the start-up
sequence, follow the procedure below:
1. Install batteries into the remote.
2. Push the Gear/Settings button on the remote
or swipe up or down on the screen.
3. Then select the Gear/Settings icon on the
screen.
4. Then select “Settings” on the screen
5. In the Settings, select “Controllers &
Bluetooth® Devices”.
6. Then from this menu, select “Add New
Remote”.
7. Then follow the on-screen steps for remote
pairing.
M
EDIA
S
OURCES
I
NPUT
(U
SING
THE
R
ADIO
AND
R
EAR
S
CREENS
)
Front Radio Screen
Users can select inputs for each rear screen from
the front radio touchscreen by selecting the Rear
Seat Tab and choosing the desired content by
selecting “Launch Source” on the Screen 1 or
Screen 2 tab.
Inputs available within Launch Source under
“Inputs” are “FireTV”, “HDMI”, and “USB”.
Rear Screens
To select inputs on the rear screen, scroll down on
the Rear Seat Entertainment Home screen and
select your desired input under “Input”.
Inputs can also be selected from the “Brand” tab in
the top menu. While in the this tap, scroll down to
“Inputs” for selection.
NOTE:
The Brand tab naming in the top menu will depend
on the naming of the vehicle’s brand.
R
EAR
S
EAT
E
NTERTAINMENT
R
EMOTE
C
ONTROL
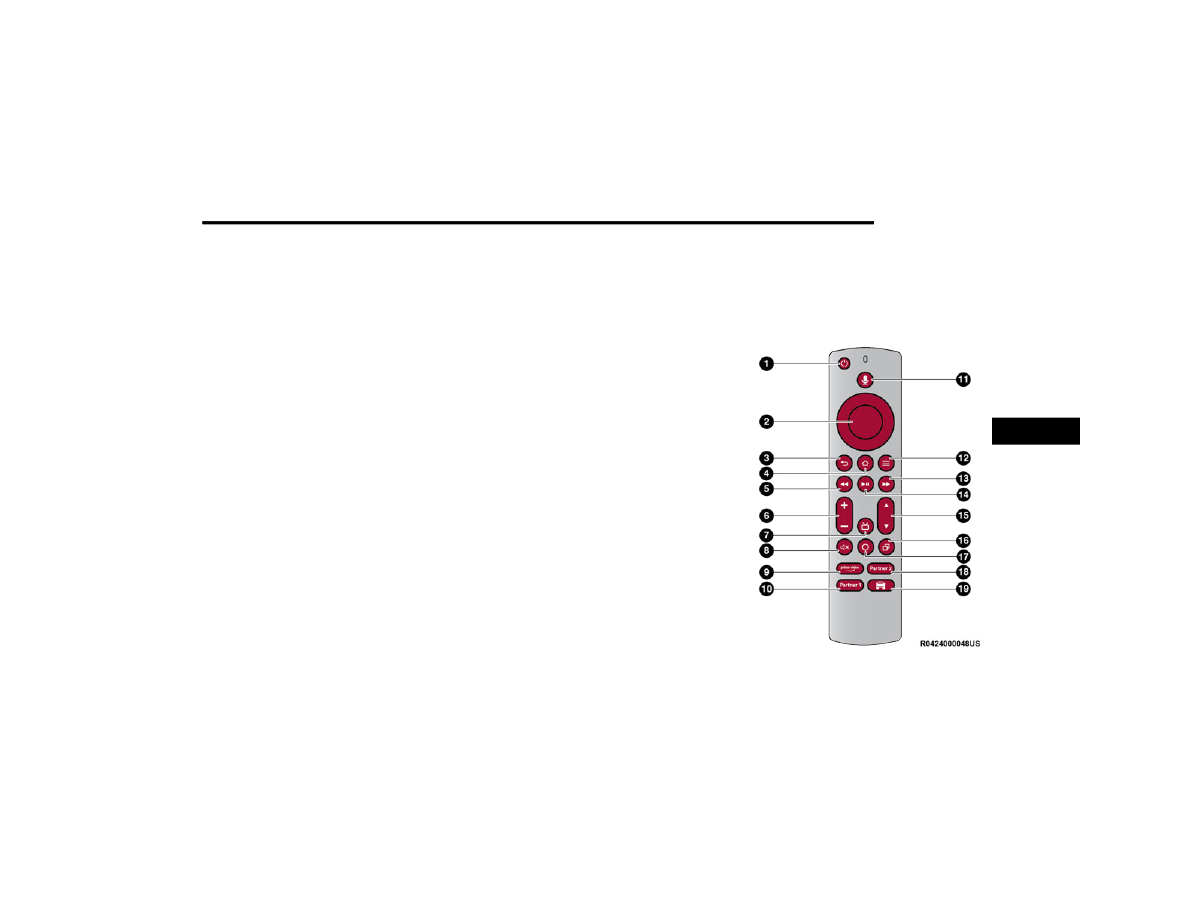
Remote Control
5

252
MULTIMEDIA
1. Power Button — Turns the screen for the
selected channel on or off.
2. 5-way Navigation Control — This control has
options by pressing the Circle button Up,
Down, Left, or Right to navigate on-screen for
selections and pushing the center button to
confirm selections.
3. Back — Push to exit out of menus or return to
the previous screen.
4. Home — Push to return to the Amazon FireTV
Built-in Home screen.
5. Seek Backward/Rewind Button — Push
and hold to fast rewind through the current
audio track or video chapter. Push once to
revert back to the previous track.
6. Volume — Push the - button to decrease the
volume and + button to increase the volume.
7. Channel Guide — Push to access the channel
guide for the system.
8. Mute — Mutes headphone audio.
9. Amazon Prime — Push to navigate to Amazon
Prime Home screen.
10. Partner 1 — Push to navigate to Partner 1
Home screen.
11. Alexa — Push to activate Alexa.
12. Menu — Push to access the FireTV menu.
13. Seek Forward Button — Push and hold
to fast forward through the current audio track
or video chapter. Push once to skip to the next
track.
14. Play/Pause Button
?
— Begin/resume or
pause disc play.
15. Channel +/- — Push the up or down arrow
button on the Channel button to browse
channels available in FireTV.
16. Recent — Push to access recently viewed
content on FireTV.
17. Gear/Settings — Push to bring up setting
options for FireTV.
18. Partner 2 — Push to navigate to Partner 2
Home screen.
19. Car Button — Push to activate the Car menu.
Replacing The Remote Control Batteries
Each remote control requires two AAA batteries for
operation.
To replace the batteries:
1. Locate the battery compartment on the back
of the remote, then slide the battery cover
downward.
2. Remove the old batteries and follow battery
recycling procedures for your area.
3. Install new batteries, making sure to orient
them according to the polarity diagram shown
inside the battery compartment.
4. Slide the battery compartment cover back on.
R
EAR
S
EAT
E
NTERTAINMENT
WITH
A
MAZON
F
IRE
TV B
UILT
-
IN
S
TREAMING
(U
SING
THE
R
ADIO
AND
R
EAR
S
CREENS
)
Access Using Launch Source
To access streaming options with Rear Seat
Entertainment on the front screen, press the
Media tab located on the bottom menu bar. Then
select the Rear Seat option located on the top
menu bar. Then select “Launch Source”, and then
select under inputs “FireTV Home”.
Access Using Browse Media
Selecting Browse Media on the front radio screen
will give access to different media within Rear Seat
Entertainment.
These options will be in the top menu of Browse
Media and are listed below:
FireTV — Selecting FireTV will give options to
view streaming options for categories like “For
Kids” and to select other streaming app options
like “Prime Video”, etc. This option will be select
-
able on the left slider menu in “Browse Media”.
Нет комментариевНе стесняйтесь поделиться с нами вашим ценным мнением.
Текст