Defender (1999-2002). Manual — part 82

TRANSFER GEARBOX
7
REPAIR
SWITCH - DIFFERENTIAL LOCK WARNING LAMP
Service repair no - 41.20.34
Remove
1. Remove battery cover.
2. Disconnect battery negative lead.
3. Remove gear lever knobs.
4. Remove gearbox tunnel carpet.
5. Remove gear lever (s) gaiter.
6. Release and remove insulation pad from around
gear levers.
7. Remove 2 screws securing relay/fuse panel and
collect 2 spacers.
8. Release bulkhead carpet from LH side of tunnel
and move aside.
9. Remove 2 bolts securing hand-brake lever to
body and move aside.
10. Remove 13 screws securing tunnel cover.
11. Release and remove tunnel cover.
12. Disconnect Lucars from differential lock warning
lamp switch.
13. Loosen and remove switch.
NOTE: Locknut fitted in place of spacer on
early transfer boxes.
14. Remove locknut/spacer from switch.
Refit
15. Clean switch, locknut/spacer and mating face on
gearbox.
16. Fit locknutnut/spacer to switch with counterbore
on spacer positioned towards switch head.
NOTE: To ensure that the switch setting is
correct, make sure the spacer is fully
tightened to switch head, (no gap).

41
TRANSFER GEARBOX
8
REPAIR
17. Apply Hylomar PL32 sealant to switch threads.
18. Position switch into gearbox housing until
locknut/spacer bottoms out on housing.
19. Switches fitted with spacer: Tighten spacer
securing differential lock switch to 11 Nm (8
lbf.ft).
20. Connect Lucars to switch.
21. Switches fitted with locknut: Adjust switch.
See Adjustment.
22. Fit and align tunnel cover, fit and tighten screws.
23. Fit hand-brake lever and tighten bolts to 25 Nm
(18 lbf.ft).
24. Secure bulkhead carpet to LH side of tunnel.
25. Position relay/fuse panel, fit spacers and tighten
screws.
26. Fit insulation pad around gear levers.
27. Fit gear lever (s) gaiter.
28. Fit gearbox tunnel carpet.
29. Fit gear lever knobs.
30. Reconnect battery negative lead.
31. Fit battery cover.
SEAL - INPUT SHAFT
Service repair no - 41.20.50
Remove
1. Remove transfer gearbox. See this Section.
2. Remove and discard input shaft oil seal from
transfer gearbox.
Refit
3. Clean oil seal recess in transfer gearbox.
4. Lubricate new oil seal with transfer gearbox oil.
5. Using LRT-37-014, fit input shaft seal to transfer
gearbox.
6. Fit transfer gearbox. See this Section.
TRANSFER GEARBOX
9
REPAIR
SEAL - FRONT OUTPUT SHAFT
Service repair no - 41.20.51
Remove
1. Position vehicle on 4 post ramp.
2. Remove underbelly panel See CHASSIS AND
BODY, Repair.
3. Mark front propeller shaft to transfer gearbox
flanges for reassembly purposes.
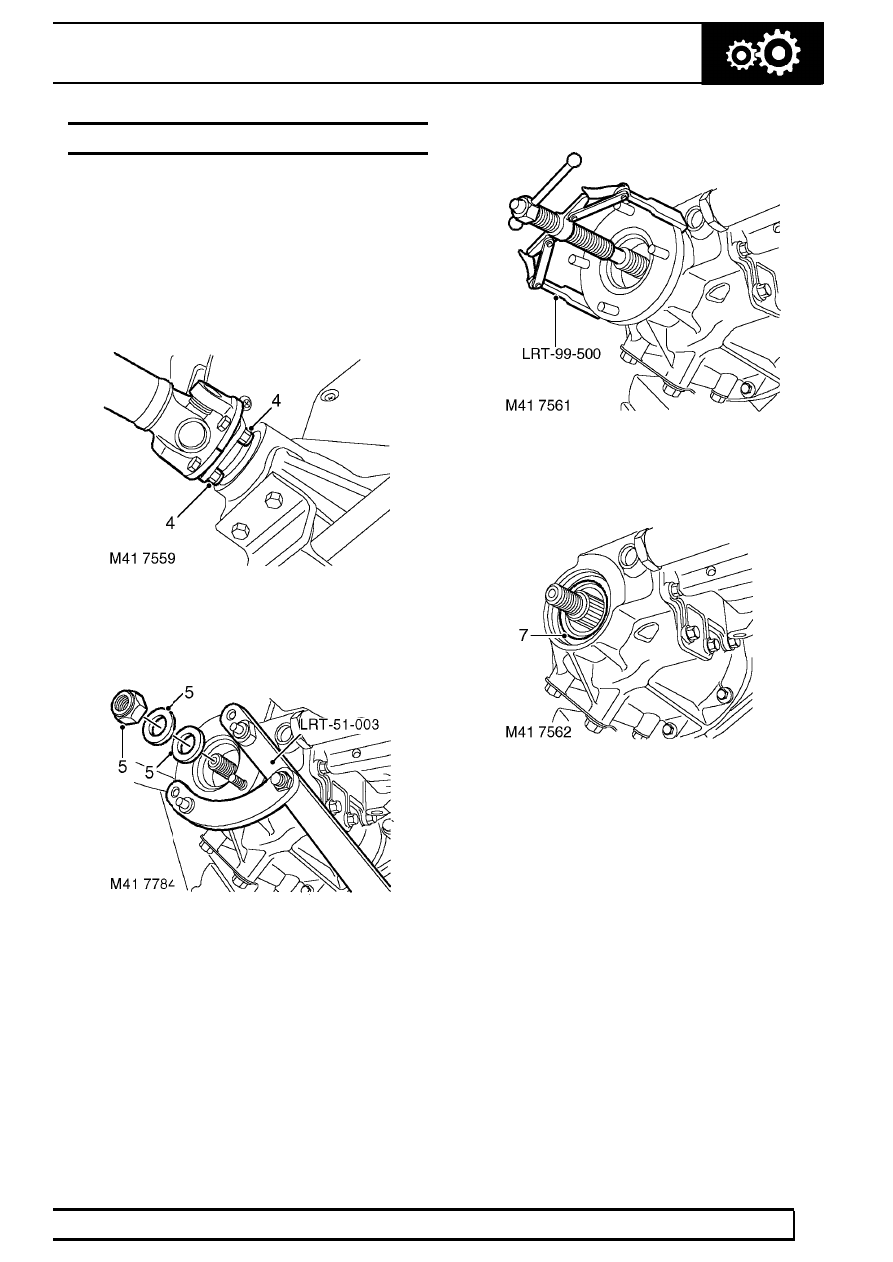
4. Remove and discard 4 nuts securing front
propeller shaft to transfer gearbox drive flange,
and release propeller shaft from flange.
5. Restrain transfer gearbox drive flange using
LRT-51-003 , remove and discard drive flange
nut, remove and discard steel and felt washers.
6. Using LRT-99-500 if necessary remove drive
flange from transfer gearbox.
7. Remove and discard front input shaft oil seal
from transfer gearbox.

41
TRANSFER GEARBOX
10
REPAIR
Refit
8. Clean oil seal recess.
9. Lubricate new input shaft oil seal with transfer
gearbox oil.
10. Fit oil seal using LRT-41-012.
NOTE: Use end of tool marked ’FRONT’ to
fit seal.
11. Position drive flange, fit new felt and steel
washers.
12. Position LRT-51-003 fit new drive flange nut and
tighten to 148 Nm (109 lbf.ft).
13. Align marks and position front propeller shaft to
output flange. Fit new nuts and tighten to 48 Nm
(35 lbf.ft).
14. Fit underbelly panel. See CHASSIS AND
BODY, Repair.
15. Check/top-up transfer gearbox oil.
SEAL - REAR OUTPUT SHAFT
Service repair no - 41.20.54
Remove
1. Loosen brake shoe adjuster bolt.
2. Remove rear propeller shaft. See PROPELLER
SHAFTS, Repair.
Нет комментариевНе стесняйтесь поделиться с нами вашим ценным мнением.
Текст