Defender (1999-2002). Manual — part 81
TRANSFER GEARBOX
3
REPAIR
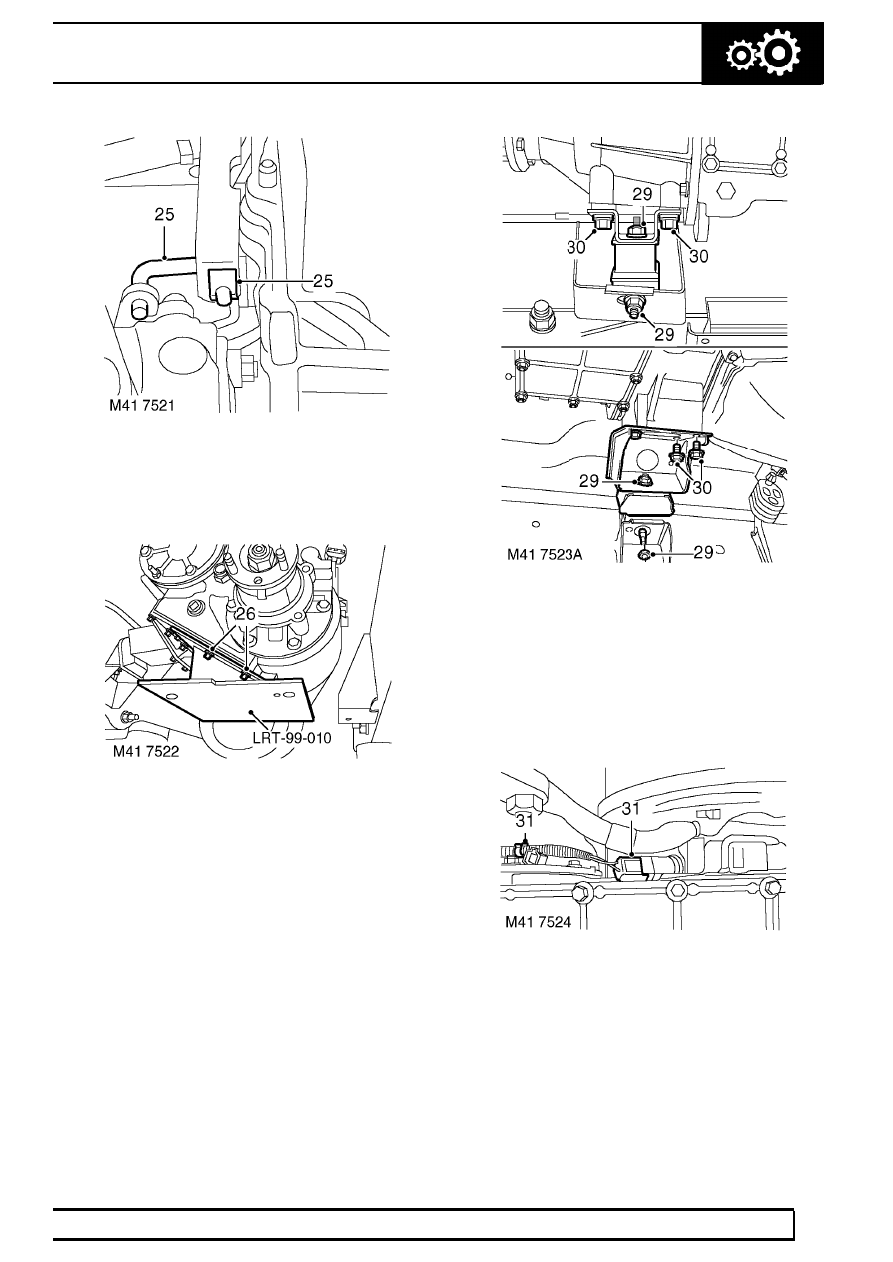
25. Remove retaining clip at lower end of pivot arm
and disconnect differential lock control operating
rod.
26. Remove 4 central bolts from transfer gearbox
bottom cover, position support plate LRT-99-010
to transfer gearbox and tighten bolts.
27. Position gearbox support jack and secure
support plate to jack using 4 bolts.
28. Support the weight of the transfer gearbox.
29. Remove 4 nuts securing LH and RH mountings
to chassis and transfer gearbox mounting
brackets.
30. Remove 8 bolts securing mounting brackets to
transfer gearbox, raise gearbox and remove both
mountings, heat shield from LH mounting and
brackets.
31. Disconnect multiplug from speed sensor and
release harness from clip on transfer gearbox.
41
TRANSFER GEARBOX
4
REPAIR
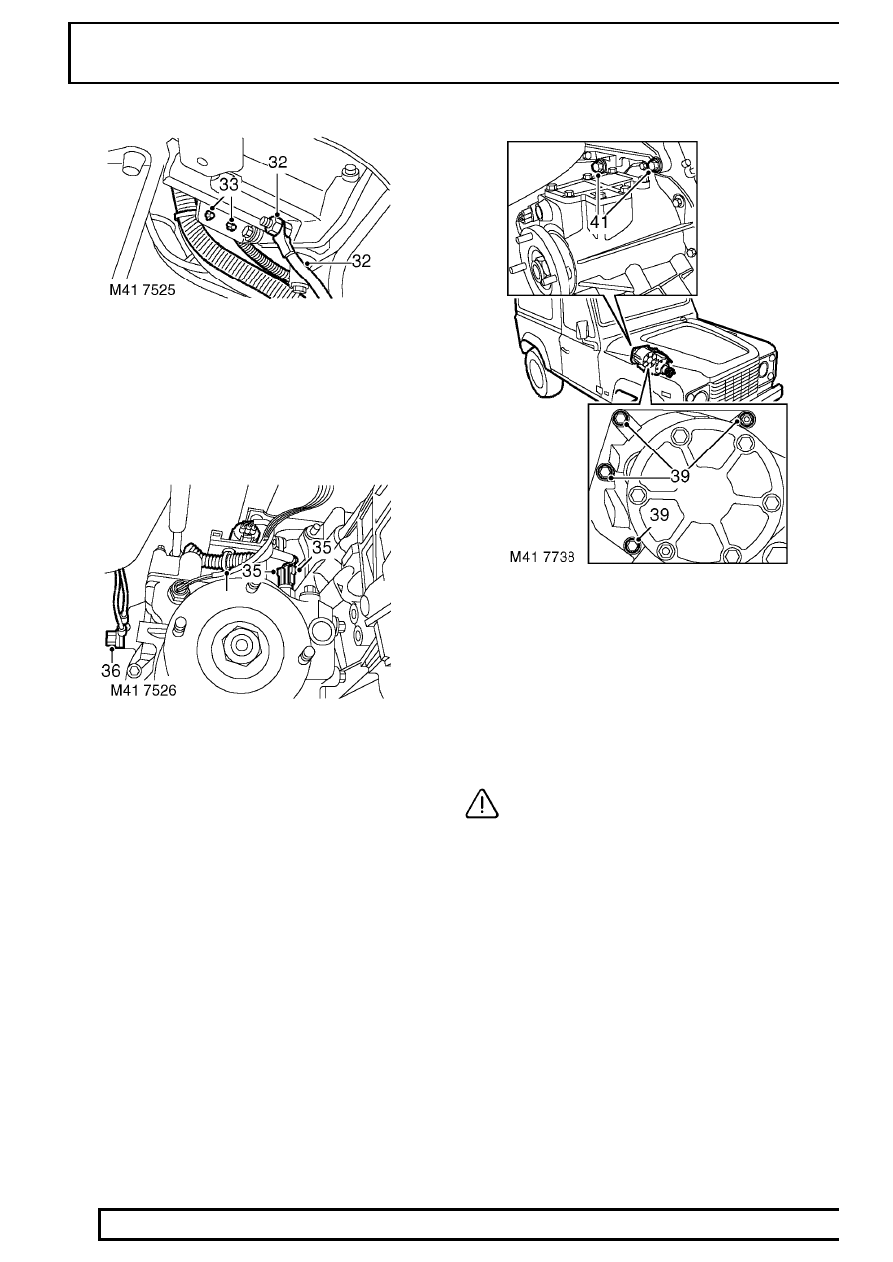
32. Remove retaining nut and release battery earth
lead from transfer gearbox.
33. Release body harness clips from bracket on top
of transfer gearbox.
34. Lower gearbox jack sufficiently to allow transfer
gearbox lever to clear tunnel.
35. Disconnect Lucars from differential lock warning
lamp switch and multiplug from low ratio detect
switch, and release multiplug from bracket.
36. Remove bolt and release earth leads from RH
side of transfer gearbox.
37. Move the high/low selector lever upwards to gain
access to adjacent nut securing transfer gearbox
to main gearbox.
38. Position a jack to support main gearbox and
engine.
39. Noting their fitted positions, remove 4 bolts
securing transfer gearbox to main gearbox
extension case.
40. Fit 3 guide studs LRT-41-009 through transfer
gearbox bolt holes to support it during during
removal.
41. Remove 2 nuts securing transfer gearbox to
main gearbox extension case.
CAUTION: If studs are removed during this
operation, they must be discarded and
new studs fitted.
42. With assistance, remove transfer gearbox from
main gearbox.

TRANSFER GEARBOX
5
REPAIR
43. If transfer gearbox is to be refitted, remove and
discard input shaft oil seal.
Refit
44. Clean mating faces of main gearbox extension
case and transfer gearbox.
45. Remove all traces of sealant from threads of
transfer gearbox securing bolts and studs.
46. Clean input shaft oil seal recess in transfer
gearbox.
47. Lubricate new input shaft oil seal with transfer
gearbox oil.
48. Using tool LRT-37-014, fit input shaft oil seal, lip
side facing inwards.
49. Ensure guide studs LRT-41-009 are fitted in
main gearbox extension case.
CAUTION: If securing studs were removed
during transfer gearbox removal, apply
Loctite 290 to threads of new studs; fit
studs and tighten to 45 Nm (33 lbf.ft).
50. Secure transfer gearbox to support plate
LRT-99-010, fit and tighten 4 bolts.
51. Raise transmission hoist until transfer gearbox
can be located over guide studs LRT-41-009.
52. Apply Loctite 290 to threads of securing bolts
and studs.
53. Fit and lightly tighten 2 nuts to secure transfer
gearbox to main gearbox extension case.
54. Remove guide studs LRT-41-009.
55. Ensuring bolts are in their original fitted
locations, fit and lightly tighten 4 bolts to secure
transfer gearbox to main gearbox extension
case.
56. Progressively tighten nuts and bolts to 45 Nm
(33 lbf.ft).
57. Position earth leads to RH side of transfer
gearbox, fit and tighten bolt.
58. Connect low ratio detect switch multiplug and
secure to bracket. Connect Lucars to differential
lock warning lamp switch.
59. Raise gearbox jack and guide transfer gearbox
lever through tunnel.
60. Connect body harness clips to bracket on top of
transfer gearbox.
61. Position earth lead to transfer gearbox, tighten
nut to 45 Nm (33 lbf.ft).
62. Connect speed sensor multiplug and secure
harness in clip.
63. Position heat shield to LH mounting, fit
mountings and brackets and tighten bolts to 85
Nm (63 lbf.ft).
64. Fit nuts securing RH and LH mountings and
tighten to 48 Nm (35 lbf.ft).
65. Position breather pipe to transfer gear box, fit
new sealing washers and tighten banjo bolts to
15 Nm (11 lbf.ft).
66. Remove bolts securing support plate to gearbox
jack.
67. Remove bolts securing LRT-99-010 to transfer
gearbox.
68. Apply Loctite 290 to threads of bottom cover
securing bolts, fit bolts and tighten to 25 Nm (18
lbf.ft)
69. Position differential lock control rod and secure
with retaining clip.
70. Clean rear propeller shaft to brake drum flange
mating faces.

41
TRANSFER GEARBOX
6
REPAIR
71. Release propeller shaft, align flange markings
and connect to studs.
72. Fit nuts securing propeller shaft and tighten to 48
Nm (33 lbf.ft).
73. Clean front propeller to transfer gearbox flange
mating faces.
74. Fit propeller shaft, align flange markings and
tighten nuts to 48 Nm (33 lbf.ft).
75. Using new gasket, fit intermediate silencer and
tighten nuts to 25 Nm (18 lbf.ft).
76. Fit exhaust front pipe. See MANIFOLD AND
EXHAUST SYSTEM, Repair.
77. Refill transfer gearbox with recommended oil.
78. Fit cooling fan cowl.
79. Fit high/low operating rod and secure with
retaining clip.
80. Position handbrake outer cable to heelboard.
81. Position handbrake cable to lever, fit clevis pin,
washer and new split pin.
82. Position handbrake gaiter and secure with trim
studs.
83. Fit insulation pad to tunnel.
84. Fit gear lever cover.
85. Fit gear lever knobs.
86. Position diagnostic plug bracket, access panel
and tighten screws.
87. Fit carpet to transmission tunnel.
88. Fit cubby box. See CHASSIS AND BODY,
Repair.
89. Fit cooling fan. See COOLING SYSTEM,
Repair.
90. Reconnect battery negative lead.
91. Fit battery cover.
GASKET - REAR COVER PLATE
Service repair no - 41.20.30
Remove
1. Raise vehicle on ’4 post ramp’.
2. Mark rear cover plate to bearing housing for
assembly purposes.
3. Noting fitted position of stud bolt and harness
clip bracket, remove 5 bolts and stud bolt
securing cover plate.
4. Collect harness clip bracket.
5. Remove cover plate.
Refit
6. Clean cover plate and mating face.
7. Apply Hylosil RTV 102 to rear cover mating face.
8. Align reference marks, fit cover plate.
9. Clean cover bolts and apply Loctite 290 threads
of bolts and stud nut.
10. Position clip bracket, fit stud nut and bolts,
tighten by diagonal selection to 25 Nm (18
lbf.ft).
11. Check/top-up transfer gearbox oil.
12. Lower vehicle.
Нет комментариевНе стесняйтесь поделиться с нами вашим ценным мнением.
Текст