Defender. Manual — part 270
Handles, Locks, Latches and Entry Systems - Hood Latch Release Handle
Removal and Installation
Removal
1. NOTE: Hood release cable renew
Open hood.
2. Remove 8 screws securing grille.
3. Remove grille.
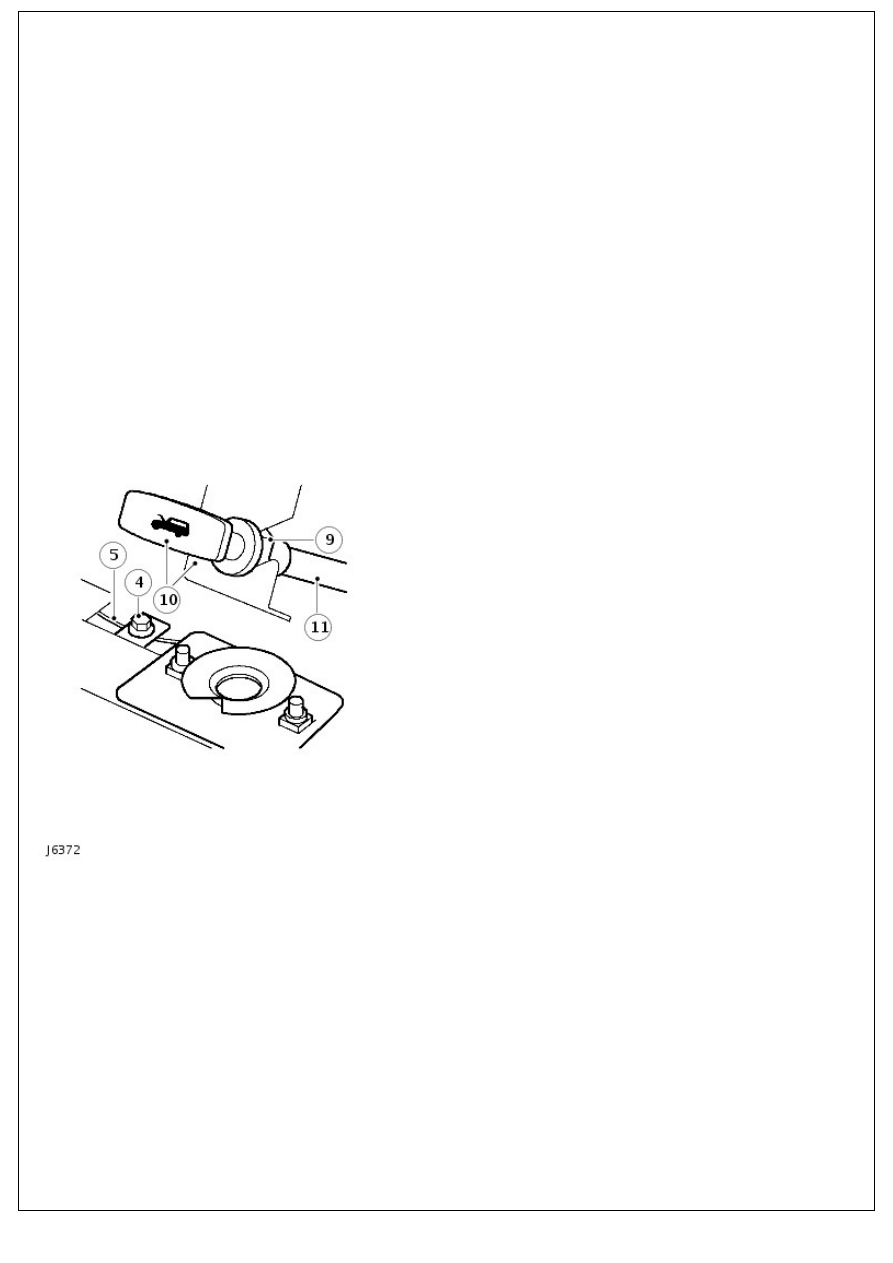
4. Slacken clamping bolt securing hood release cable.
5. Remove cable from lock.
6. Release cable from clip on underside of hood platform.
7. Feed cable through valance and collect grommet.
8. Release cable from clip fixed to wheelarch under expansion
tank.
9. Loosen clamping nut securing hood release handle to
mounting bracket.
10. Remove hood release handle from mounting bracket.
11. Withdraw cable through bulkhead.
Installation
1. Feed cable through bulkhead and fit hood release handle to
mounting bracket. Tighten clamping nut.
2. Route cable behind expansion tank and fit to securing clip.
3. Feed cable through valance.
4. Fit grommet between cable and valance.
5. Fit cable to securing clip on underside of hood platform.
6. Fit cable to lock and tighten clamping bolt.
7. Check operation of release cable and hood lock and adjust if
necessary.
8. Fit grille and tighten screws.
9. Close hood.
Handles, Locks, Latches and Entry Systems - Front Door Lock Actuator
Removal and Installation
Removal
1. Remove door trim panel.
For additional information, refer to:
Front Door Trim Panel
(501-05 Interior Trim and Ornamentation, Removal and
Installation).
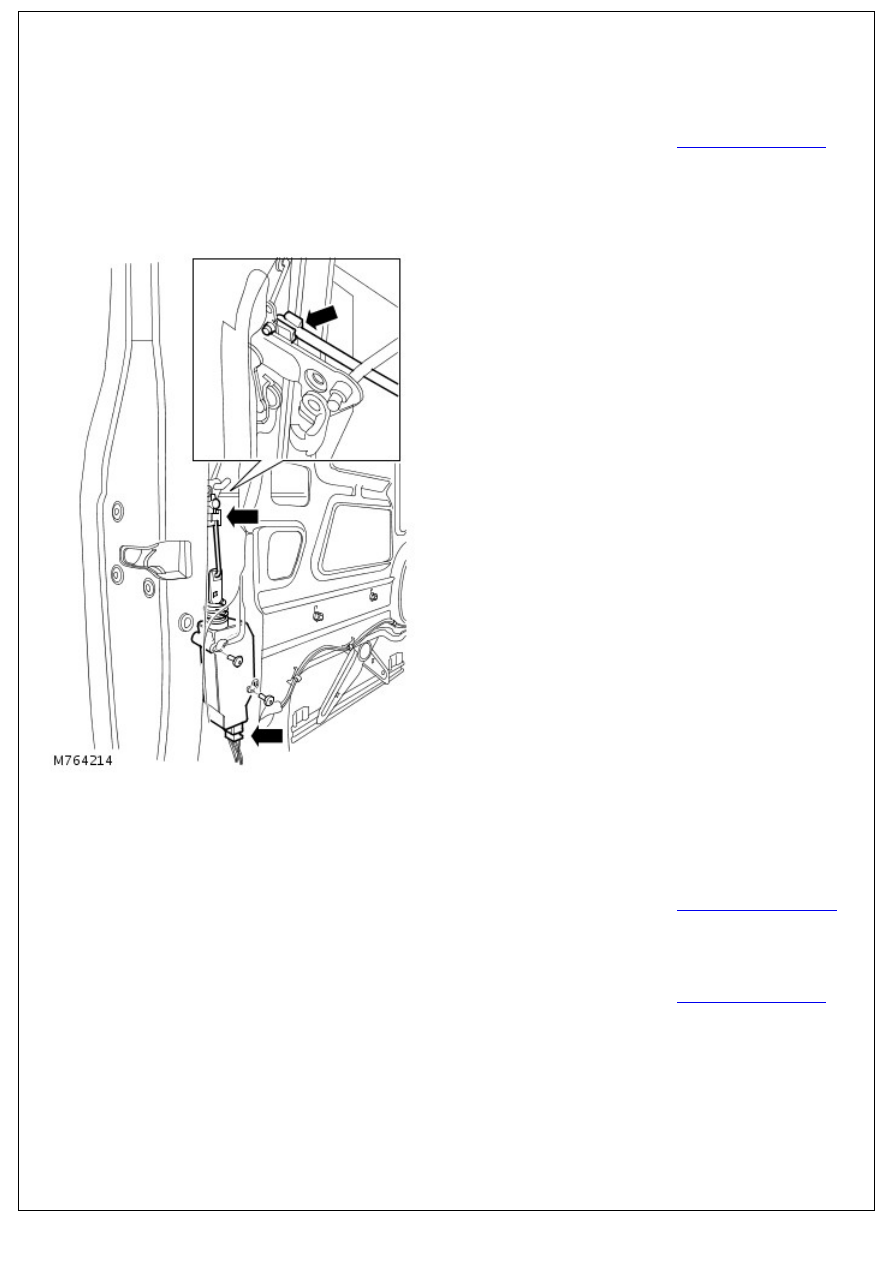
2. Carefully peel back plastic sheet to expose mechanism.
3. Release clip, detach and remove lock solenoid link.
4. Loosen 2 screws securing solenoid, release solenoid from
mounting panel, disconnect multiplug and remove solenoid.
Installation
1. Connect multiplug to solenoid, locate solenoid to mounting
panel and tighten screws.
2. Instal and secure link.
3. Adjust door latch cable.
For additional information, refer to:
Latch Cable Adjustment
(501-14 Handles, Locks, Latches and Entry Systems, General
Procedures).
4. |Refit plastic sheet.
5. Fit door trim panel.
For additional information, refer to:
Front Door Trim Panel
(501-05 Interior Trim and Ornamentation, Removal and
Installation).

Handles, Locks, Latches and Entry Systems - Front Door Push Button Rod
and Linkage
Removal and Installation
Removal
1. Remove door trim panel.
For additional information, refer to:
Front Door Trim Panel
(501-05 Interior Trim and Ornamentation, Removal and
Installation).
2. Peel back sufficient of plastic sheet to expose mechanism.
3. Release spring clip and disconnect operating rod from latch
mechanism.
4. Remove 2 screws and withdraw push button rod and
linkage.
Installation
1. Secure push button rod and linkage to door with 2 screws.
2. Connect operating rod to latch mechanism and secure with
spring clip.
3. Re-seal plastic sheet and install door trim panel.
For additional information, refer to:
Front Door Trim Panel
(501-05 Interior Trim and Ornamentation, Removal and
Installation).

Handles, Locks, Latches and Entry Systems - Rear Door Lock Actuator
Removal and Installation
Removal
1. Remove door trim panel.
For additional information, refer to:
Rear Door Trim Panel
(501-05 Interior Trim and Ornamentation, Removal and
Installation).
2. Carefully peel back plastic sheet to expose mechanism
3. Release clip, detach and remove lock solenoid link.
4. Release clip and disconnect interior handle link from latch
mechanism.
5. Remove 3 bolts securing mounting panel.
6. Loosen remaining bolts and nut, ease mounting panel
away from door and retain in this position for access.
7. Disconnect multiplug from solenoid.
8. Remove 2 screws securing solenoid.
Нет комментариевНе стесняйтесь поделиться с нами вашим ценным мнением.
Текст