Defender. Manual — part 294
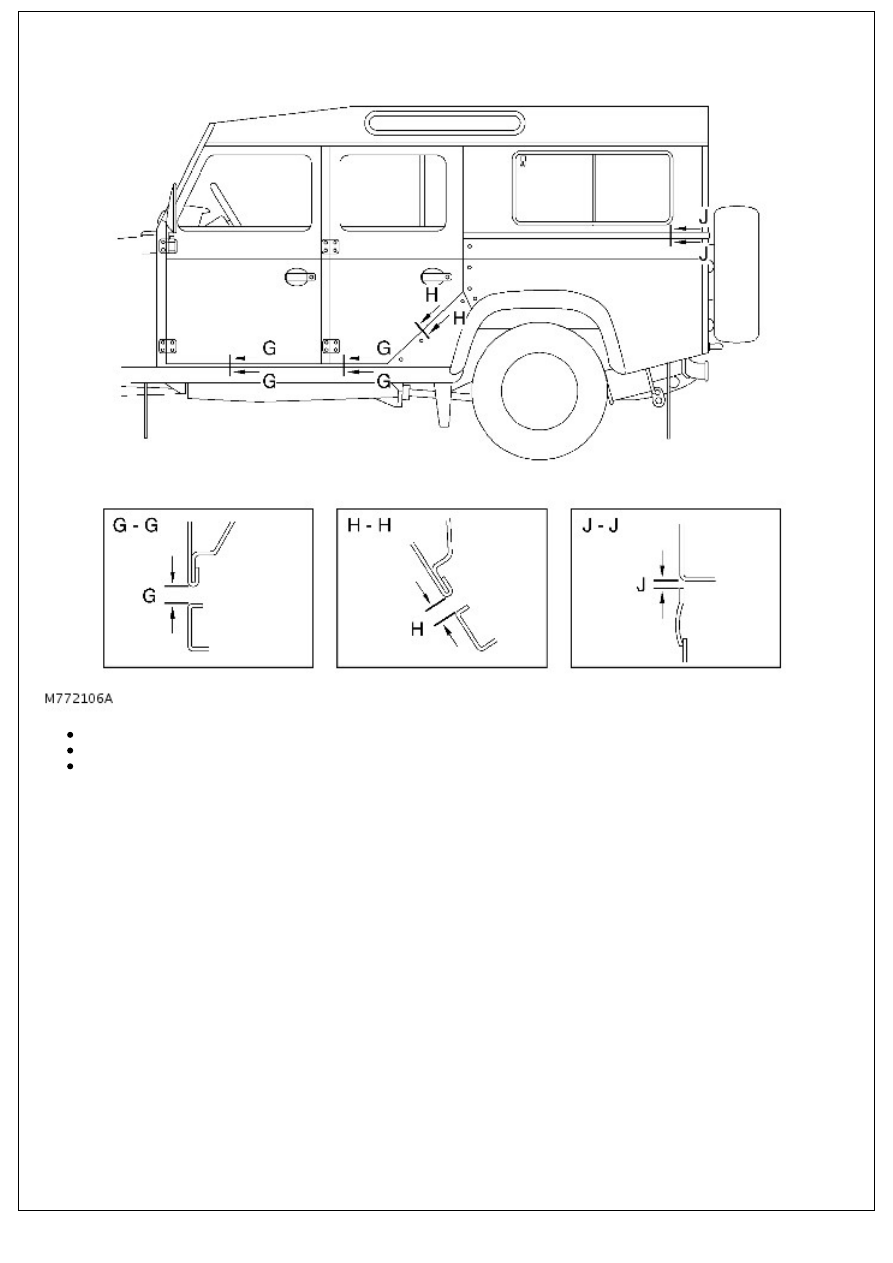
Section G-G, Door to sill gap G = 7 - 11 mm. Door profile to sill = 0 to = + 2 mm
Section H-H, Rear door to body gap H = 7 - 11 mm. Door profile to body = 0 to = + 3 mm
Section J-J, Body side lower to body, gap J = 0 - 4 mm. To be parallel within 2 mm
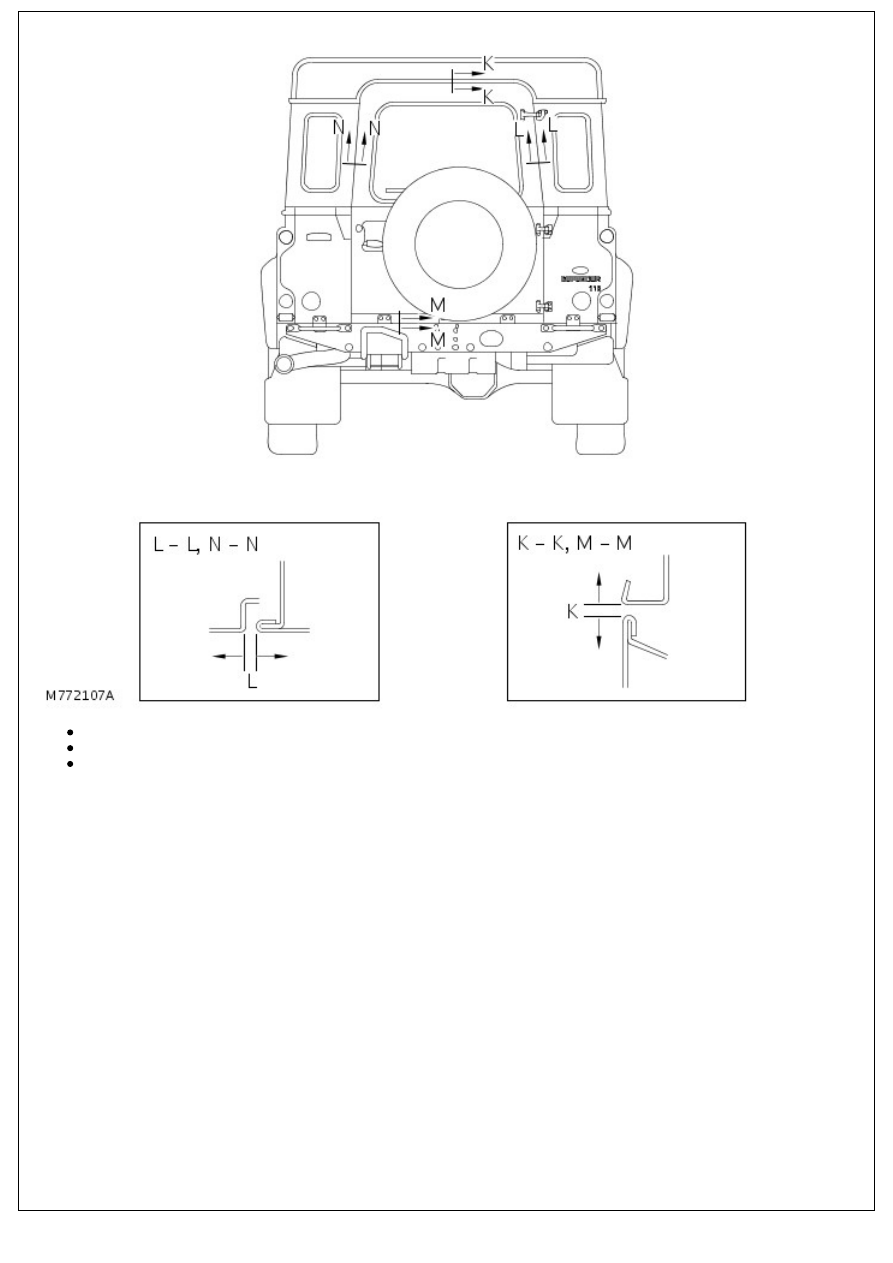
Section K-K, Roof to taildoor, gap K = 7 - 9 mm. Profile = ± 1 mm
Section L-L, N-N, Body side to taildoor, gap L = 56 - 7 mm. Profile = ± 1 mm
Section M-M, Body rear to taildoor, gap M - 7 - 9 mm
Front End Sheet Metal Repairs - Bulkhead Assembly
Removal and Installation
Removal
All vehicles
1. Disconnect both battery leads, negative lead first.
2. Remove front fender side panel.
For additional information, refer to:
Front Fender Side Panel
(501-27 Front End Sheet Metal Repairs, Removal and
Installation).
3. Remove RH and LH front upper wing. For additional
information, refer to:
Front Fender Top Panel LH
(501-27
Front End Sheet Metal Repairs, Removal and Installation).and
For additional information, refer to:
Front Fender Top Panel
RH
(501-27 Front End Sheet Metal Repairs, Removal and
Installation).
4. Remove headlamp mounting panels.
5. Remove windshield frame.
For additional information, refer to:
Windshield Frame
(501-
27 Front End Sheet Metal Repairs, Removal and Installation).
6. Remove both front doors.
Vehicles built up to 12/2006
7. Remove lower fascia panel. For additional information, refer
to: (501-12 Instrument Panel and Console)
Instrument Panel Lower Section - Vehicles Built From:
07/2001 (Removal and Installation),
Instrument Panel Lower Section - Vehicles Built From:
07/1998 (Removal and Installation),
Instrument Panel Lower Section - Vehicles Built Up To:
07/1998 RHD (Removal and Installation),
Instrument Panel Lower Section - Vehicles Built Up To:
07/1998 LHD (Removal and Installation).
All vehicles
8. Models with A/C: Remove relevant A/C pipes.
9. Remove front grille.
10. Drain cooling system.
1. 4.0 -
For additional information, refer to: Cooling System
Draining, Filling and Bleeding (303-03A Engine
Cooling - 4.0L, General Procedures).
2. Tdi -
For additional information, refer to: Cooling System
Draining, Filling and Bleeding (303-03B Engine
Cooling - 2.5L (Tdi) Diesel, General Procedures).
3. Td5 -
For additional information, refer to: Cooling System
Draining, Filling and Bleeding (303-03C Engine
Cooling - 2.5L (Td5) Diesel, General Procedures).
4. 2.4L Diesel -
For additional information, refer to:
Cooling System
Draining, Filling and Bleeding
(303-03 Engine
Cooling - 2.4L Duratorq-TDCi HPCR (103kW/140PS)
- Puma, General Procedures).
11. Remove radiator and charge air cooler.
12. Models with A/C: Remove condenser.
13. Remove air cleaner assembly.
14. Remove heater unit.For additional information, refer to:
(412-02 Heating and Ventilation)

Heater Core - Vehicles Without: Air Conditioning (Removal
and Installation),
Heater Core and Evaporator Core Housing - LHD (Removal
and Installation),
Heater Core and Evaporator Core Housing - RHD (Removal
and Installation),
Heater Core and Evaporator Core Housing
(Removal and
Installation).
15. Remove brake booster assembly.
16. Remove heater ducts.
17. Remove both front seats.
18. Remove front carpets.
19. Release all relevant harnesses and position aside.
20. Remove facia support bracket.
Installation
1. Prepare and clean panel joint faces. Ensure all necessary
grommets and sealant is applied to new bulkhead.
2. Reverse removal procedure.
3. Bleed brake system.
For additional information, refer to:
Brake System Bleeding
(206-00 Brake System - General Information, General
Procedures).
4. Adjust headlamps.
For additional information, refer to:
Headlamp Adjustment
(417-01 Exterior Lighting, General Procedures).
5. Water test after refitting.
Нет комментариевНе стесняйтесь поделиться с нами вашим ценным мнением.
Текст