Defender. Manual — part 29
Front Drive Axle/Differential - Front Drive Axle and Differential
Description and Operation
GENERAL
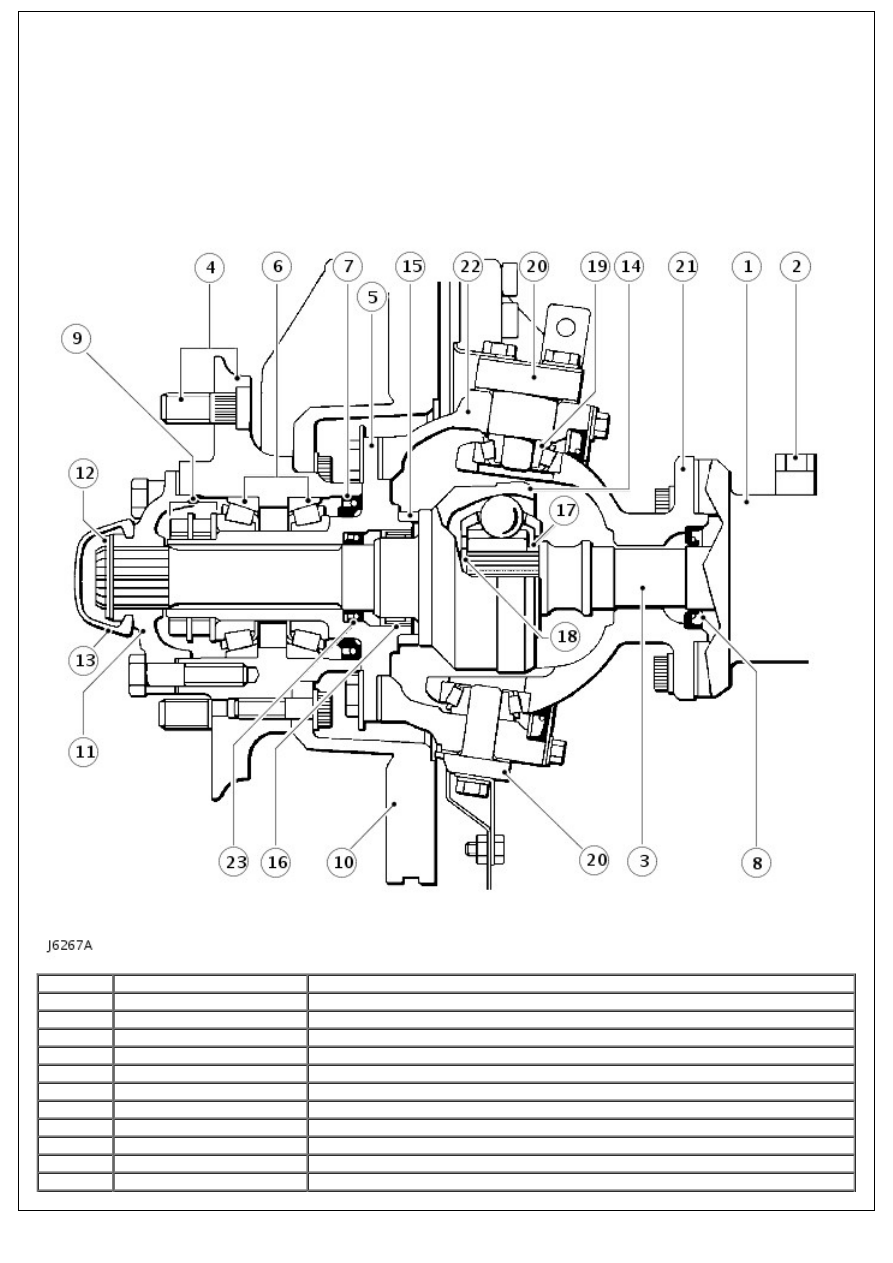
Front axle hub and swivel housing
Item
Part Number
Description
1
-
Axle casing
2
-
Ventilation pipe
3
-
Axle shaft
4
-
Wheel studs and hub
5
-
Stub axle
6
-
Wheel bearings
7
-
Inner and outer hub seals
8
-
Axle shaft seal
9
-
Hub lock plate, thrust washer and nuts
10
-
Brake disc
11
-
Drive flange

12
-
Shim washer and circlip
13
-
Dust cap
14
-
Constant velocity joint/shaft
15
-
Thrust collar for CV joint
16
-
Roller bearing
17
-
Spacer
18
-
Circlip
19
-
Top and bottom swivel taper bearing
20
-
Top and bottom swivel pins
21
-
Spherical housing, seal and retainer
22
-
Swivel housing
23
-
Constant velocity shaft seal
The front differential is mounted on the LH side of the chassis.
Operation
The welded steel front axle casing houses a separate spiral bevel type differential unit, which is off-set to the right of
the vehicle centre line. The differential unit drives the front wheels via the axle shafts and constant velocity joints which
are totally enclosed in the spherical and swivel housings.
The front wheels are pivoted on tape roller bearings at the top and bottom of the swivel housing. The wheel hubs on all
axles are supported by two taper bearings and driven by drive flanges which are splined to the one piece, stub
shaft/constant velocity joint.
Lubrication
The differential, swivel pin housing and wheel hubs are individually lubricated and separated by oil seals (7) and (8), see
J6267A, to prevent oil transfer across the axle when the vehicle is traversing steep inclines. The wheel bearings are
lubricated with grease and the swivel housing and differential with oil. On later vehicles, identified by having only a filler
plug in the swivel housing, grease is used to lubricate the housing assembly,
Ventilation
Ventilation of the differential is through a plastic pipe (2) which terminates at a high level in the vehicle axle. The swivel
housings ventilate through axle shaft oil seals (8) into the differential and the hub bearings vent via the oil seals into the
swivel housing.
Front Drive Axle/Differential - Front Drive Axle
Diagnosis and Testing
Complaint - Oil leaks
An external leak of lubrication from the hub seals can be caused by a faulty internal seal. For example, if the seals which
separate the differential from the hubs are faulty and the vehicle is operating or parked on an embankment, oil from the
differential may flood one hub resulting in a lack of lubrication in the differential.
When a seal is found to be leaking check the axle ventilation system, as a blockage can cause internal pressure to force
oil past the seals.
Illustrations of oil seal locations are given in Description and Operation.
REFER to:
Front Drive Axle and Differential
(205-03 Front Drive Axle/Differential, Description and Operation).
When investigating hub seal leaks check the grease for dilution with oil. Also check the differential oil level, for signs of
metal particles in the oil and the condition of internal seals.
If the vehicle is driven in deep water with defective oil seals, water may contaminate the lubricants and raise the
differential oil level, giving a false impression that the housing has been over filled. Do not assume that a high oil
level in the differential is due to over filling or, that a low level is because of an external leak.
Front Drive Axle/Differential - Axle Assembly
Removal and Installation
Removal
WARNING: Remove and refit of axle requires a further two persons to steady axle when lowering or repositioning
axle.
1. Support chassis front.
2. Remove road wheels.
3. Support axle weight with hydraulic jack.
4. Remove radius arms to chassis frame nuts.
5. Disconnect steering damper from track rod. Using a extractor
remove track rod links from swivel pin arms.
6. Remove four nuts and bolts securing radius arms to axle
bracket.
7. Remove radius arms.
8. Remove bolts securing brake hose brackets . Refit bolts to
prevent oil leakage.
9. Remove bolts from brake calipers and tie to one side.
10. Remove nuts and washers securing shock absorbers to
axle.
11. Disconnect drag link from swivel pin housing arm.
12. Remove two nuts and bolts securing panhard rod to axle
bracket. Lift rod clear of axle.
13. Mark for reassembly drive shaft flanges. Remove four nuts
and bolts, tie propeller shaft to one side.
14. Release axle ventilation pipe banjo and lower axle
assembly. Remove road springs.
15. Disconnect stabilizer bar link.
For additional information, refer to:
Front Stabilizer Bar Link
(204-01 Front Suspension, Removal and Installation).
16. Remove axle assembly.
17. Transfer components to new axle, if appropriate.
Нет комментариевНе стесняйтесь поделиться с нами вашим ценным мнением.
Текст