Defender 300Tdi (1996+). Manual — part 26

19
FUEL SYSTEM
4
REPAIR
FUEL LIFT PUMP
Service repair no - 19.45.09
Remove
NOTE: Blank off pipe ends and
connections to prevent ingress of dirt.
1. Disconnect battery.
2. Remove high pressure fuel pipes, injection pump
to injectors.
3. Disconnect fuel inlet and outlet pipes from lift
pump.
4. Remove 2 bolts and withdraw lift pump and
gasket from cylinder block.
Refit
5. Clean mating faces of pump and cylinder block.
6. Fit lift pump to cylinder block with a new gasket,
ensure correct location of operating lever with
camshaft.
7. Secure with bolts. Tighten to
25 Nm (18 lbf/ft).
8. Connect inlet and outlet pipes using new nuts
and olives.
9. Refit injector pipes. Tighten union nuts to
28 Nm
(21 lbf/ft).
FUEL SEDIMENTOR
Service repair no - 19.25.01
Remove
1. Disconnect battery.
2. Disconnect inlet and outlet fuel pipes from
sedimentor.
3. Slacken drain tap and allow sedimentor to
completely drain.
4. Remove 2 bolts, washers and nuts and detach
sedimentor from chassis mounting bracket.
Refit
5. Secure sedimentor to chassis mounting with
fixing bolts.
6. Reconnect inlet and outlet fuel pipes to
sedimentor.
7. Slacken drain plug until diesel free from air
flows, then retighten plug.
8. Prime vehicle fuel system.
See Adjustment,
Priming the fuel system
9. Reconnect battery.

FUEL SYSTEM
5
REPAIR
FUEL FILTER ASSEMBLY
Service repair no - 19.25.02
Remove
1. Disconnect battery.
2. Place a suitable container under filter element
and slacken filter bleed screw.
3. Slacken drain tap and allow fuel to drain from
filter element.
4. Slacken fuel inlet and outlet banjo connections.
5. Remove 2 bolts and nuts securing filter head to
inner wing.
6. Remove fuel inlet and outlet banjo bolts and
detach fuel pipes.
7. Remove filter assembly from vehicle. Unscrew
filter element, if necessary.
8. Plug fuel pipe ends to prevent ingress of dirt.
Refit
9. Position filter assembly and fit fuel inlet and
outlet pipes using new copper sealing washers
both sides of the banjo connections.
10. Secure filter head to inner wing.
11. Fully tighten banjo connections.
12. Prime fuel system to remove any air trapped in
filter
See Adjustment, Priming the fuel
system
13. Reconnect battery.
FUEL FILTER ELEMENT
Service repair no - 19.25.07
For remove and refit procedure.
See Fuel filter
element

19
FUEL SYSTEM
6
REPAIR
SIDE MOUNTED FUEL TANK
Service repair no - 19.55.05
NOTE: This fuel tank is standard on 90
models and an option on 110/130 2 door
vehicles fitted with twin tanks.
Remove
WARNING: Before any attempt is made to
start the removal procedure it is vital that
the FUEL HANDLING PRECAUTIONS are
carefully studied and implemented in the interests
of safety.
See INTRODUCTION, Information, Fuel
Handling Precautions
1. Disconnect battery.
2. Remove fuel filler cap.
3. Remove fuel tank drain plug, allow fuel to drain
into a clean container and refit plug.
4. Remove RH seat cushion.
5. Release retaining catch and remove seat base
cover to gain access to fuel tank.
6. Disconnect electrical plug from fuel gauge unit.
7. Disconnect fuel supply pipe from tank.
8. Disconnect spill return pipe from fuel tank.
9. Disconnect breather pipe from fuel filler tube.
10. Slacken hose clip and remove filler hose from
filler tube.
11. From rear of tank, remove 2 nuts and washers
securing tank mounting to captive-headed bolts.
12. Support rear of fuel tank and remove captive
bolts.
FUEL SYSTEM
7
REPAIR
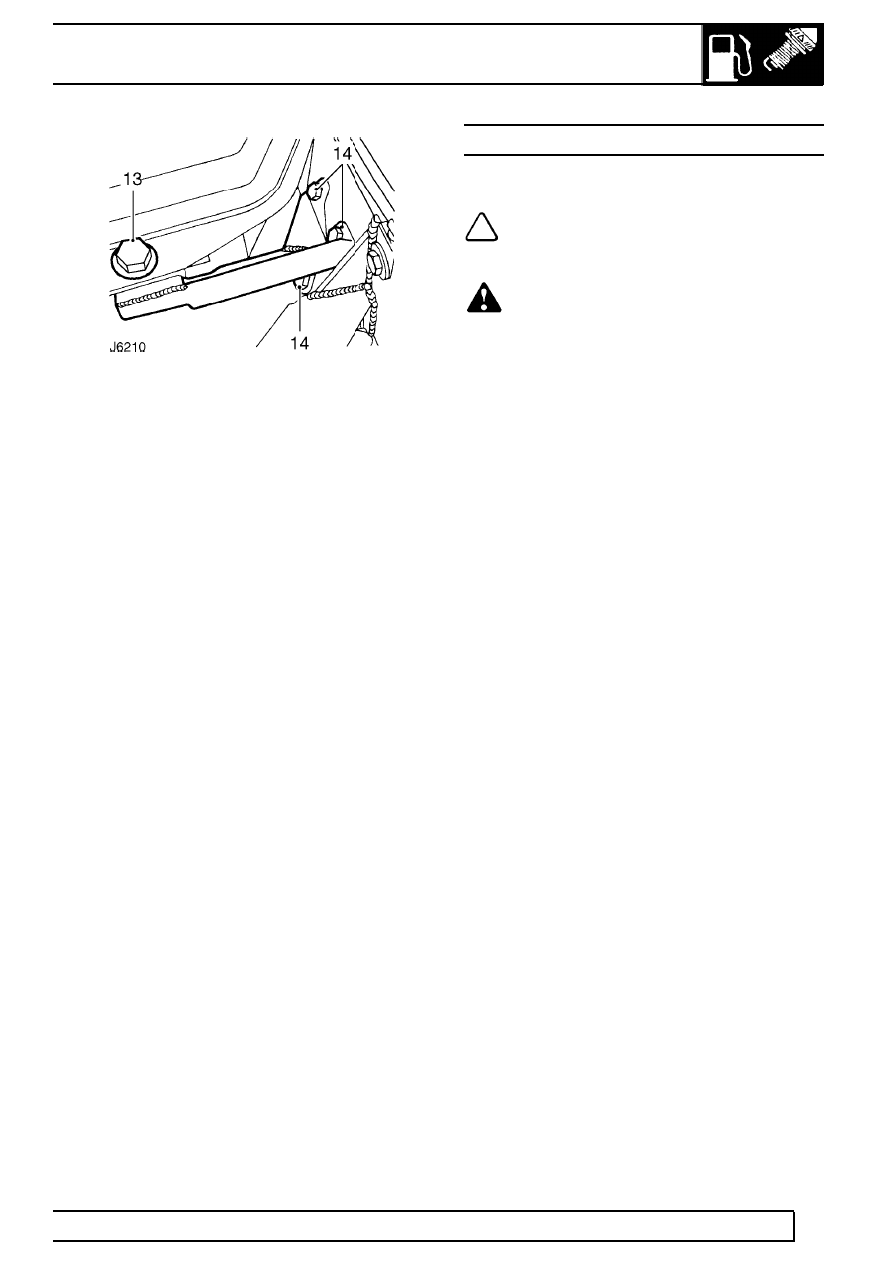
13. Remove single bolt fixing assembly securing
front of tank to chassis mounted bracket.
14. Remove 3 bolts securing tank mounting bracket
to chassis and release bracket.
15. Lower front of tank while turning anti-clockwise
and remove from vehicle.
16. If required, remove tank gauge unit.
See
INSTRUMENTS, Repair, Fuel gauge tank unit
- side fuel tank or See INSTRUMENTS,
Repair, Fuel gauge tank unit - rear fuel tank,
110/130
Refit
17. Fit filler hose and clip to tank but do not fully
tighten. Position clip screw so that it is
accessible when tank is fitted.
18. Fit breather hose and secure with clip.
19. Position fuel tank in vehicle and loosely secure
front mounting bracket to tank with special bolt
and rubber bushes.
20. Secure mounting bracket to chassis with 3 bolts
and fully tighten to
20 Nm (15 lbf/ft).
21. Secure rear of tank to chassis mounting and
tighten captive bolt plate fixings to
20 Nm (15
lbf/ft).
22. Fully tighten front fixing bolt assembly to
20 Nm
(15 lbf/ft).
23. Fit spill return and fuel supply pipes and secure
union connections.
24. Fit fuel level unit electrical plug.
25. Fit hose to filler tube and tighten upper and lower
clips.
26. Check that drain plug is secure and fill fuel tank.
27. Reconnect battery.
28. Prime fuel system
See Adjustment, Priming
the fuel system and start engine.
29. Check system for leaks and operation of fuel
gauge.
30. Fit seat base cover and seat cushion.
SIDE MOUNTED FUEL TANK - 5 DOOR VEHICLES
Service repair no - 19.55.01
NOTE: This fuel tank is used on 110/130 5
door vehicles fitted with a twin tank
option.
WARNING: Before any attempt is made to
start the removal procedure it is vital that
the FUEL HANDLING PRECAUTIONS,
See
INTRODUCTION, Information, Fuel handling
precautions are carefully studied and
implemented in the interests of safety.
Remove
1. Disconnect battery.
2. Remove tank drain plug, allow fuel to drain into a
clean container, and refit plug.
3. Remove RH seat cushion.
4. Remove retaining catch and remove seat base
cover to gain access to fuel tank.
5. Disconnect electrical plug from fuel gauge unit.
6. Disconnect fuel supply pipe from tank.
7. Disconnect spill return pipe from tank.
8. Remove 3 bolts securing tank to front mounting
bracket.
9. Support front of tank and remove single fixing
assembly securing tank to rear mounting
bracket.
10. Remove tank from vehicle.
11. If required, remove fuel gauge unit.
See
INSTRUMENTS, Repair, Fuel gauge tank unit
- side fuel tank or See INSTRUMENTS,
Repair, Fuel gauge tank unit - rear fuel tank,
110/130
Refit
12. Position fuel tank in vehicle and loosely secure
to rear mounting bracket with special bolt and
rubber bushes.
13. Secure tank to front mounting bracket and
tighten fixings to
20 Nm (15 lbf/ft).
14. Fully tighten rear fixing bolt assembly to
20 Nm
(15 lbf/ft).
15. Fit spill return and fuel supply pipes to fuel tank
and securely tighten union connectios.
16. Fit electrical plug to fuel gauge unit.
17. Check that drain plug is secure and fill fuel tank.
18. Reconnect battery.
19. Prime fuel system.
See Adjustment, Priming
the fuel system and start engine.
20. Check system for leaks and operation of fuel
gauge.
21. Fit seat base cover and seat cushion.
Нет комментариевНе стесняйтесь поделиться с нами вашим ценным мнением.
Текст