Defender 300Tdi (1996+). Manual — part 17
ENGINE
11
REPAIR
CRANKSHAFT OIL SEAL
Service repair no - 12.21.14
Remove
1. Remove crankshaft gear.
See Crankshaft gear
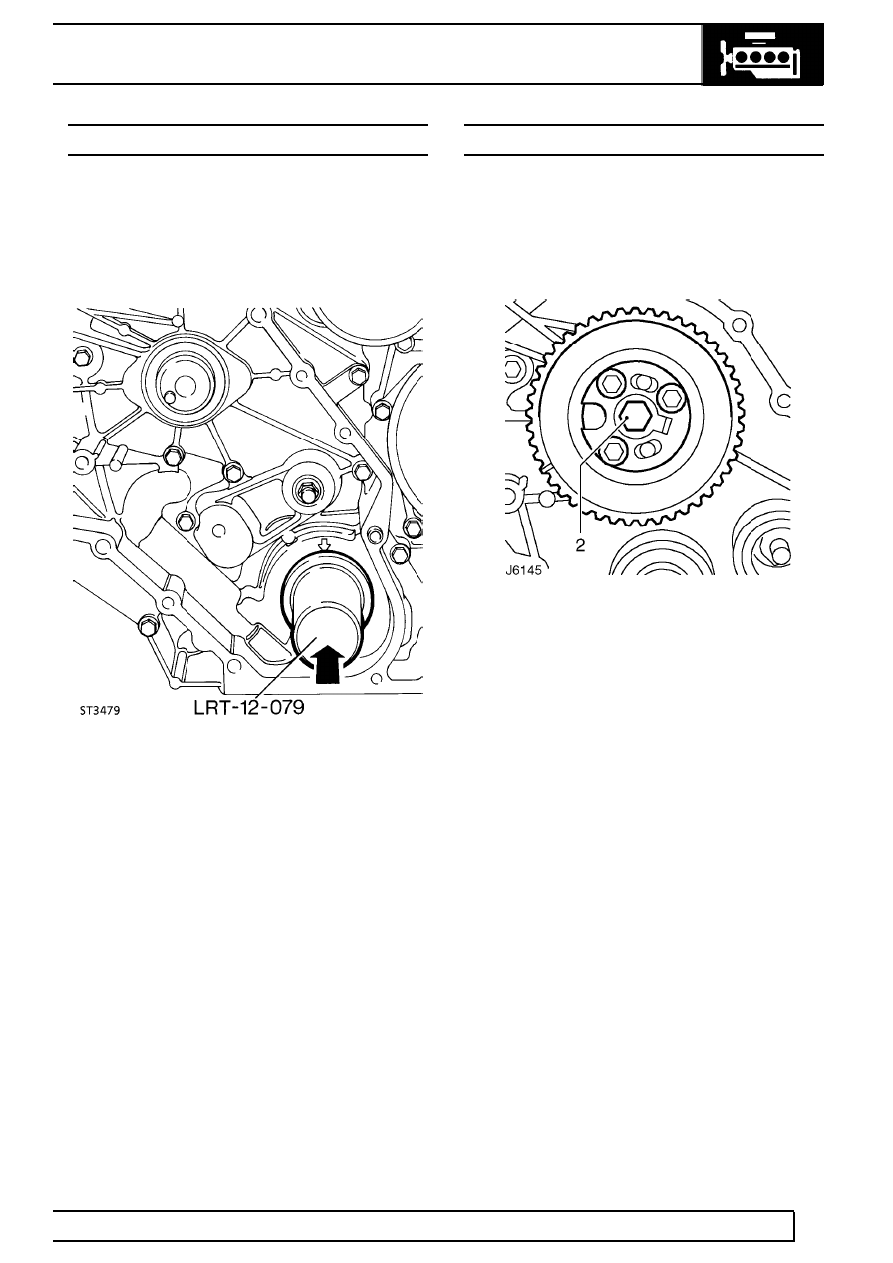
2. Prise out oil seal from front cover.
Refit
3. Lubricate a new crankshaft oil seal with clean
engine oil.
4. With lip side leading, drive in seal squarely using
special tool LRT-12-079.
5. Fit crankshaft gear.
See Crankshaft gear
CAMSHAFT GEAR
Service repair no - 12.65.24
Remove
1. Remove camshaft drive belt.
See Camshaft
drive belt
2. Remove centre bolt and withdraw camshaft
gear, complete with hub and retaining plate.
Refit
3. Fit camshaft gear. Tighten bolt to
80 Nm (59
lbf/ft).
4. Fit camshaft drive belt.
See Camshaft drive
belt
12
ENGINE
12
REPAIR
CAMSHAFT OIL SEAL
Service repair no - 12.13.05
Remove
1. Remove camshaft gear.
See Camshaft gear
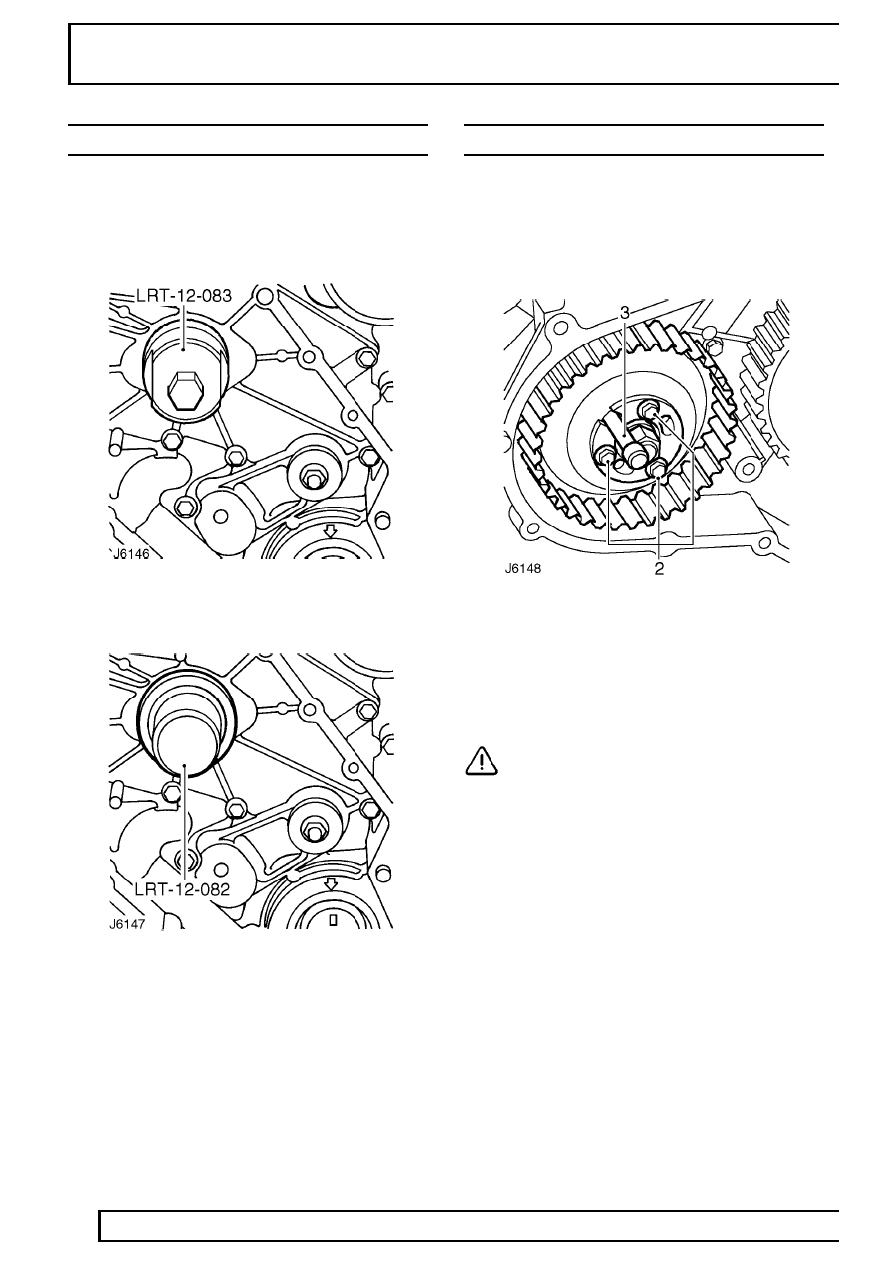
2. Remove camshaft oil seal from front cover using
special tool LRT-12-083.
Refit
3. Lubricate a new camshaft oil seal with clean
engine oil.
4. With lip side leading, drive in seal squarely using
special tool LRT-12-082.
5. Fit camshaft gear.
See Camshaft gear
INJECTION PUMP GEAR
Service repair no - 19.30.06
Remove
1. Remove camshaft drive belt.
See Camshaft
drive belt
2. Slacken 3 bolts on front of injector pump gear.
3. Remove special tool pin from gear.
4. Remove 3 bolts and withdraw gear and retaining
plate.
Refit
CAUTION: It is important to ensure that
when the injection pump is locked no
attempt must be made to rotate it. Take
care not to allow the crankshaft to be turned.
5. Fit gear and retaining plate. Tighten bolts to
25
Nm (18 lbf/ft).
6. Insert pin from special tool LRT-12-045 in
injection pump gear and through into pump
flange.
7. Fit camshaft drive belt.
See Camshaft drive
belt
ENGINE
13
REPAIR
FRONT COVER GASKET
Service repair no - 12.65.10
Remove
1. Remove camshaft drive belt.
See Camshaft
drive belt
2. Remove crankshaft gear.
See Crankshaft gear
3. Remove camshaft gear.
See Camshaft gear
4. Remove injection pump gear.
See Injection
pump gear
5. Remove fuel injection pump.
See FUEL
SYSTEM, Repair, Fuel injection pump
6. Remove engine oil sump.
See Engine oil
sump
7. Remove oil pick up strainer.
See Oil pick-up
strainer
8. Remove 10 bolts securing timing gear housing to
block.
9. Withdraw timing gear housing complete with
gasket.
10. Clean all gasket material from mating faces.
Refit
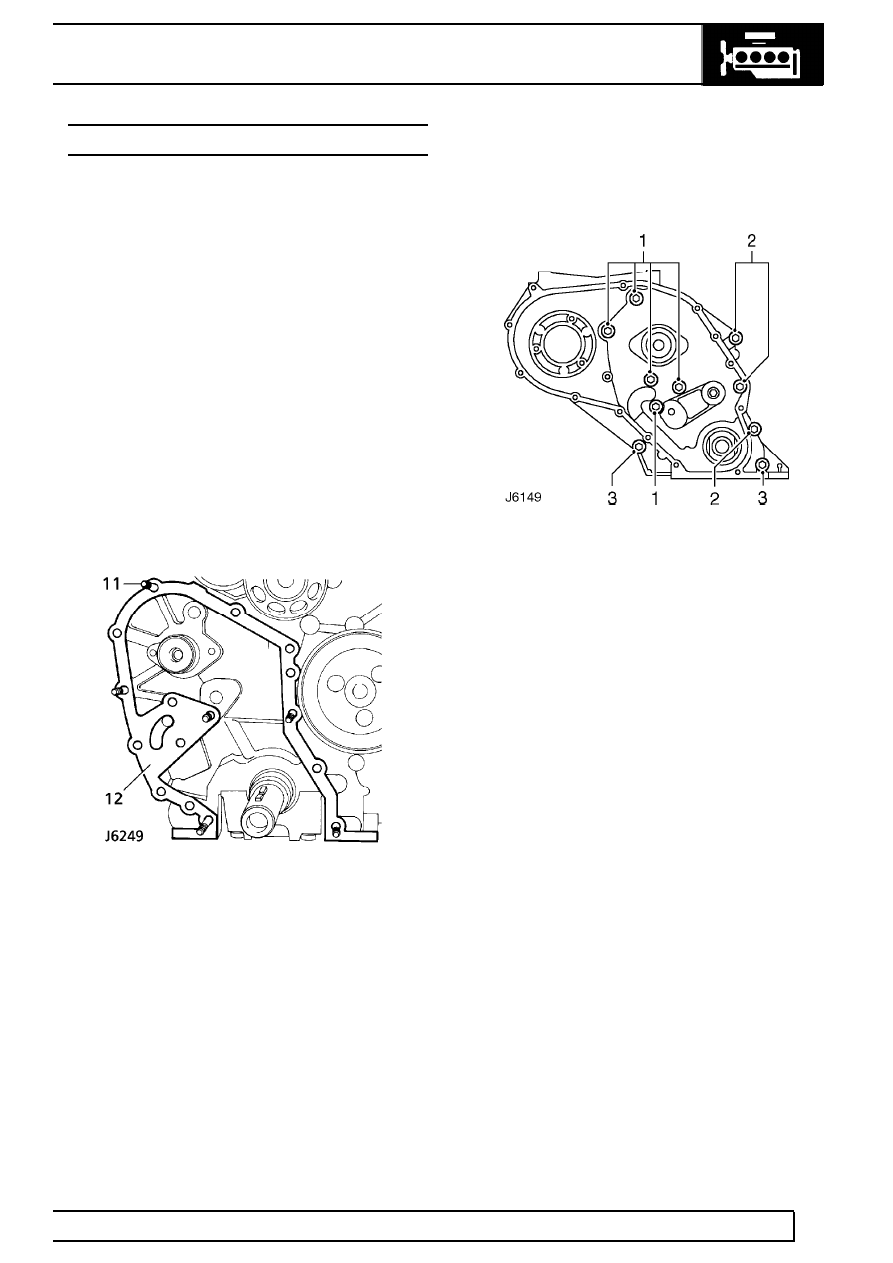
11. Fit slave guide studs to locate gasket.
12. Fit new gasket to cylinder block.
13. Align flats on oil pump with flats on crankshaft.
14. Fit front cover to block taking care not to damage
oil seal.
15. Secure with bolts of correct length in locations
where slave studs are not fitted, see J6149.
16. Remove slave studs and fit correct length bolts.
17. Tighten all bolts to
25 Nm (18 lbf/ft).
1 - 25 mm, 2 - 35 mm, 3 - 80 mm.
18. Fit oil pick-up strainer.
See Oil pick-up
strainer
19. Fit oil sump.
See Engine oil sump
20. Fit fuel injection pump.
See FUEL SYSTEM,
Repair, Fuel injection pump
21. Fit injection pump gear.
See Injection pump
gear
22. Fit camshaft gear.
See Camshaft gear
23. Fit crankshaft gear.
See Crankshaft gear
24. Fit camshaft drive belt.
See Camshaft drive
belt
12
ENGINE
14
REPAIR
ENGINE OIL SUMP
Service repair no - 12.60.44
Remove
1. Disconnect battery.
2. Drain engine oil.
NOTE: A chassis undertray may be fitted
on some vehicle derivatives to conform to
legal requirements. When under chassis
remove and refit procedures are required, it may
be necessary to remove the undertray and/or
integral access panels.
See CHASSIS AND BODY, Repair, Front
undertray or See CHASSIS AND BODY, Repair,
Rear undertray
3. Slacken sump securing bolts.
4. Break sealant around sump flange, using a
sharp knife.
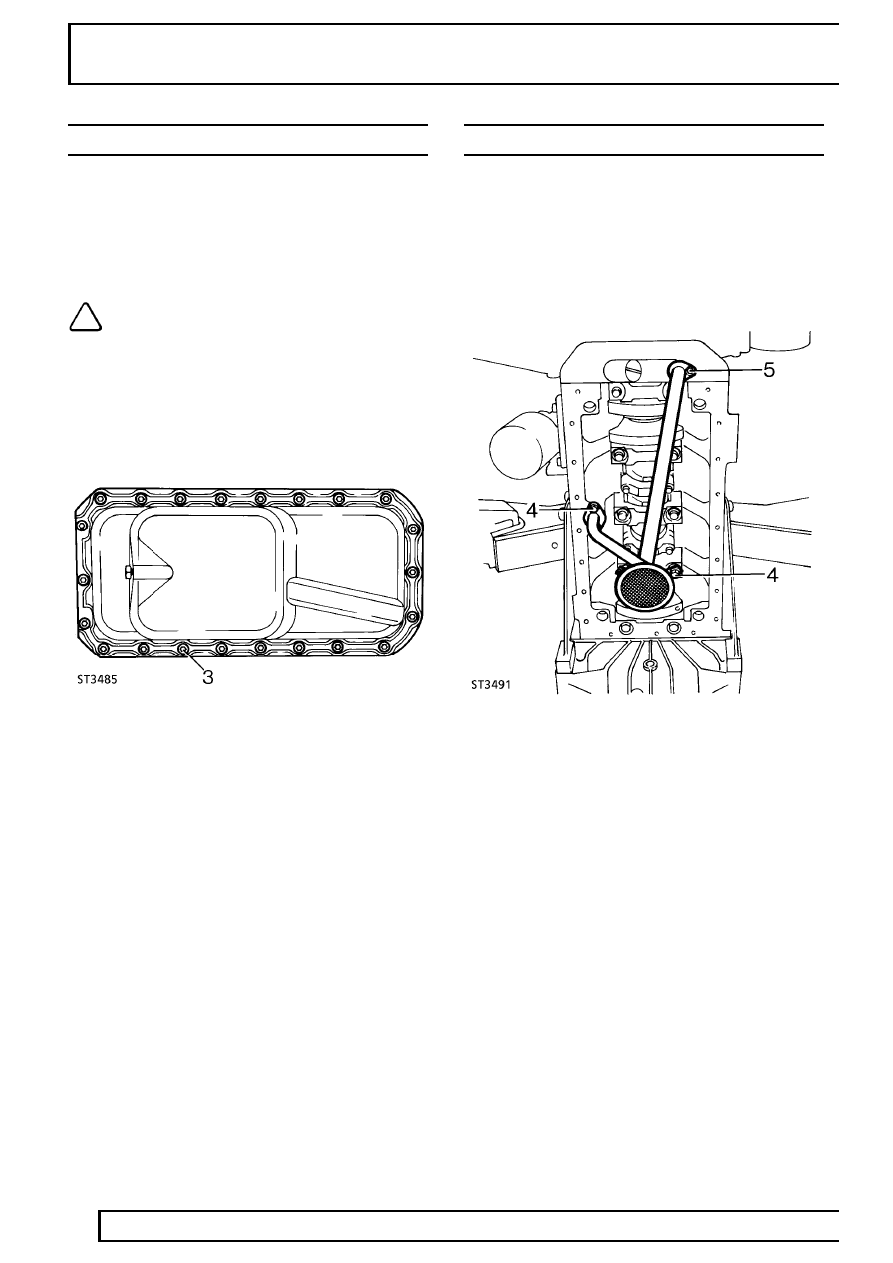
5. Remove 22 bolts and withdraw sump.
Refit
6. Clean mating faces of sump, timing gear housing
and cylinder block.
7. Apply a 2,0 mm bead of ’Hylosil RTV102’ to the
sump flange, ensuring bead is applied inboard of
the bolt holes.
8. Secure sump to block with 22bolts. Tighten to
25
Nm (18 lbf/ft).
9. Refill engine oil.
See LUBRICANTS, FLUIDS
AND CAPACITIES, Information, Capacities
10. Reconnect battery.
OIL PICK-UP STRAINER
Service repair no - 12.60.20
Remove
1. Disconnect battery.
2. Drain engine oil.
3. Remove engine oil sump.
See Engine oil
sump
4. Remove 2 bolts securing pipe support bracket to
main bearing cap fixings.
5. Remove bolts from pipe flanges.
6. Withdraw pick-up strainer assembly.
Refit
7. Postion pick-up strainer assembly, fitting a new
’O’ ring seal at oil pump connection.
8. Apply Loctite 242E to threads of bolts at main
bearing cap. Fit bolts, tighten to
9 Nm (7 lbf/ft).
9. Fit bolts to pipe flanges. Tighten to
25 Nm (18
lbf/ft).
10. Fit sump.
See Engine oil sump
11. Reconnect battery.
Нет комментариевНе стесняйтесь поделиться с нами вашим ценным мнением.
Текст