Discovery 2. Manual — part 647
DOORS
REPAIRS
76-1-1
DOORS
REPAIRS
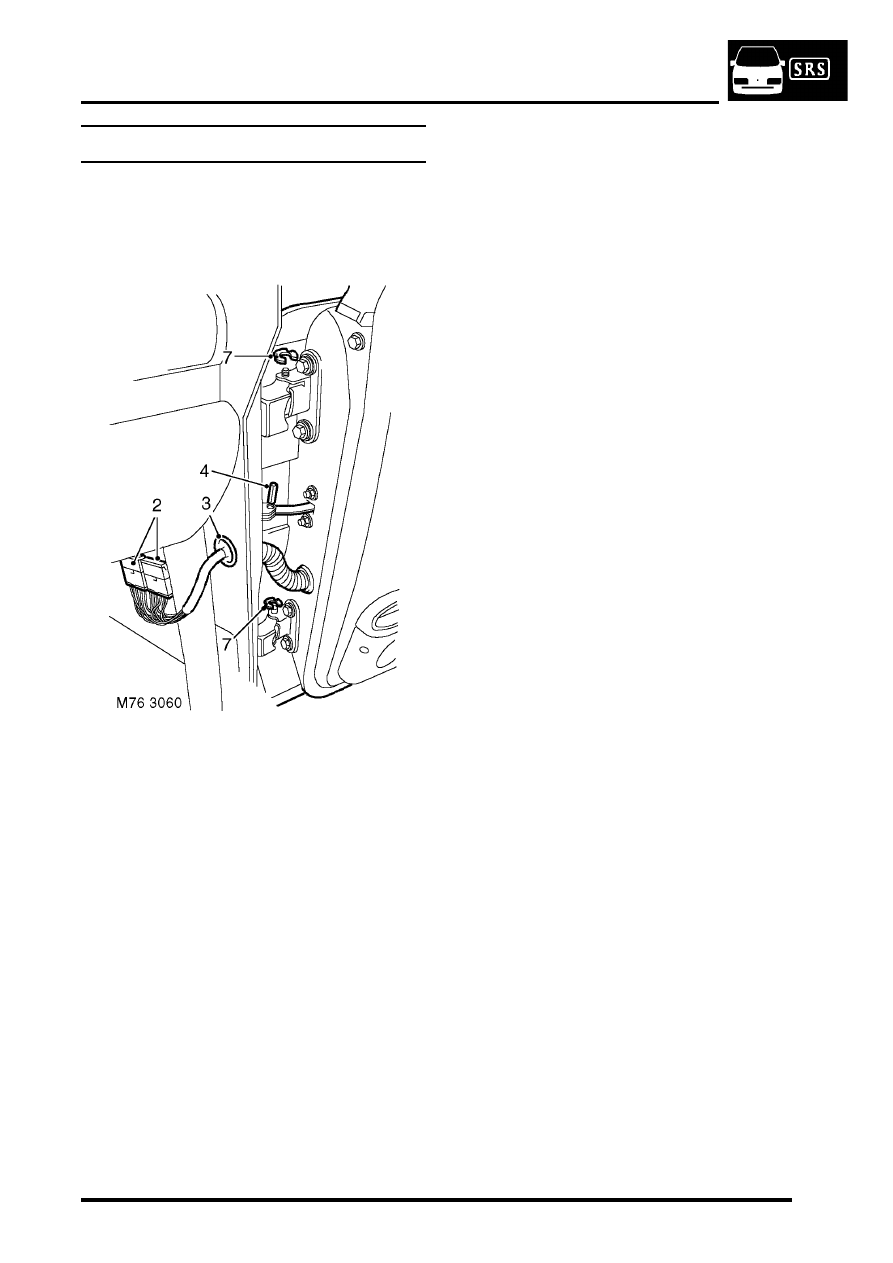
Door - front
$% 76.28.01.99
Remove
1. Release 'A' post lower trim and position aside.
2. Release and disconnect multiplugs from lower
'A' post.
3. Release harness sleeve and pull harness
through 'A' post.
4. Remove roll pin from door check strap.
5. Release check strap from 'A' post.
6. Discard roll pin.
7. Remove 2 'C' clips from door hinges.
8. With assistance raise and remove door.
Refit
1. With assistance position door to hinges.
2. Fit 'C' clips to hinge pins.
3. Position check strap to 'A' post and secure with
new roll pin.
4. Feed door harness through 'A' post.
5. Connect and secure multiplugs at lower 'A'
post.
6. Connect harness sleeve to 'A' post and door.
7. Fit 'A' post finisher.
8. Check door for flush fit to adjacent panels and
door edges for equal gap. If adjustment is
necessary:
a Open door
b Place a wooden block on jack and position
jack to support door lower edge.
c Loosen 4 bolts securing hinges to door.
d Loosen 2 Torx bolts securing door latch
striker.
e Use jack to assist with door alignment.
f Tighten hinge bolts.
g Remove jack, close door and check for
correct alignment.
h When alignment is correct, tighten door
hinge bolts to 30 Nm (22 lbf.ft).
i Adjust door latch striker and tighten Torx
bolts to 26 Nm (19 lbf.ft).
DOORS
76-1-2
REPAIRS
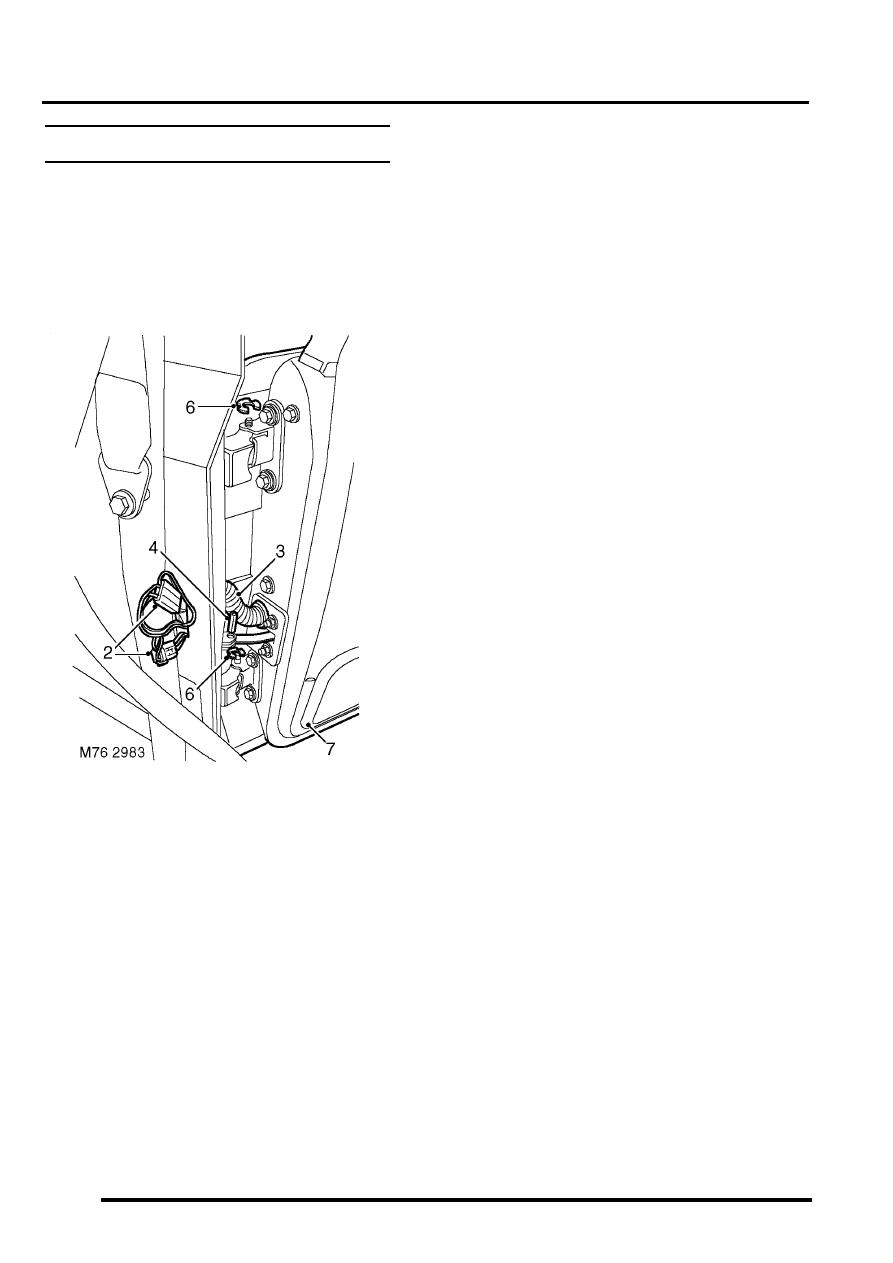
Door - rear
$% 76.28.02.99
Remove
1. Release 'B' post lower trim casing and position
aside.
REPAIRS, Trim casing - lower - 'B' post.
2. Release multiplugs from within 'B' post and
disconnect.
3. Release harness sleeve and pull through 'B'
post.
4. Remove roll pin from check strap and discard.
5. Release check strap from 'B' post.
6. Remove 2 'C' clips securing door to each hinge.
7. With assistance raise and remove door.
Refit
1. With assistance position door to hinges.
2. Fit 'C' clips to hinge pins.
3. Position check strap to 'B' post and secure with
new roll pin.
4. Feed door harness through 'B' post and
connect multiplugs.
5. Connect harness sleeve to 'B' post and door.
6. Fit 'B' post lower trim casing.
REPAIRS, Trim casing - lower - 'B' post.
7. Check door for flush fit to adjacent panels and
door edges for equal gap. If adjustment is
necessary:
a Open door.
b Place a wooden block on jack and position
jack to support door lower edge.
c Loosen 4 bolts securing hinges to door.
d Loosen 2 Torx bolts securing door latch
striker.
e Use jack to assist with door alignment.
f Tighten hinge bolts.
g Remove jack, close door and check for
correct alignment.
h When alignment is correct, tighten door
hinge bolts to 30 Nm (22 lbf.ft).
i Adjust door latch striker and tighten Torx
bolts to 26 Nm (19 lbf.ft).
DOORS
REPAIRS
76-1-3
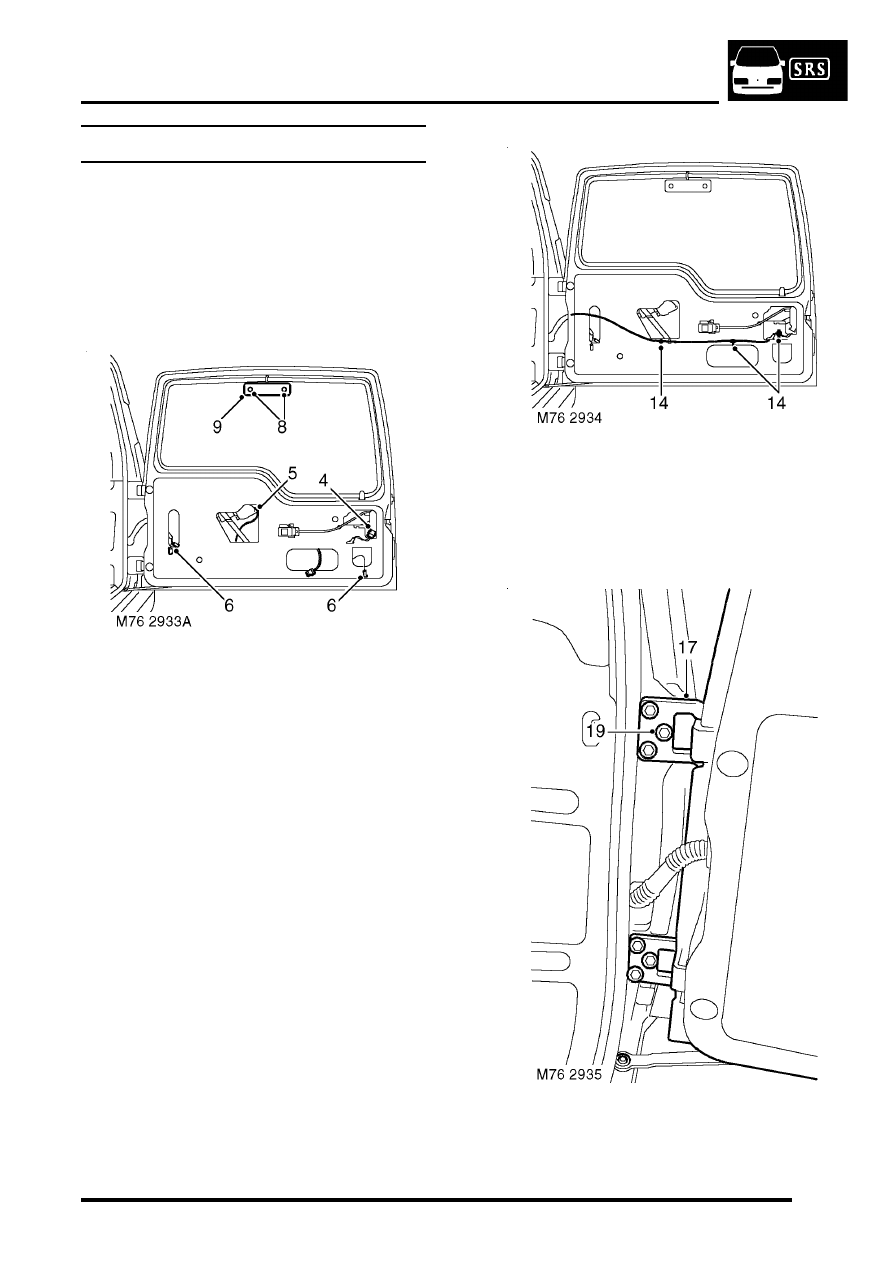
Door - tail
$% 76.28.19.99
Remove
1. Remove spare wheel from tail door.
2. Remove tail door trim casing.
DOORS, REPAIRS, Trim casing - tail
3. Carefully release water shedder from tail door.
4. Disconnect multiplug from door latch.
5. Disconnect multiplug from rear wiper motor.
6. Disconnect 2 Lucars from Heated Rear
Window (HRW).
7. Disconnect multiplug from number plate lamp.
8. Remove 2 screws securing Centre High
Mounted Stop Lamp (CHMSL) cover to tail door
glass.
9. Remove CHMSL cover.
10. Disconnect 2 Lucars from CHMSL.
11. Attach draw string to CHMSL wires and draw
wires through tail door. Disconnect draw string
from wires.
12. Tape draw string in tail door to retain its
position.
13. Release washer tube from rear of wiper arm.
14. Release 3 clips securing harness to tail door.
15. Release harness sleeve from door outer edge
and feed harness and washer tube through
door.
16. Remove spring clip securing check strap to tail
door aperture and collect washer.
17. Mark position of hinges.
18. Support the tail door on a jack, using a block of
wood to protect the door.
DOORS
76-1-4
REPAIRS
19. Remove 6 bolts securing tail door hinges to
body and, with assistance, remove tail door.
Refit
1. Support the tail door on a jack, using a block of
wood to protect the door.
2. With assistance position door. Fit securing
bolts but do not tighten at this stage.
3. Fit washer and spring clip securing check strap
to aperture.
4. Adjust position of tail door in relation to
aperture, ensuring gaps around all 4 edges
are consistent, and door closes cleanly onto
dove tail.
5. When tail door is correctly adjusted, tighten tail
door hinge bolts to 34 Nm (25 lbf.ft).
6. Feed harness and washer tube through outer
edge of door and connect harness sleeve to
door.
7. Secure harness to tail door with clips.
8. Connect washer tube to rear of wiper arm.
9. Remove tape from draw string and secure to
CHMSL wires.
10. Draw wires through tail door and connect
Lucars to CHMSL.
11. Fit CHMSL cover and secure with screws.
12. Connect multiplug of number plate lamp.
13. Connect Lucars to HRW.
14. Connect multiplug to rear wiper motor.
15. Connect multiplug to door latch.
16. Fit water shedder to door.
17. Fit tail door trim casing.
DOORS, REPAIRS, Trim casing - tail
18. Fit spare wheel to tail door.
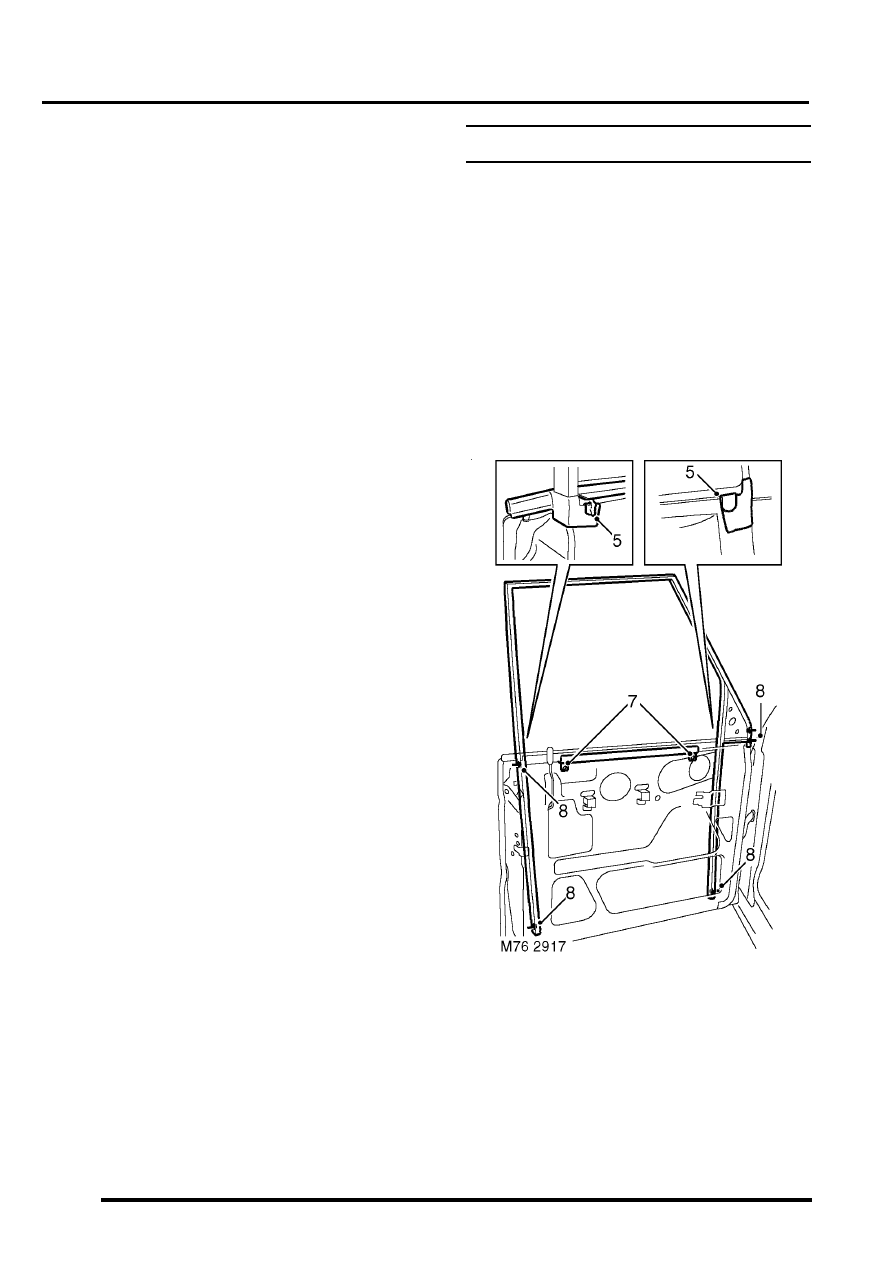
Glass - front or rear door
$% 76.31.01
Remove
1. Remove door trim casing.
2. Carefully release water shedder from door.
3. Front door glass only: Remove exterior door
4. Remove inner waist seal.
Front door shown, rear door similar
5. Remove 2 clips securing ends of outer waist
seal.
6. Remove outer waist seal.
7. Remove 2 bolts securing glass to regulator. If
necessary, lower glass to access bolts.
8. Remove bolts securing frame to door.
9. Remove door frame complete with glass.
10. Slide out and remove glass from frame.
Нет комментариевНе стесняйтесь поделиться с нами вашим ценным мнением.
Текст