Discovery 2. Manual — part 37
ENGINE - V8
REPAIRS 12-2-21
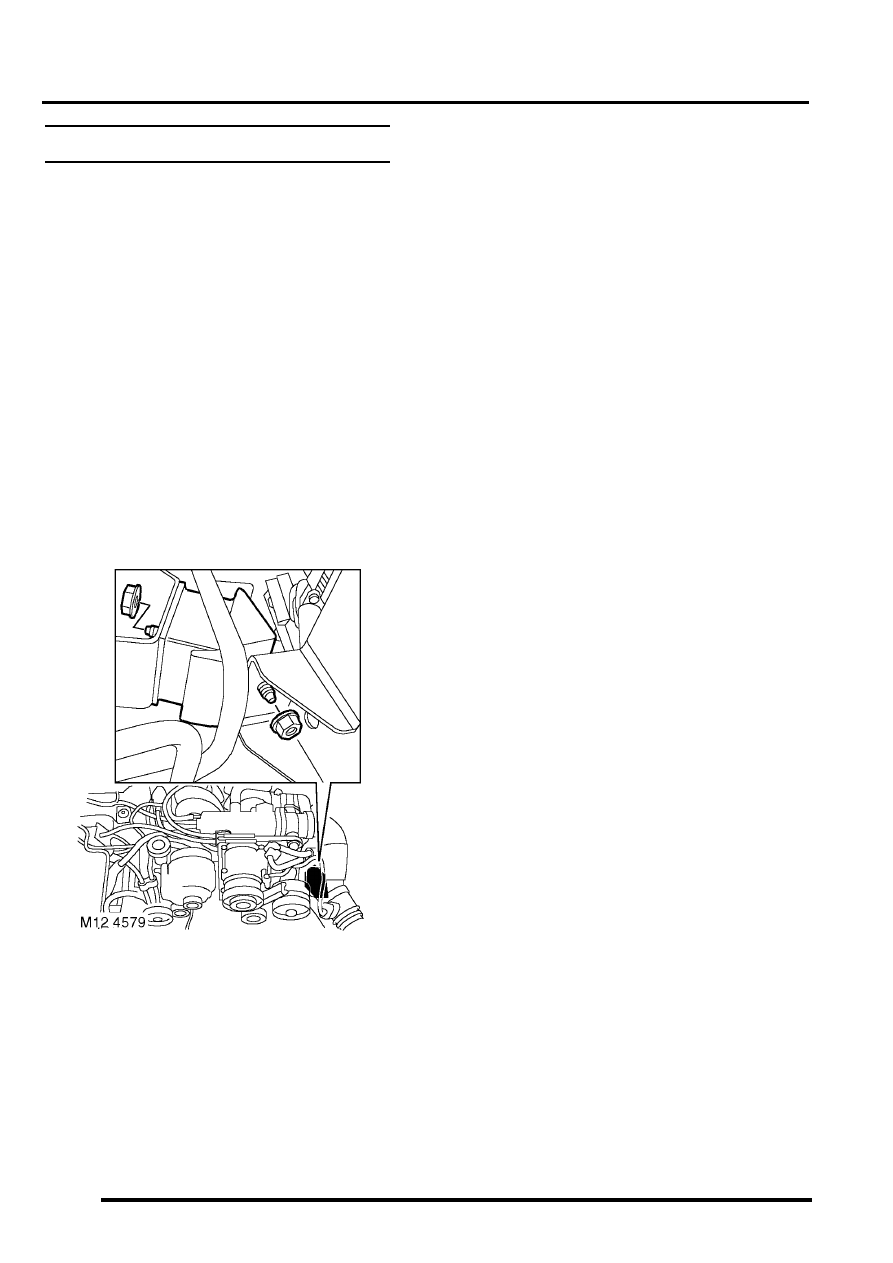
5. Release coolant rail from inlet manifold and
discard 'O' ring.
6. Remove nuts securing alternator cables and
release cables from alternator.
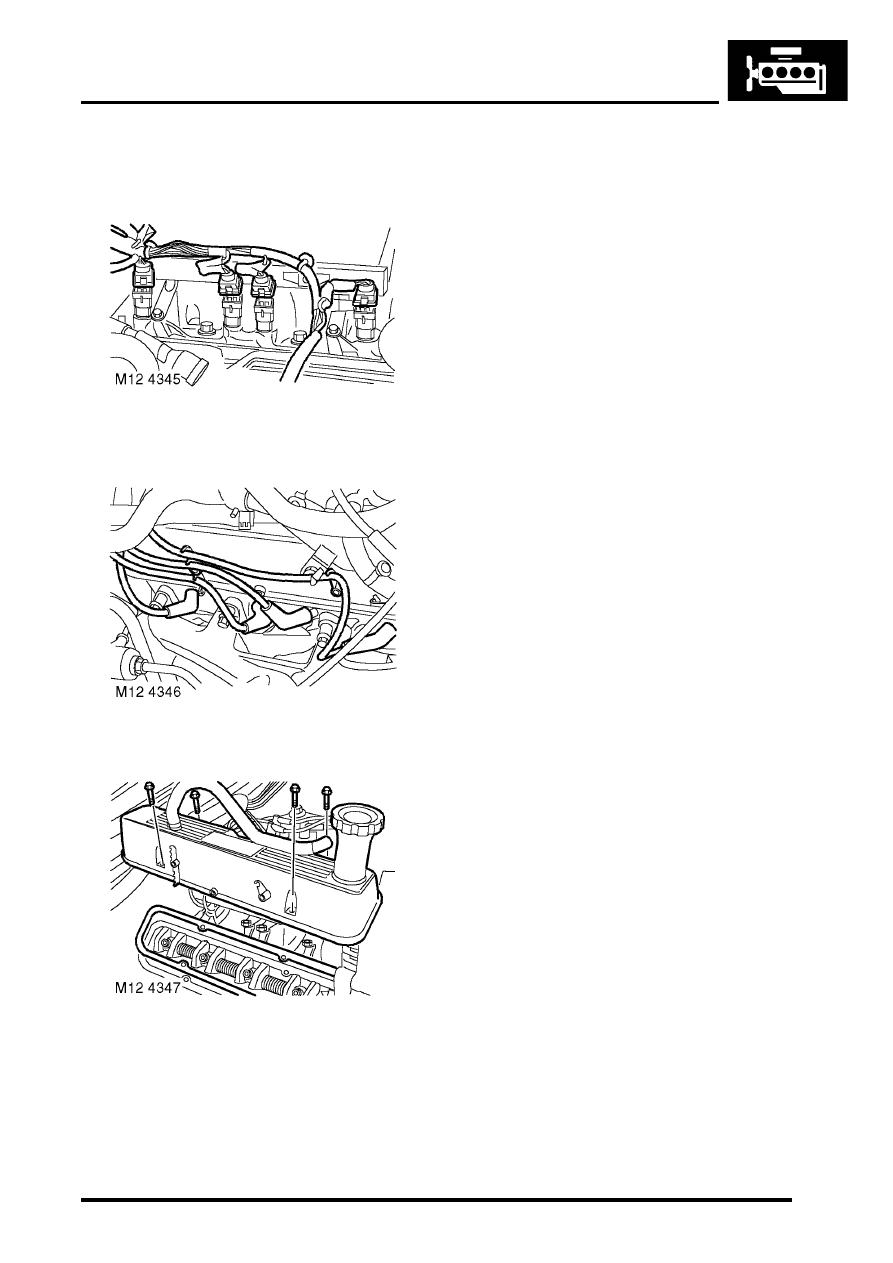
7. Disconnect multiplugs from RH bank of
injectors and release harness from fuel rail.
8. Release ht leads from clips on rocker cover.
9. Noting fitted position of 2 long screws or multi-
hex bolts, remove and discard screws/bolts
securing rocker cover; remove rocker cover.
10. Remove and discard rocker cover gasket.
Refit
1. Clean mating faces of rocker cover and
cylinder head, ensure bolt holes are clean and
dry.
2. Fit a new gasket dry, position rocker cover
ensuring gasket is correctly located.
3. Fit new 'patched' multi-hex rocker cover bolts
ensuring that 2 short bolts are on side of rocker
cover nearest centre of engine.
4. Tighten bolts by diagonal selection to:
l
Stage 1 - 3 Nm (2.5 lbf.ft)
l
Stage 2 - 8 Nm (6 lbf.ft)
5. Ensure that outer rim of gasket is correctly
positioned around periphery of rocker cover.
6. Secure ht leads in rocker cover clips.
7. Secure injector harness to fuel rail and connect
multiplugs to injectors.
8. Position alternator cables, and tighten terminal
B+ nut to 18 Nm (13 lbf.ft) and terminal D+ nut
to 5 Nm (3 lbf.ft).
9. Clean coolant rail 'O' ring recess.
10. Lubricate and fit new 'O' ring to coolant rail,
position coolant rails, fit bolts and tighten to 22
Nm (16 lbf.ft).
11. Models with SAI: Apply a small amount of
engine oil to top of air manifold union nuts and
around air manifold pipes.
12. Models with SAI:Position air manifold and
finger tighten both air manifold union nuts.
CAUTION: Finger tighten union nuts as far
as possible, damage to air manifold pipes or
adapters may result if this is not done.
13. Models with SAI: Tighten both union nuts to
25 Nm (18 lbf.ft).
CAUTION: Ensure that air manifold pipes
are not distorted during tightening
operation.
14. Fit upper inlet manifold.
SYSTEMS - V8, REPAIRS, Gasket - inlet
manifold - upper - Without Secondary Air
Injection.
15. Refill cooling system.
ENGINE - V8
12-2-22 REPAIRS
Mounting - front - LH
$% 12.45.01
Remove
1. Release turnbuckles and remove battery cover.
2. Disconnect battery earth lead.
3. Raise front of vehicle.
WARNING: Do not work on or under a
vehicle supported only by a jack. Always
support the vehicle on safety stands.
4. Remove underbelly panel.
5. Position a jack beneath the sump, and support
the engine on the jack.
CAUTION: To prevent damage to
components, cushion the jack pad with a
block of wood or hard rubber.
6. Remove 2 nuts securing engine mountings to
chassis.
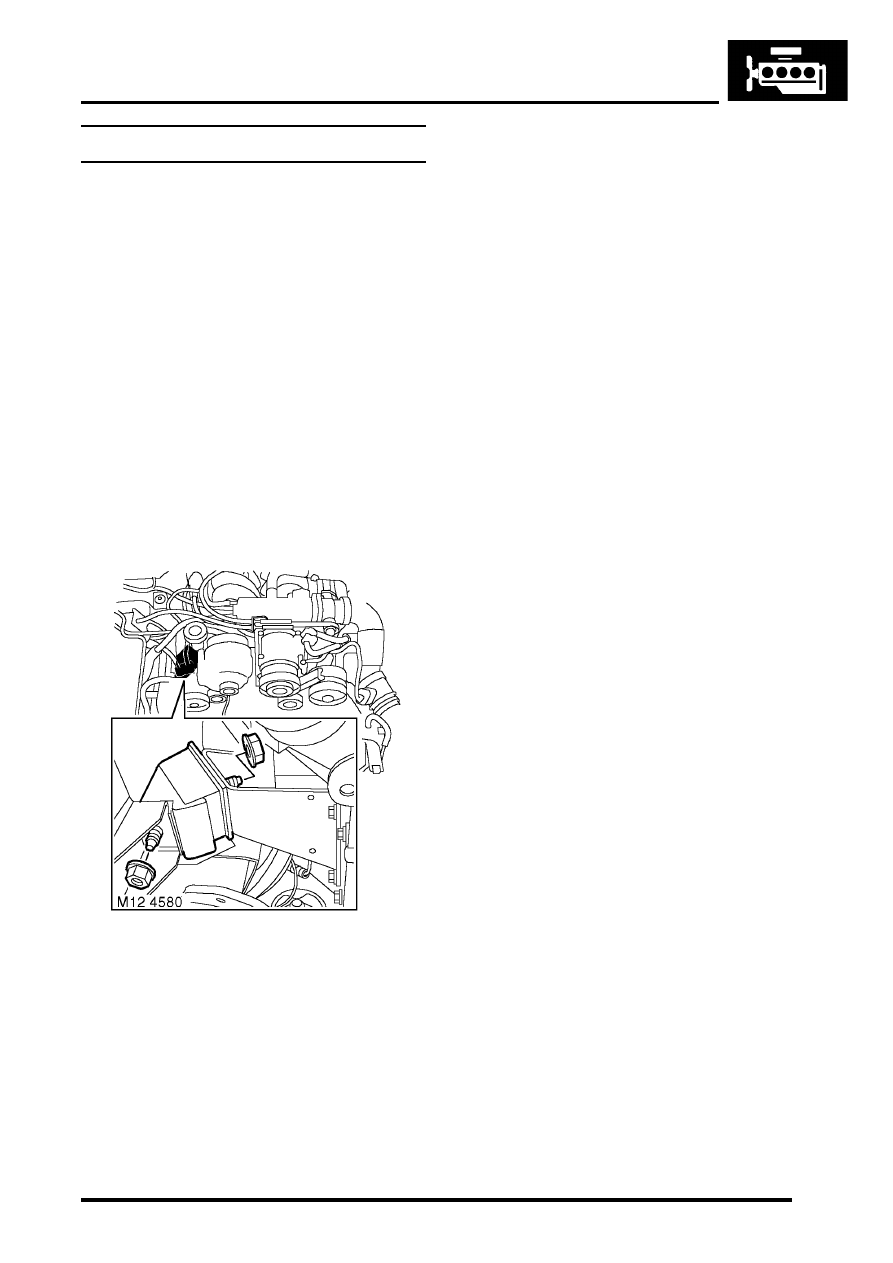
7. Remove nut securing LH mounting to cylinder
block.
8. Raise engine sufficiently to allow engine
mounting to be removed, take care not to trap
any cables, pipes or harness.
9. Remove engine mounting. Collect heat shield,
if fitted.
Refit
1. Fit heat shield to engine mounting, if fitted.
2. Fit engine mounting ensuring dowel is located.
3. Lower the jack and engage engine mounting
studs in chassis.
4. Fit nuts securing LH engine mounting and
tighten to 85 Nm (63 lbf.ft).
5. Fit underbelly panel.
6. Remove stand(s) and lower vehicle.
7. Connect battery earth lead.
8. Fit battery cover and secure turnbuckles.
ENGINE - V8
REPAIRS 12-2-23
Mounting - front - RH
$% 12.45.03
Remove
1. Release turnbuckles and remove battery cover.
2. Disconnect battery earth lead.
3. Raise front of vehicle.
WARNING: Do not work on or under a
vehicle supported only by a jack. Always
support the vehicle on safety stands.
4. Remove underbelly panel.
5. Position a jack beneath the sump, and support
the engine on the jack.
CAUTION: To prevent damage to
components, cushion the jack pad with a
block of wood or hard rubber.
6. Remove 2 nuts securing engine mountings to
chassis.
7. Remove nut securing RH mounting to cylinder
block.
8. Raise engine sufficiently to allow engine
mounting to be removed. Take care not to trap
any cables, pipes or harness.
9. Remove engine mounting.
10. Collect heat shield.
Refit
1. Position heat shield.
2. Fit engine mounting ensuring dowel is located.
3. Lower the jack and engage engine mounting
studs in chassis.
4. Fit engine mounting nuts and tighten to 85 Nm
(63 lbf.ft).
5. Fit underbelly panel.
6. Remove stand(s) and lower vehicle.
7. Connect battery earth lead.
8. Fit battery cover and secure turnbuckles.
ENGINE - V8
12-2-24 REPAIRS
Mounting - rear - LH
$% 12.45.07
Remove
1. Raise vehicle on lift.
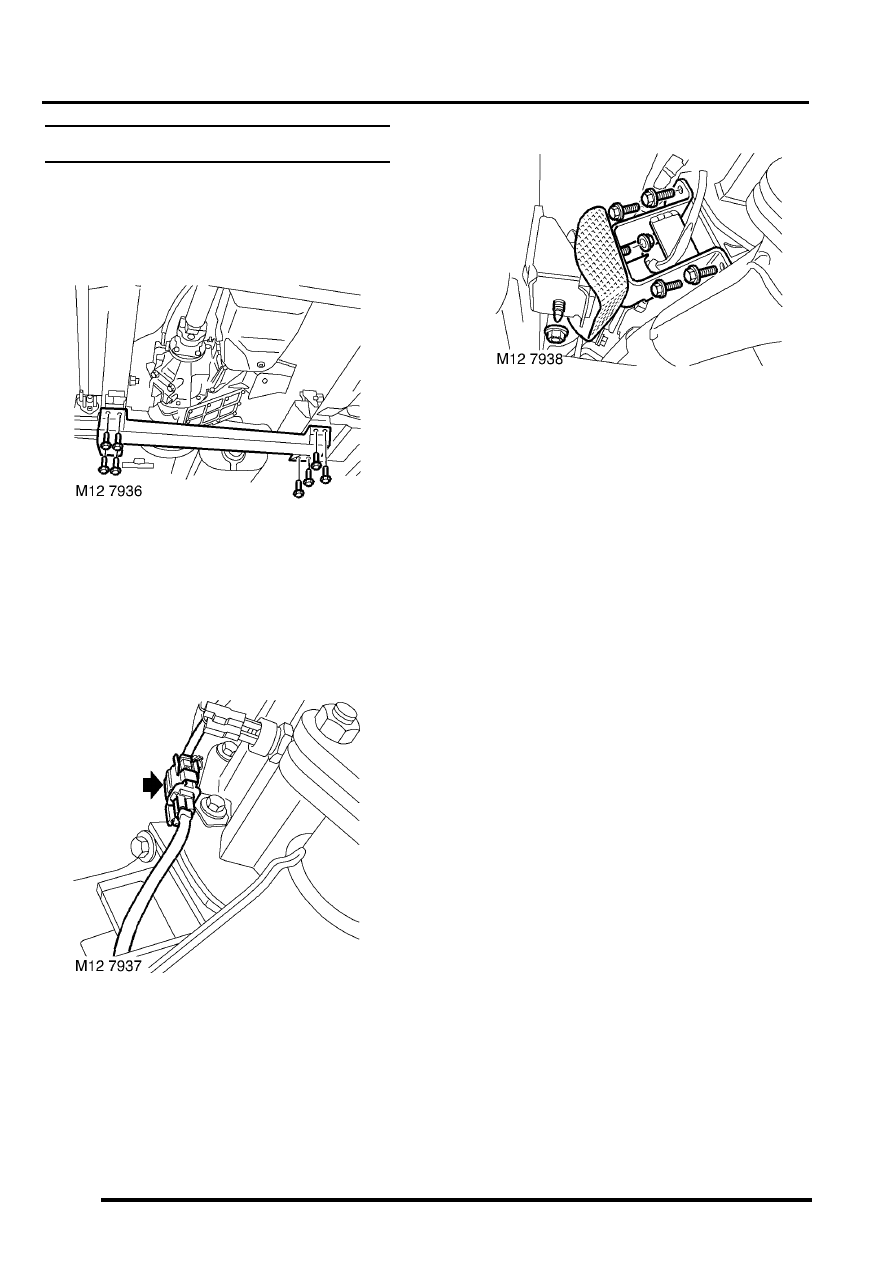
2. Remove 8 bolts securing rear cross member
and remove cross member.
3. Support transfer gearbox on jack.
CAUTION: To prevent damage to
components, cushion the jack pad with a
block of wood or hard rubber.
4. Release and disconnect HO2S multiplug.
5. Remove nut securing mounting to body
bracket.
6. Remove nut securing mounting to mounting
bracket.
7. Remove 4 bolts securing mounting bracket to
gearbox.
8. Remove mounting and mounting bracket
assembly.
9. Remove mounting rubber.
10. Remove heat shield, if fitted.
Refit
1. If fitted position heatshield, fit mounting rubber
to mounting bracket, fit nut but do not tighten.
2. Position mounting bracket assembly, fit bolts
securing mounting bracket to gearbox and
tighten to 85 Nm (63 lbf.ft).
3. Fit nut securing mounting to body bracket and
tighten to 48 Nm (35 lbf.ft).
4. Tighten nut securing mounting to gearbox
bracket to 48 Nm (35 lbf.ft).
5. Connect HO2S multiplug and secure to support
bracket.
6. Position rear cross member, fit bolts and
tighten to 26 Nm (19 lbf.ft).
7. Lower vehicle.
Нет комментариевНе стесняйтесь поделиться с нами вашим ценным мнением.
Текст