Discovery 2. Manual — part 576
AUTOMATIC GEARBOX - ZF4HP22 - 24
REPAIRS
44-43
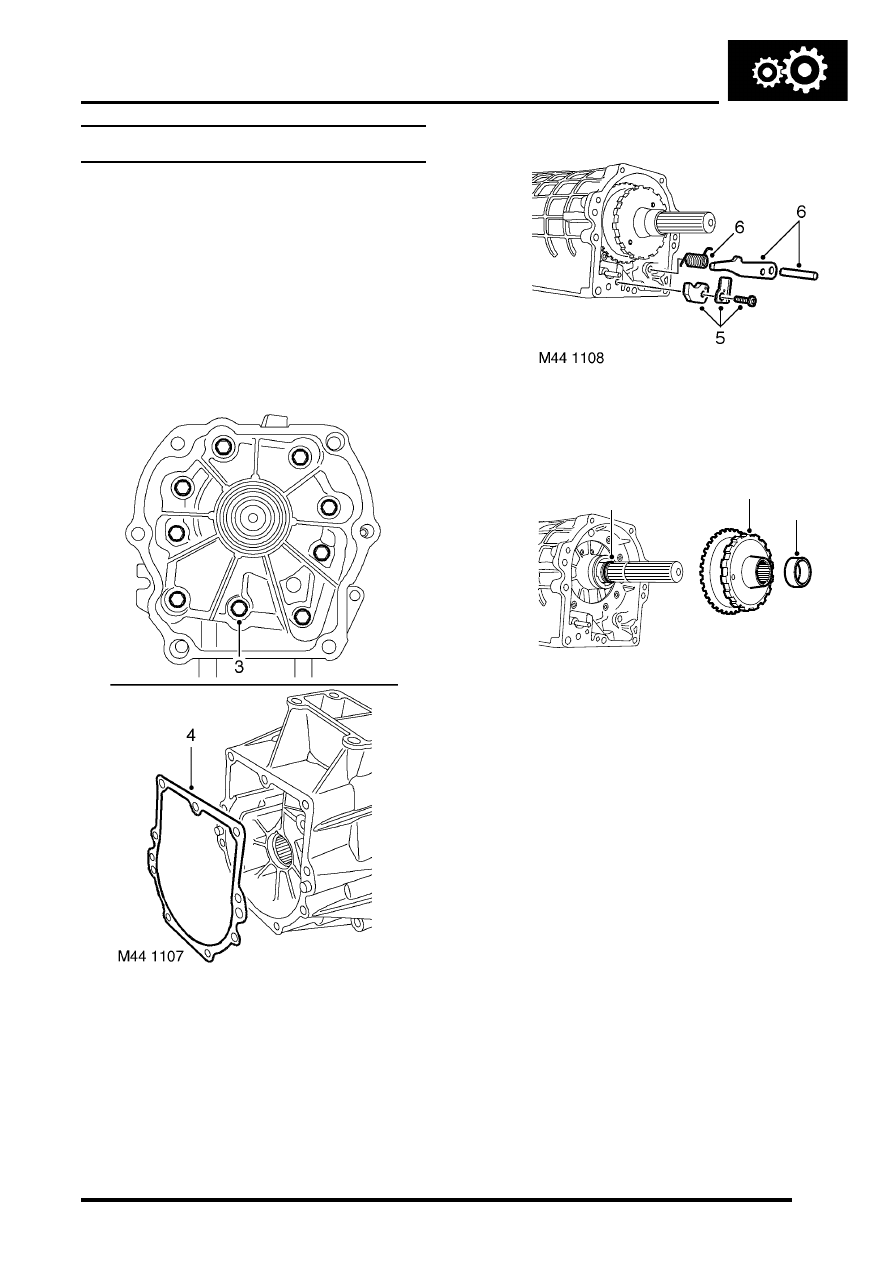
Parking pawl assembly.
$% 44.28.07
Remove
1. Drain automatic gearbox oil.
2. Remove transfer gearbox.
REPAIRS, Transfer box - Diesel.
3. Remove and discard 9 bolts securing extension
housing to gearbox case.
4. Remove extension housing and discard gasket.
5. Remove Torx screw and discard, lift off parking
pawl guide and guide plate.
6. Remove ratchet, spring and pivot pin.
7. Td5 models: Remove spacer from output
shaft.
8. Remove park lock gear.
9. Remove and discard 'O' ring from output shaft.
Refit
1. Clean park lock components.
2. Lubricate and fit new 'O' ring to output shaft.
3. Position park lock gear on the output shaft.
4. Td5 models: Fit the spacer.
CAUTION: Ensure that spacer is fitted on
output shaft - Tdi Models only. If spacer is
omitted, park gear and speed sensor may
move out of position.
5. Position pivot pin, spring and ratchet.
6. Position parking pawl guide and guide plate,
tighten Torx screw to 10 Nm (8 lbf.ft).
M44 1109B
9
7
8
AUTOMATIC GEARBOX - ZF4HP22 - 24
44-44
REPAIRS
7. Clean extension housing and gearbox case.
8. Position new gasket to gearbox case.
9. Position extension housing and tighten bolts to
25 Nm (18 lbf.ft).
10. Fit transfer gearbox.
REPAIRS, Transfer box - Diesel.
11. Fill automatic gearbox with oil.
Gasket - oil sump
$% 44.24.05
Remove
1. Raise vehicle on ramp.
2. Drain automatic gearbox oil.
3. Remove 6 bolts and spacers securing oil sump
to gearbox, remove sump and discard gasket.
Refit
1. Clean oil sump and mating face.
2. Fit new gasket to oil sump, position sump to
gearbox.
3. Position spacers and tighten bolts to 8 Nm (6
lbf. ft).
4. Fill automatic gearbox with oil.
5. Lower vehicle.
AUTOMATIC GEARBOX - ZF4HP22 - 24
REPAIRS
44-45
Filter - oil
$% 44.24.07
Remove
1. Remove oil sump gasket.
- 24, REPAIRS, Gasket - oil sump.
2. Remove Torx screw securing oil pick-up tube
and remove tube.
3. Remove 2 Torx screws securing filter to valve
body and discard 'O' rings.
Refit
1. Clean filter and pick-up tube using a lint free
cloth.
2. Fit new 'O' rings to filter.
3. Position filter and tighten Torx screws to 8 Nm
(6 lbf.ft).
4. Position oil pick-up tube and tighten Torx
screw to 8 Nm (6 lbf.ft).
5. Fit oil sump gasket.
- 24, REPAIRS, Gasket - oil sump.
Cooler - fluid - Td5
$% 44.24.10
Remove
1. Remove intercooler.
2. Disconnect fluid temperature sensor multiplug.
3. Position absorbent cloth under each gearbox
cooler hose connection to collect spillage.
4. Push against coupling release ring and
disconnect both fluid hoses from cooler.
5. Remove screw and release cooler from
radiator.
6. Carefully remove cooler.
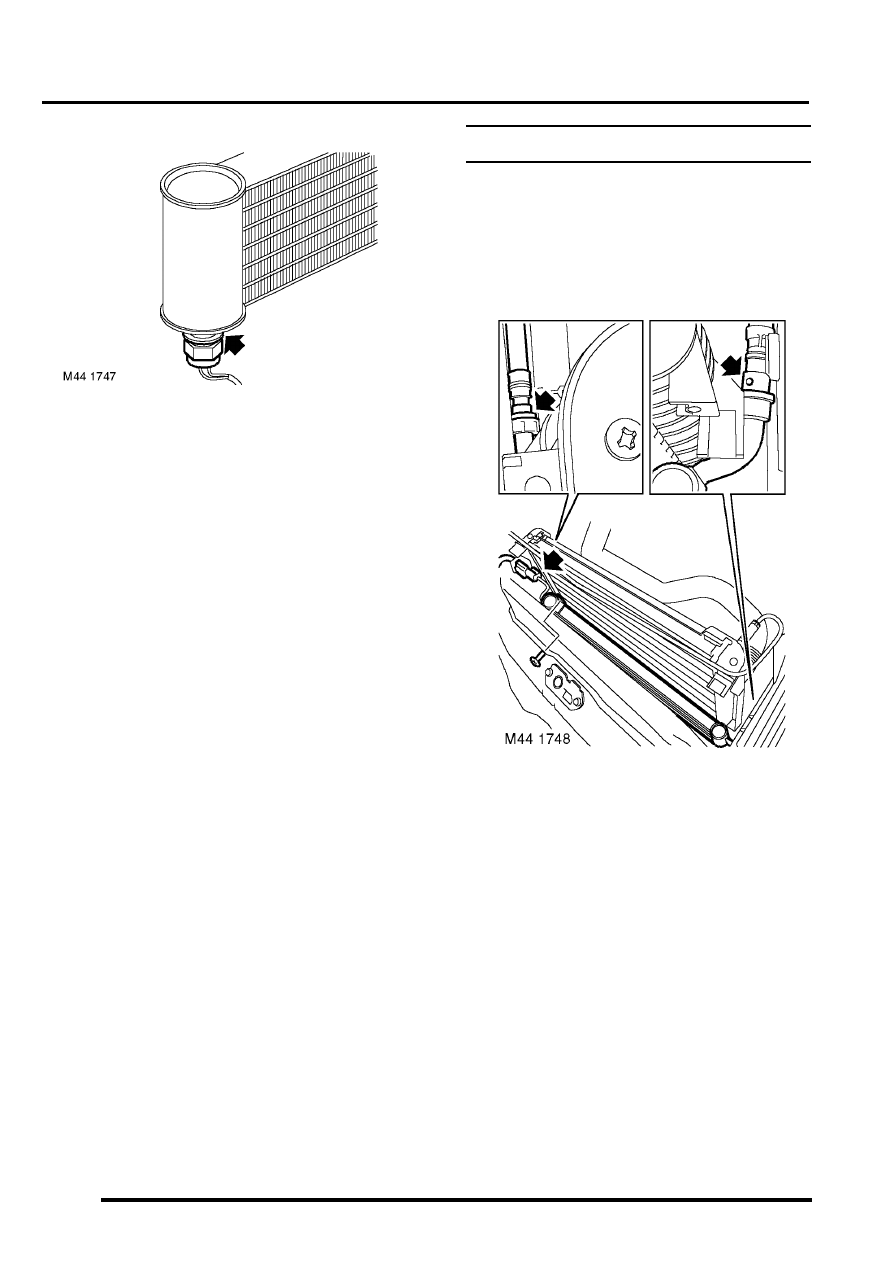
AUTOMATIC GEARBOX - ZF4HP22 - 24
44-46
REPAIRS
7. Remove temperature sensor and discard
sealing washer.
Refit
1. Use new sealing washer and tighten
temperature sensor to 14 Nm (10 lbf.ft).
2. Fit cooler, engage with radiator and secure with
screw.
3. Connect temperature sensor multiplug.
4. Ensure connections are clean and fit hoses to
cooler.
5. Fit intercooler.
6. Check and if necessary top up gearbox fluid.
Cooler - fluid - V8
$% 44.24.10
Remove
1. If fitted: Remove engine oil cooler.
ENGINE - V8, REPAIRS, Cooler -
2. Disconnect fluid temperature sensor multiplug.
3. Position absorbent cloth under each gearbox
cooler hose connection to collect spillage.
4. Push against coupling release ring and
disconnect both fluid hoses from cooler.
CAUTION: Always fit plugs to open
connections to prevent contamination.
5. Remove screw and release cooler from
radiator.
6. Carefully move radiator towards engine and
remove cooler.
Нет комментариевНе стесняйтесь поделиться с нами вашим ценным мнением.
Текст