Defender (1993+). Manual — part 11
MAINTENANCE
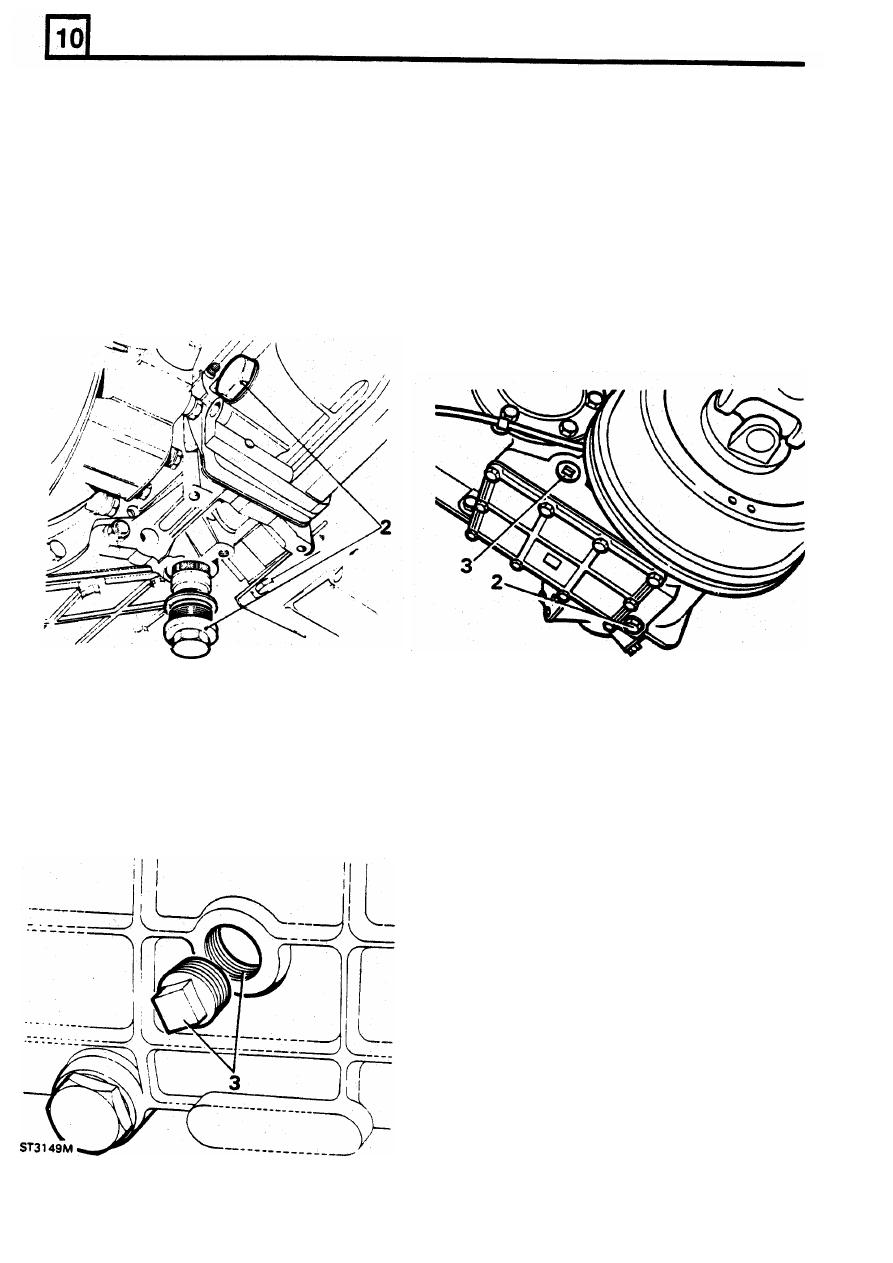
RENEW MAIN AND TRANSFER GEARBOX OILS
DRAIN
AND
RENEW
LT230T
TRANSFER
DRAIN AND REFILL LT77S MAIN GEARBOX
GEARBOX OIL
1.
Drive the vehicle to level ground and place a
1. Drive the vehicle
to
level ground and place a
container under the gearbox
to
catch the old
suitable container under the gearbox
to
catch
oil.
the old oil.
2.
Remove the drain plug and allow the oil to
2.
Remove the gearbox and extension case
drain.
Fit
the plug using a new washer, if
drain plugs and allow the oil to drain
necessary, and tighten to the correct torque.
completely. Wash the extension case filter in
3.
Remove the filler-level plug and inject the
kerosene and refit the plugs using new
approximate quantity
of
the recommended oil
washers, i f necessary, and tighten
to
the
until it begins to run from the plug hole.
Fit
the
correct torque.
level plug and tighten only to the correct
torque, do not overtighten, wipe away any
surplus oil.
3. Remove the oil filler-level plug and inject the
approximate quantity of new oil of the correct
make and grade until it begins to run out of
the filler-level hole. Fit the plug and tighten to
the correct torque. Since the plug has a
Wipe away any surplus oil.
tapered thread it must not
be
overtightened.
10
REISSUED: FEB
1993
ST3084M
ST1070M
MAINTENANCE
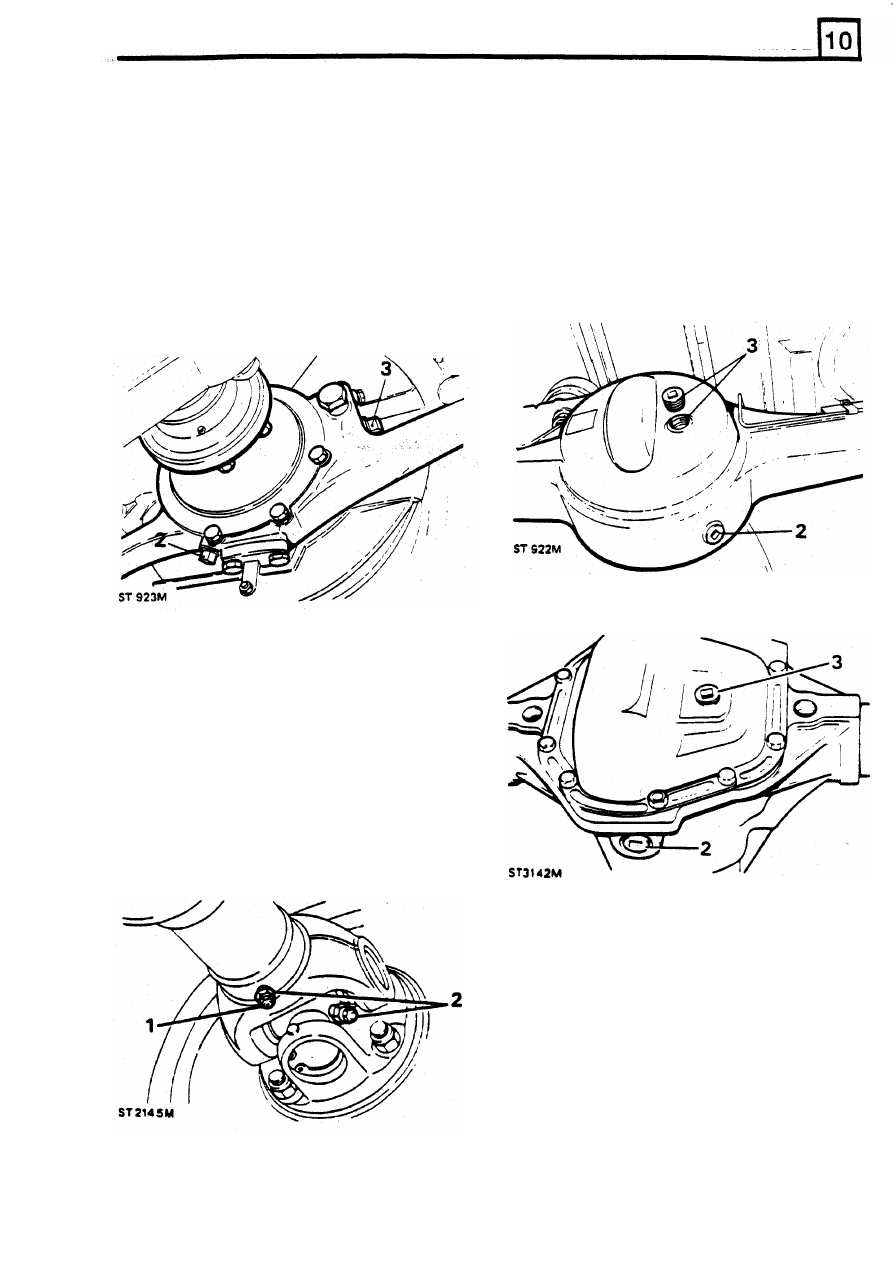
RENEW SWIVEL PIN HOUSING OIL
RENEW FRONT AND
REAR
AXLE OIL
1.
Drive the vehicle to level ground and place a
1 .
Drive the vehicle to level ground and place a
container under each swivel housing to catch
container under the axle to be drained.
the used oil.
2.
Using a spanner with a
13
mm
square drive
2.
Remove the drain plug and allow the oil to
remove the drain plug and allow the oil to
drain completely and clean and refit the plugs.
drain completely. Clean and refit the drain
recommended make and grade of oil until oil
3.
Remove the oil filler-level plug and inject new
begins to run from the level hole. Clean and
oil of a recommended make and grade until
it
fit
the level plugs and wipe away any surplus
begins
to
run from the hole. Clean and fit the
Oil.
filler-level plug and wipe away any surplus oil.
3.
Remove the oil filler-level plug and inject the
plug.
LUBRICATE PROPELLER SHAFTS
1.
Clean all the grease nipples on the front and
rear propshaft universal joints, and sliding
portion of the shaft.
2. Charge a low pressure hand grease gun with
grease of a recommended make and grade
and apply to the grease nipple. giving two to
three strokes of the gun only to each nipple
every 40.000 km (24,000 miles) intervals.
RE-ISSUED:
FEB
1993
11
MAINTENANCE
GENERAL MAINTENANCE AND ADJUSTMENT
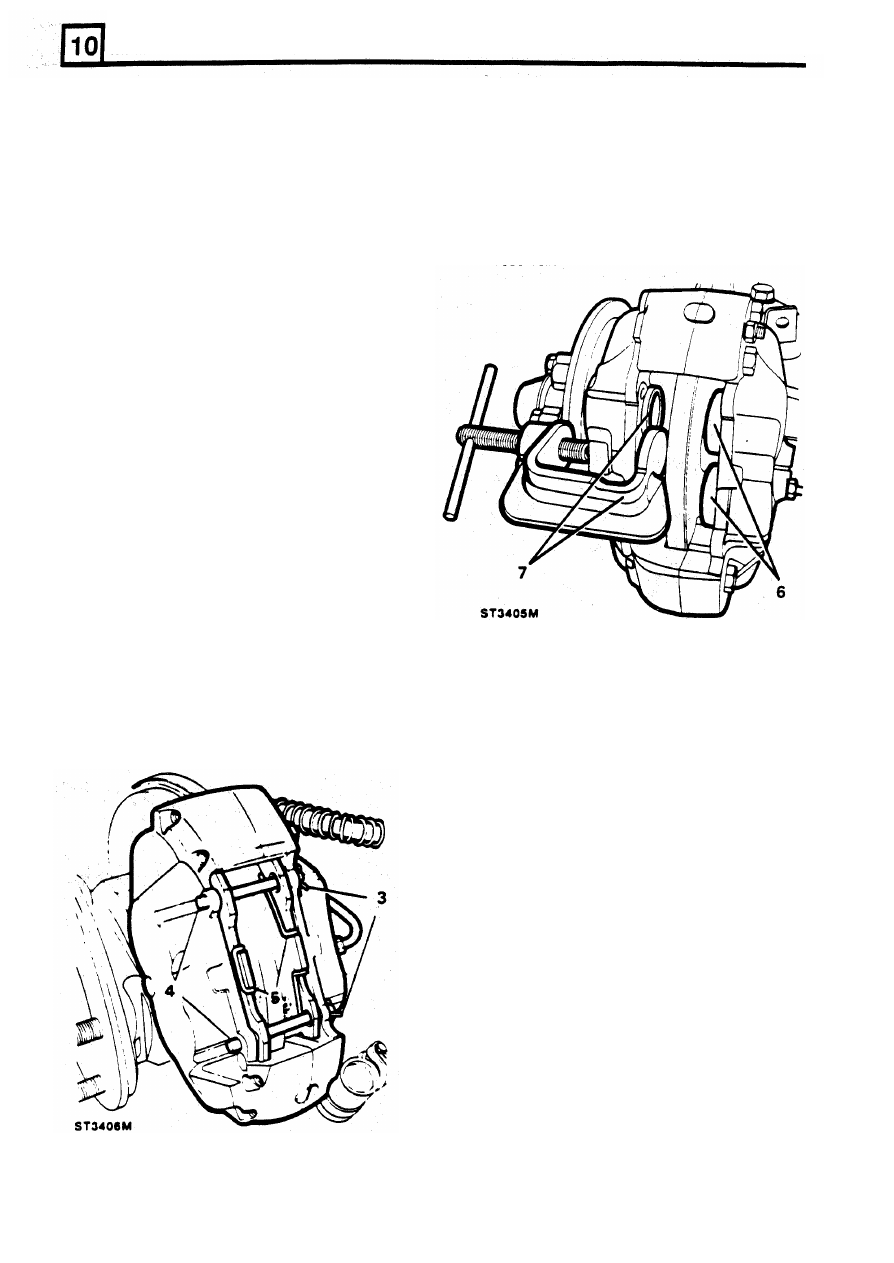
4 .
Withdraw the pad retaining pins.
5.
Remove the anti-rattle springs and
withdraw
This second part of the maintenance section covers
the friction pads.
adjustments and items of general maintenance as
6.
Clean the exposed surfaces
of
the
pistons
dictated by the 'MAINTENANCE SCHEDULES'
.
with new hydraulic fluid or brake cleaning
However, only maintenance operations that are not
fluid.
included in the OVERHAUL SECTlONS of the
7.
Using piston clamp (18G 672), press each
manual appear in this section.
piston back into its bore, whilst ensuring that
the displaced fluid does not overflow from the
EXAMINE AND RENEW DISC BRAKE FRICTION
reservoir.
PADS
NOTE: Defender 90 has disc type brakes
fitted
to
both front and rear
axles.
Defender 110 is fitted
with disc type brakes at the front and drum type
brakes
at
the rear. Front brakes on both vehicle
types are fitted with four piston calipers and the
rear brakes on Defender 90 are fitted with twin
piston calipers, The procedure for renewing
friction pads is the same for both types although
there
may
be
a variation
in
the type of anti-rattle
spring fitted, see Section 70.
Examine the friction pads for wear, if the friction
material is less than 3 mm thick
or
oil contaminated,
they must be renewed as described
in
the following
instructions. Observe precautions
in
SECTlON
01
concerning asbestos:
CAUTION: Friction pads must
be
changed
in
axle
sets.
1.
Loosen wheel nuts, jack-up the vehicle, lower
onto axle stands. and remove the
wheels.
2.
Clean the exterior
of
me
calipers.
3.
Remove the split pins,
or
spring clips,
from
9.
Insert the new
friction pads.
the pad retaining pins.
8.
Smear the faces of the pistons with disc brake
lubricant, taking care not to allow any to reach
the pad lining material.
10. Place the anti-rattle springs in position.
11. Insert the pad retaining pins and secure with
new split pins.
12. Apply the foot brake pedal several times to
locate the pads.
13. Check the fluid reservoir and top up if
necessary
14
Fit the road wheels and secure with the nuts
Jack up the vehicle to remove the axle stands
and lower m e vehicle to me ground Finally.
tighten the road wheel securing nuts evenly.
to the correct torque.
12
REVISED: OCT
1993
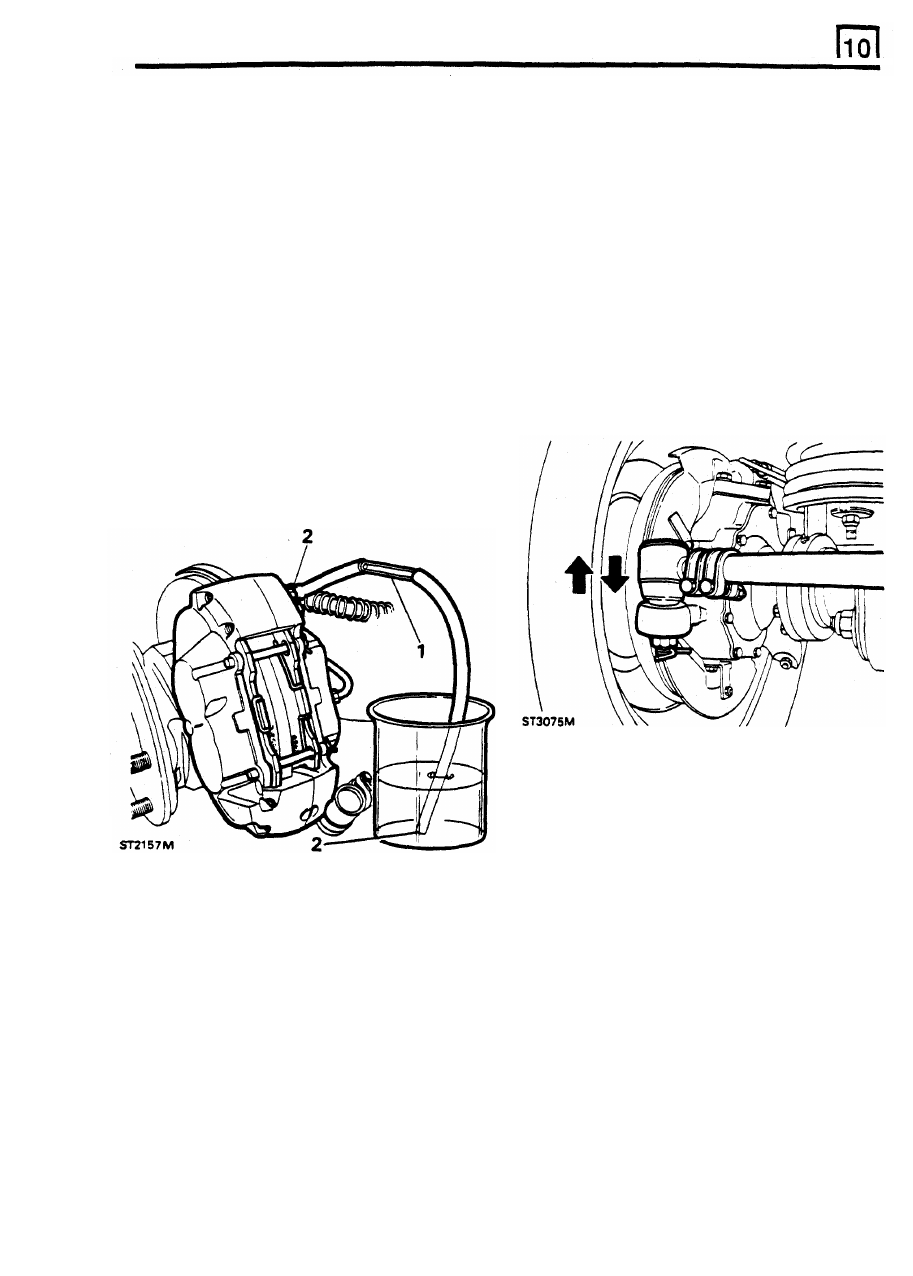
CHANGING THE HYDRAULIC BRAKE FLUID
In the service schedule it
IS
recommended that the
Pipes attached to the breathers on the axles
brake fluid is renewed at 18,000 miles (30.000 km)
terminate inside the engine compartment.
This
allows
intervals or every eighteen months.
If
the following
the axles to breath whilst the vehicle
IS
traversing
procedure is adopted air should not enter the
mud and water. No maintenance is required except
system.
to ensure that the pipes do
not
become blocked,
kinked, or split, or damaged in any other way
to
prevent proper breathing.
AXLE BREATHERS
1
Proceed in the same way and order
as
for
bleeding the system, see
SECTION 70
.
If
a
clear plastic bleed tube is not available,
CHECK STEERING BALL JOINTS
interpose a short length
of
glass tube into the
bleed hose being used
so
that the passage of
the fluid can be seen.
2.
Attach one end
of
the bleed hose to the bleed
nipple of the wheel cylinder nearest to the
master cylinder and immerse the
free
end into
a glass vessel containing a small quantity
of
brake fluid
so
that the end of the tube
is
below the fluid level.
3.
Unscrew the bleed nipple screw about
half-a-turn, enough
to
allow fluid to be
pumped out. Air could be drawn into the
system
if
the screw
is
withdrawn too far.
Ball joints are lubricated for their normal life during
manufacture and require no further lubrication. This
applies only
if
the rubber gaiter has not become
dislodged or damaged. The joints should be checked
at the specified mileage intervals but more frequently
if
the vehicle is
used
under arduous conditions.
MAINTENANCE
1.
Check
for
wear
in
the joints by moving the
ball joint
up
and down vigorously. If free
movement
is
apparent renew the complete
joint assembly.
4
Pump-out most, but not all, of the fluid from
the reservoir by continuously depressing and
releasing the foot pedal. Do not, however,
allow the reservoir to empty completely.
5. Top-up the reservoir with new, unused fluid. of
the correct specification, from a sealed
container. See SECTION 09 .
6. Ensure that the reservoir is kept topped-up
and continue bleeding until the old and
discoloured fluid is dispelled and the new fluid
is seen passing through the clear bleed hose
or glass tube. Continue to bleed for two full
strokes of the pedal and then close the bleed
nipple whilst the pedal is depressed.
7
Repeat the above procedure at the remaining
wheel cylinders in turn.
8. Top-up the reservoir and road test the vehicle.
RE-ISSUED: FEB
1993
‘ 7
Нет комментариевНе стесняйтесь поделиться с нами вашим ценным мнением.
Текст