Defender (1993+). Manual — part 36
COOLING
SYSTEM
COOLING SYSTEM
DRAIN AND FILL COOLING SYSTEM
Engine Protection
WARNING: Do not remove the radiator filler cap
To prevent corrosion of the aluminium engine parts
it
when the engine is hot because the cooling
is vital that the cooling system is filled with a solution
system is pressurized and personal scalding
of clean water and anti-freeze winter and summer.
could result.
Never
fill
or top-up with water only, always add
anti-freeze. Never use salt water otherwise corrosion
will
occur. In certain territories where the only
available water supply may have some salt content,
use only clean rainwater or distilled water, with
anti-freeze added.
Use only Universal anti-freeze or permanent type
ethylene base, without methanol containing,
a
suitable inhibitor for aluminium engine parts. Use one
part of anti-freeze to one part water. Anti-freeze
should be used even in climates where is it not
necessary as a corrosion
inhibitor.
No
other
corrosion inhibitor should be used. A concentration
of at least 50% should be maintained.
Anti-freeze can remain in the cooling system and
will
provide adequate protection for
two
years provided
that the specific gravity of the coolant is checked
before the onset
of
the second winter and topped-up
with new anti-freeze as required.
The specific gravity can be checked with a
hydrometer and a 50% concentration at
68°
F
(20°
C shouId read
1.075.
2.
Disconnect bottom hose and drain cooling
Land Rovers leaving the factory have the cooling
system. Connect hose after draining.
system filled with a
50%
anti-freeze mixture. This
3.
To drain the expansion tank remove it from
gives protection against frost down to minus
47°
C
the vehicle, empty. flush-out and refit. If
(minus 53° F ) .
necessary renew the expansion tank hose.
After the second winter the system should be
4.
Make up a solution
of anti-freeze and water in
drained and thoroughly flushed. Before adding new
a separate container in the concentration
anti-freeze examine all joints and renew defective
required. The cooling system capacity is
hoses
to make sure that the system is leak proof.
quoted in the data section. Therefore
to
allow
See SECTION
09
for protection quantities.
for topping up and
the
expansion tank make
up a quantity
in excess
of this quantity.
5. Although anti-freeze may not be required it
should
be used as an inhibitor see under
'Engine Protection'.
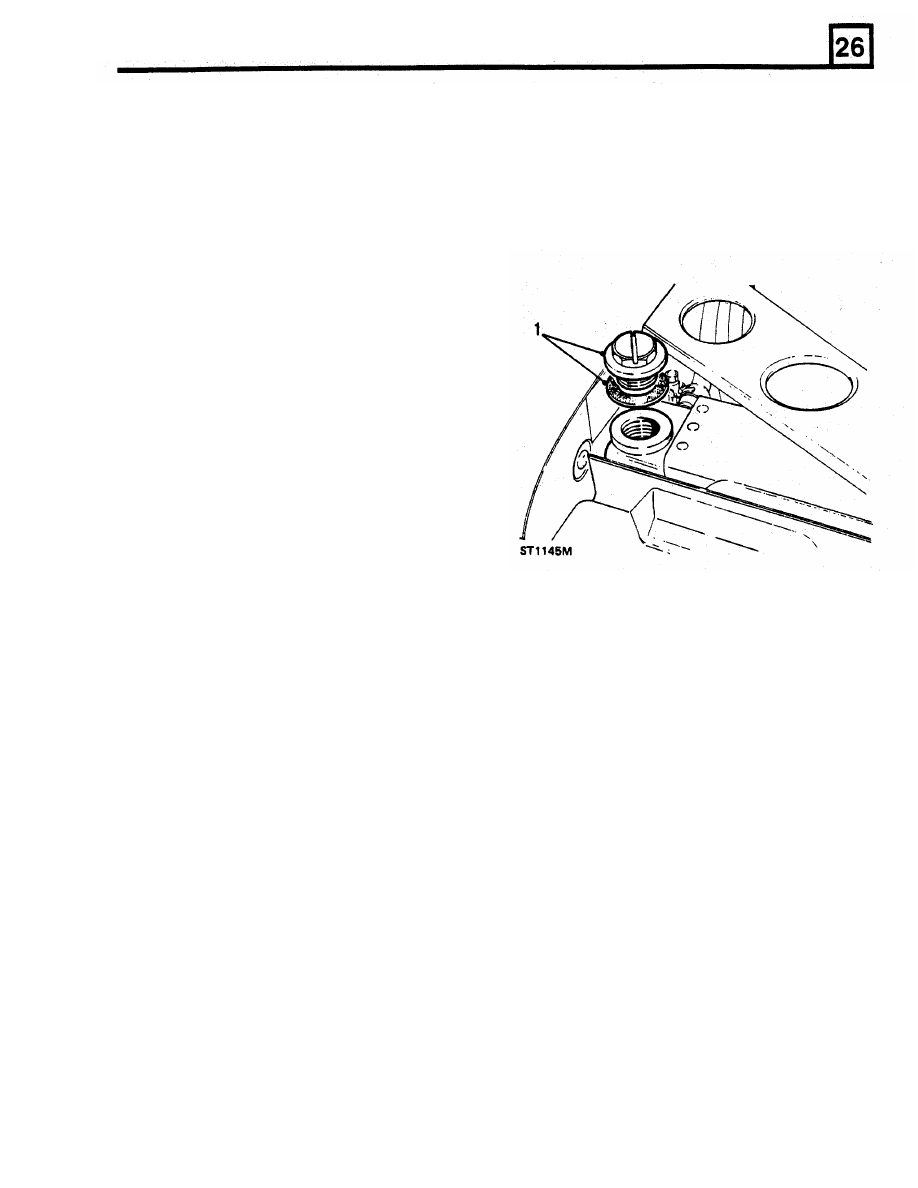
6.
Fill
the system through the radiator filler plug
until the coolant is just below the filler neck.
7.
Fit the plug but do not over tighten.
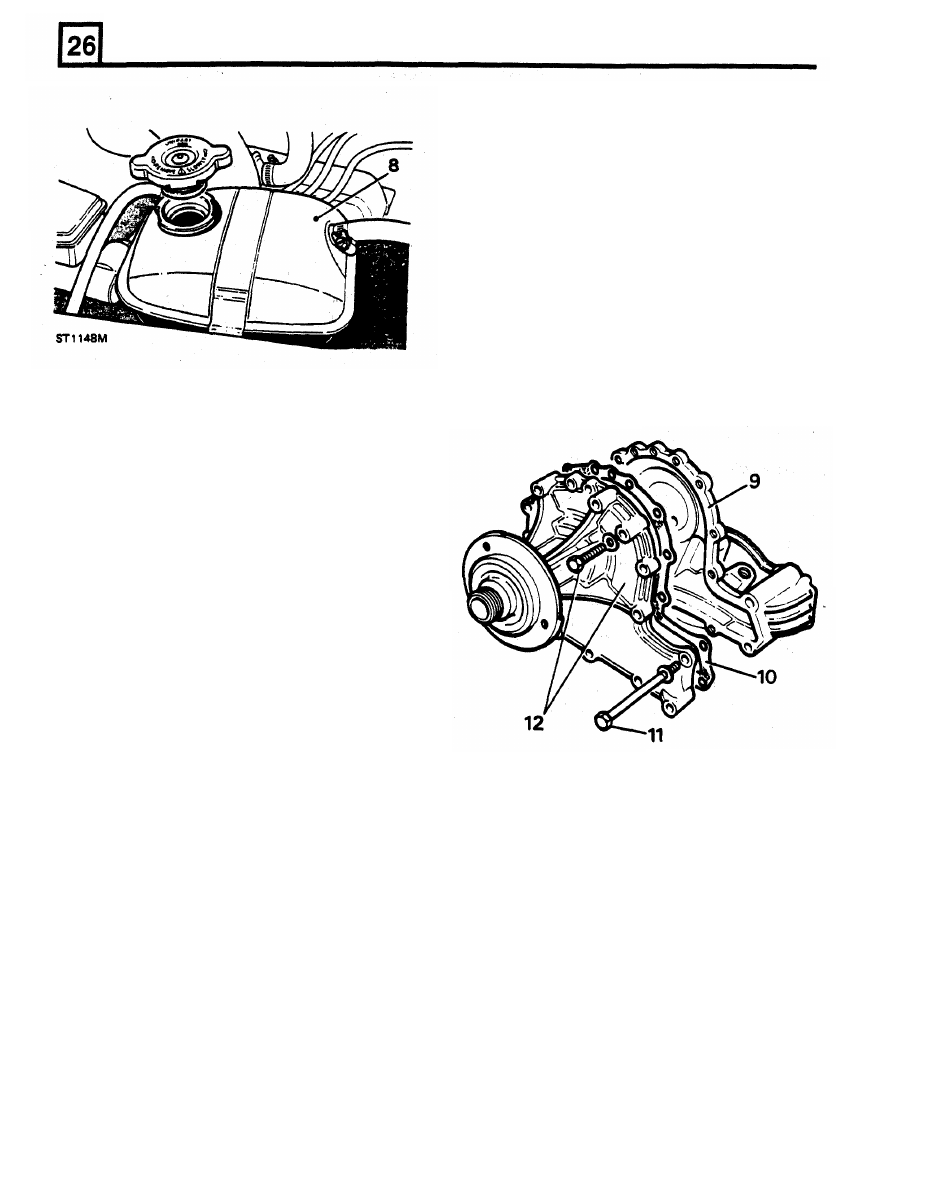
8.
Half fill the expansion tank with coolant and
secure the cap correctly.
1.
Remove the radiator filler plug.
COOLING
SYSTEM
To
Refit
9.
Clean the timing cover mating face and
ensure all trace
of
old gasket is removed.
10. Smear a small quantity of grease on both
sides of a new gasket and place
it
in position
on the timing cover.
11.
Clean the threads of the four long bolts that
penetrate the cylinder block and apply Loctite
572
to
the threads.
12.
Fit the water pump
to the engine and secure
with the retaining
bolts
and single stud that
also secures
the
alternator adjustment strap.
13.
Fit the bottom hose
to
the water pump and
radiator.
14.
Fit the fan cowl,
if
removed.
15.
Fit and tension the drive belt.
9.
Start and run the engine until normal
16.
Fit the fan and viscous coupling.
operating temperature is reached. Allow the
engine
to
cool
and check the levels in the
radiator and expansion tank and top up
if
necessary. Finally check all hose connections
for leaks.
REMOVING
WATER PUMP
NOTE: The following instructions cover the basic
vehicle without air conditioning and power
steering. It may therefore
be
necessary to
remove other items in order to gain access to the
water pump.
To Remove
1.
Disconnect the battery.
2. Disconnect the bottom hose from the radiator
to drain the cooling system.
3.
Using a cranked open-ended spanner, remove
17.
Fill the cooling system
with
the required
the fan and viscous coupling assembly, noting
concentration of recommended anti-freeze in
that it has a left-handed thread.
accordance with the instructions in this
section.
4.
If
necessary, remove the
fan
cowl.
5. Remove the fan drive belt.
18.
Connect the battery and run the engine while
6.
Remove
the
bottom hose
from
the water
checking for leaks.
7.
Release the alternator adjustment strap from
REMOVING THERMOSTAT
8. Remove the fourteen bolts and withdraw the
To Remove
ST3166M
pump.
the water pump stud.
water pump and gasket.
1.
Disconnect the battery and drain the cooling
NOTE:
Information relating to the inspection
of
system.
the water pump is contained in the engine
2. Remove any pipes, hoses, or other items that
overhaul section 12.
may inhibit access to the thermostat housing.
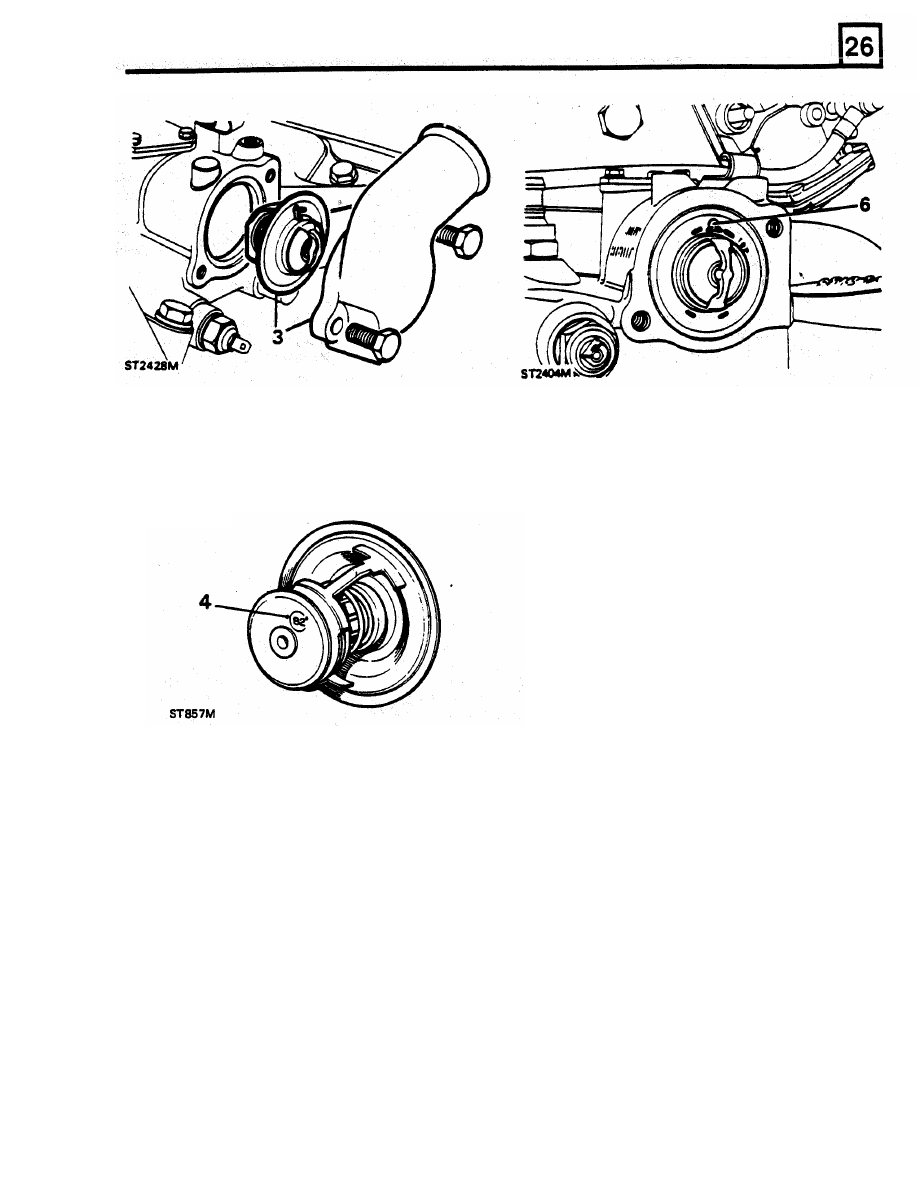
3.
Remove the thermostat cover and withdraw
the thermostat. Clean any deposits
from
the
housing and the cover.
COOLING SYSTEM
4.
The temperature at which the thermostat
7. Fit the thermostat cover using a new gasket.
should be fully open is stamped on the
Coat the threads
of
the retaining screws with
forward end of the thermostat. The following
Loctite
572
and tighten the screws evenly
to
method can be used
to
determine
if
the
the correct torque.
thermostat
is
satisfactory and suitable for
8. Connect all pipes and hoses and refill the
refitting.
cooling system in accordance with the
instructions in this section.
5.
Place the thermostat and a Centigrade
thermometer
in a laboratory beaker, or a
suitable alternative, half
full of water. Heat the
water and observe the temperature at which
the thermostat opens.
If
faulty, discard the
thermostat.
To Refit
6.
The thermostat has a small vent hole in which
is fitted a 'jiggle' pin
to keep the hole clear. Fit
the thermostat to the housing ensuring that
this vent is uppermost at the
12
o'clock
position.
If
fitted
in any other way, an air lock
could result in the water passages causing
overheating and coolant
loss from the system.
COOLING
SYSTEM
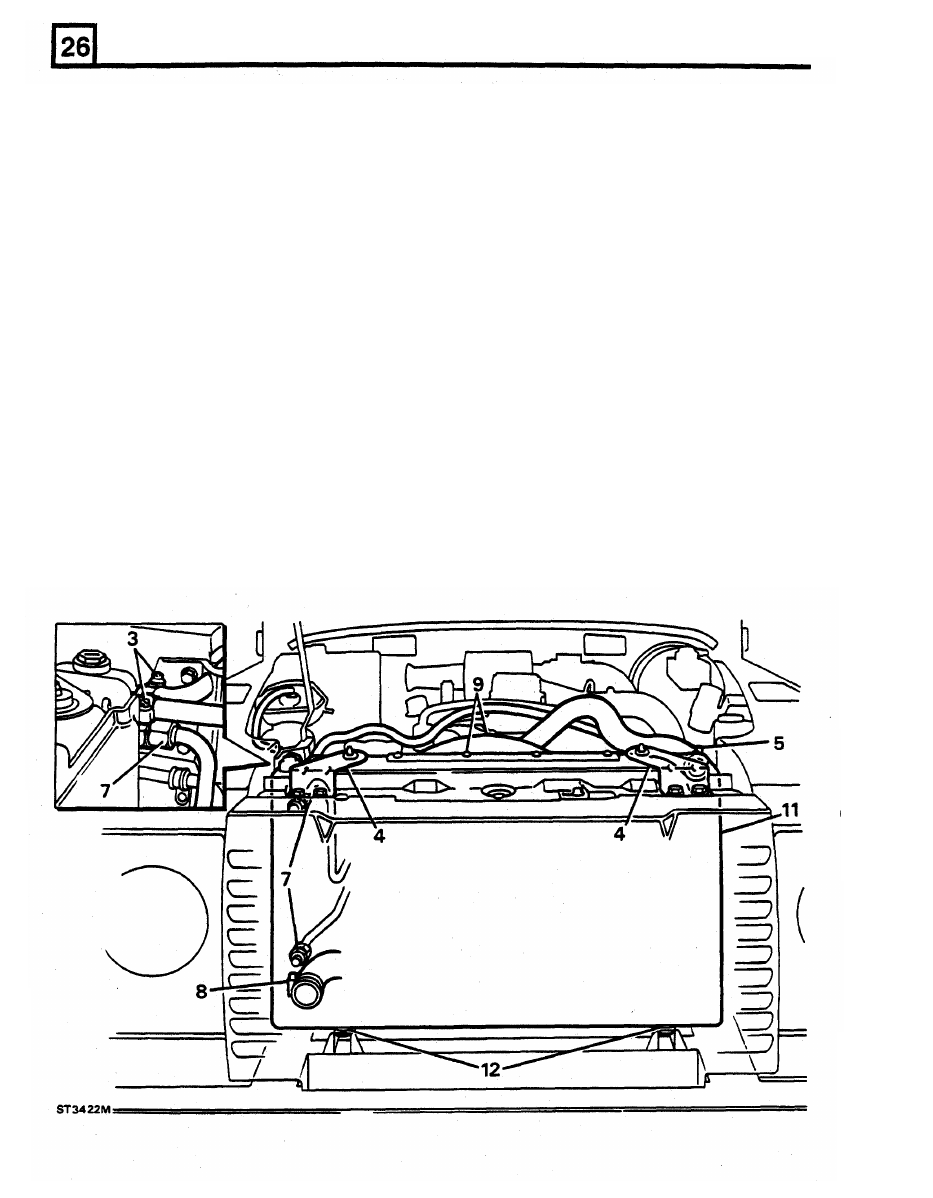
REMOVING RADIATOR
To Refit
To remove
12. Lower the radiator into position in the engine
compartment, ensuring that the
two
pegs at
1.
Disconnect the battery.
the bottom of the radiator locate
in the
2.
Drain the cooling system.
corresponding rubber pads in the cross
3.
Disconnect the expansion and overflow hoses
member brackets.
from the top of the radiator.
13.
Locate the cowling into the clips at the bottom
4.
Release radiator support bracket fixings and
of the radiator and secure it
to
the top with
detach brackets.
the four screws.
5. Slacken top hose clip, detach hose and place
14.
Secure the top of the radiator with the
two
aside.
brackets and bolts.
6.
Place a suitable container under the oil cooler
15.
Secure the top and bottom hoses.
hose connections.
16.
Connect the
oil
cooler hoses
to
the radiator.
7.
Disconnect
oil cooler hoses at cooler and
17.
Connect the expansion tank and overflow
place aside.
hoses. Ensure all hose clips are fully
8. Slacken bottom hose clip, detach hose and
tightened.
place aside.
18. Refill cooling system with correct coolant
9.
Remove the screws securing the cowling to
mixture.
the radiator.
10.
Lift the cowling out
of
the clips at the bottom
of
the radiator and push it back towards the
engine.
11.
Carefully
lift
the radiator out of the engine
compartment.
19. Check and
top up engine oil as necessary.
Нет комментариевНе стесняйтесь поделиться с нами вашим ценным мнением.
Текст