Defender (1993+). Manual — part 118

BODY
REAR END LINING
REAR SPEAKER PANEL
Service repair
no - 76.64.12
Remove
Remove
Service repair
no - 76.13.13
1. Remove rear end trim panel. See this Section.
2. Remove rear grab handles. See this Section.
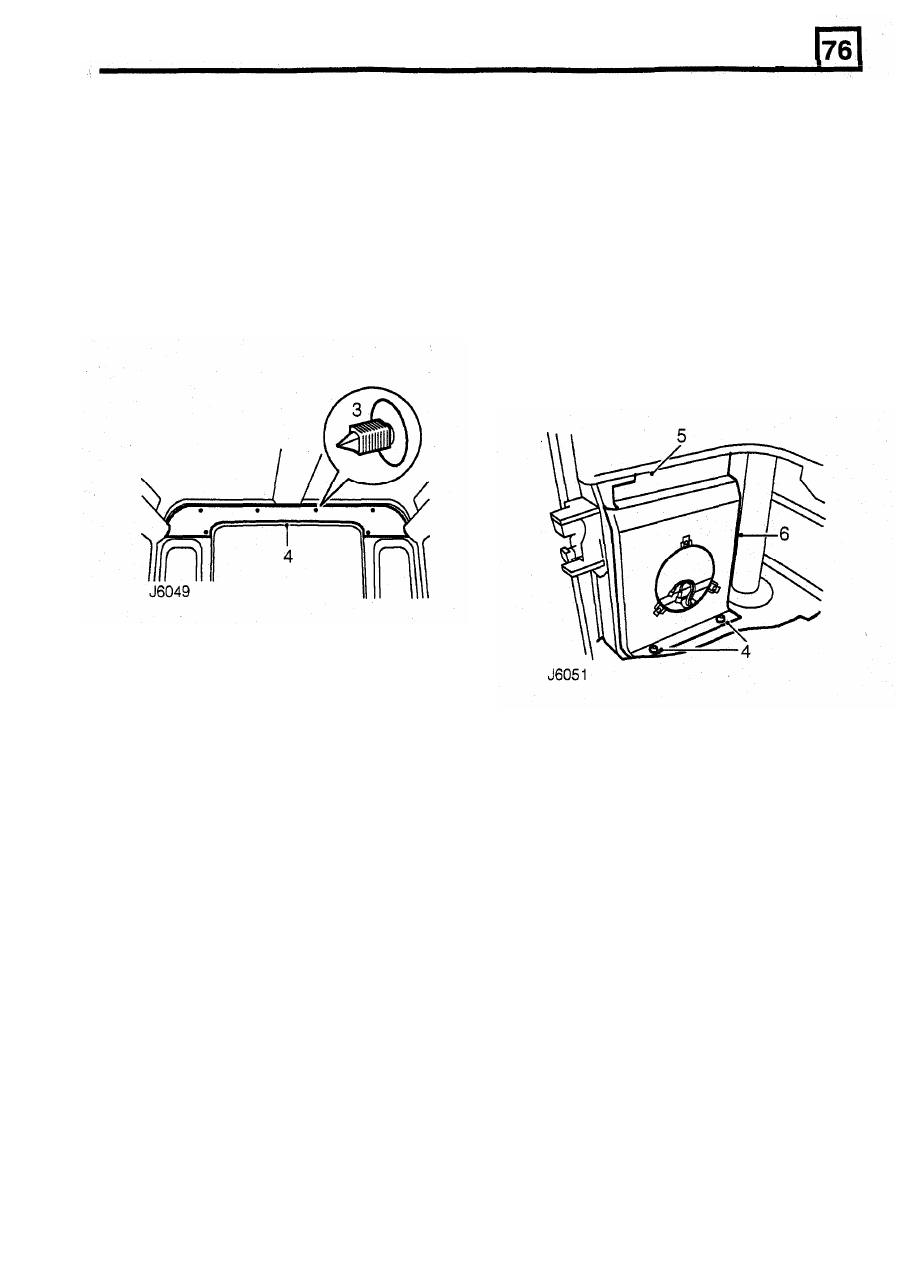
3. Carefully prise out 6 trim studs securing rear end
4. Remove rear end lining.
1.
Raise seat cushion and fit stowage strap.
2.
Remove rear end trim panel. See this Section.
3. Remove rear speaker. See Electrical.
4.
Peel back carpet and remove two screws
securing speaker panel to wheelarch.
5.
Prise top edge of panel down to release from
body channel.
6.
Remove speaker panel.
lining to mounting brackets.
Refit
5.
Position rear end lining on mounting brackets
6. Fit rear grab handles See this Section.
7. Fit rear end trim panel See this Section.
and secure with
6
trim studs.
Refit
7. Position speaker panel on wheel arch.
8.
Press top edge of panel down firmly and locate
9. Secure speaker panel to wheel arch with 2
under body channel.
screws and reposition carpet.
10. Fit rear speaker. See Electrical.
11.
Fit rear end trim panel.
See
this
Section
.
7

BODY
5.
Remove rear interior lamp. See Electrical
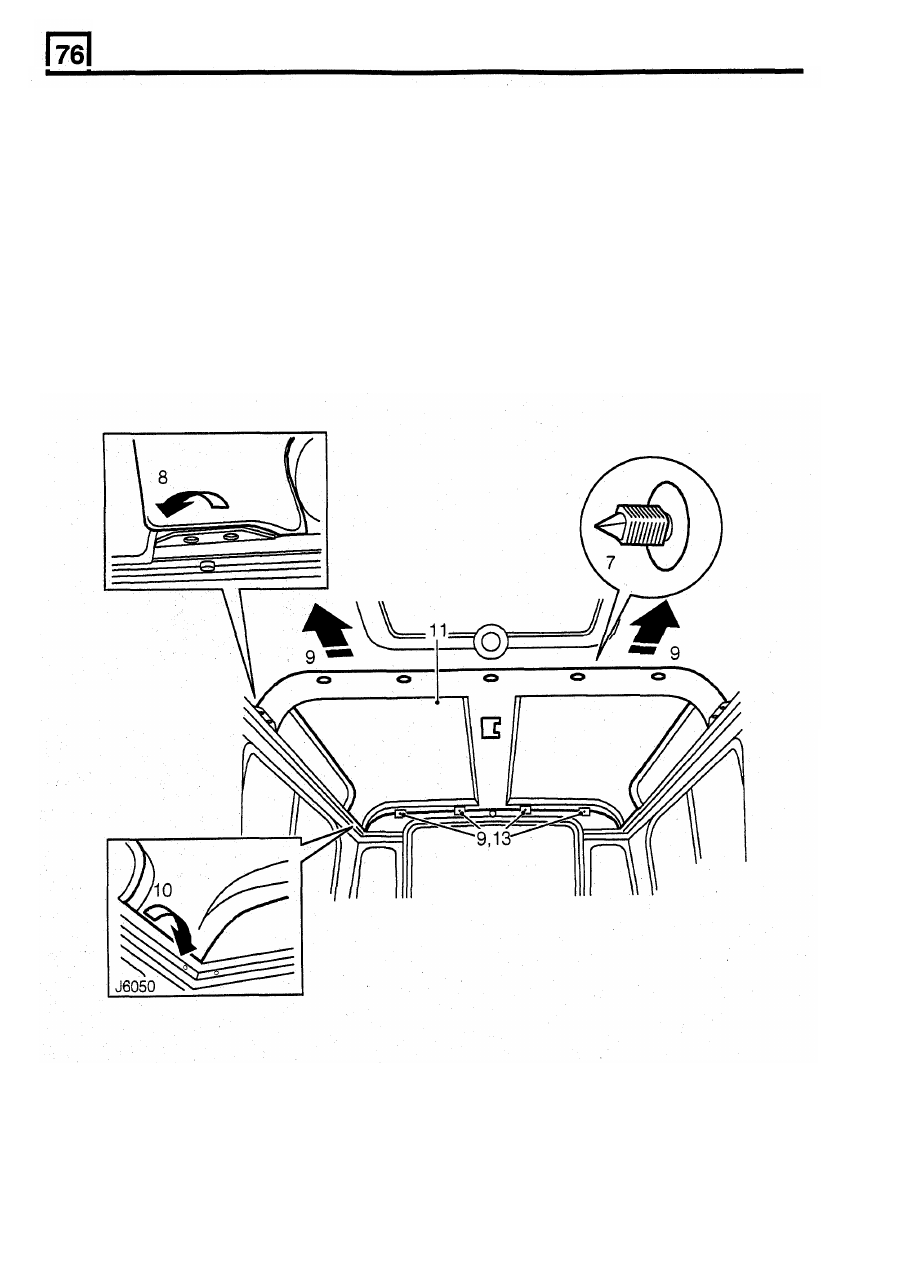
7. Carefully prise out 5 trim studs securing rear and
front headlining to roof mounting brackets.
8. Release front comers of headlining from cant
rail, on both sides.
9.
Pull headlining forwards sufficiently to clear rear
end lining mounting brackets.
10.
Release rear corners of headlining from cant rail,
on both sides.
11
.
Lower rear headlining from roof and remove from
vehicle.
NOTE: T a k e care not to bend headlining on
removal and refitting.
REAR HEADLINING
6. Remove interior roll-over bar. See this Section
Service repair no -
76.64.11
Remove
1.
Remove rear end trim panel. See this Section.
2. Remove side trim panels. See this Section.
3. Remove rear grab handles. See this Section.
4. Remove rear end lining. See this Section
8

BODY
Refit
REAR DOOR
TRIM
CASING
Service repair no - 76.34.09
Remove
12. With assistance, position rear headlining to roof
and locate rear corners in cant rail.
13. Push headlining rearwards and position over
rear end lining mounting brackets.
14. Locate front corners of headlining in cant rail.
15. Position front edge of rear headlining over front
headlining and secure with trim studs.
16. Adjust rear headlining to achieve good fit at all
corners.
17. Fit rear interior lamp. See Electrical.
18. Fit interior roll-over bar. See this Section .
19. Fit rear end lining. See this Section .
20. Fit rear grab handles. See this Section.
1. Unscrew 2 bolts and remove grab handle from
2. Remove 2 screws and detach wiper motor cover.
3. Remove 7 screws securing trim casing to door.
4. Remove two screws and lift wiper motor harness
5. Carefully release 8 clips securing trim casing to
6. Remove trim casing and collect door lock cover.
rear door.
cover from harness support bracket.
door.
21. Fit side
trim panels. See this Section.
22.
Fit rear end trim panels. See this Section.
Refit
7. Position door lock cover, fit trim casing and
secure with clips.
8. Fit harness cover and secure with two screws.
9. Secure door panel with retaining screws.
10. Position wiper motor cover and secure with 2
11. Position grab handle and secure with 2 bolts.
screws.
9

BODY
4.
Remove sun roof.
5. Starting from centre rear, peel headlining finisher
from inner frame.
6. Remove 18 screws securing inner frame to outer
frame and detach inner frame.
7.
Lift outer frame from roof.
SUN ROOF
Service repair no - 76.82.15
Remove
NOTE: Assistance may be required to remove the
sun roof assembly.
1. Open sun roof fully.
2.
Disengage spring lock from operating handle
catch.
3. Holding sun roof at both sides, release hinges
from locating brackets at front of outer frame.
12. Starting from centre rear, fit headlining finisher
13. Press finisher firmly over inner frame and
continue around complete frame, ensuring
finisher lies flat on headlining.
14. Fit sun roof hinges fully into locating brackets on
outer frame, and lower the glass panel.
15. Engage operating handle catch with spring lock
of outer frame and close sunroof.
Refit
lip into locating channel of inner frame.
8. Clean roof area around outer frame seating.
9. Position outer frame on roof.
10. Fit inner frame to headlining and secure to outer
frame with 18 screws but do not fully tighten.
11 . Check alignment of inner and outer frames with
roof mounting and headlining, adjust as
necessary, and fully tighten fixing screws to 10
Nm (7 Ibf.ft).
10

Нет комментариевНе стесняйтесь поделиться с нами вашим ценным мнением.
Текст