Subaru Legacy (2022 year). Manual in english — page 20
(314,1)
trim can be used to hold beverage bottles
and other items.
6-6. Accessory Power Out-
lets
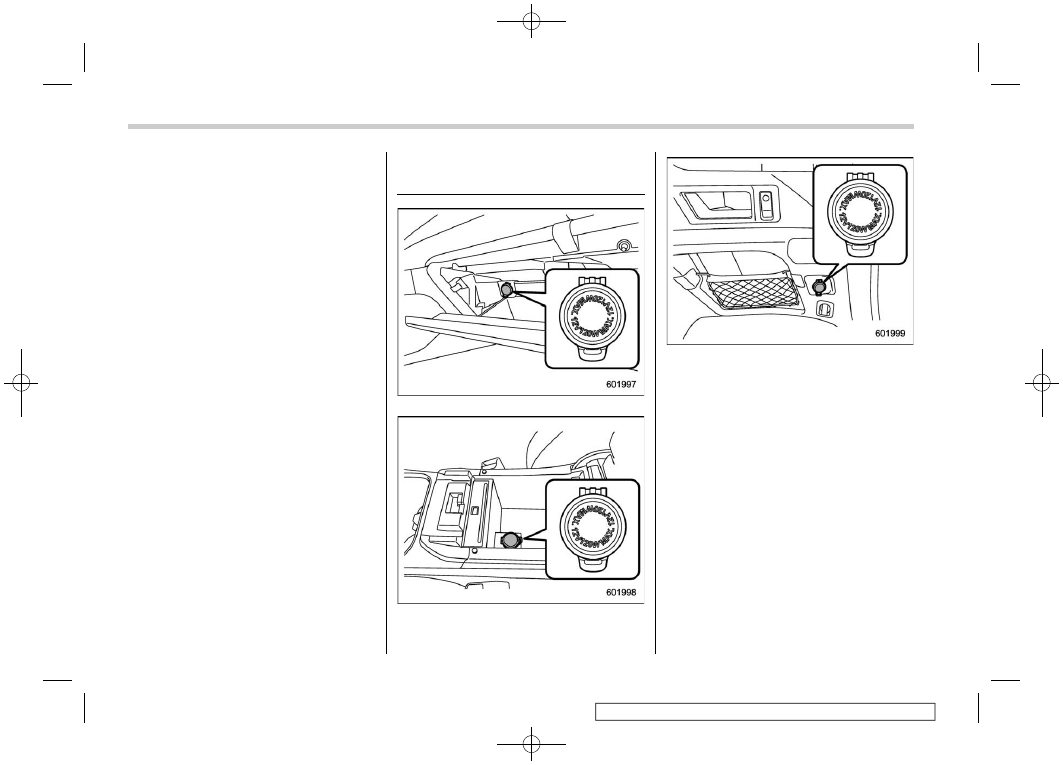
Power outlet in the glove box
Power outlet in the center console (if
equipped)
Power outlet in the cargo area (Outback/
Subaru Outback Wilderness)
Accessory power outlets are provided in
the glove box, center console and cargo
area. Electrical power (12 V DC) from the
battery is available at any of the outlets
when the ignition switch is in either the
“ACC” or “ON” position.
You can use an in-vehicle electrical appli-
ance by connecting it to an outlet.
The maximum power rating of an appli-
ance that can be connected is
120 W
. Do
not use an appliance which exceeds the
indicated wattage for each outlet.
When using appliances connected to two
or more outlets simultaneously, the total
power consumed by them must not ex-
ceed 120 W.
Accessory Power Outlets
312
(315,1)
CAUTION
.
Do not attempt to use a cigarette
lighter in the accessory power
outlet.
.
Do not place any foreign objects,
especially metal ones such as
coins or aluminum foil, into the
accessory power outlet. That
could cause a short circuit. Al-
ways put the cap on the acces-
sory power outlet when it is not in
use.
.
Use only electrical appliances
which are designed for 12 V DC.
The maximum power rating of an
appliance that can be connected
is 120 W. Do not use an appliance
which exceeds the indicated wat-
tage for each outlet.
When using appliances con-
nected to two or more outlets
simultaneously, the total power
consumed by them must not
exceed 120 W. Overloading the
accessory power outlet can
cause a short circuit. Do not use
double adapters or more than
one electrical appliance.
.
If the plug on your electric appli-
ance is either too loose or too
tight for the accessory power
outlet, this can result in a poor
contact or cause the plug to get
stuck. Only use plugs that fit
properly.
.
Use of an electric appliance in the
accessory power outlet for a long
period of time while the engine is
not running can cause battery
discharge.
.
Before driving your vehicle, make
sure that the plug and the cord on
your electrical appliance will not
interfere with your shifting gears
and operating the accelerator
and brake pedals. If they do, do
not use the electrical appliance
while driving.
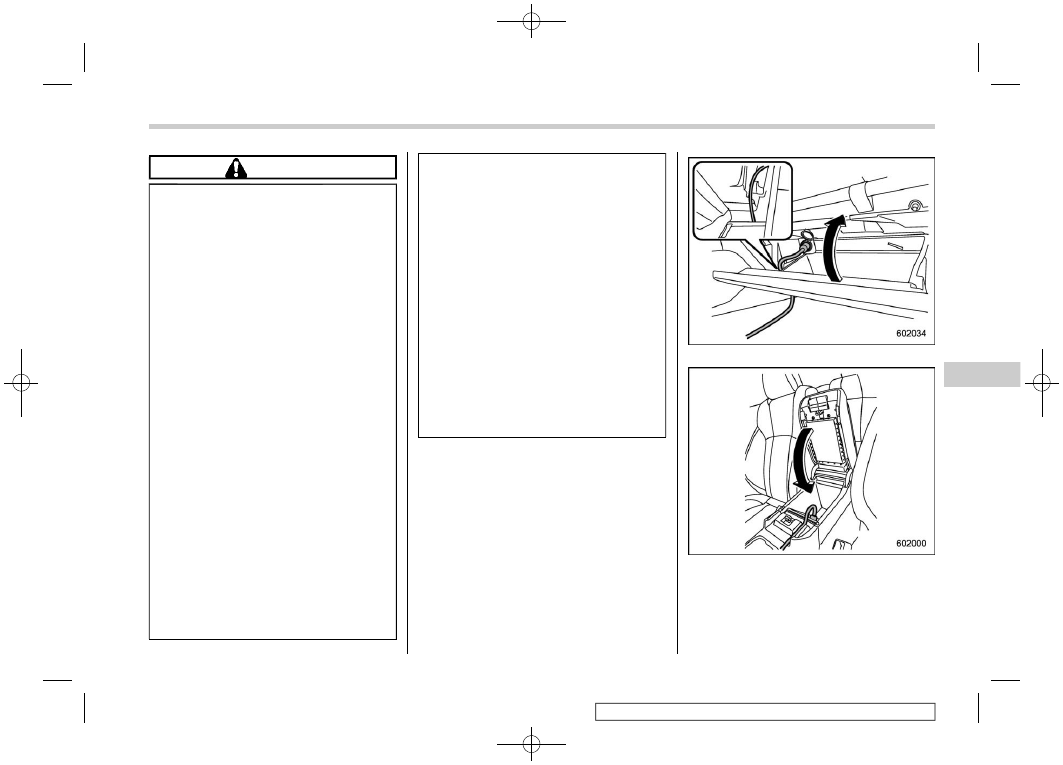
Power outlet in the glove box
Power outlet in the center console (if
equipped)
NOTE
The power outlets in the center console
and the glove box can be used even
– CONTINUED –
Accessory Power Outlets
313
6
Interior
Equipment
(316,1)
when the lid is closed, because there
are gaps that allow the cords to come
out. Pass the cord of the electrical
appliance through this gap.
6-7. USB Power Supply
CAUTION
.
The specification of a USB term-
inal that can be used is the A-
type. If a different specification of
terminal is connected, power
supply or charging may not be
possible, or the device may mal-
function.
.
There is a risk that a connected
device may malfunction or data
may be damaged. The connec-
tion of a device shall be per-
formed at your responsibility.
.
To avoid an electric shock or a
malfunction, observe the follow-
ing precautions.
– Do not connect a USB hub.
– Do not insert any metal or
other foreign object into the
USB terminal.
– Do not spill water or other
liquid on the USB terminal.
.
Be careful not to pull the con-
nected cable. Doing so could
break the USB terminal and the
connected device.
.
If a device is connected for a long
time when the engine is not
running, doing so may cause the
risk of a discharged battery. Even
when the engine is running, we
recommend that you do not con-
nect a device for an unnecessa-
rily long time.
.
Do not connect a malfunctioning
device. Doing so may cause the
risk of smoke and fire.
NOTE
.
The rated voltage of each USB
terminal is 5 V/2.1 A (total 4.2 A). For
details about the maximum rated
power, refer to “How to Use the USB
Power Supply”
P315. Before con-
necting a device, be sure to read the
instruction manual of the device and
check whether or not this specification
of the output is supported by the
device. If a device that requires power
exceeding the maximum rating is con-
nected, power supply or charging may
not be possible. Even if charging could
be completed, the time required for
charging may be longer than when the
genuine charger for that device is used.
.
Depending on the device, charging
may be possible only when a special
USB Power Supply
314
(317,1)
cable is used. In this case, be sure to
connect the device using the special
cable.
.
When a device that communicates
with a PC is connected, power supply
or charging may not be possible.
.
When connect a device for charging,
disconnect the device promptly after
charging is completed.
&
How to Use the USB Power
Supply
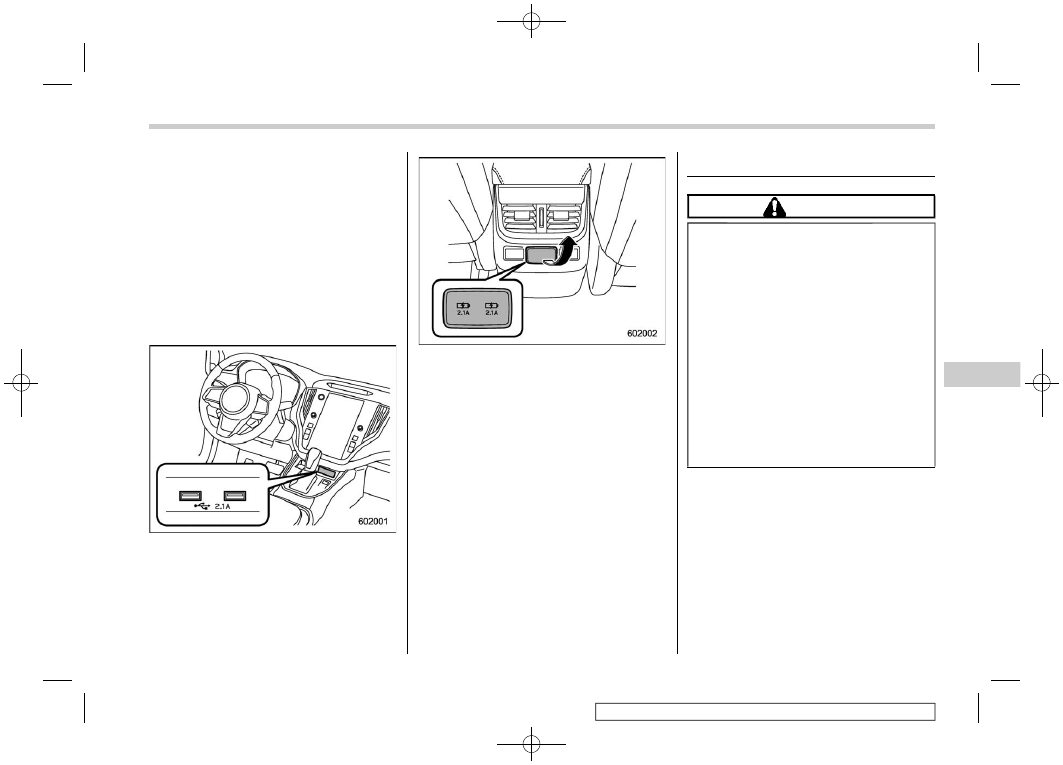
Front seat USB power supply (an audio
device can be connected and used)
Console USB power supply (charge only)
(if equipped)
Use the USB terminal to use or charge an
electronic device.
When using the USB, open the USB power
supply cover. After use, close it.
When the ignition switch is in the “ACC” or
“ON” position, the power can be supplied
to the electronic device. Up to 5 V/2.1 A
can be supplied from each terminal (total
of 4.2 A).
6-8. Ashtray (Dealer Option)
CAUTION
.
Do not use ashtrays as waste
receptacles or leave a lighted
cigarette in an ashtray. This could
cause a fire.
.
Always extinguish matches and
cigarettes before putting them
into the ashtray, and then close
the ashtray securely. If you keep
the ashtray open, the fire of the
cigarette may spread to another
cigarette butt and start a fire.
.
Do not put flammable material in
the ashtray.
.
Do not leave a lot of cigarette
butts in the ashtray.
NOTE
Particles of ash and tobacco will accu-
mulate around the hinges of the ash-
tray’s inner lid. Clean them off using a
toothbrush or a similar narrow-ended
implement.
– CONTINUED –
Ashtray (Dealer Option)
315
6
Interior
Equipment
(318,1)
The portable ashtray can be installed in
each cup holder or bottle holder. For the
locations of the cup holders, refer to “Cup
Holder”
P310. For the locations of the
bottle holders, refer to “Bottle Holders”
When using the ashtray, open the lid of the
ashtray. Fully close the lid after using the
ashtray to help reduce residual smoke.
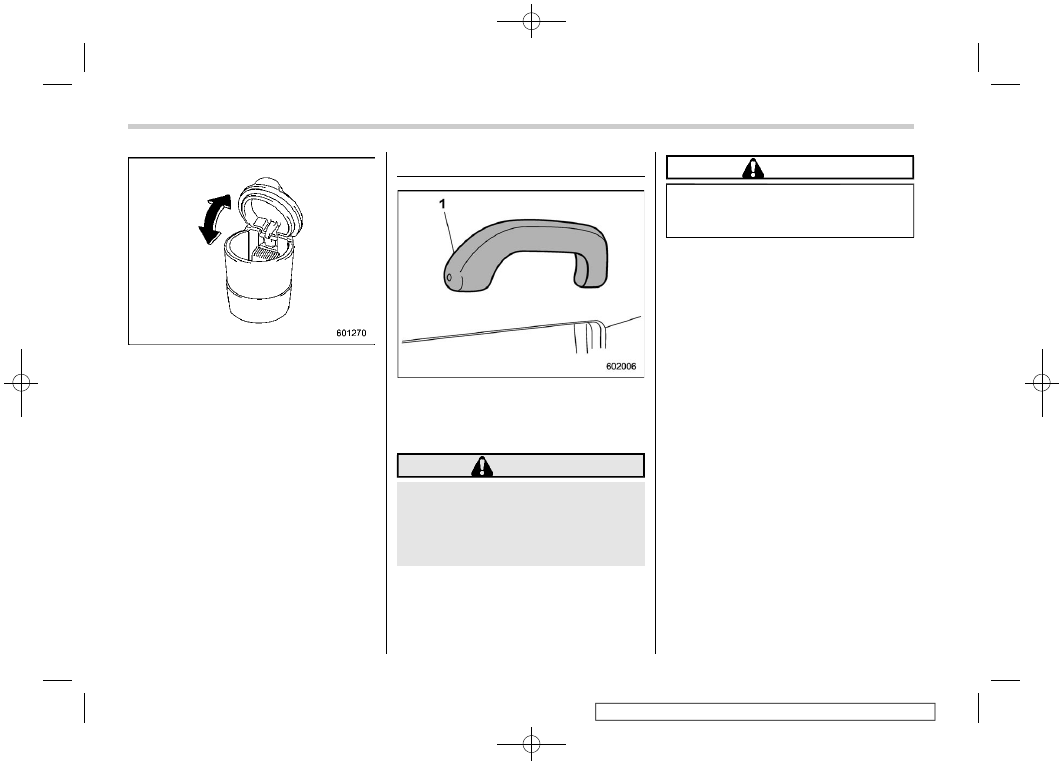
6-9. Assist Grip
1)
Assist grip
The assist grip is to be held to support the
body of the passengers when they are in
the seat and the vehicle is moving.
WARNING
Do not hold the assist grip when
getting up from the seat. Holding
and pulling the assist grip in the
wrong way could break the grip and
possibly cause injury.
CAUTION
Do not attach heavy objects to the
assist grip. Doing so could break it
and damage the object.
Assist Grip
316
(319,1)
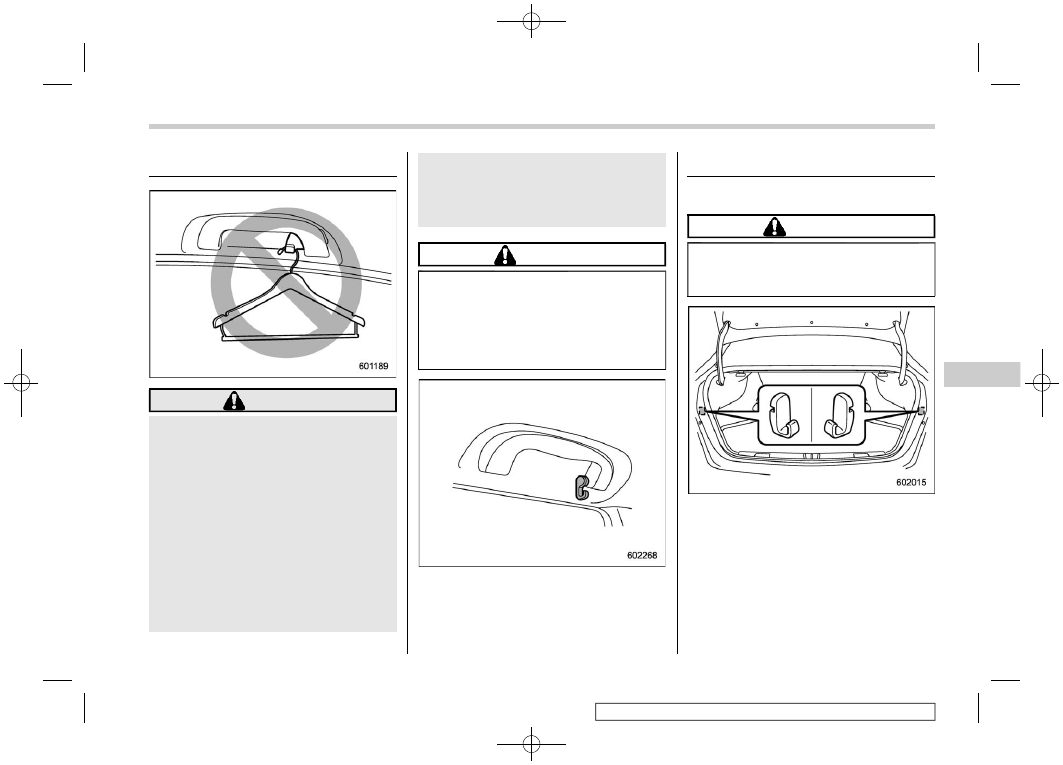
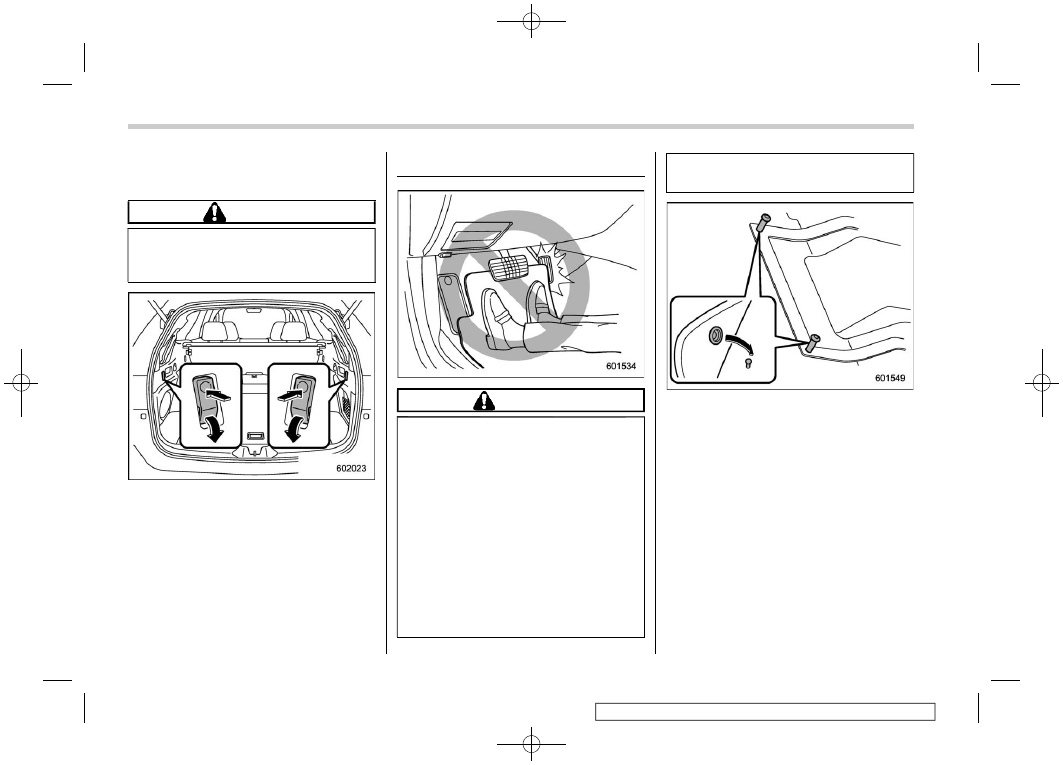
6-10. Coat Hook
WARNING
Obey the following instructions.
.
Do not hang coat hangers or
other hard or pointed objects on
the coat hooks. Hang clothing
directly on the coat hooks with-
out using hangers.
.
Before hanging clothing on the
coat hooks, make sure there are
no pointed objects in the pock-
ets.
If these instructions are ignored, the
following may occur in sudden
stops or in a collision.
.
Serious injuries by the items
thrown through the cabin
.
Incorrect SRS curtain airbag de-
ployment
CAUTION
Never hang anything on the coat
hook that might obstruct the driver’s
view or that could cause injury in
sudden stops or in a collision. And
do not hang items on the coat hook
that weigh 11 lbs (5 kg) or more.
The coat hook is attached to each rear
passenger’s assist grip.
6-11. Shopping Bag Hook
&
Legacy
CAUTION
Do not hang items on the shopping
bag hook that weigh 11 lbs (5 kg) or
more.
A shopping bag hook is attached to each
inner side wall of the trunk near the trunk
lid opening.
– CONTINUED –
Coat Hook
317
6
Interior
Equipment
(320,1)
&
Outback/Subaru Outback
Wilderness
CAUTION
Do not hang items on the shopping
bag hook that weigh 6 lbs (3 kg) or
more.
A shopping bag hook is attached to each
side of the cargo area.
To use the hook, push the upper portion
and the shopping bag hook will appear.
Store the hook after using it.
6-12. Floor Mat
CAUTION
If the floor mat slips forward and
interferes with the movement of the
pedals during driving, it could cause
an accident. Observe the following
precautions to prevent the floor mat
from slipping forward.
.
Be sure to use a genuine
SUBARU floor mat designed with
grommets in the correct loca-
tions.
.
Make sure that the driver’s floor
mat is placed back in its proper
location and is correctly secured
on its retaining pins.
.
Do not use more than one floor
mat.
Retaining pins are located on the driver’s
side floor.
The floor mat should be properly secured
using the built-in grommets, by placing the
grommets over the pins and pushing them
downward.
Floor Mat
318
(321,1)
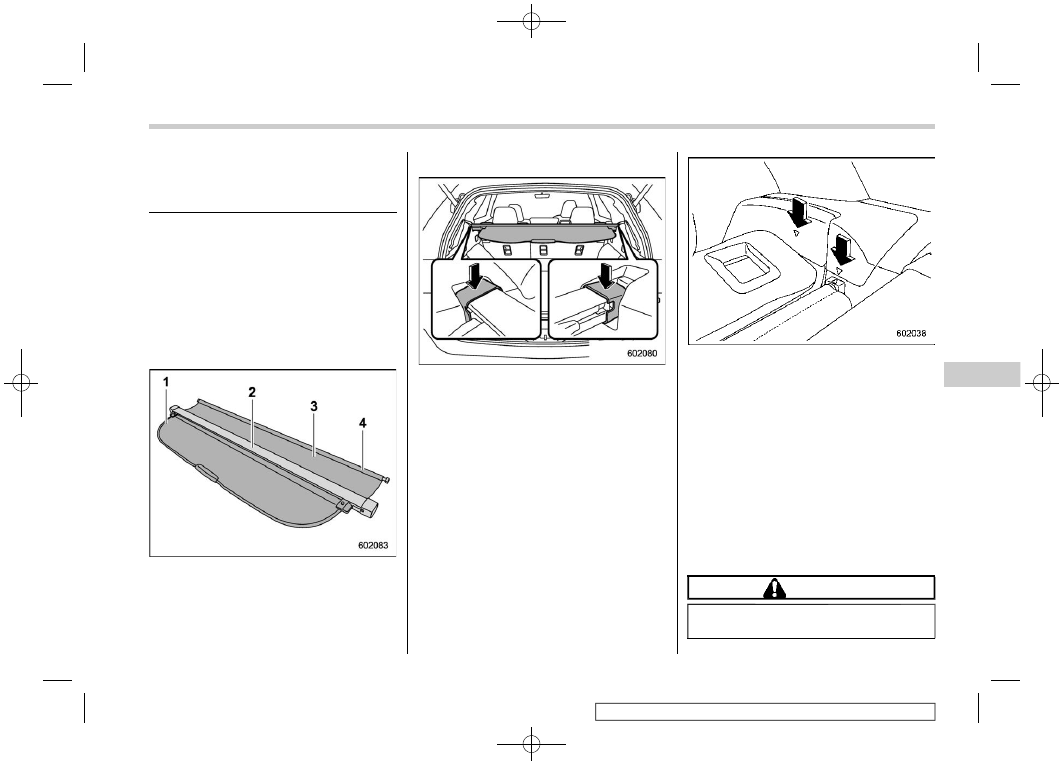
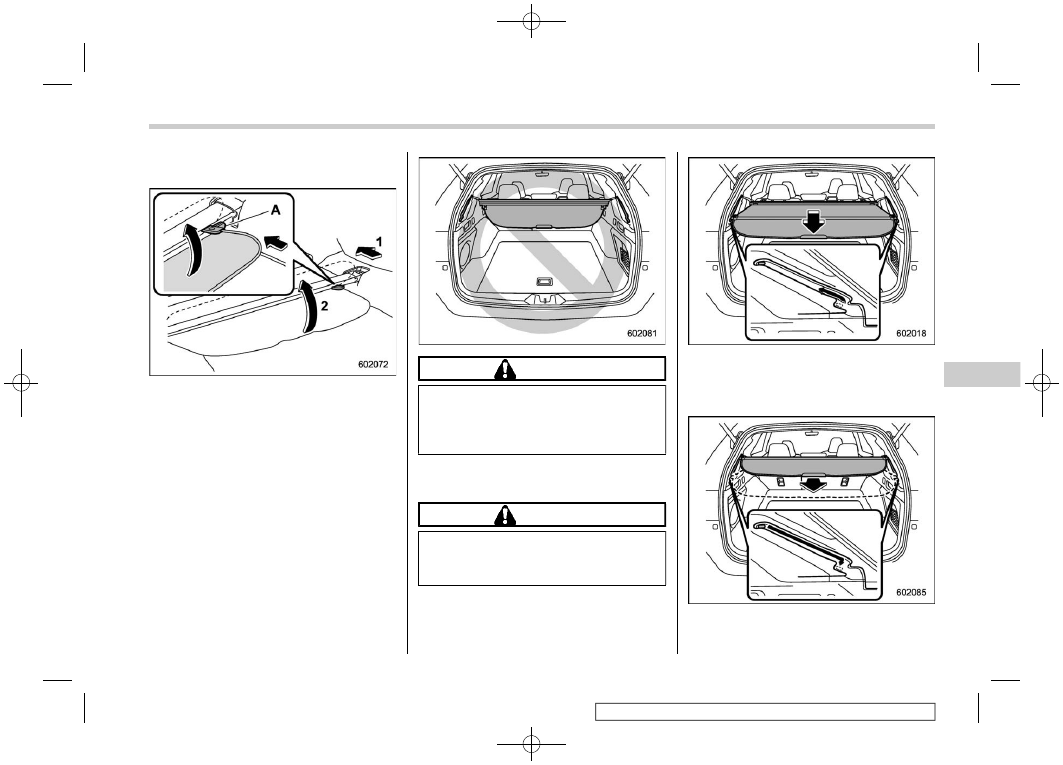
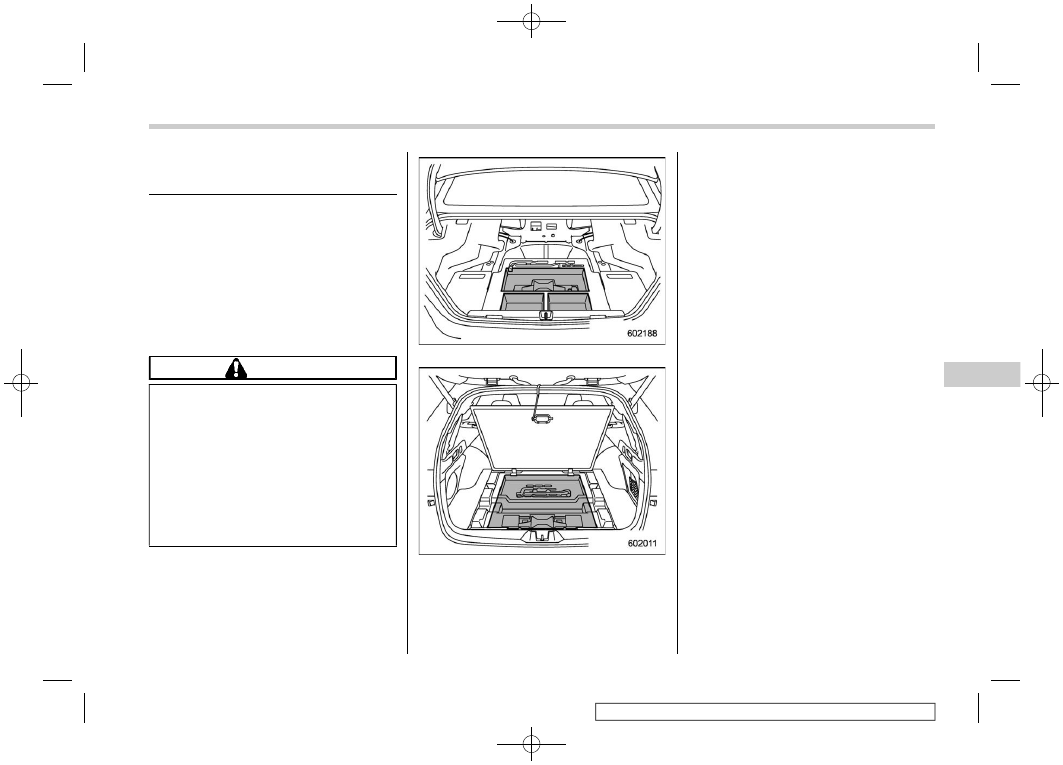
6-13. Lifting Cargo Cover
(Outback/Subaru Outback
Wilderness – If Equipped)
The Lifting Cargo Cover is provided to
cover the cargo area and to protect its
contents from direct sunlight.
The cover also has the practicability of its
easy lift-up function, eliminating the need
to rewind the cover all the way when
accessing the cargo.
This cover can be detached to make room
for additional cargo.
1)
Cargo area cover
2)
Cover housing
3)
Front cover
4)
Front cover rod
&
To Install the Cover Housing
1. Insert the left side cover housing end
into the retainer, then insert the right cover
housing end into the right retainer.
Make sure both ends are clicked into the
retainers.
NOTE
If the label on the cover housing is
placed on the top, the cover housing
will be installed in reverse and it will not
be affixed to the vehicle body.
2. Align the right side of the front cover
rod end with a triangle mark on the cargo
area trim.
NOTE
When the rear seatbacks are reclined,
align the front cover rod to the rear
triangle mark.
3. Push the front cover rod on the right
side against the cargo area trim to shorten
the front cover rod.
4. Once the right side is aligned, align the
left side to a triangle mark on the cargo
area trim to fix the front cover in place.
CAUTION
When reclining the rear seatback,
move the front cover backward so
– CONTINUED –
Lifting Cargo Cover (Outback/Subaru Outback Wilderness – If Equipped)
319
6
Interior
Equipment
(322,1)
that the cover is not damaged
&
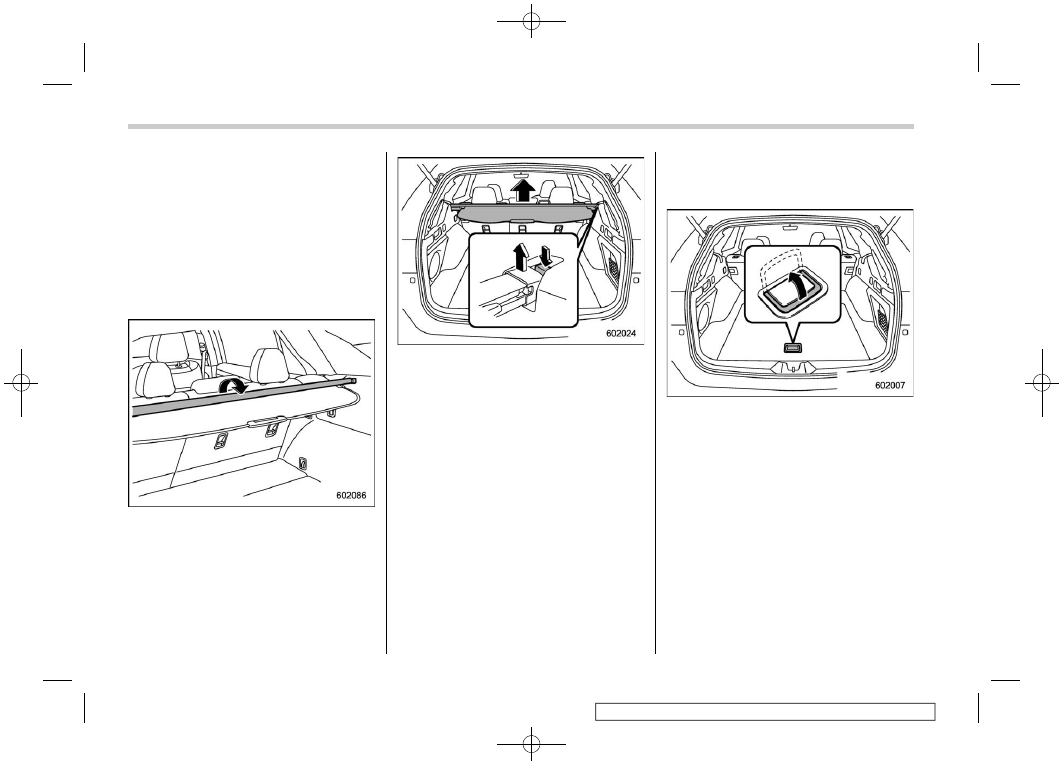
Using the Cover
WARNING
Do not place anything on the ex-
tended cover. Putting excessive
weight on the extended cover can
break it and the object on the cover
could tumble forward in the event of
a sudden stop or collision. This
could cause serious injury.
CAUTION
Be careful not to scratch the rear
gate stays while extending and re-
winding the cover. Scratches on the
stays could cause leakage of gas
from the stays, which may result in
their inability to hold the rear gate
open.
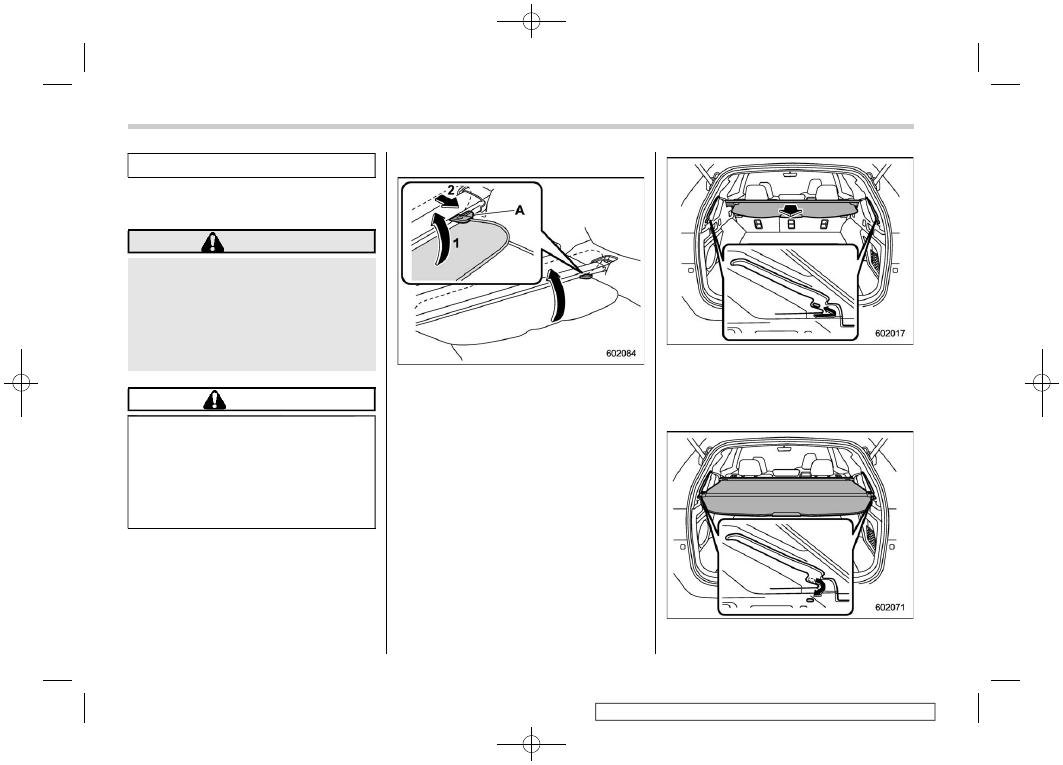
!
To extend the cover
A)
Stopper
1)
Tilt up
2)
Pull out
1. Hold the cover by the handle in the
center, tilt it up and pull it out to free the
stoppers.
2. Pull out the cover by the handle in the
center to extend it. Then insert the
stoppers into the catches as shown.
!
To rewind the cover
1. Hold the cover by the handle in the
Lifting Cargo Cover (Outback/Subaru Outback Wilderness – If Equipped)
320
(323,1)
center and pull it toward you, then slightly
lower it to free the stoppers in the catches.
A)
Stopper
1)
Rewind
2)
Tilt up
2. Slowly rewind the cover completely.
Then tilt the cover up by the handle to hook
the stoppers.
CAUTION
Do not leave the cover dangling.
Make sure the stoppers are hooked
on to the cover housing. Otherwise
the cover may be torn and damaged.
!
To lift the cover
CAUTION
Do not drive with the cover lifted up.
Doing so could obstruct the rear-
ward view.
1. Push down the handle in the center to
lift the cover up.
The stoppers will slide up the grooves and
stop at the top.
2. To lower the lifted cover, hold the cover
by the handle and pull it back into to the
– CONTINUED –
Lifting Cargo Cover (Outback/Subaru Outback Wilderness – If Equipped)
321
6
Interior
Equipment
(324,1)
catches.
&
To Remove the Cover Hous-
ing
1. Slowly rewind the cover completely.
Then tilt the cover up by the handle to hook
the stoppers.
2. Push the front cover rod on the right
side against the cargo area trim to shorten
the front cover rod.
3. Remove the front cover and place it on
the cover housing.
4. Hold down the button on the right-hand
cargo area trim and lift up the right-hand
cover housing end.
5. Gently slide the left-hand cover end out
to the right then remove the cover housing.
&
To Stow the Cover
The cover can be stowed in the under-floor
storage.
1. To open the cargo floor lid, pull the
handle up.
Lifting Cargo Cover (Outback/Subaru Outback Wilderness – If Equipped)
322
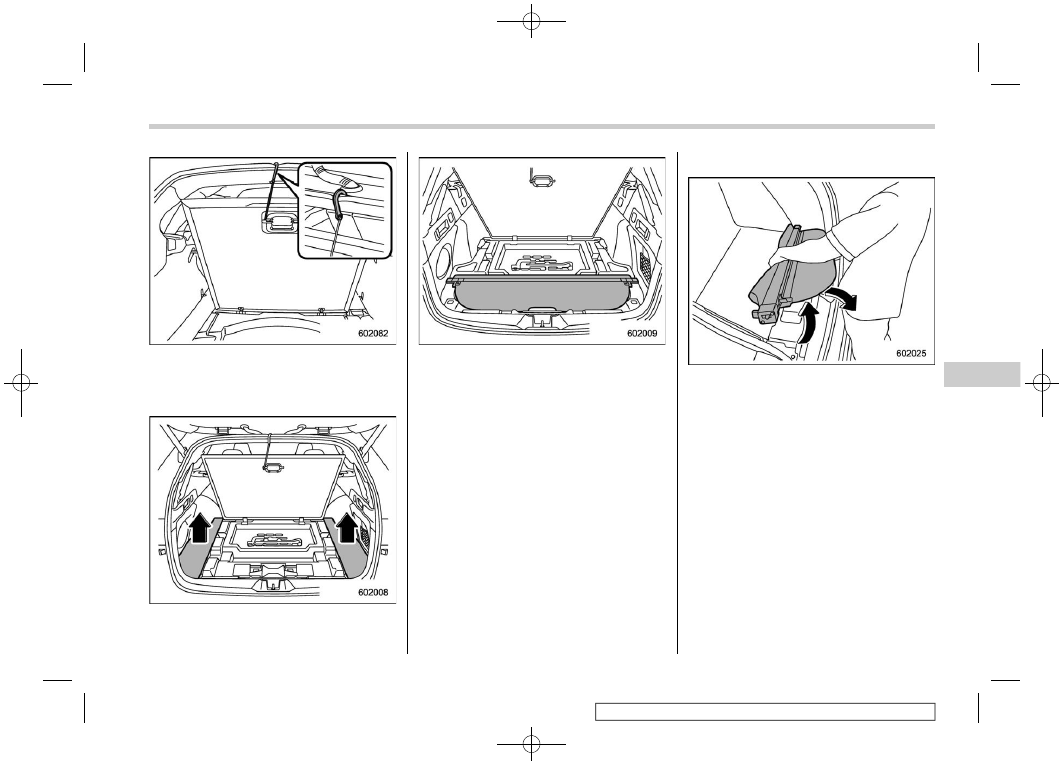
(325,1)
2. Use the hook provided on the back to
hang the cargo floor lid open.
The hook can be hanged onto the opening
of the rear gate.
3. Remove the left and right corners of
the cargo floor lid.
4. Stow the cover housing in the cargo
area under-floor storage.
NOTE
To make enough room for the cover
when stowing, first insert the right-
hand side into the ditch on the cargo
area trim.
&
To Take Out the Stowed Cover
1. Raise the cover.
2. Take out the cover housing by lifting it
toward you.
Lifting Cargo Cover (Outback/Subaru Outback Wilderness – If Equipped)
323
6
Interior
Equipment
(326,1)
6-14. Convenient Tie-Down
Hooks (Outback/Subaru
Outback Wilderness)
CAUTION
The convenient tie-down hooks are
designed only for securing light
cargo. Never try to secure cargo that
exceeds the capacity of the hooks.
The maximum load capacity is 110
lbs (50 kg) per hook.
The cargo area is equipped with several
tie-down hooks so that cargo can be
secured with a luggage net or ropes.
When using the tie-down hooks, turn them
down out of the storing recesses. When
not in use, put the hooks up into the storing
recesses.
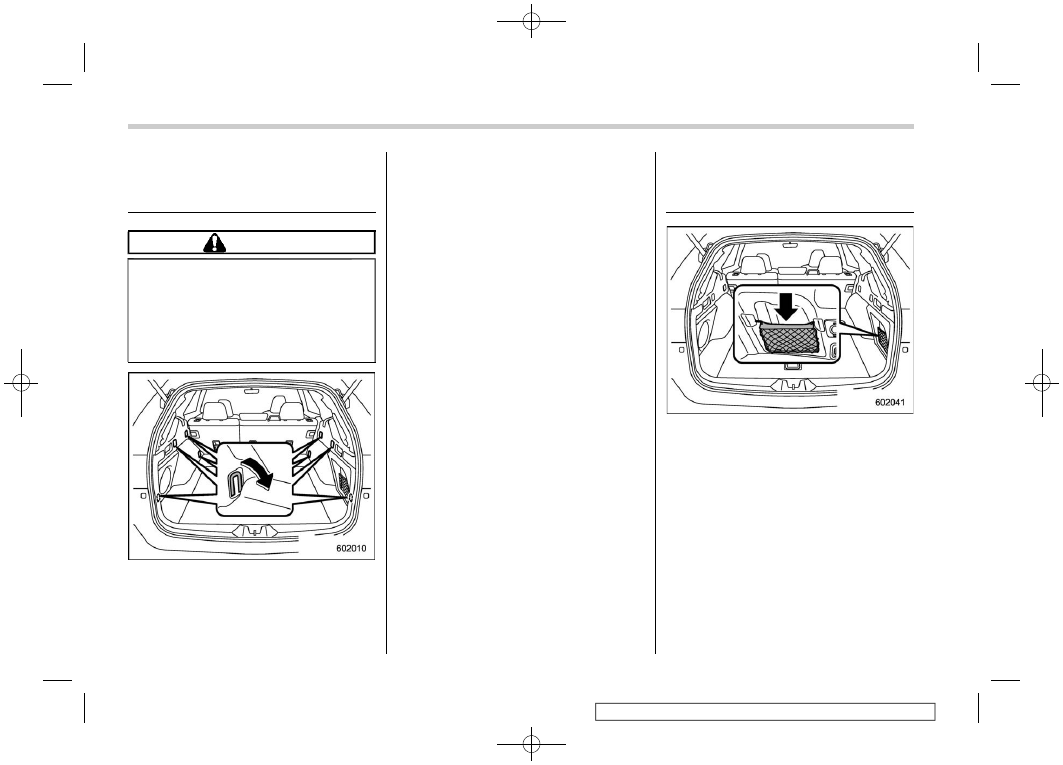
6-15. Adjustable Storage Net
(Outback/Subaru Outback
Wilderness)
There is an adjustable storage net in the
cargo area. Push the net downward to
expand the cargo area.
Convenient Tie-Down Hooks (Outback/Subaru Outback Wilderness)
324
(327,1)
6-16. Under-Floor Storage
Compartment
The subfloor storage compartment is
located under the floor of the trunk or
cargo area and can be used to store small
items. To open the lid, pull the tab or
handle up.
NOTE
When storing a flat tire, put the subfloor
storage in the trunk or cargo area.
CAUTION
.
Always keep the lid of the sub-
floor storage compartment
closed while driving to reduce
the risk of injury in the event of
sudden stop or an accident.
.
Do not store spray cans, contain-
ers with flammable or corrosive
liquids or any other dangerous
items in the subfloor storage
compartment.
Legacy
Outback/Subaru Outback Wilderness
For Outback/Subaru Outback Wilderness,
hang the hook provided on the underside
of the lid on the rear edge of the roof to
keep the lid open.
NOTE
The lid cannot be hooked while the
Lifting Cargo Cover is being used.
Rewind the cover completely to open
the lid.
Under-Floor Storage Compartment
325
6
Interior
Equipment
(329,1)
7-1. Fuel . . . . . . . . . . . . . . . . .. 330
Fuel Requirements. . . . . . . . . . . .. 330
Fuel Filler Lid and Cap. . . . . . . . . . 332
7-2. State Emission Testing (U.S. Only) . . . ... 336
7-3. Preparing to Drive . . . . . . . . . . .. 337
7-4. Starting and Stopping the Engine (Models
without Push-Button Ignition Switch) . . . 338
General Precautions When Starting/Stopping
Engine. . . . . . . . . . . . . . . .. 338
Starting Engine. . . . . . . . . . . . ... 338
Stopping the Engine . . . . . . . . . . ... 339
Steering Lock . . . . . . . . . . . . . . 339
7-5. Starting and Stopping Engine (Models
with Push-Button Start System) . . . . .. 340
Safety Precautions. . . . . . . . . . . .. 340
Operating Range for Push-Button Start System... 340
Starting Engine. . . . . . . . . . . . ... 340
Stopping Engine . . . . . . . . . . . . . 342
When Access Key Fob Does Not Operate
Properly . . . . . . . . . . . . . . ... 342
Steering Lock . . . . . . . . . . . . . . 342
7-6. Remote Engine Start System (Dealer
Option) . . . . . . . . . . . . . . ... 343
Remote Engine Starter Transceiver (Fob) . . . 343
Alternate Operation Method for Models with
“Keyless Access with Push-Button Start
System” . . . . . . . . . . . . . . ... 347
Entering the Vehicle While It Is Running via
Remote Start (Models without “Keyless
Access with Push-Button Start System”). . ... 347
Entering the Vehicle While It Is Running via
Remote Start (Models with “Keyless Access
with Push-Button Start System”) . . . . . .. 348
Entering the Vehicle Following Remote Engine
Start Shutdown . . . . . . . . . . . . 348
Pre-heating or Pre-cooling the Interior of the
Vehicle. . . . . . . . . . . . . . . . 348
Remote Transmitter Program (Remote Engine
Starter Transceiver). . . . . . . . . . .. 348
System Maintenance . . . . . . . . . . .. 349
Certification for Remote Engine Starter . . . .. 350
7-7. Continuously Variable Transmission . . . .351
Continuously Variable Transmission Features. . 351
Select Lever . . . . . . . . . . . . . ... 352
Shift Lock Function. . . . . . . . . . . 353
Selection of Manual Mode . . . . . . . . .. 355
Driving Tips . . . . . . . . . . . . . ... 356
7-8. SI-DRIVE (If Equipped) . . . . . . . . . 356
Intelligent (I) Mode . . . . . . . . . . . . 356
Sport Sharp (S#) Mode . . . . . . . . . ... 357
SI-DRIVE Switches . . . . . . . . . . . . 357
7-9. Power Steering . . . . . . . . . . . . 358
7-10. Braking . . . . . . . . . . . . . . ...359
Braking Tips . . . . . . . . . . . . . .. 359
Brake System. . . . . . . . . . . . . . 359
Disc Brake Pad Wear Warning Indicators. . . 360
7-11. ABS (Anti-Lock Brake System) . . . . . 360
ABS Self-Check. . . . . . . . . . . . .. 360
ABS Warning Light. . . . . . . . . . . . 360
Starting and Operating
7
Starting
and
Operating
(330,1)
7-12. Electronic Brake Force Distribution
(EBD) System . . . . . . . . . . . . 361
EBD System Malfunctions. . . . . . . . ... 361
7-13. Vehicle Dynamics Control System . . . .. 362
Vehicle Dynamics Control System Monitor . . .. 363
To Turn On/Off the Vehicle Dynamics Control
System . . . . . . . . . . . . . . . . 363
7-14. X-MODE (Outback/Subaru Outback
Wilderness). . . . . . . . . . . . . 364
To Activate/Deactivate X-MODE. . . . . . ... 365
Hill Descent Control Function . . . . . . . . 366
7-15. Tire Pressure Monitoring System (TPMS)
(U.S.-Spec. Models) . . . . . . . . . .. 367
TPMS Screen . . . . . . . . . . . . . .. 369
7-16. Parking Your Vehicle . . . . . . . . . 369
Electronic Parking Brake . . . . . . . . . 370
Parking Tips . . . . . . . . . . . . . ... 375
7-17. Auto Start Stop System . . . . . . . ... 376
System Operation . . . . . . . . . . . ... 376
Displaying the Auto Start Stop System Status. . 379
System Warning . . . . . . . . . . . . . 379
7-18. Front View Monitor (If Equipped) . . . . 380
How to Access the Front View Monitor. . . . 381
How to Cancel the Front View Monitor . . . . 381
Range of Image on Screen. . . . . . . . .. 381
Guiding Line. . . . . . . . . . . . . ... 382
Handling of Camera . . . . . . . . . . . 382
7-19. Rear View Camera . . . . . . . . . . 383
How to Use the Rear View Camera . . . . . .. 384
Viewing Range on the Screen. . . . . . . . 385
Help Lines . . . . . . . . . . . . . . . 386
7-20. BSD/RCTA (If Equipped) . . . . . . . ...388
System Features . . . . . . . . . . . . 388
System Operation . . . . . . . . . . . .. 390
BSD/RCTA Approach Indicator Light/Warning
Buzzer . . . . . . . . . . . . . . . . 392
BSD/RCTA OFF Indicator. . . . . . . . . 393
BSD/RCTA Warning Indicator. . . . . . . .. 394
To Turn On/Off the BSD/RCTA . . . . . . . 394
Certification for the BSD/RCTA . . . . . . ... 395
Handling of Rear Corner Radars . . . . . . . 396
7-21. Reverse Automatic Braking (RAB)
System (If Equipped) . . . . . . . . . 397
Reverse Automatic Braking (RAB) System
Overview. . . . . . . . . . . . . . .. 398
Operating Conditions . . . . . . . . . . . 400
Sonar Audible Alarm . . . . . . . . . . .. 403
Automatic Braking Operation . . . . . . . . 404
Canceling the Reverse Automatic Braking
(RAB) System Operation . . . . . . . . .. 406
Reverse Automatic Braking (RAB) System
ON/OFF Setting . . . . . . . . . . . . 406
RAB Warning Indicator . . . . . . . . . ... 407
Handling of the Sonar Sensors. . . . . . ... 407
7-22. Driver Monitoring System (If Equipped) . ..408
User Recognition Function . . . . . . . . . 412
Inattentive/Drowsy Driving Warning . . . . . 414
Driver Monitoring System Indicator/Warning . ... 415
Using the Driver Monitoring System . . . . ... 416
Starting and Operating
Нет комментариевНе стесняйтесь поделиться с нами вашим ценным мнением.
Текст