Ford Ranger (2022 year). Manual in english — page 8

Press and release
+
or
-
on the right-hand
side of the climate control to set the
right-hand temperature.
Setting the Blower Motor Speed
Press and release
+
or
-
to adjust
the volume of air circulated in
the vehicle.
Switching Auto Mode On and Off
Press and release the button to
switch on automatic operation,
then set the temperature.
The system adjusts the blower motor
speed, air distribution, air conditioning
operation, and outside or recirculated air
to reach and maintain the temperature you
have set.
Note:
You can also switch off dual zone
mode by pressing and holding the button
for more than two seconds.
Switching the Air Conditioning On
and Off
Press and release the button.
Use air conditioning with recirculated air
to improve cooling performance and
efficiency.
Note:
In certain conditions such as
maximum defrost, the air conditioning
compressor may continue to operate even
though you switch off the air conditioning.
Switching the Climate Control On
and Off
Press and release the button.
Switching Defrost On and Off
Press and release the button to
distribute air through the
windshield air vents and
de-mister.
You can also use this setting to defog and
clear the windshield of a thin covering of
ice.
Switching the Heated Seats On
and Off
Press and release the button to
cycle through the various heat
settings and off.
Switching Maximum Air
Conditioning On and Off
Press and release the button for
maximum cooling.
The left-hand and right-hand settings set
to LO, recirculated air flows through the
instrument panel air vents, air conditioning
turns on and the blower motor adjusts to
the highest speed.
Switching Maximum Defrost On
and Off
Press and release the button for
maximum defrosting.
The left-hand and right-hand settings set
to HI, outside air flows through the
windshield air vents, and the blower motor
adjusts to the highest speed.
You can also use this setting to defog and
clear the windshield of a thin covering of
ice.
Note:
To prevent window fogging, you
cannot select recirculated air when
maximum defrost is on.
119
Climate Control

Note:
The heated rear window also turns
on when you select maximum defrost.
Switching Recirculated Air On and
Off
Press and release the button to
switch between outside air and
recirculated air.
The air currently in the passenger
compartment recirculates. This may
reduce the time needed to cool the interior,
when used with
A/C
, and reduce unwanted
odors from entering your vehicle.
Note:
Recirculated air may turn off, or
prevent you from switching on, in all air flow
modes except
MAX A/C
to reduce the risk
of fogging. Recirculation may also turn on
and off in various air distribution control
combinations during hot weather to improve
cooling efficiency.
HINTS ON CONTROLLING THE
INTERIOR CLIMATE
General Hints
Note:
Prolonged use of recirculated air may
cause the windows to fog up.
Note:
You may feel a small amount of air
from the footwell air vents regardless of the
air distribution setting.
Note:
To reduce humidity build-up inside
your vehicle, do not drive with the system
switched off or with recirculated air always
switched on.
Note:
Do not place objects under the front
seats as this may interfere with the airflow
to the rear seats.
Note:
Remove any snow, ice or leaves from
the air intake area at the base of the
windshield.
Note:
To improve the time to reach a
comfortable temperature in hot weather,
drive with the windows open until you feel
cold air through the air vents.
Manual Climate Control
Note:
To reduce fogging of the windshield
during humid weather, adjust the air
distribution control to the windshield air
vents position.
Automatic Climate Control
Note:
Adjusting the settings when your
vehicle interior is extremely hot or cold is
not necessary. The system automatically
adjusts to heat or cool the interior to your
selected temperature as quickly as possible.
For the system to function efficiently, the
instrument panel and side air vents should
be fully open.
Note:
If you select
AUTO
during cold
temperatures, the system directs airflow to
the windshield and side window vents. In
addition, the fan may run at a slower speed
until the engine warms up.
Note:
If you select
AUTO
during hot
temperatures and the inside of the vehicle
is hot, the system automatically uses
recirculated air to maximize interior cooling.
Fan speed may also reduce until the air
cools.
120
Climate Control
Quickly Heating the Interior
Automatic climate control
Manual climate control
Press
AUTO
.
Adjust the fan speed to the highest
setting.
1
Adjust the temperature control to the
desired setting.
Adjust the temperature control to the
full heat setting.
2
Direct air to the footwell using the air
distribution buttons.
3
Recommended Settings for Heating
Automatic climate control
Manual climate control
Press
AUTO
.
Adjust the fan speed to the center
setting.
1
Adjust the temperature control to the
desired setting. Use 72°F (22°C) as a
starting point, then adjust the setting as
necessary.
Adjust the temperature control to the
midway point of the hot settings.
2
Direct air to the footwell using the air
distribution buttons.
3
Quickly Cooling the Interior
Automatic climate control
Manual climate control
Select
MAX A/C
.
Select
MAX A/C
.
1
Drive with the windows open until you
feel cold air through the air vents.
2
121
Climate Control
Recommended Settings for Cooling
Automatic climate control
Manual climate control
Press
AUTO
.
Adjust the fan speed to the center
setting.
1
Adjust the temperature control to the
desired setting. Use 72°F (22°C) as a
starting point, then adjust the setting as
necessary.
Adjust the temperature control to the
midway point of the cold settings.
2
Direct air to the instrument panel using
the air distribution buttons.
3
Defogging the Side Windows in Cold Weather
Automatic climate control
Manual climate control
Press the defrost button.
Direct air to the windshield using the air
distribution buttons.
1
Adjust the temperature control to the
desired setting. Use 72°F (22°C) as a
starting point, then adjust the setting as
necessary.
Press
A/C
.
2
Adjust the temperature control to the
desired setting.
3
Adjust the fan speed to the highest
setting.
4
HEATED WINDSHIELD
(IF
EQUIPPED)
Windshield Wiper De-Icer
E184884
When you switch the heated rear
window on, the windshield wiper
de-icer turns on.
HEATED REAR WINDOW
(IF
EQUIPPED)
E184884
Press the button to clear the rear
window of thin ice and fog. The
heated rear window turns off
after a short period of time.
122
Climate Control
Note:
Do not use harsh chemicals, razor
blades or other sharp objects to clean or
remove decals from the inside of the heated
rear window. The vehicle warranty may not
cover damage to the heated rear window
grid lines.
HEATED EXTERIOR MIRRORS
(IF EQUIPPED)
When you switch the heated rear window
on, the heated exterior mirrors turn on.
Note:
Do not remove ice from the mirrors
with a scraper or adjust the mirror glass
when it is frozen in place.
Note:
Do not clean the mirror housing or
glass with harsh abrasives, fuel or other
petroleum-based cleaning products. The
vehicle warranty may not cover damage
caused to the mirror housing or glass.
CABIN AIR FILTER
Your vehicle is equipped with a cabin air
filter, which gives you and your passengers
the following benefits:
•
It improves your driving comfort by
reducing particle concentration.
•
It improves the interior compartment
cleanliness.
•
It protects the climate control
components from particle deposits.
You can locate the cabin air filter behind
the glove box.
Note:
Make sure you have a cabin air filter
installed at all times. This prevents foreign
objects from entering the system. Running
the system without a filter in place could
result in degradation or damage to the
system.
Replace the filter at regular intervals. See
For additional cabin air filter information,
or to replace the filter, see an authorized
dealer.
REMOTE START
(IF EQUIPPED)
You can switch this feature on or off and
adjust the settings using the information
display controls. See
The climate control system adjusts the
interior temperature during remote start.
You cannot adjust the climate control
setting during remote start operation.
Switch the ignition on to make
adjustments.
Based on your remote start settings, the
following vehicle-dependent features may
or may not remain on after remote starting
your vehicle:
•
Climate controlled seats.
•
Heated steering wheel.
•
Heated mirrors.
•
Heated rear window.
•
Windshield wiper de-icer.
Note:
For dual zone climate controlled
seats, the passenger seat setting defaults
to match the driver seat during remote start.
Automatic Settings
If
Auto
is on, the system sets the interior
temperature to 72°F (22°C) and heats or
cools the vehicle interior as required to
achieve comfort.
Note:
In cold weather, the heated rear
window and heated mirrors turn on.
Last Settings
If
Last Settings
is on, the system uses the
settings last selected before you turned
off the vehicle.
123
Climate Control
Heated and Cooled Features
In
Auto
mode, certain heated features may
switch on during cold weather, and cooled
features during hot weather.
124
Climate Control
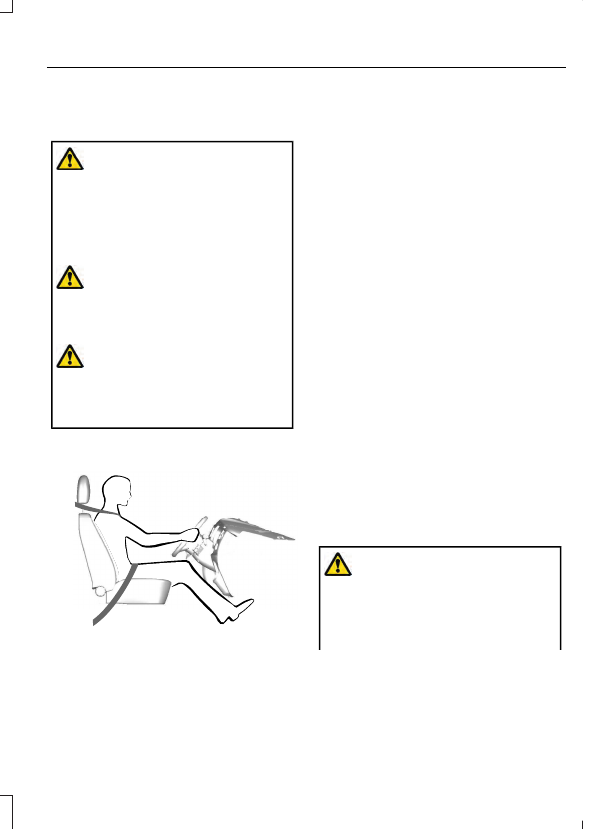
SITTING IN THE CORRECT
POSITION
WARNING:
Sitting improperly, out
of position or with the seatback reclined
too far can take weight off the seat
cushion and affect the decision of the
passenger sensing system, resulting in
serious injury or death in the event of a
crash. Always sit upright against your
seat back, with your feet on the floor.
WARNING:
Do not recline the seat
backrest too far as this can cause the
occupant to slide under the seatbelt,
resulting in personal injury in the event
of a crash.
WARNING:
Do not place objects
higher than the top of the seat backrest.
Failure to follow this instruction could
result in personal injury or death in the
event of a sudden stop or crash.
E68595
When you use them properly, the seat,
head restraint, seatbelt and airbags will
provide optimum protection in the event
of a crash.
We recommend that you follow these
guidelines:
•
Sit in an upright position with the base
of your spine as far back as possible.
•
Do not recline the seat backrest so that
your torso is more than 30 degrees
from the upright position.
•
Adjust the head restraint so that the
top of it is level with the top of your
head and as far forward as possible.
Make sure that you remain
comfortable.
•
Keep sufficient distance between
yourself and the steering wheel. We
recommend a minimum of 10 in
(25 cm) between your breastbone and
the airbag cover.
•
Hold the steering wheel with your arms
slightly bent.
•
Bend your legs slightly so that you can
press the pedals fully.
•
Position the shoulder strap of the
seatbelt over the center of your
shoulder and position the lap strap
tightly across your hips.
Make sure that your driving position is
comfortable and that you can maintain full
control of your vehicle.
HEAD RESTRAINTS
WARNING:
Fully adjust the head
restraint before you sit in or operate your
vehicle. This will help minimize the risk
of neck injury in the event of a crash. Do
not adjust the head restraint when your
vehicle is moving.
125
Seats
WARNING:
The head restraint is a
safety device. Whenever possible it
should be installed and properly
adjusted when the seat is occupied.
Failure to adjust the head restraint
properly could reduce its effectiveness
during certain impacts.
WARNING:
Adjust the head
restraints for all passengers before you
drive your vehicle. This will help minimize
the risk of neck injury in the event of a
crash. Do not adjust the head restraints
when your vehicle is moving.
Note:
Adjust the seat backrest to an upright
driving position before adjusting the head
restraint. Adjust the head restraint so that
the top of it is level with the top of your head
and as far forward as possible. Make sure
that you remain comfortable. If you are
extremely tall, adjust the head restraint to
its highest position.
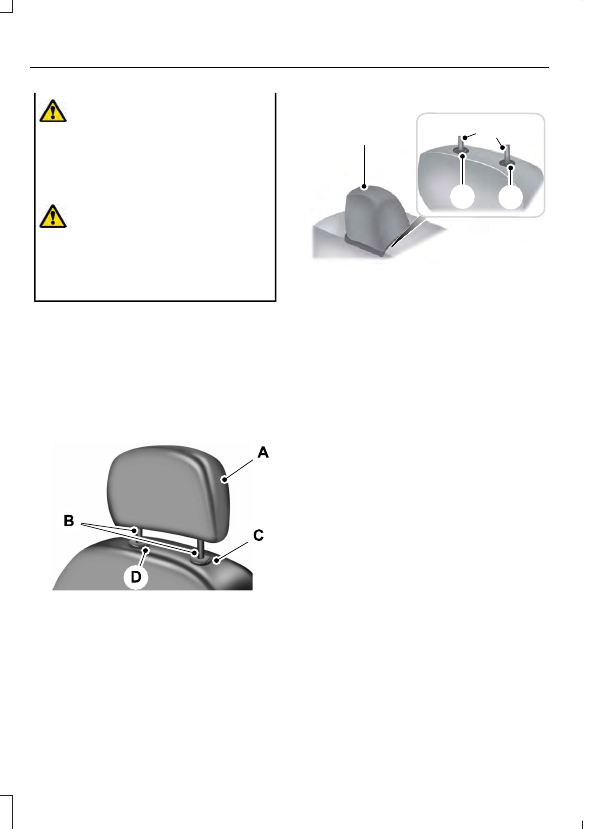
Head Restraint
E138642
Rear Seat Center Head Restraint
E166701
A
D
C
B
The head restraints consist of:
An energy absorbing head
restraint.
A
Two steel stems.
B
Guide sleeve adjust and release
button.
C
Guide sleeve unlock and remove
button - if equipped.
D
Adjusting the Head Restraint
Raising the Head Restraint
Pull the head restraint up.
Lowering the Head Restraint
1.
Press and hold button C.
2. Push the head restraint down.
Removing the Head Restraint
1.
Pull up the head restraint until it
reaches the highest adjustment
position.
2. Press and hold buttons C and D.
3. Pull up the head restraint.
Note:
For rear outermost seats, fold the
seat backrest forward for easier removal -
only double cab.
126
Seats
Installing the Head Restraint
Align the steel stems into the guide sleeves
and push the head restraint down until it
locks.
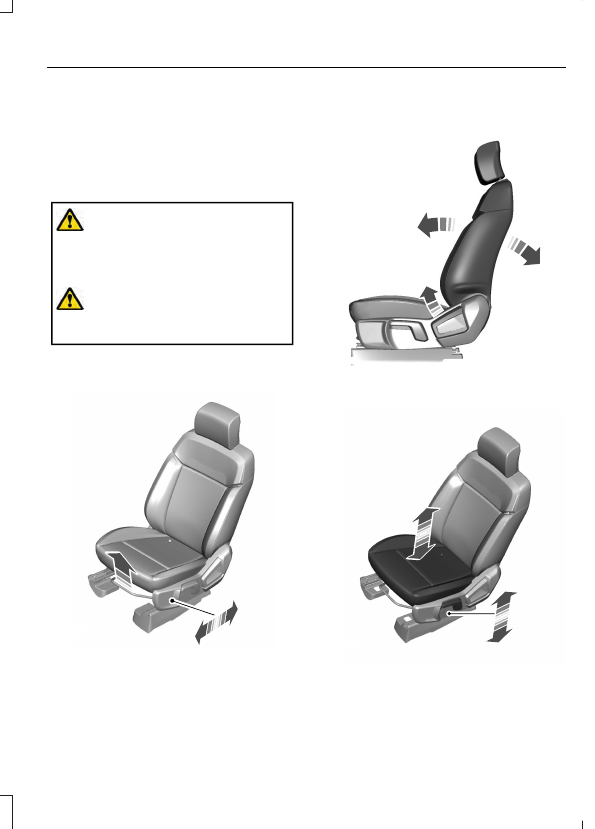
MANUAL SEATS
WARNING:
Do not adjust the driver
seat or seat backrest when your vehicle
is moving. This may result in sudden seat
movement, causing the loss of control
of your vehicle.
WARNING:
Make sure the seat fully
locks into place by rocking it backward
and forward.
Moving the Seat Backward and
Forward
E331208
Adjusting the Recliner
E331209
Adjusting the Seat Height
E331210
127
Seats
Adjusting the Lumbar Support
(If
Equipped)
E331529
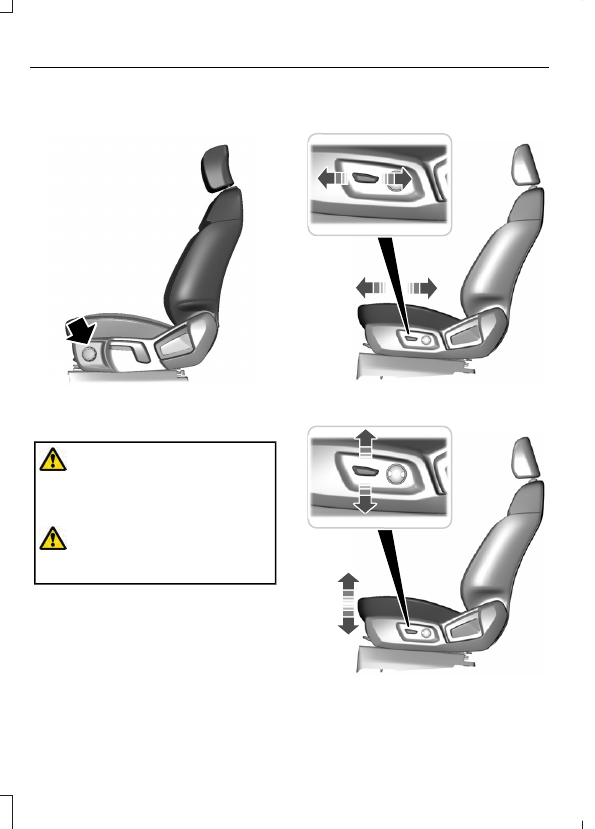
POWER SEATS
(IF EQUIPPED)
WARNING:
Do not adjust the driver
seat or seat backrest when your vehicle
is moving. This may result in sudden seat
movement, causing the loss of control
of your vehicle.
WARNING:
Do not place cargo or
any objects behind the seatback before
returning it to the original position.
Moving the Seat Backward and
Forward
E274074
Adjusting the Driver Seat Height
E273890
128
Seats
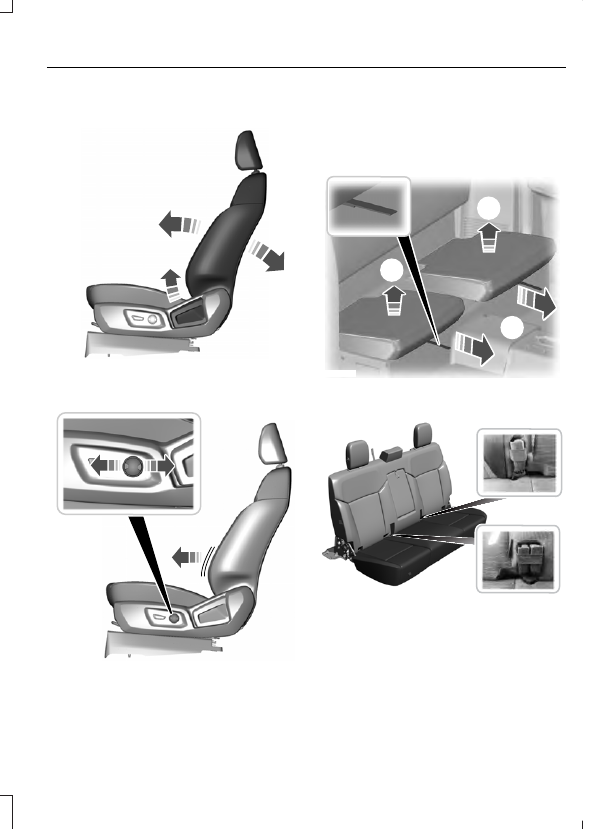
Adjusting the Recliner
E273885
Adjusting the Lumbar
E273887
REAR SEATS
(IF EQUIPPED)
Removing the Seat Cushion
Super Cab
2
2
1
E131743
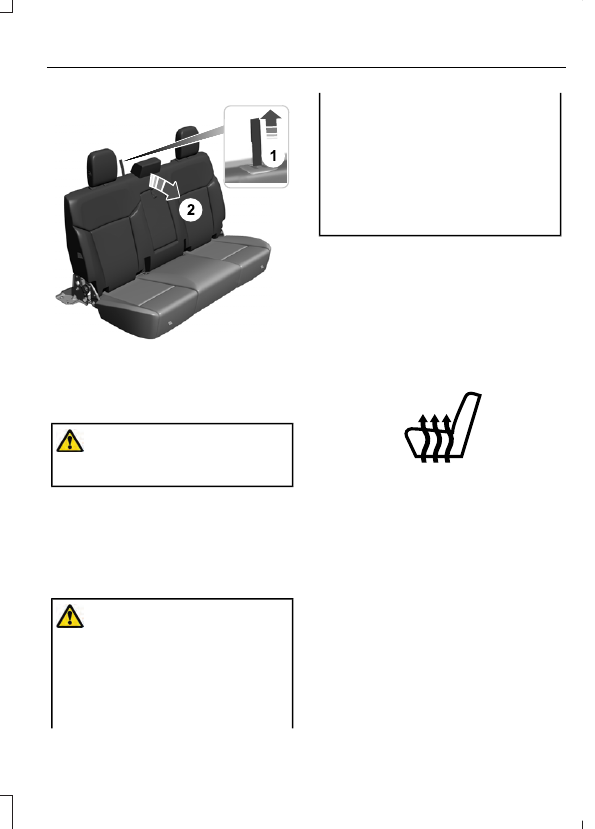
Folding the Seat Cushion
E275421
129
Seats
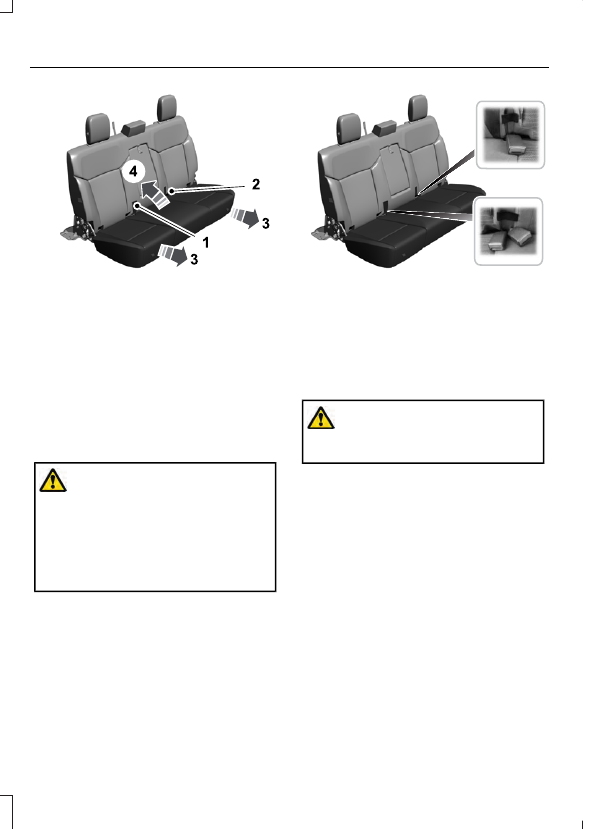
E275422
1.
Place the passenger side seat buckles
behind the elastic strap on the seat
backrest.
2. Place the driver side seat buckle behind
the elastic strap on the seat backrest.
3. Pull the tether straps.
4. Raise the seat cushion.
Note:
When folding the cushion up, make
sure that the seatbelt buckles are visible to
an occupant and are not under the seat.
Unfolding the Seat Cushion
WARNING:
Make sure that cargo
and other objects are not trapped under
the seat cushion and that you return the
seat cushion to the full-down position.
Failure to do so may prevent the seat
from operating properly, which could
increase the risk of serious injury in a
crash.
E275423
1.
Push the seat cushion down.
2. Remove the seatbelt buckles from
behind the elastic strap on the seat
backrest.
Note:
You must stow the cushion tether
strap in the pocket provided.
Folding the Seat Backrest
WARNING:
When folding the seat
backrest down, take care not to get your
fingers caught in the mechanism.
Note:
Do not use the rear surface of the rear
seat backrest as a load floor.
Note:
Do not unlatch and fold the seat
backrest when the seat cushion is folded
up.
130
Seats
E275420
1.
Pull the release strap up.
2. Push the seat backrest forward.
Unfolding the Seat Backrest
WARNING:
Make sure that the
seats and the seat backrests are secure
and fully locked in their catches.
Note:
When unfolding the seat backrest,
make sure that the seatbelts are visible to
an occupant and not caught behind the
seat.
HEATED SEATS
(IF EQUIPPED)
WARNING:
People who are unable
to feel pain to their skin because of
advanced age, chronic illness, diabetes,
spinal cord injury, medication, alcohol
use, exhaustion or other physical
conditions, must use caution when using
the heated seat. The heated seat may
cause burns even at low temperatures,
especially if used for long periods of time.
Do not place anything on the seat that
may block the heat, such as a blanket or
cushion. This can cause the heated seat
to overheat. Do not puncture the seat
with pins, needles or other pointed
objects. This damages the heating
element and can cause the heated seat
to overheat. An overheated seat may
cause serious personal injury.
Do not do the following:
•
Place heavy objects on the seat.
•
Operate the heated seat if water or any
other liquid spills on the seat. Allow the
seat to dry thoroughly.
•
Operate the heated seats unless the
engine is running. Doing so could drain
your vehicle battery.
E146322
Press the heated seat symbol to cycle
through the various heat settings and off.
More indicator lights indicate warmer
settings.
The heated seats only operate when you
switch the ignition on.
The maximum temperature is reached
after five or six minutes. It is regulated
thermostatically.
The heated seats remain on until you either
switch the heated seats off or you switch
the ignition off.
131
Seats
WHAT IS THE REAR
OCCUPANT ALERT SYSTEM
The rear occupant alert system monitors
vehicle conditions and notifies you to check
for rear seat occupants when you switch
the ignition off.
HOW DOES THE REAR
OCCUPANT ALERT SYSTEM
WORK
The system monitors when rear doors have
been opened and closed to indicate the
potential presence of an occupant in the
rear seat.
A message displays in the information and
entertainment display screen and an
audible warning sounds when you switch
the ignition off after any of the following
conditions have been met:
•
A rear door is opened or closed while
the ignition is on.
•
You switch the ignition on within 15
minutes of a rear door opening and
closing.
•
You switch the ignition on within 15
minutes of the alert having displayed
or sounded.
REAR OCCUPANT ALERT
SYSTEM PRECAUTIONS
WARNING:
On hot days, the
temperature inside the vehicle can rise
very quickly. Exposure of people or
animals to these high temperatures for
even a short time can cause death or
serious heat related injuries, including
brain damage. Small children are
particularly at risk.
WARNING:
Do not leave children
or pets unattended in your vehicle.
Failure to follow this instruction could
result in personal injury or death.
REAR OCCUPANT ALERT
SYSTEM LIMITATIONS
The system does not detect the presence
of objects or passengers in the rear seat.
It monitors when rear doors are opened
and closed.
Note:
It is possible to receive an alert when
there is no rear seat occupant, but alert
conditions are met.
Note:
It is possible to receive no alert when
there is an occupant in the rear seat, if alert
conditions are not met. For example, if a rear
seat occupant does not enter the vehicle
through a rear door.
Note:
The audible warning does not sound
when the front door is opened before you
switch the ignition off.
SWITCHING REAR OCCUPANT
ALERT SYSTEM ON AND OFF
1.
Press
Settings
on the touchscreen.
2. Press
Vehicle
.
3. Switch
Rear Occupant Alert
on or off.
Note:
The default setting is on.
Note:
Performing a master reset causes the
system to switch on again.
Semiannual Reminder
(If Equipped)
When you switch the system off, a
message appears every six months as a
reminder that the system is off. You can
switch the system back on or leave it off.
132
Rear Occupant Alert System
(If Equipped)

REAR OCCUPANT ALERT
SYSTEM INDICATORS
E350472
Message
Check rear seats for occupants.
Displays when you switch your vehicle off
after the alert conditions are met.
The message displays for a short period of
time. Press
Close
to acknowledge and
remove the message.
Note:
Depending on your SYNC version, the
graphic may look different from what you
see here.
REAR OCCUPANT ALERT
SYSTEM AUDIBLE WARNINGS
Sounds when you switch your vehicle off
after the alert conditions are met.
The warning sounds for a short period of
time.
133
Rear Occupant Alert System
(If Equipped)
UNIVERSAL GARAGE DOOR
OPENER
HomeLink Wireless Control
System
WARNING:
Do not use the system
with any garage door opener that does
not have the safety stop and reverse
feature as required by U.S. Federal
Safety Standards (this includes any
garage door opener manufactured
before April 1, 1982). A garage door
opener which cannot detect an object,
signaling the door to stop and reverse,
does not meet current federal safety
standards. Using a garage door opener
without these features increases the risk
of serious injury or death.
Note:
Make sure that the garage door and
security device are free from obstruction
when you are programming. Do not program
the system with the vehicle in the garage.
Note:
Make sure you keep the original
remote control transmitter for use in other
vehicles as well as for future system
programming.
Note:
We recommend that upon the sale
or lease termination of your vehicle, you
erase the programmed function buttons for
security reasons. See
Erasing the Function
Button Codes
later in this section.
Note:
You can program a maximum of
three devices. To change or replace any of
the three devices after it has been initially
programmed, you must first erase the
current settings. See
Erasing the Function
Button Codes
.
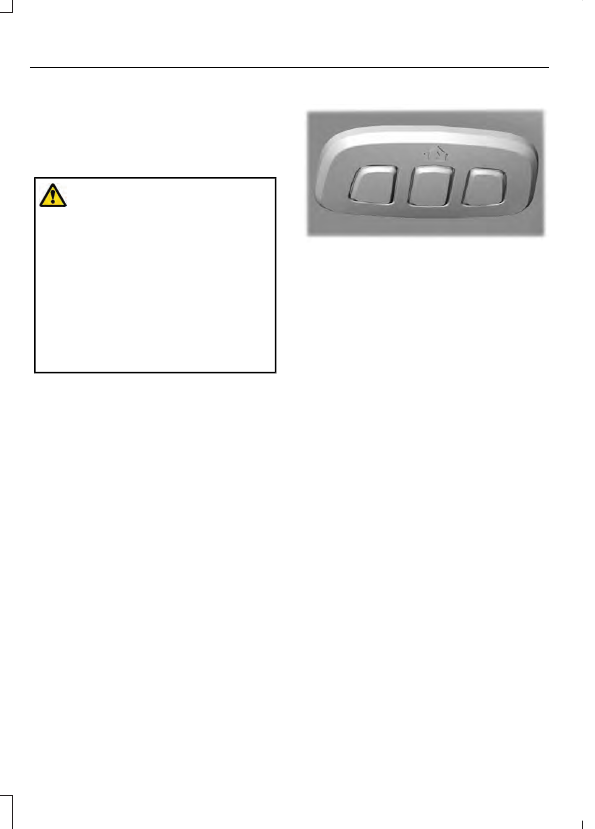
E188211
The universal garage door opener replaces
the common hand-held garage door
opener with a three-button transmitter
integrated into the driver’s sun visor.
The system includes two primary features,
a garage door opener and a platform for
remote activation of devices within the
home. You can program garage doors as
well as entry gate operators, security
systems, entry door locks and home or
office lighting.
Additional system information can be
found online at www.homelink.com,
www.youtube.com/user/HomeLinkGentex
or by calling the toll-free help line at
1-800-355-3515.
In-Vehicle Programming
This process is to program your in-vehicle
HomeLink function button with your
hand-held transmitter.
Note:
The programming steps below
assume you will be programming HomeLink
that was not previously programmed. If your
HomeLink was previously programmed, you
may need to erase your HomeLink buttons.
See
Erasing the Function Button Codes.
Note:
Put a new battery in the hand-held
transmitter. This allows for quicker training
and accurate transmission of the
radio-frequency signal.
134
Garage Door Opener
(If Equipped)
Нет комментариевНе стесняйтесь поделиться с нами вашим ценным мнением.
Текст