Ford Ranger (2022 year). Manual in english — page 10
Some fuel stations, particularly those in
high altitude areas, offer fuels posted as
regular unleaded gasoline with an octane
rating below 87. The use of these fuels
could result in engine damage that will not
be covered by the vehicle warranty.
For best overall vehicle and engine
performance, premium fuel with an octane
rating of 91 or higher is recommended. The
performance gained by using premium fuel
is most noticeable in hot weather as well
as other conditions, for example when
towing a trailer. See
Do not be concerned if the engine
sometimes knocks lightly. However, if the
engine knocks heavily while using fuel with
the recommended octane rating, contact
an authorized dealer to prevent any engine
damage.
We recommend Top Tier detergent
gasolines, where available to help minimize
engine deposits and maintain optimal
vehicle and engine performance. For
additional information, refer to
www.toptiergas.com.
Note:
Use of any fuel for which the vehicle
was not designed can impair the emission
control system, cause loss of vehicle
performance, and cause damage to the
engine which may not be covered by the
vehicle Warranty.
Do not use:
•
Diesel fuel.
•
Fuels containing kerosene or paraffin.
•
Fuel containing more than 15% ethanol
or E85 fuel.
•
Fuels containing methanol.
•
Fuels containing metallic-based
additives, including manganese-based
compounds.
•
Fuels containing the octane booster
additive, methylcyclopentadienyl
manganese tricarbonyl (MMT).
•
Leaded fuel, using leaded fuel is
prohibited by law.
The use of fuels with metallic compounds
such as methylcyclopentadienyl
manganese tricarbonyl (commonly known
as MMT), which is a manganese-based
fuel additive, will impair engine
performance and affect the emission
control system.
FUEL FILLER FUNNEL
LOCATION
The fuel filler funnel is located under the
rear bench seat or behind the rear seat.
RUNNING OUT OF FUEL
Running out of fuel can cause damage not
covered by the vehicle Warranty.
If your vehicle runs out of fuel:
•
Add a minimum of 1.3 gal (5 L) of fuel
to restart the engine.
•
You may need to switch the ignition
from off to on several times after
refueling to allow the fuel system to
pump the fuel from the tank to the
engine. When restarting, cranking time
takes a few seconds longer than
normal.
Note:
If your vehicle is on a steep slope,
more fuel may be required.
Filling a Portable Fuel Container
WARNING:
Flow of fuel through a
fuel pump nozzle can produce static
electricity. This can cause a fire if you are
filling an ungrounded fuel container.
151
Fuel and Refueling
Use the following guidelines to avoid
electrostatic charge build-up, which can
produce a spark, when filling an
ungrounded fuel container:
•
Only use an approved fuel container to
transfer fuel to your vehicle. Place the
container on the ground when filling it.
•
Do not fill a fuel container when it is
inside your vehicle (including the cargo
area).
•
Keep the fuel pump nozzle in contact
with the fuel container when filling it.
•
Do not use a device that holds the fuel
pump nozzle lever in the fill position.
Adding Fuel From a Portable Fuel
Container
WARNING:
Do not insert the nozzle
of a fuel container or an aftermarket
funnel into the fuel filler neck. This may
damage the fuel system filler neck or its
seal and cause fuel to run onto the
ground.
WARNING:
Do not try to pry open
or push open the capless fuel system
with foreign objects. This could damage
the fuel system and its seal and cause
injury to you or others.
WARNING:
Do not dispose of fuel
in the household refuse or the public
sewage system. Use an authorized waste
disposal facility.
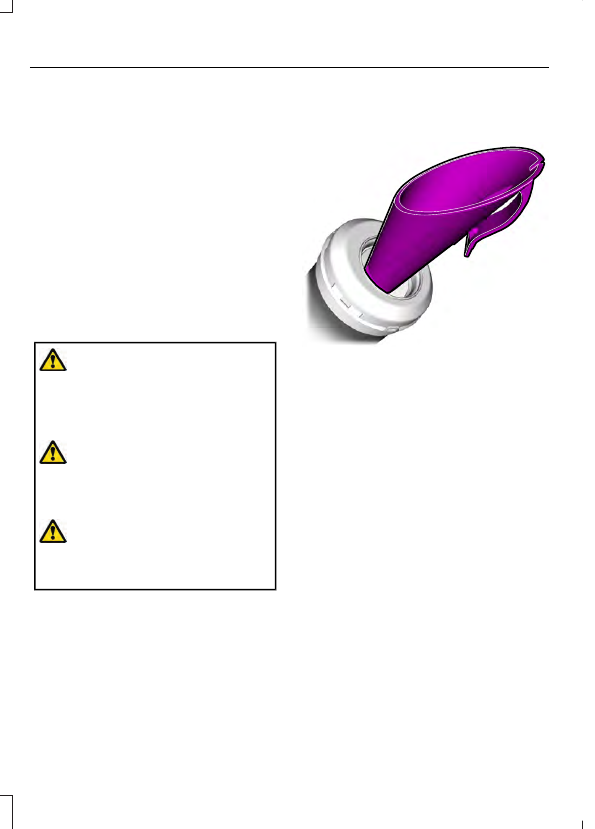
When refueling the vehicle fuel tank from
a fuel container, use the fuel filler funnel
included with your vehicle. See
Note:
Do not use aftermarket funnels as
they may not work with the capless fuel
system and can damage it.
When refueling the vehicle fuel tank from
a fuel container, do the following:
1.
Fully open the fuel filler door.
2. Fully insert the fuel filler funnel into the
fuel filler inlet.
E157452
3. Add fuel to your vehicle from the fuel
container.
4. Remove the fuel filler funnel.
5. Fully close the fuel filler door.
6. Clean the fuel filler funnel and place it
back in your vehicle or correctly dispose
of it.
Note:
Extra funnels can be purchased from
an authorized dealer if you choose to
dispose of the funnel.
152
Fuel and Refueling
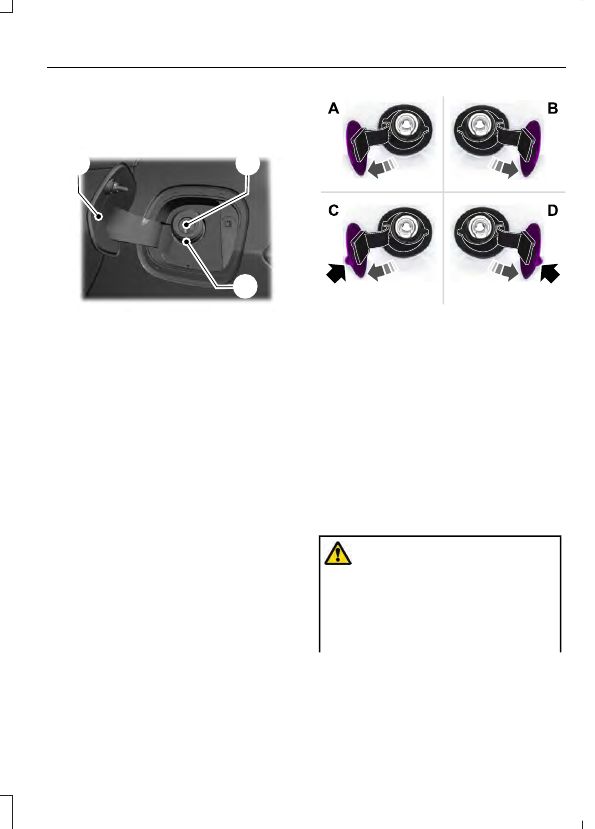
REFUELING
Refueling System Overview
E267248
B
C
A
Fuel filler door.
A
Fuel tank filler valve.
B
Fuel tank filler pipe.
C
Your vehicle does not have a fuel tank filler
cap.
E206911
Left-hand side. To open the fuel
filler door, press the center rear
edge of the fuel filler door and
then release.
A
Right-hand side. To open the
fuel filler door, press the center
rear edge of the fuel filler door
and then release.
B
Left-hand side. Pull the rear of
the fuel filler door to open it.
C
Right-hand side. Pull the rear of
the fuel filler door to open it.
D
Refueling Your Vehicle
WARNING:
When refueling always
shut the engine off and never allow
sparks or open flames near the fuel tank
filler valve. Never smoke or use a cell
phone while refueling. Fuel vapor is
extremely hazardous under certain
conditions. Avoid inhaling excess fumes.
153
Fuel and Refueling

WARNING:
The fuel system may
be under pressure. If you hear a hissing
sound near the fuel filler inlet, do not
refuel until the sound stops. Otherwise,
fuel may spray out, which could cause
serious personal injury.
WARNING:
Do not pry open the
fuel tank filler valve. This could damage
the fuel system. Failure to follow this
instruction could result in fire, personal
injury or death.
WARNING:
Do not remove the fuel
pump nozzle from its fully inserted
position when refueling.
WARNING:
Stop refueling when
the fuel pump nozzle automatically
shuts off for the first time. Failure to
follow this will fill the expansion space
in the fuel tank and could lead to fuel
overflowing.
WARNING:
Do not overfill the fuel
tank. The pressure in an overfilled tank
may cause leakage and lead to fuel spray
and fire.
WARNING:
Wait at least five
seconds before removing the fuel pump
nozzle to allow any residual fuel to drain
into the fuel tank.
1.
Fully open the fuel filler door.
2. Select the correct fuel pump nozzle for
your vehicle.
E139202
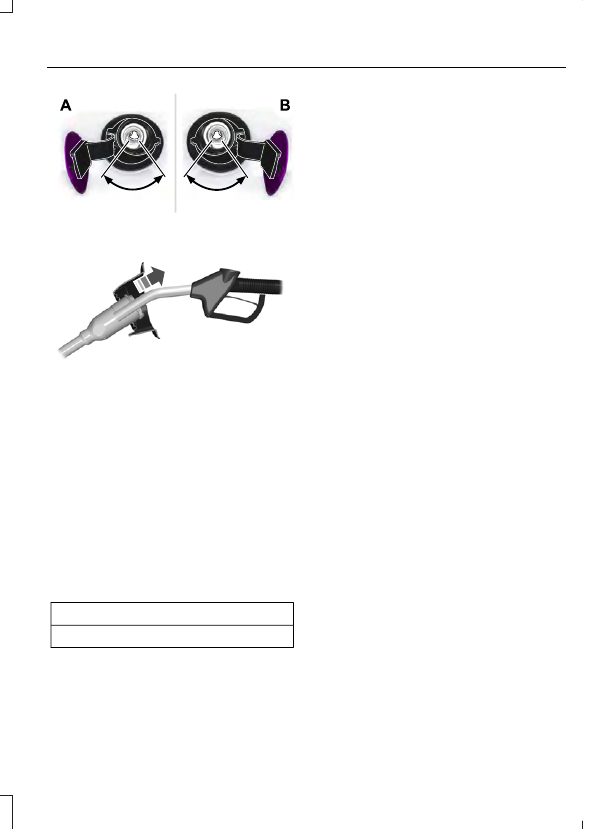
3. Insert the fuel pump nozzle up to the
first notch on the nozzle A. Keep the
fuel pump nozzle resting on the fuel
tank filler pipe.
E139203
A
B
4. Hold the fuel pump nozzle in position
B when refueling. Holding the fuel
pump nozzle in position A can affect
the flow of fuel and shut off the fuel
pump nozzle before the fuel tank is full.
154
Fuel and Refueling
E206912
5. Operate the fuel pump nozzle within
the area shown.
E119081
6. When you finish refueling slightly raise
the fuel pump nozzle and slowly
remove it.
7.
Fully close the fuel filler door.
Do not attempt to start the engine if you
have filled the fuel tank with incorrect fuel.
Incorrect fuel use could cause damage not
covered by the vehicle Warranty. Have your
vehicle immediately checked.
Refueling System Warning
(If Equipped)
If the fuel tank filler valve does not fully
close, a message could appear in the
information display.
Message
Check Fuel Fill Inlet
If the message appears, do the following:
1.
Stop your vehicle as soon as it is safe
to do so and switch the engine off.
2. Shift into park (P) or neutral (N).
3. Apply the parking brake.
4. Fully open the fuel filler door.
5. Check the fuel tank filler valve for any
debris that may be restricting its
movement.
6. Remove any debris from the fuel tank
filler valve.
7.
Fully insert a fuel pump nozzle or the
fuel filler funnel provided with your
vehicle into the fuel filler pipe. See
151). This action should dislodge any
debris that may be preventing the fuel
tank filler valve from fully closing.
8. Remove the fuel pump nozzle or fuel
filler funnel from the fuel filler pipe.
9. Fully close the fuel filler door.
Note:
The message may not immediately
reset. If the message continues to appear
and a warning lamp illuminates, have your
vehicle checked as soon as possible.
FUEL CONSUMPTION
Advertised Capacity
The advertised capacity is the maximum
amount of fuel that you can add to the fuel
tank when the fuel gauge indicates empty.
See
In addition, the fuel tank contains an empty
reserve. The empty reserve is an
unspecified amount of fuel that remains
in the fuel tank when the fuel gauge
indicates empty.
Note:
When refueling your vehicle after the
fuel gauge indicates empty, you might not
be able to refuel the full amount of the
advertised capacity due to the empty
reserve still present in the fuel tank.
155
Fuel and Refueling
Filling the Fuel Tank
For consistent results when refueling:
•
Turn the ignition off before fueling; an
inaccurate reading results if the engine
is left running.
•
Use the same fill rate
(low-medium-high) each time the tank
is filled.
•
Allow no more than one automatic
shut-off when refueling.
Results are most accurate when the filling
method is consistent.
Calculating Fuel Economy
Your vehicle calculates fuel economy
figures through the trip computer average
fuel function. See
The first 1,000 mi (1,500 km) of driving is
the break-in period of the engine. A more
accurate measurement is obtained after
2,000 mi (3,000 km).
1.
Completely fill the fuel tank and record
the initial odometer reading.
2. Each time you fill the fuel tank, record
the amount of fuel added.
3. After at least three fill ups, fill the fuel
tank and record the current odometer
reading.
4. Subtract your initial odometer reading
from the current odometer reading.
To calculate L/100 km (liters per 100
kilometers) fuel consumption, multiply the
liters used by 100, then divide by kilometers
traveled. To calculate MPG (miles per
gallon) fuel consumption, divide miles
traveled by gallons used.
Keep a record for at least one month and
record the type of driving, for example city
or highway. This provides an accurate
estimate of your vehicle’s fuel economy
under current driving conditions. Keeping
records during summer and winter shows
how temperature impacts fuel economy.
Conditions
•
Heavily loading your vehicle reduces
fuel economy.
•
Carrying unnecessary weight in your
vehicle may reduce fuel economy.
•
Avoid adding accessories that increase
aerodynamic drag to your vehicle such
as bug deflectors, car top carriers and
ski or bike racks.
•
Using fuel blended with alcohol may
lower fuel economy.
•
Fuel economy may decrease with lower
temperatures.
•
Fuel economy may decrease when
driving short distances.
•
You will get better fuel economy when
driving on flat terrain than when driving
on hilly terrain.
156
Fuel and Refueling
EMISSION LAW
WARNING:
Do not remove or alter
the original equipment floor covering or
insulation between it and the metal floor
of the vehicle. The floor covering and
insulation protect occupants of the
vehicle from the engine and exhaust
system heat and noise. On vehicles with
no original equipment floor covering
insulation, do not carry passengers in a
manner that permits prolonged skin
contact with the metal floor. Failure to
follow these instructions may result in
fire or personal injury.
U.S. federal laws and certain state laws
prohibit removing or rendering inoperative
emission control system components.
Similar federal or provincial laws may
apply in Canada. We do not approve of any
vehicle modification without first
determining applicable laws.
Tampering with emissions
control systems including
related sensors or the Diesel
Exhaust Fluid system can result in reduced
engine power and the illumination of the
service engine soon light.
Tampering With a Noise Control
System
Federal laws prohibit the following acts:
•
Removal or rendering inoperative by
any person other than for purposes of
maintenance.
•
Repair or replacement of any device or
element of the design incorporated into
a new vehicle for the purpose of noise
control prior to its sale or delivery to
the ultimate purchaser or while it is in
use.
•
The use of the vehicle after any person
removes or renders inoperative any
device or element of the design.
The U.S. Environmental Protection Agency
may presume to constitute tampering as
follows:
•
Removal of hood blanket, fender apron
absorbers, fender apron barriers,
underbody noise shields or acoustically
absorptive material.
•
Tampering or rendering inoperative the
engine speed governor, to allow engine
speed to exceed manufacturer
specifications.
If the engine does not start, runs rough,
experiences a decrease in engine
performance, experiences excess fuel
consumption or produces excessive
exhaust smoke, check for the following:
•
A plugged or disconnected air inlet
system hose.
•
A plugged engine air filter element.
•
Water in the fuel filter and water
separator.
•
A clogged fuel filter.
•
Contaminated fuel.
•
Air in the fuel system, due to loose
connections.
•
An open or pinched sensor hose.
•
Incorrect engine oil level.
157
Engine Emission Control
•
Incorrect fuel for climatic conditions.
•
Incorrect engine oil viscosity for
climactic conditions.
Note:
Some vehicles have a lifetime fuel
filter that is integrated with the fuel tank.
Regular maintenance or replacement is not
needed.
Note:
If these checks do not help you
correct the concern, have your vehicle
checked as soon as possible.
Noise Emissions Warranty,
Prohibited Tampering Acts and
Maintenance
On January 1, 1978, Federal regulation
became effective governing the noise
emission on trucks over 10,000 lb
(4,536 kg) Gross Vehicle Weight Rating
(GVWR). The preceding statements
concerning prohibited tampering acts and
maintenance, and the noise warranty
found in the Warranty Guide, are
applicable to complete chassis cabs over
10,000 lb (4,536 kg) GVWR.
CATALYTIC CONVERTER
WARNING:
Do not park, idle or
drive your vehicle on dry grass or other
dry ground cover. The emission system
heats up the engine compartment and
exhaust system, creating the risk of fire.
WARNING:
The normal operating
temperature of the exhaust system is
very high. Never work around or attempt
to repair any part of the exhaust system
until it has cooled. Use special care when
working around the catalytic converter.
The catalytic converter heats up to a very
high temperature after only a short
period of engine operation and stays hot
after the engine is switched off.
WARNING:
Exhaust leaks may
result in entry of harmful and potentially
lethal fumes into the passenger
compartment. If you smell exhaust
fumes inside your vehicle, have your
vehicle inspected immediately. Do not
drive if you smell exhaust fumes.
WARNING:
Do not allow people or
animals in truck beds that have
modifications, such as bed covers or
slide-in campers, when the engine is
running. Exhaust fumes are toxic. Failure
to follow this instruction could result in
personal injury or death.
Your vehicle has various emission control
components and a catalytic converter that
enables it to comply with applicable
exhaust emission standards.
To make sure that the catalytic converter
and other emission control components
continue to work properly:
•
Do not crank the engine for more than
10 seconds at a time.
•
Do not run the engine with a spark plug
lead disconnected.
•
Do not push-start or tow-start your
vehicle. Use booster cables. See
•
Use only the specified fuel listed.
•
Do not switch the ignition off when your
vehicle is moving.
•
Avoid running out of fuel.
•
Have the items listed in scheduled
maintenance information performed
according to the specified schedule.
Note:
Your vehicle warranty does not cover
resulting component damage.
The scheduled maintenance items listed
in scheduled maintenance information are
essential to the life and performance of
your vehicle and to its emissions system.
158
Engine Emission Control

If you use anything other than our parts for
maintenance replacements or for service
of components affecting emission control,
such aftermarket parts should be
equivalent to our genuine parts in
performance and durability.
Illumination of the service engine soon
indicator, charging system warning light or
the temperature warning light, fluid leaks,
strange odors, smoke or loss of engine
power could indicate that the emission
control system is not working properly.
An improperly operating or damaged
exhaust system may allow exhaust to
enter the vehicle. Have a damaged or
improperly operating exhaust system
inspected and repaired immediately.
Do not make any unauthorized changes to
your vehicle or engine. By law, vehicle
owners and anyone who manufactures,
repairs, services, sells, leases, trades
vehicles, or supervises a fleet of vehicles
are not permitted to intentionally remove
an emission control device or prevent it
from working. Information about your
vehicle’s emission system is on the Vehicle
Emission Control Information Decal
located on or near the engine. This decal
also lists engine displacement.
Please consult your warranty information
for complete details.
On-Board Diagnostics (OBD-II)
Your vehicle has a computer known as the
on-board diagnostics system (OBD-II) that
monitors the engine’s emission control
system. The system protects the
environment by making sure that your
vehicle continues to meet government
emission standards. The OBD-II system
also assists a service technician in properly
servicing your vehicle.
When the service engine soon
indicator illuminates, the OBD-II
system has detected a
malfunction. Temporary malfunctions may
cause the service engine soon indicator to
illuminate. Examples are:
1.
Your vehicle has run out of fuel—the
engine may misfire or run poorly.
2. Poor fuel quality or water in the
fuel—the engine may misfire or run
poorly.
3. The fuel fill inlet may not have closed
properly. See
4. Driving through deep water—the
electrical system may be wet.
You can correct these temporary
malfunctions by filling the fuel tank with
good quality fuel, properly closing the fuel
fill inlet or letting the electrical system dry
out. After three driving cycles without these
or any other temporary malfunctions
present, the service engine soon indicator
should stay off the next time you start the
engine. A driving cycle consists of a cold
engine startup followed by mixed city and
highway driving. You do not require
additional vehicle service.
If the service engine soon indicator remains
on, have your vehicle serviced at the first
available opportunity. Although some
malfunctions detected by the OBD-II may
not have symptoms that are apparent,
continued driving with the service engine
soon indicator on can result in increased
emissions, lower fuel economy, reduced
engine and transmission smoothness and
lead to more costly repairs.
159
Engine Emission Control
Readiness for Inspection and
Maintenance (I/M) Testing
Some state and provincial and local
governments may have
Inspection/Maintenance (I/M) programs
to inspect the emission control equipment
on your vehicle. Failure to pass this
inspection could prevent you from getting
a vehicle registration.
If the service engine soon
indicator is on or the bulb does
not work, your vehicle may need
service. See On-Board Diagnostics.
Your vehicle may not pass the I/M test if
the service engine soon indicator is on or
not working properly, for example, the bulb
does not work, or if the OBD-II system has
determined that some of the emission
control systems have not been properly
checked. In this case, the vehicle is not
ready for I/M testing.
If you have just serviced the vehicle’s
engine or transmission or the battery has
recently run down or you have replaced it,
the OBD-II system may indicate that the
vehicle is not ready for I/M testing. To
determine if the vehicle is ready for I/M
testing, turn the ignition key to the on
position for 15 seconds without cranking
the engine. If the service engine soon
indicator blinks eight times, it means that
the vehicle is not ready for I/M testing; if
the service engine soon indicator stays on
solid, it means that your vehicle is ready
for I/M testing.
The OBD-II system checks the emission
control system during normal driving. A
complete check may take several days.
If the vehicle is not ready for I/M testing,
you can perform the following driving cycle
consisting of mixed city and highway
driving:
1.
15 minutes of steady driving on an
expressway or highway followed by 20
minutes of stop-and-go driving with at
least four 30-second idle periods.
2. Allow your vehicle to sit for at least
eight hours with the ignition off. Then,
start the vehicle and complete the
above driving cycle. The vehicle must
warm up to its normal operating
temperature. Once started, do not turn
off the vehicle until the above driving
cycle is complete.
If the vehicle is still not ready for I/M
testing, you need to repeat the above
driving cycle.
160
Engine Emission Control
AUTOMATIC TRANSMISSION
WARNING:
Always fully apply the
parking brake and make sure you shift
into park (P). Failure to follow this
instruction could result in personal injury
or death.
WARNING:
Do not apply the brake
pedal and accelerator pedal
simultaneously. Applying both pedals
simultaneously for more than a few
seconds will limit engine performance,
which may result in difficulty maintaining
speed in traffic and could lead to serious
injury.
Note:
A cold engine has a higher idle
speed. This increases the tendency for your
vehicle to creep when you have selected a
drive gear.
Transmission Selector Lever
Positions
E269654
Park.
P
Reverse.
R
Neutral.
N
Drive.
D
Sport mode and manual shifting.
S
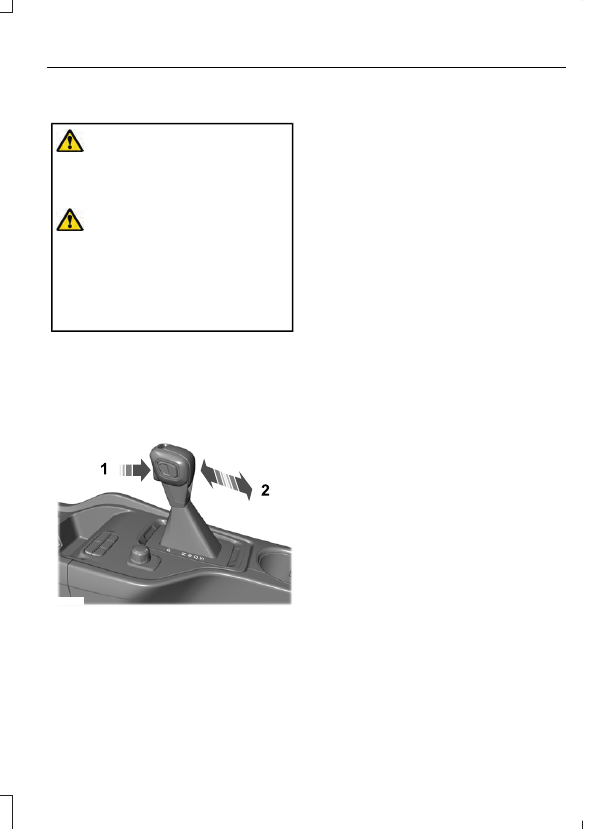
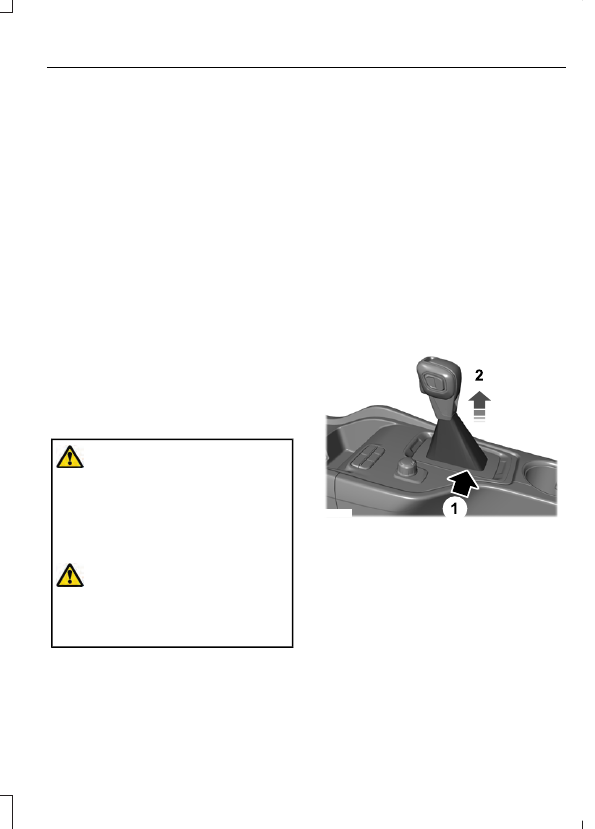
To select a position, depress the button
(1) then pull back on the selector lever (2)
to engage reverse (R), neutral (N) or drive
(D). To select sport mode, first engage
drive (D), depress button (1) and then pull
back on the selector lever (2). The current
gear displays in the instrument panel.
Park (P)
Note:
To move the transmission selector
lever from park (P), apply the brake with
the ignition key in position II.
Note:
An audible warning sounds if you
open the driver door and you have not
moved the selector lever to park (P). The
battery saver deactivates the audible
warning after a period of time.
In this position, there is no power
transmitted to the driven wheels, and the
transmission locks. You can start the
engine with the transmission selector lever
in this position.
Reverse (R)
Shift the selector lever to reverse (R) to
allow your vehicle to move backward.
Neutral (N)
In this position, there is no power
transmitted to the driven wheels, but the
transmission does not lock. You can start
the engine with the transmission selector
lever in this position.
Drive (D)
Drive (D) is the normal driving position for
the best fuel economy and smoothness.
Shift the transmission selector lever to
drive (D) to allow your vehicle to move
forward and shift through the forward
gears.
The transmission shifts to the appropriate
gear for optimum performance based on
ambient temperature, road slope, vehicle
load and your input.
161
Transmission
Sport Mode (S)
Switch on sport mode by shifting the
transmission selector lever to sport (S). In
sport (S), the transmission selects the
optimum gear for best performance. This
gear selection is typically lower than that
of drive (D), and the shifts are faster.
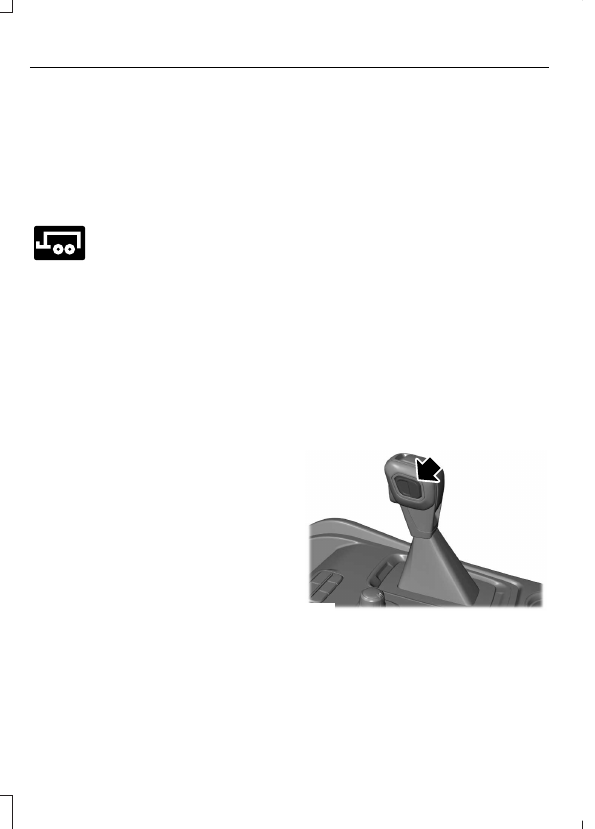
Tow Mode
E246592
To switch on tow mode, press
the button on the center console
until tow mode is active. The
indicator light illuminates in the instrument
cluster when the system becomes active.
The tow mode feature:
•
Moves upshifts to higher engine speeds
to reduce the frequency of
transmission shifting.
•
Provides engine braking in all forward
gears, which slows your vehicle and
assists you in controlling your vehicle
when descending a slope.
•
Depending on driving conditions and
load conditions, may downshift the
transmission, slow your vehicle and
control your vehicle speed when
descending a hill, without pressing the
accelerator pedal. The amount of
downshift braking provided varies
based upon the amount you press the
brake pedal.
The tow mode feature improves
transmission operation when towing a
trailer or a heavy load. All transmission
gear ranges are available when using tow
mode.
To switch off the tow mode feature and
return to normal driving mode, press the
button on the center console twice. The
indicator light turns off when the system
turns off. Tow mode also turns off when
you power down your vehicle.
SelectShift™ Automatic
Transmission
This feature gives you the ability to change
gears up or down as desired.
If the engine speed does not exceed the
maximum allowable limit, the vehicle
allows the downshifts. SelectShift
automatically downshifts at low engine
speeds to prevent engine stalls.
Note:
Engine damage could occur if you
maintain excessive engine revving without
shifting.
SelectShift does not automatically upshift,
even if the engine is approaching the RPM
limit.
For 10 speed transmissions - with the
transmission selector lever in sport (S)
position:
•
Press the (+) button on the
transmission selector lever to upshift.
•
Press the (-) button on the
transmission selector lever to
downshift.
E269656
To exit this mode, return the transmission
selector lever to drive (D).
When your vehicle is stationary, you can
only select the 1st and 2nd gears. Manual
shifting is sequential. Therefore, you
cannot skip gears.
162
Transmission
Progressive Range Selection
This system gives you the ability to lockout
gears from the automatic shifting range.
This could provide you with an improved
driving experience for example, in slippery
conditions or when experiencing a steep
slope.
With the transmission in drive (D), press
the – button to active progressive range
selection. The instrument cluster indicates
the available and selected gears.
All available gears display with the current
gear indicated. Press the – button again to
lock out gears beginning with the highest
gear. For example, press the – button or
twice to lock out 10th and 9th gears. Only
the available gears display, and the
transmission shifts between the available
gears. Press the + button to unlock gears
to allow the transmission to shift to higher
gears. The transmission shifts within the
gear range you select.
Brake-Shift Interlock
WARNING:
When doing this
procedure, you need to take the
transmission out of park (P) which
means your vehicle can roll freely. To
avoid unwanted vehicle movement,
always fully apply the parking brake prior
to doing this procedure. Use wheels
chocks if appropriate.
WARNING:
If the parking brake is
fully released, but the brake warning
lamp remains illuminated, the brakes
may not be working properly. Have your
vehicle checked as soon as possible.
Note:
Some markets disable this feature.
Your vehicle has a feature that prevents
moving the gearshift lever from park (P)
when the ignition is on and you do not
press the brake pedal.
The system requires service if you cannot
move the gearshift lever out of park (P)
with the ignition on and the brake pedal
pressed. It is possible that a fuse has
blown, or your vehicle’s brake lamps are
not operating properly. See
If the fuse has not blown and the brake
lamps are properly working, the following
procedure allows you to move the selector
lever from park (P):
Note:
See an authorized dealer as soon as
possible if you use this procedure.
10 Speed Transmission
Apply the parking brake and switch the
ignition off before performing this
procedure.
E269652
1.
Insert a screwdriver between the shifter
boot material and the trim ring (1) to
release the retainer tabs from the top
panel trim ring.
2. Lift the shifter boot (2) upwards.
163
Transmission
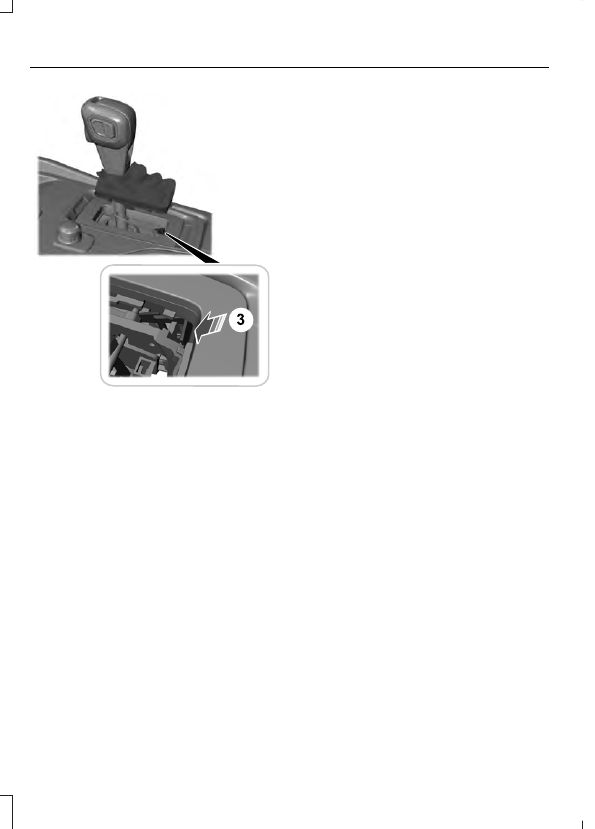
E269653
3. Locate the lower white lever (3) on the
side of the transmission selector lever.
4. Using the screwdriver, move the lower
white lever (3) toward the front of the
transmission selector lever.
5. When holding the lower white lever (3)
in the forward position, move the
transmission selector lever out of the
park (P) position and into another gear.
Automatic Transmission Adaptive
Learning
This feature may increase durability and
provide consistent shift feel over the life
of your vehicle. A new vehicle or
transmission may have firm shifts, soft
shifts or both. This operation is normal and
does not affect function or durability of the
transmission. Over time, the adaptive
learning process fully updates transmission
operation.
If Your Vehicle Gets Stuck in Mud
or Snow
Note:
Do not rock your vehicle if the engine
is not at normal operating temperature or
damage to the transmission could occur.
Note:
Do not rock your vehicle for more
than a minute or damage to the
transmission and tires could occur, or the
engine could overheat.
If your vehicle gets stuck in mud or snow,
you can rock it out by shifting between
forward and reverse gears, stopping
between shifts in a steady pattern. Press
lightly on the accelerator in each gear.
164
Transmission
PRINCIPLE OF OPERATION
The four-wheel drive system in your vehicle
is a part-time system activated using the
rotary switch mounted in the center
console. In normal rear-wheel drive, the 2H
drive operation system directs torque to
the rear axle. Moving the switch to 4H or
4L directs drive torque to both the front
and rear axles, providing four-wheel drive.
Depending on your vehicle, further
four-wheel drive options may be available
on the switch panel located on the center
console.
USING FOUR-WHEEL DRIVE
Note:
There is additional important
information regarding the safe operation of
this type of vehicle in this manual. See
Note:
Do not use 4H or 4L modes on dry,
hard surfaced roads. Doing so can produce
excessive noise, increase tire wear and could
damage drive components. We intend 4H
or 4L modes only for consistently slippery
or loose surfaces. Use of 4L mode on these
surfaces could produce some noise, such
as occasional clunks, but should not
damage drive components.
Note:
When you select 4L when your
vehicle is moving, it does not perform a shift
until your vehicle is stationary. This is normal
and is no reason for concern.
Note:
You can switch on and switch off the
electronic locking differential by pressing
the locking differential button. See
Electronic Locking Differential
4WD Indicator Lights
Note:
When a 4X4 system fault is present,
the system typically remains in whichever
4X4 mode you selected prior to the fault
condition occurring. It should never default
to 4X2. When the warning displays, have
your vehicle serviced by an authorized
dealer.
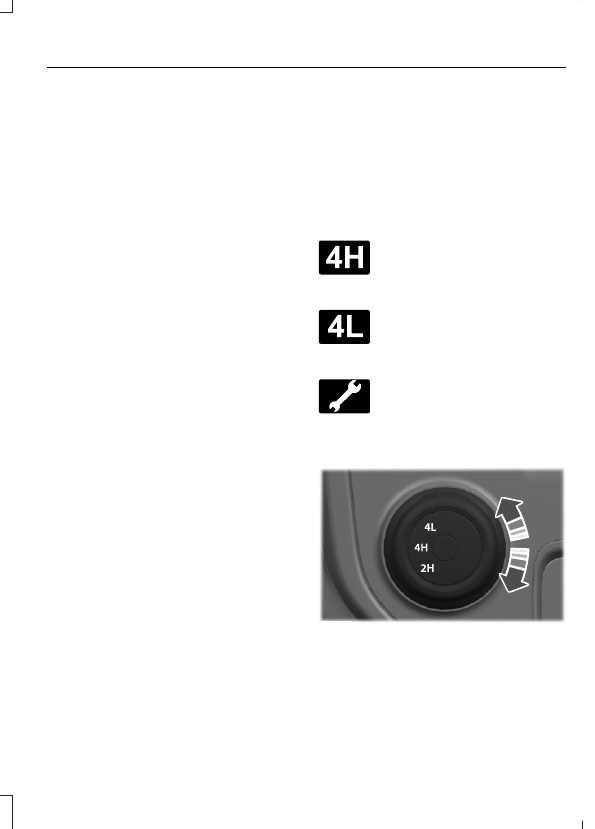
4X4 HIGH
E181779
Continuously illuminates when
you select 4H.
4X4 LOW
E181780
Continuously illuminates when
you select 4L.
CHECK 4X4
Displays when a 4X4 fault is
present.
Using the Electronic Shift on the
Fly 4WD system
E277079
2H (4X2)
For general on-road driving, this mode
provides optimal smoothness and fuel
economy. Sends power to the rear wheels
only.
165
Four-Wheel Drive
(If Equipped)
Note:
2H may engage or disengage based
on terrain mode selection. See
4H (4X4 HIGH)
Provides mechanically locked four-wheel
drive power to both the front and rear
wheels for use in off-road or winter
conditions such as deep snow, sand or
mud. This mode is not for use on dry
pavement.
Note:
4H may engage or disengage based
on terrain mode selection. See
4L (4X4 LOW)
Provides mechanically locked four-wheel
drive power to both the front and rear
wheels with additional gearing for
increased torque multiplication. Intended
only for off-road applications such as deep
sand, steep slopes, or pulling heavy
objects.
Note:
4L may engage or disengage based
on terrain mode selection. See
Shifting Between 4WD System Modes
Note:
Momentarily releasing the accelerator
pedal when performing a shift aids the
performance of engagement or
disengagement.
Note:
Do not perform this operation if the
rear wheels are slipping, or when applying
the accelerator pedal.
Note:
It is normal to hear some noise as the
system shifts or engages.
You can move the control between 2H to
4H at a stop or when driving up to 68 mph
(110 km/h). The information display may
display a message indicating a 4X4 shift
and the LED for the selected mode flashes.
Once the shift is complete, the LED light
for the selected mode remains illuminated.
Shifting To or From 4L (4X4 Low)
Note:
It is normal to hear some noise as the
system shifts or engages.
1.
Stop your vehicle when it is safe to do
so.
2. Place the transmission in neutral (N).
3. Move the transfer shift switch to the
desired position.
The information display displays a
message indicating a 4X4 shift is in
progress followed by the system mode
selected. If any of the above shift
conditions are not present, the shift does
not occur and the information display
shows information guiding you through the
proper shifting procedures.
How Your Vehicle Differs From
Other Vehicles
WARNING:
Vehicles with a higher
center of gravity (utility and four-wheel
drive vehicles) handle differently than
vehicles with a lower center of gravity
(passenger cars). Avoid sharp turns,
excessive speed and abrupt steering in
these vehicles. Failure to drive cautiously
increases the risk of losing control of your
vehicle, vehicle rollover, personal injury
and death.
Truck and utility vehicles can differ from
some other vehicles. Your vehicle may be
higher to allow it to travel over rough
terrain without getting hung up or
damaging underbody components.
The differences that make your vehicle so
versatile also make it handle differently
than an ordinary passenger car.
166
Four-Wheel Drive
(If Equipped)
Нет комментариевНе стесняйтесь поделиться с нами вашим ценным мнением.
Текст