Ford Bronco (2022 year). Manual in english — page 18

Driving In Sand
When driving over sand, try to keep all four
wheels on the most solid area of the trail.
Drive through the terrain without varying
vehicle speed. Apply the accelerator and
avoid excessive wheel slip.
Use the vehicle's momentum to maintain
forward motion in sand. Avoid coming to
a stop on steep sand slopes as the vehicle
may not be able to continue forward after
it has stopped.
Driving In Mud
Be cautious of sudden changes in vehicle
speed or direction when you are driving in
mud.
Even four-wheel drive vehicles can lose
traction in slick mud. If your vehicle does
slide, steer in the direction of the slide until
you regain control of your vehicle.
After driving through mud, clean off residue
stuck to the wheels and tires and rotating
driveshafts. Excess mud stuck on the
wheels and tires and rotating driveshafts
can cause an imbalance that could
damage drive components.
Note:
The vehicle brakes are less effective
when wet or muddy.
Driving Over Rocks and Gravel
Gravel is a constantly changing, low-grip
surface. Driving at slow speeds on gravel
reduces the risk of losing traction when you
stop, accelerate or turn a corner.
When approaching large rocks, position
the vehicle so that the tires pass over the
largest obstacle.
Note:
Never attempt to straddle a rock that
is large enough to strike your axles or
undercarriage.
Note:
Never attempt to drive over a rock
which is large enough to contact the door
sills if your vehicle does not have rock rails.
If you lose traction on your wheels facing
uphill, stop and choose a more suitable
route.
Leave a generous gap between your
vehicle and other vehicles to minimize the
risk of damage from flying gravel. Avoid
dust clouds as they reduce visibility.
Before navigating on uneven ground,
secure anything inside the vehicle. If
possible, remove any roof-rack items. Use
the lowest gear possible and approach the
obstacle at a slow speed.
If your vehicle begins to slide down a slope,
steer downhill and gently apply the
throttle. If you lose traction on your uphill
wheels, stop immediately and choose a
more suitable route.
Approach logs, rocky steps or ditches
diagonally. Keep at least three wheels on
the ground at all times.
Climbing A Hill
WARNING:
Extreme care should
be used when steering the vehicle in
reverse down a slope so as not to cause
the vehicle to swerve out of control.
Although natural obstacles can make it
necessary to travel diagonally up or down
a hill or steep incline, try to drive straight
up or straight down.
Note:
Avoid turning on steep slopes or
hills. A danger lies in losing traction, slipping
sideways and possible vehicle roll over.
Whenever driving on a hill, you must first
determine the route you can use.
When climbing a steep slope or hill, start
in a lower gear rather than downshifting to
a lower gear from a higher gear. This
reduces strain on the engine and the
possibility of stalling.
292
Driving Hints

If your vehicle stalls, do not try to turn
around because this could cause your
vehicle to roll over. It is better to reverse
back to a safe location.
Do not drive over the crest of a hill without
seeing what conditions are on the other
side. Do not drive in reverse over a hill
without the aid of an observer.
If the vehicle is unable to make it up the
hill, do not attempt to turn back down the
slope.
Apply the accelerator just enough for the
wheels to climb the hill.
Note:
Too much acceleration can cause
the tires to slip, spin or lose traction,
resulting in loss of vehicle control.
Descending A Hill:
•
Use the same gear you would use to
climb the hill.
•
Do not descend in neutral.
•
Disengage overdrive.
•
Avoid sudden and excessive braking.
Note:
The front wheels have to be turning
in order to steer your vehicle.
When descending a steep hill in a manual
transmission vehicle do not leave the
vehicle in gear with the clutch pressed. This
could cause damage to your driveline.
Driving Through Water
WARNING:
Do not attempt to
cross a deep, fast flowing body of water.
Failure to follow this instruction could
result in the loss of control of your
vehicle, personal injury or death.
As the water depth increases, you must
reduce your vehicle speed to avoid
potential vehicle damage.
The key to a safe crossing is the water
depth, current and bottom of the water's
condition. On soft bottoms, the vehicle
sinks in, effectively increasing the water
level on the vehicle. Make sure to consider
this when determining the depth of water.
Determine the depth and speed of the
current before attempting a water crossing.
Be aware that obstacles and debris may
be beneath the water’s surface.
Note:
Cross flowing water at an angle
heading slightly upstream.
Note:
You should tread lightly and avoid
damage to the environment.
Drive slowly when crossing water. Proceed
with a constant slow speed lightly pressing
on the accelerator.
Drive through the water very slowly when
entering, then build up momentum. Keep
your vehicle moving at a steady pace.
Note:
Do not try to accelerate through the
water crossing.
When driving too fast in water or through
deep water, the engine, transmission,
transfer case, axles, electrical components
or vehicle interior could ingest water. Water
can cause permanent damage that may
not be covered by your vehicle warranty.
See
Driving Through Water Limitations
Note:
Failure to follow the recommended
speeds can result in vehicle damage.
Never stop or shut a vehicle off when
crossing deep water unless your vehicle
ingested water into the engine air intake.
If the engine stalls, do not attempt to
restart it.
Ease off the accelerator as you reach the
other side to diminish the front wave. Apply
the accelerator slowly and as necessary
to climb out of the other side.
293
Driving Hints

Muddy waters can reduce the cooling
system effectiveness by depositing debris
into the radiator.
Extra care must be taken crossing any type
of water. Do not drive into water unless
necessary. You should only drive through
areas that are designated and approved.
High currents even in shallow water can
wash the dirt out from around your tires or
push your vehicle across slippery rocks or
surfaces.
Never attempt to cross flowing water that
is deeper than your vehicles ground
clearance. Even in low currents your
vehicles body surface area can be pushed
downstream and out of control.
Do not cross any body of water that is fast
flowing and rising, wait for the flow rate to
reduce.
Determine exit points that are downstream
of your entry point to allow for drifting.
If there are other vehicles ahead, wait until
they’ve left the water. Unsettled water can
make a safe passage more challenging.
Know your vehicle’s abilities and be able
to recover it if something goes wrong.
Keep the doors fully closed during a water
crossing.
Vehicles used to traverse water regularly
should be periodically inspected for signs
of water ingestion in all of the vehicle's
fluids. If water is found inside your vehicle
fluids, service your vehicle or see an
authorized dealer.
After driving through water and as soon as
it is safe to do so, check the brakes, horn,
lights, and steering wheel to make sure
everything is still in working order.
Avoid Getting High-Centered
Always keep available ground clearance
in mind and pick a route that minimizes the
risk of catching the underside of the vehicle
on an obstacle and getting high-centered.
Freeing A Stuck Vehicle
WARNING:
Do not spin the wheels
at over 34 mph (55 km/h). The tires may
fail and injure a passenger or bystander.
Recovery hooks are mounted to the
vehicle's structure and are used to pull out
the vehicle from a surface or location when
stuck. Recover your vehicle using various
towing apparatus attached to your
recovery hook such as winch, open hook,
or strap.
Note:
Do not use recovery hooks to
recreationally tow your vehicle. See
Recreationally Towing Your Vehicle
If your vehicle gets stuck in mud or snow,
you may rock it out by shifting between
forward and reverse gears, stopping
between shifts in a steady pattern. Press
the accelerator in each gear.
Note:
Do not rock your vehicle if the engine
is not at normal operating temperature
damage to the transmission may occur.
Note:
Do not rock your vehicle for more
than a minute damage to the transmission
and tires may occur or the engine may
overheat.
If you are unable to free your vehicle call
roadside assistance. See
294
Driving Hints
Crossing A Ravine, Gully, Ditch,
Washout Or Rut
Review the path ahead before attempting
to cross any obstacle. Review the obstacle
from outside the vehicle for an
understanding of the terrain condition in
front of and behind the obstacle. Approach
obstacles slowly and inch the vehicle over.
Ditches and washouts should be crossed
at a 45 degree angle when possible.
Driving Over Logs
Review the path ahead before attempting
to cross any obstacle. Review the obstacle
from outside the vehicle for an
understanding of the terrain condition in
front of and behind the obstacle.
Approach obstacles slowly and inch the
vehicle over, approaching at a 15 degree
angle.
Note:
It is best to have a front tire on top of
the log when the other begins to climb over.
If a large obstacle near the log such as a
rock cannot be avoided, choose a path that
places the rock directly under the tire
rather than the undercarriage of the
vehicle. This helps prevent damage to the
vehicle.
DRIVING YOUR VEHICLE AT HIGH
SPEEDS
Before off-road driving in unfamiliar areas
at high speeds, do a low speed
reconnaissance run to become aware of
any obstacles that you could encounter.
Your vehicle can incur damage if driven
beyond its capabilities. Skid plates and
rock rails are designed to help limit
damage to vital components and exterior
finishes, but cannot prevent all damage if
driven in extreme off-road conditions.
Damage to skid plates, rock rails and
exterior finishes as well as bent, cracked
or broken body, frame and chassis
components may not be covered by
warranty.
It is important that you take the time to
become familiar with the controls and
dynamics of your vehicle before
attempting higher speed off-road driving.
Some points to consider:
•
Slowly build up speed. Initially, drive at
a speed that allows ample time to fully
assess the terrain around you and to
understand how the vehicle responds
to both the terrain and your inputs.
Increase speed as comfort increases,
being mindful of how the vehicle
responds to various conditions at
different speeds.
•
Find a wide open place to experiment
with different functions on your vehicle
and different driving techniques. Try a
given maneuver with different
functions, such as drive modes,
four-wheel drive modes or switching
the electronic locking differential on
and off and see how your vehicle
responds. If the vehicle is tending to
push straight ahead when trying to
negotiate a turn, a light application of
the brake when turning could help turn
your vehicle. A wider entry to a corner
or entering a corner more slowly could
help your vehicle turn and allow you to
apply the throttle sooner after
negotiating the turn.
295
Driving Hints
•
As speed increases, look farther ahead
of the vehicle so that there is time to
react to oncoming obstacles.
Remember that in many off-road
environments, obstacles can be hard
to see until they are relatively near. A
good strategy is to alternate between
looking far ahead and up closer to the
front of your vehicle when driving.
•
Remember that you may not be the
only one in a particular recreational
area. Be aware of others in your area.
This is especially true of motorcycles
and all-terrain vehicles that may be
more difficult to spot than a full-sized
vehicle.
•
When driving in desert conditions, the
midpoint of the day is the most difficult
time to see many of the small ridges
and dips due to flat shadows from the
sun being at its highest point. Extreme
care should be taken at these times.
•
We encourage you to switch on
off-road modes for off-road driving.
See
DRIVING THROUGH WATER
LIMITATIONS
Maximum Wading
Depth
Model
31.5 in (800 mm)
Vehicles without
the Sasquatch
Package.
33.5 in (850 mm)
Vehicles with the
Sasquatch
Package.
When you are driving through water do not
exceed 4 mph (7 km/h).
OFF-ROAD DRIVING AIDS
Selecting an Off-Road G.O.A.T
Mode
Using the appropriate drive mode increases
your vehicle's control. See
Note:
Drive modes are selected by using
the Goes Over Any-type of Terrain
G.O.A.T.
MODES
controller.
Using Four-Wheel Drive
Your vehicle has a four-wheel drive system
that offers various modes to help you
optimize traction on any off-road surface.
See
Using the Stabilizer Bar
Disconnect
The stabilizer bar disconnect improves
suspension articulation, improving traction
and comfort in rough terrain.
The vehicle's disconnect system is
hydraulically actuated.
Your vehicle is capable of disconnecting
under high load. Your vehicle is also
capable of reconnecting under all
conditions.
It is not necessary for the vehicle to be on
level ground in order to reconnect the
stabilizer bar. See
Using the Cameras Off-Road
Use the 360 degree camera to enhance
your off-road experience. See
296
Driving Hints

Using the Front and Rear
Differential Lock
When engaged, the front and rear
differential lock provides additional
traction to your vehicle by forcing either
the two rear wheels or two front wheels to
turn at the same speed.
You can activate and deactivate the front
and rear differential lock on the fly within
the operating speed range. See
Using Trail Control
The system works in a similar manner to
cruise control in off-road conditions. Trail
Control provides you the ability to
maneuver the vehicle without using the
throttle and brake pedals.
Trail Control allows you to set a speed
between 1 mph (1.6 km/h) to 14 mph
(23 km/h) in a forward motion and 1 mph
(1.6 km/h) to 5 mph (8 km/h) in reverse.
The system controls acceleration and
braking in difficult off-road environments,
which allows you to focus on steering. See
Trail Control Performance:
•
Manages wheel slip to maximize
traction.
•
Removes the need for you to use both
feet when driving in off-road situations.
•
Provides braking to maximize traction
in descents.
•
Gives you confidence in difficult
environments.
Using Trail One Pedal Drive
Trail one pedal drive coordinates
propulsive and braking torque through your
application of the accelerator pedal to
simulate a two footed driving technique.
Use this when driving over large obstacles,
such as rocks or logs, to help maintain a
constant vehicle speed.
In 4H, the system offers lift pedal braking
and auto hill hold functionality. See
Note:
Trail one pedal drive is only available
when the vehicle is in 4H or 4L.
Using Trail Turn Assist
The feature reduces the turn radius of the
vehicle on off-road surfaces.
The system reduces driver effort to
negotiate difficult off-road terrain by
allowing the vehicle to make a tight turn
in a single maneuver that might otherwise
require a three point turn. See
Note:
Trail turn assist is only available when
the vehicle is in 4H or 4L.
Note:
Trail turn assist cannot activate if the
rear differential is locked.
What Are Rock Rails
(If Equipped)
Rock rails protect the rocker and body side
from damage and provide a sliding surface
to allow the vehicle to cross boulders and
rock ledges.
Rock rails also can act as a pivot point to
sharply turn the vehicle in tight spaces with
high walls or rocks present.
AFTER DRIVING YOUR VEHICLE
OFF-ROAD
WARNING:
After off-road use,
before returning to the road, check the
wheels and tires for damage. Off-road
use may cause damage to your wheels
and tires that can lead to tire failure, loss
of vehicle control, serious injury or death.
297
Driving Hints
Driving off-road places more stress on your
vehicle than most on-road driving. After
driving off-road, check for damage to the
wheels, chassis and underbody.
Inspect the underbody of your vehicle by
checking tires, body structure, steering,
suspension, and exhaust system for
damage.
Inspect the tires for any cuts in the tread
or sidewall area. Also inspect the sidewall
for any bulge indicating damage to the tire.
Make sure the tires are inflated to proper
tire pressure as indicated on the tire
placard.
Check the radiator for mud and debris and
clean as needed.
Check that the air filter is clean and dry.
Remove accumulations of plants or brush.
These things could be a fire hazard or hide
damage to the fuel lines, brake hoses and
propeller shafts.
Make sure the grille and radiator are clear
of any obstructions that may affect
cooling.
After extended operation in mud, sand,
water, or similar dirty conditions, inspect
the wipers and washers to make sure they
are working.
Note:
Mud caked windows are hard to see
through and can damage wiper blades or
motor.
Check wipers for debris or anything that
may scratch the windshield.
If you experience unusual vibration after
driving in mud, slush or similar conditions,
check the wheels for impacted material.
Impacted material can cause vibrations
when driving and wheel imbalance.
Remove the material to reduce the
vibration.
Note:
If you have removed the impacted
material from the wheels and your vehicle
still has a vibration check your vehicle for
damage or see an authorized dealer.
Inspect the exhaust system for damage or
looseness.
Make sure that the brakes are in proper
working order and free of any mud, stones
and debris, which can become trapped
around the brake rotor, backing plate and
caliper.
Inspect the wheels for dents, cracks, or
other damage.
Inspect undercarriage fasteners. If any are
loose or damaged, tighten or replace
ensuring that the proper torque
specification is used.
Inspect for torn or punctured boots on ball
joints, half shafts, steering gears.
Refit the front license plate if removed
previously.
COLD WEATHER
PRECAUTIONS
The functional operation of some
components and systems can be affected
at temperatures below approximately
-13°F (-25°C).
BREAKING-IN
Your vehicle requires a break-in period. For
the first 1,000 mi (1,600 km), avoid driving
at high speeds, heavy braking, aggressive
shifting or using your vehicle to tow. During
this time, your vehicle may exhibit some
unusual driving characteristics.
298
Driving Hints
DRIVING ECONOMICALLY
The following helps to improve fuel
consumption:
•
Drive smoothly, accelerate gently and
anticipate the road ahead to avoid
heavy braking.
•
Regularly check your tire pressures and
make sure that they are inflated to the
correct pressure.
•
Follow the recommended maintenance
schedule and carry out the
recommended checks.
•
Plan your journey and check the traffic
before you set off. It is more efficient
to combine errands into a single trip
whenever possible.
•
Avoid idling the engine in cold weather
or for extended periods. Start the
engine only when you are ready to set
off.
•
Do not carry unnecessary weight in your
vehicle as extra weight wastes fuel.
•
Do not add unnecessary accessories
to the exterior of your vehicle, for
example running boards. If you use a
roof rack, remember to fold it down or
remove it when not in use.
•
Do not shift into neutral when you are
braking or when your vehicle is slowing
down.
•
Shut all windows when driving at high
speeds.
•
Switch off all electric systems when
not in use, for example air conditioning.
Make sure that you unplug any
accessories from the auxiliary power
points when not in use.
FLOOR MATS
WARNING:
Use a floor mat
designed to fit the footwell of your
vehicle that does not obstruct the pedal
area. Failure to follow this instruction
could result in the loss of control of your
vehicle, personal injury or death.
WARNING:
Pedals that cannot
move freely can cause loss of vehicle
control and increase the risk of serious
personal injury.
WARNING:
Secure the floor mat
to both retention devices so that it
cannot slip out of position and interfere
with the pedals. Failure to follow this
instruction could result in the loss of
control of your vehicle, personal injury or
death.
WARNING:
Do not place additional
floor mats or any other covering on top
of the original floor mats. This could
result in the floor mat interfering with the
operation of the pedals. Failure to follow
this instruction could result in the loss of
control of your vehicle, personal injury or
death.
WARNING:
Always make sure that
objects cannot fall into the driver foot
well while your vehicle is moving. Objects
that are loose can become trapped
under the pedals causing a loss of
vehicle control.
299
Driving Hints
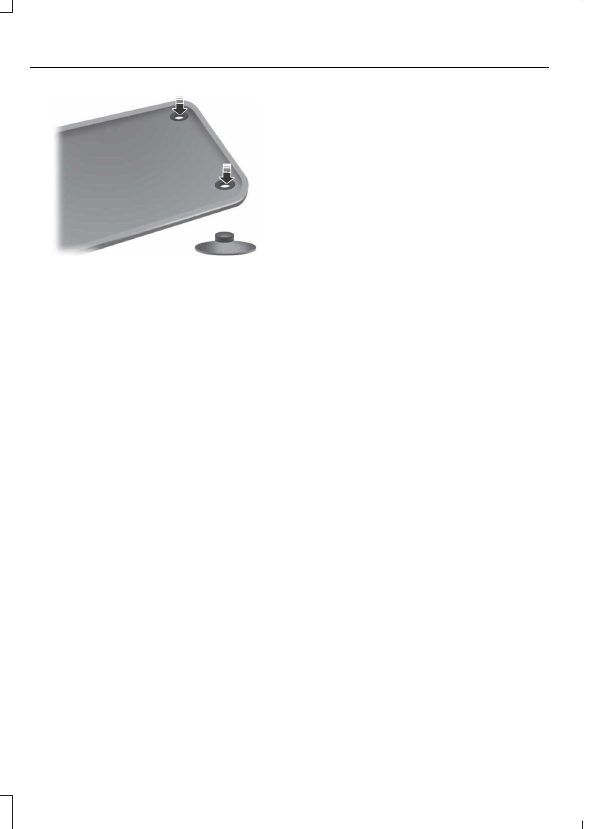
E142666
To install floor mats that have eyelets,
position the floor mat eyelet over the
retention post and press down to lock in
position. Repeat for all eyelets on the floor
mat.
To remove the floor mats, reverse the
installation procedure.
Note:
Regularly check the floor mats to
make sure they are secure.
300
Driving Hints
ROADSIDE ASSISTANCE
Vehicles Sold in the United States:
Getting Roadside Assistance
To fully assist you should you have a
vehicle concern, Ford Motor Company
offers a complimentary roadside
assistance program. This program is
separate from the New Vehicle Limited
Warranty.
The service is available:
•
24 hours a day, seven days a week.
•
For the coverage period supplied with
your vehicle.
Roadside Assistance covers:
•
A flat tire change with a good spare
(except vehicles supplied with a tire
inflation kit).
•
Battery jump start.
•
Lock-out assistance (key replacement
cost is the customer's responsibility).
•
Fuel delivery — independent service
contractors, if not prohibited by state,
local or municipal law, shall deliver up
to 2 gal (8 L) of gasoline or 5 gal (20 L)
of diesel fuel to a disabled vehicle.
Roadside assistance limits fuel delivery
service to two no-charge occurrences
within a 12-month period.
•
Winch out — available within 100 ft
(30 m) of a paved or county
maintained road, no recoveries.
•
Towing — independent service
contractors, if not prohibited by state,
local or municipal law, shall tow Ford
eligible vehicles to an authorized dealer
within 35 mi (56 km) of the
disablement location or to the nearest
authorized dealer. If a member
requests a tow to an authorized dealer
that is more than 35 mi (56 km) from
the disablement location, the member
shall be responsible for any mileage
costs in excess of 35 mi (56 km).
•
Roadside Assistance includes up to
$200 for a towed trailer if the disabled
eligible vehicle requires service at the
nearest authorized dealer. If the towing
vehicle is operational but the trailer is
not, then the trailer does not qualify for
any roadside services.
Vehicles Sold in the United States:
Using Roadside Assistance
Complete the roadside assistance
identification card and place it in your
wallet for quick reference. This card is in
the Owner's Manual kit.
United States vehicle customers who
require Roadside Assistance, call
1-800-241-3673.
If you need to arrange roadside assistance
for yourself, Ford Motor Company
reimburses a reasonable amount for
towing to the nearest dealership within
35 mi (56 km). To obtain reimbursement
information, United States vehicle
customers call 1-800-241-3673.
Customers need to submit their original
receipts.
301
Crash and Breakdown Information
Vehicles Sold in Canada: Getting
Roadside Assistance
To fully assist you should you have a
vehicle concern, Ford Motor Company of
Canada, Limited offers a complimentary
roadside assistance program. This
program is eligible within Canada or the
continental United States.
The service is available 24 hours a day,
seven days a week.
This program is separate from the New
Vehicle Limited Warranty, but the coverage
is concurrent with the powertrain coverage
period of your vehicle. Canadian roadside
coverage and benefits may differ from the
U.S. coverage.
If you require more information, please call
us in Canada at 1-800-665-2006, or visit
our website at
SWITCHING THE HAZARD
FLASHERS ON AND OFF
The hazard flasher button is on
the instrument panel. Press the
button to switch the hazard
flashers on if your vehicle is creating a
safety hazard for other road users.
When you switch the hazard flashers on,
all front and rear direction indicators flash.
Note:
The hazard flashers operate when
the ignition is in any position, or if the key is
not in the ignition. The battery loses charge
and could have insufficient power to restart
your vehicle.
Press the button again to switch them off.
JUMP STARTING THE VEHICLE
JUMP STARTING PRECAUTIONS
WARNING:
Batteries normally
produce explosive gases which can
cause personal injury. Therefore, do not
allow flames, sparks or lighted
substances to come near the battery.
When working near the battery, always
shield your face and protect your eyes.
Always provide correct ventilation.
WARNING:
Keep batteries out of
reach of children. Batteries contain
sulfuric acid. Avoid contact with skin,
eyes or clothing. Shield your eyes when
working near the battery to protect
against possible splashing of acid
solution. In case of acid contact with skin
or eyes, flush immediately with water for
a minimum of 15 minutes and get prompt
medical attention. If acid is swallowed,
call a physician immediately.
WARNING:
Use only adequately
sized cables with insulated clamps.
WARNING:
Make sure that the
cables are clear of any moving parts and
fuel delivery system parts.
WARNING:
Connect batteries with
only the same nominal voltage.
WARNING:
If the engine is running
while the hood is open, stay clear of
moving engine components. Failure to
follow this warning could result in serious
personal injury or death.
Do not attempt to push-start an automatic
transmission vehicle. This could cause
transmission damage.
302
Crash and Breakdown Information
Do not disconnect the battery of the
disabled vehicle. This could damage your
vehicle's electrical system.
PREPARING THE VEHICLE
Use only a 12 volt supply to start your
vehicle.
Park the booster vehicle close to the hood
of the disabled vehicle, making sure the
two vehicles do not touch.
JUMP STARTING THE VEHICLE
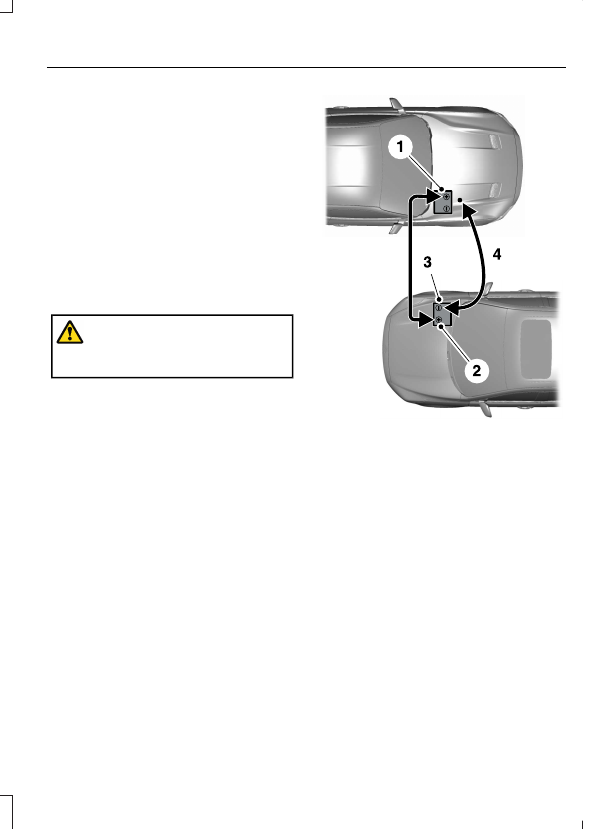
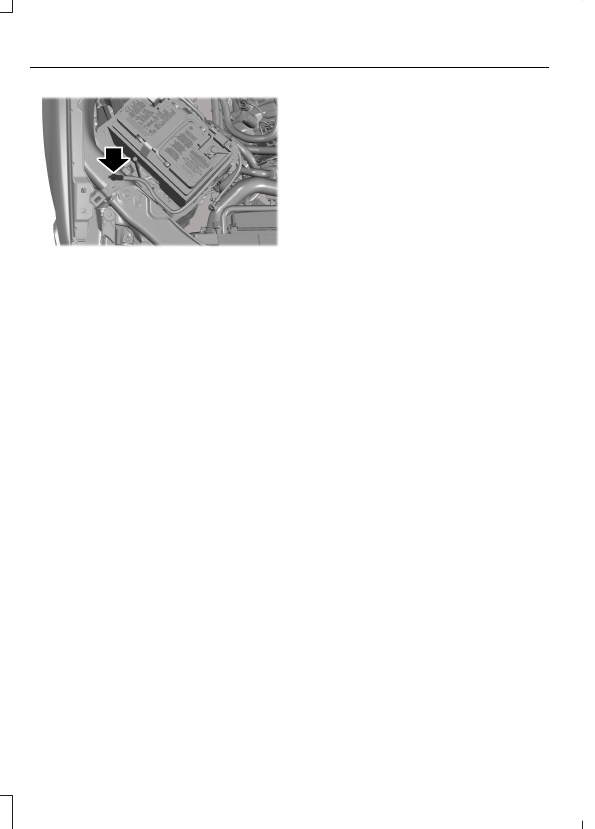
Connecting the Jumper Cables
WARNING:
Do not connect the
negative jumper cable to any other part
of your vehicle. Use the ground point.
Note:
If you are using a jump pack or
booster box, follow the manufacturer's
instructions.
E281345
1.
Pull the red plastic boot backward.
Connect the positive (+) jumper cable
to the positive (+) terminal of the
discharged battery.
2. Connect the other end of the positive
(+) jumper cable to the positive (+)
terminal of the booster vehicle battery.
3. Connect the negative (-) jumper cable
to the negative (-) terminal of the
booster vehicle battery.
4. Make the final connection of the
negative (-) jumper cable to an
exposed metal part of the disabled
vehicle's engine, as shown in the
following illustration, away from the
battery and fuel injection system, or
connect the negative (-) jumper cable
to a ground connection point if
available.
303
Crash and Breakdown Information
E309115
Starting the Engine
1.
Start the engine of the booster vehicle
and moderately rev the engine, or
gently press the accelerator to keep
the engine speed between 2000 and
3000 RPM, as shown in your
tachometer.
2. Start the engine of the disabled vehicle.
3. Once you start the disabled vehicle, run
both vehicle engines for an additional
three minutes before disconnecting the
jumper cables.
Removing the Jumper Cables
Remove the jumper cables in the reverse
order that they were connected.
Note:
Do not switch the headlamps on
when disconnecting the cables. The peak
voltage could blow the bulbs.
POST-CRASH ALERT SYSTEM
WHAT IS THE POST-CRASH
ALERT SYSTEM
The system helps draw attention to your
vehicle in the event of a serious impact.
HOW DOES THE POST-CRASH
ALERT SYSTEM WORK
The system is designed to turn the hazard
flashers on and to intermittently sound the
horn in the event of a serious impact that
deploys an airbag or the seatbelt
pretensioners.
POST-CRASH ALERT SYSTEM
LIMITATIONS
Depending on applicable laws in the
country your vehicle was built for, the horn
does not sound in the event of a serious
impact.
SWITCHING THE POST-CRASH
ALERT SYSTEM OFF
Press the hazard flasher switch or the
unlock button on the remote control to
switch the system off.
Note:
The alert turns off when the vehicle
battery runs out of charge.
POST IMPACT BRAKING
HOW DOES POST IMPACT
BRAKING WORK
In the event of a moderate to severe crash,
the braking system reduces the vehicle’s
speed in order to prevent or reduce the
impact of a potential secondary crash.
POST IMPACT BRAKING
LIMITATIONS
Post impact braking does not activate if
any of the following occur:
•
The anti-lock braking system is
damaged during the collision.
•
Electronic stability control is disabled.
304
Crash and Breakdown Information

OVERRIDING POST IMPACT
BRAKING
You can override post impact braking by
pressing the brake or accelerator pedal.
POST IMPACT BRAKING
INDICATORS
E138639
It flashes when a post impact
braking event is occurring.
AUTOMATIC CRASH SHUTOFF
WHAT IS AUTOMATIC CRASH
SHUTOFF
The automatic crash shutoff is designed
to stop the fuel going to the engine in the
event of a moderate or severe crash.
Note:
Not every impact causes a shutoff.
AUTOMATIC CRASH SHUTOFF
PRECAUTIONS
WARNING:
If your vehicle has been
involved in a crash, have the fuel system
checked. Failure to follow this instruction
could result in fire, personal injury or
death.
RE-ENABLING YOUR VEHICLE
1.
Switch the ignition off.
2. Attempt to start your vehicle.
3. Switch the ignition off.
4. Attempt to start your vehicle.
Note:
If your vehicle does not start after the
third attempt, have your vehicle checked as
soon as possible.
RECOVERY TOWING
ACCESSING THE FRONT TOWING
POINT
WARNING:
Using recovery hooks
is dangerous and should only be done by
a person familiar with proper vehicle
recovery safety practices. Improper use
of recovery hooks may cause hook failure
or separation from the vehicle and could
result in serious injury or death.
WARNING:
Slowly remove the
slack from the recovery strap prior to
pulling. Failure to do so can introduce
significantly higher loads which can
cause the recovery hooks to break off, or
the recovery strap to fail which can cause
serious injury or death.
WARNING:
Never link two straps
together with a clevis pin. These heavy
metal objects could become projectiles
if the strap breaks and can cause serious
injury or death.
E357173
Front recovery hooks.
A.
305
Crash and Breakdown Information
Note:
Do not apply a load to the recovery
hooks that is greater than the gross vehicle
weight rating of your vehicle.
Before using recovery hooks:
•
Make sure all attaching points are
secure and capable of withstanding
the applied load.
•
Do not use chains, cables or tow straps
with metal hook ends.
•
Only use recovery straps that have a
minimum breaking strength two to
three times the gross vehicle weight of
the stuck vehicle.
•
Make sure the recovery strap is in good
condition and free of visible cuts, tears
or damage.
•
Use a damper device such as a tarp,
heavy blanket or piece of carpet, and
place it over the recovery strap to help
absorb the energy in the event the
strap breaks.
•
Make sure the stuck vehicle is not
loaded heavier than its gross vehicle
weight rating specified on the
certification label.
•
Align the tow vehicle and stuck vehicle
in a straight line, within 10 degrees.
•
Keep bystanders to the sides of the
vehicle, at a distance of at least twice
the length of the recovery strap. This
helps avoid injury from the hazard of a
recovery hook or strap breaking, or a
vehicle lurching into their path.
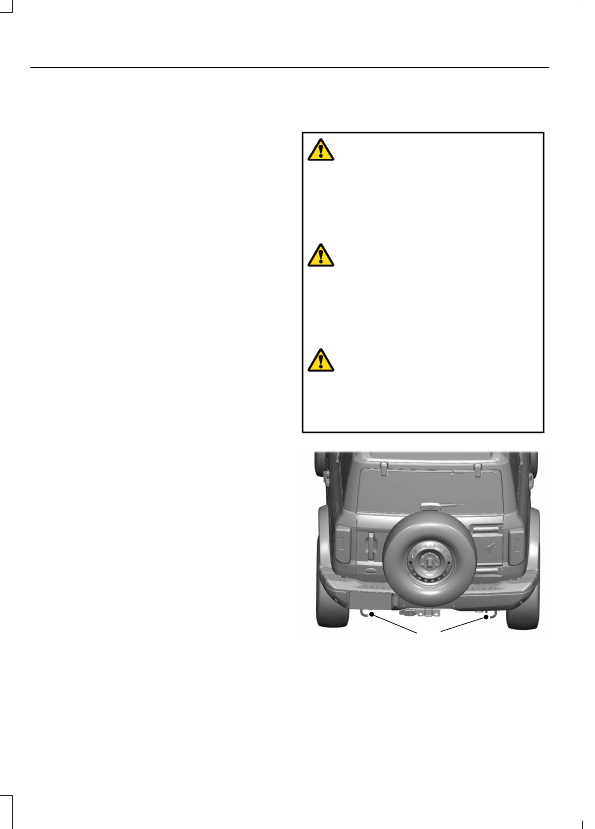
ACCESSING THE REAR TOWING
POINT
WARNING:
Using recovery hooks
is dangerous and should only be done by
a person familiar with proper vehicle
recovery safety practices. Improper use
of recovery hooks may cause hook failure
or separation from the vehicle and could
result in serious injury or death.
WARNING:
Slowly remove the
slack from the recovery strap prior to
pulling. Failure to do so can introduce
significantly higher loads which can
cause the recovery hooks to break off, or
the recovery strap to fail which can cause
serious injury or death.
WARNING:
Never link two straps
together with a clevis pin. These heavy
metal objects could become projectiles
if the strap breaks and can cause serious
injury or death.
E335947
A
Rear recovery hooks.
A.
Note:
Do not apply a load to the recovery
hooks that is greater than the gross vehicle
weight rating of your vehicle.
306
Crash and Breakdown Information
Before using recovery hooks:
•
Make sure all attaching points are
secure and capable of withstanding
the applied load.
•
Do not use chains, cables or tow straps
with metal hook ends.
•
Only use recovery straps that have a
minimum breaking strength two to
three times the gross vehicle weight of
the stuck vehicle.
•
Make sure the recovery strap is in good
condition and free of visible cuts, tears
or damage.
•
Use a damper device such as a tarp,
heavy blanket or piece of carpet, and
place it over the recovery strap to help
absorb the energy in the event the
strap breaks.
•
Make sure the stuck vehicle is not
loaded heavier than its gross vehicle
weight rating specified on the
certification label.
•
Align the tow vehicle and stuck vehicle
in a straight line, within 10 degrees.
•
Keep bystanders to the sides of the
vehicle, at a distance of at least twice
the length of the recovery strap. This
helps avoid injury from the hazard of a
recovery hook or strap breaking, or a
vehicle lurching into their path.
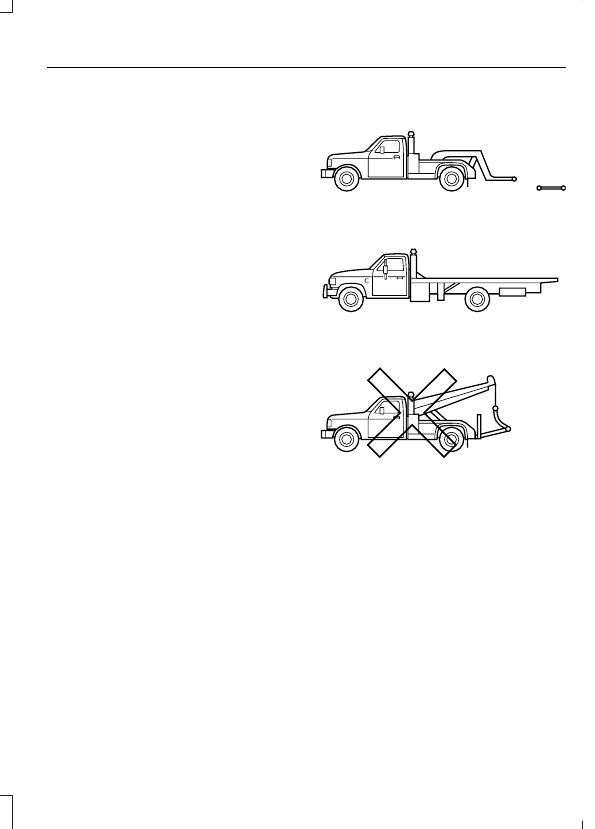
TRANSPORTING THE VEHICLE
E143886
If you need to tow your vehicle, contact a
professional towing service or your
roadside assistance service provider.
Your manufacturer produces a towing
manual for all authorized tow truck
operators. Have your tow truck operator
refer to this manual for proper hook-up
and towing procedures.
All-wheel or four-wheel drive vehicles
require that all wheels be off the ground
using a wheel lift and dollies or flatbed
equipment. This prevents damage to the
transmission and drive system.
307
Crash and Breakdown Information
Нет комментариевНе стесняйтесь поделиться с нами вашим ценным мнением.
Текст