Ford Bronco (2022 year). Manual in english — page 17
The above calculations also
assume that the loads are
positioned in your vehicle in a
manner that does not overload
the front or the rear gross axle
weight rating specified for your
vehicle on the Safety Compliance
Certification label.
ROOF RACK
(IF EQUIPPED)
ROOF RACK PRECAUTIONS
WARNING:
Read and follow the
manufacturer's instructions when you
are fitting a roof rack.
WARNING:
When loading the roof
racks, we recommend you evenly
distribute the load, as well as maintain
a low center of gravity. Loaded vehicles,
with higher centers of gravity, may
handle differently than unloaded
vehicles. Take extra precautions, such
as slower speeds and increased stopping
distance, when driving a heavily loaded
vehicle.
Note:
If you use a roof rack, the fuel
consumption of your vehicle will be higher
and you may experience different driving
characteristics.
Note:
Never place loads directly on the roof
panel. The roof panel is not designed to
directly carry a load.
You must place loads directly on the
crossbars fitted to the roof rack side rails.
When using the roof rack system, we
recommend that you use genuine Ford
accessory crossbars specifically designed
for your vehicle.
Make sure that you securely fasten the
load. Check the tightness of the load
before driving and at each fuel stop.
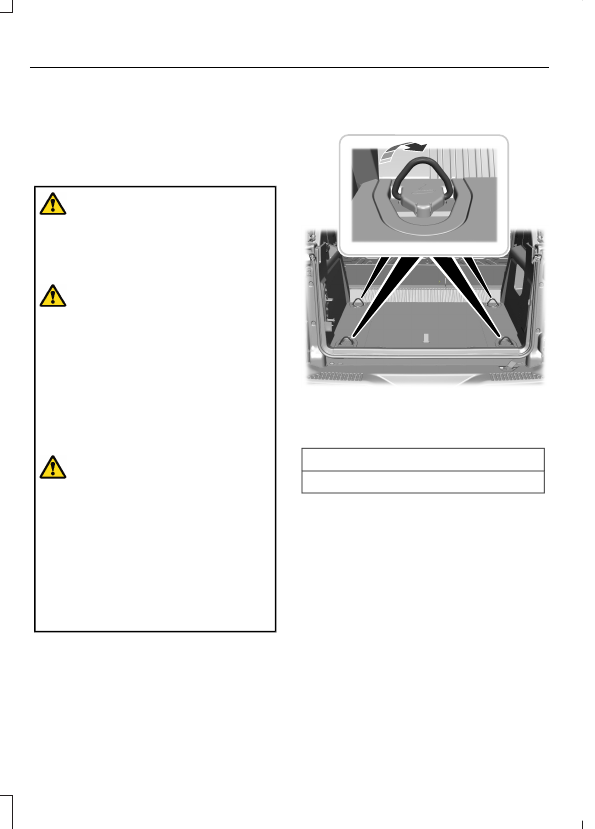
REMOVING AND INSTALLING THE
ROOF RACK
Removing the Roof Rack
(If Equipped)
E339405
1
2
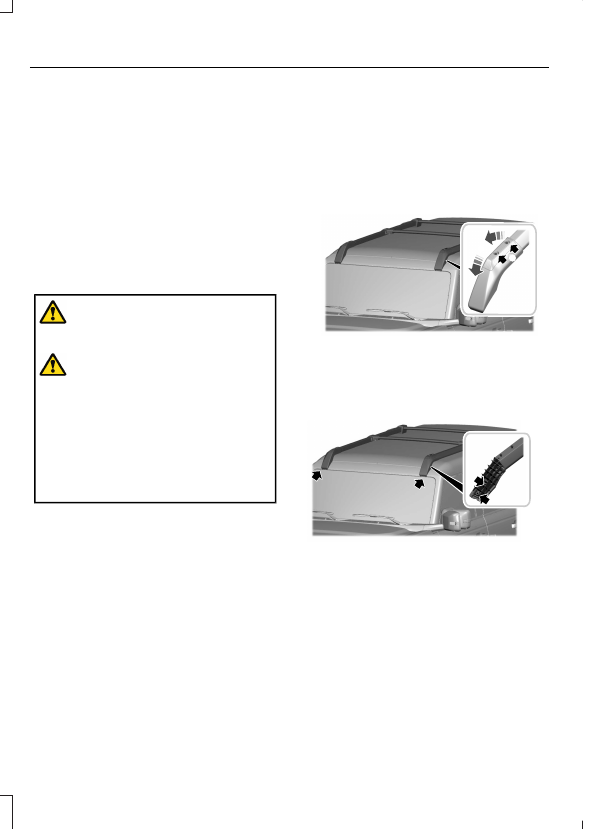
1.
Using the provided T30 tool, remove
the front roof rack cover fasteners.
2. Remove the front roof rack covers by
pulling upward at the rear edge and
rotating forward.
E339073
3. Using a 10 mm socket, remove the front
roof rack fasteners.
276
Load Carrying
E339074
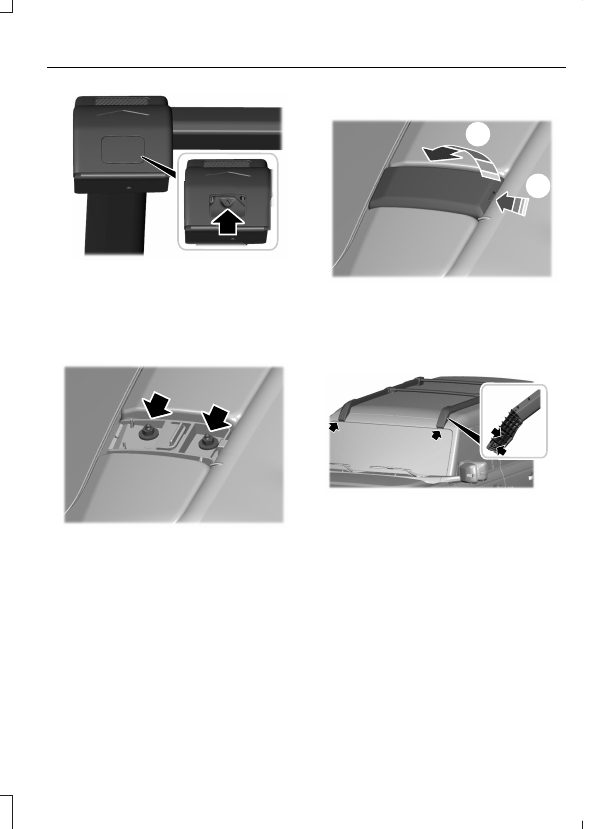
4. Remove the cover to access the rear
fastener.
5. Using the supplied special tool, loosen
the fastener until you can remove the
rack.
6. Remove the rack from the vehicle.
E339407
Note:
The windshield trim cover, retaining
plate and fasteners are provided. The trim
cover is installed when you remove the roof
rack.
7.
Locate the trim cover components.
8. Place the trim cover retaining plate
over the mounting studs.
9. Install the supplied fasteners. Torque
nuts to 7.7 lb.ft (10.5 Nm).
10.
Align the cover with the alignment
slot at the front of the cover, then
rotate rearward and snap into place.
Installing the Roof Rack
E339406
1
2
1.
To remove, press the button on the rear
of the trim cover and rotate forward.
2. Remove the fasteners and remove the
trim cover retaining plate.
3. Store the trim cover components.
E339073
4. Position the roof rack on the vehicle.
5. Hand start the front roof rack fasteners.
6. Using a 10 mm socket, tighten the front
roof rack fasteners. Torque bolts to
7.7 lb.ft (10.5 Nm).
7.
Align the cover with the alignment slot
and rotate rearward.
8. Hand start the front roof rack cover
fasteners.
9. Using the provided T30 tool, tighten
the front roof rack cover fasteners.
Torque bolts to 5.9 lb.ft (8 Nm).
277
Load Carrying
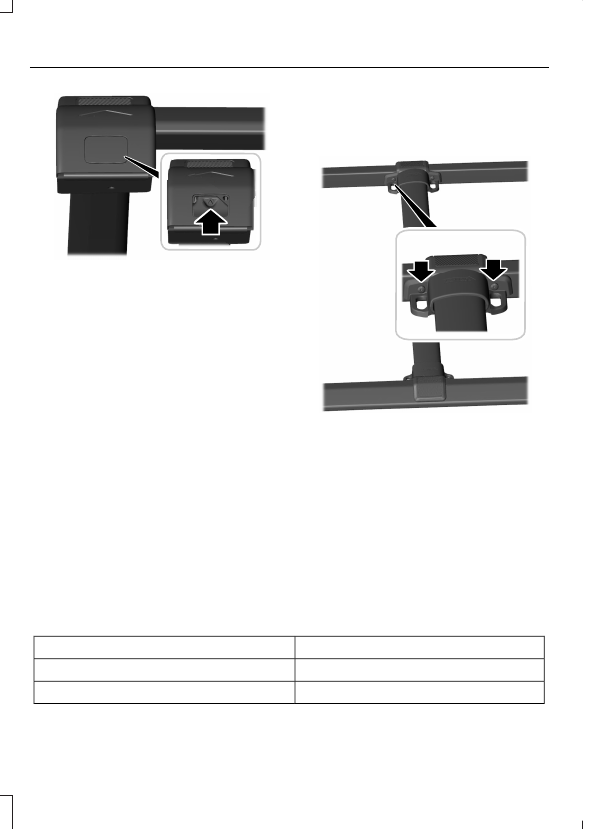
E339074
Note:
The rear crossbar is part of the
clamping system. If you removed the
crossbar you must install it first for proper
attachment to the hard top.
10.
Using the supplied special tool,
tighten the fastener.
Note:
The supplied special tool stops
turning the fastener when you have proper
torque applied.
11.
Install the rear roof rack fastener
cover.
ADJUSTING A ROOF RACK
CROSSBAR
Adjusting the Crossbar
(If Equipped)
E339075
1.
Using the provided T30 tool, remove
the crossbar bolts.
2. Move the crossbar to the new position.
3. Using the provided T30 tool, install the
crossbar bolts.
Note:
Torque bolts to 5.9 lb.ft (8 Nm).
Note:
Moving the crossbars forward may
increase wind noise. To limit wind noise
return the crossbars to the rearward
position.
ROOF RACK LOAD CAPACITIES
Maximum Recommended Load Amounts
Maximum Recommended Load
Description
110 lb (50 kg)
When in motion
450 lb (204 kg)
When stationary
278
Load Carrying
Note:
The maximum recommended load
is based on the load being evenly distributed
on the crossbars.
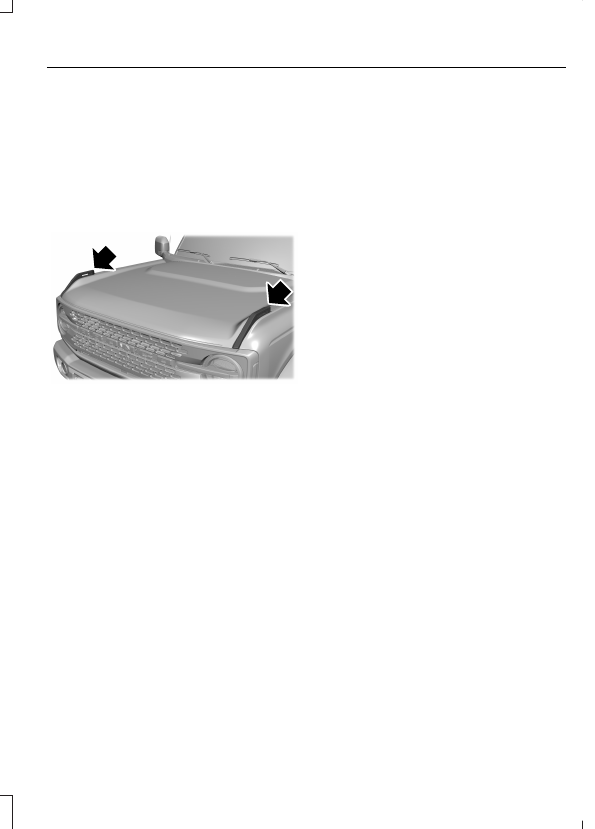
FENDER ANCHOR POINTS
LOCATING THE FENDER ANCHOR
POINTS
E331351
FENDER ANCHOR POINT LOAD
CAPACITIES
The maximum recommended load is 150 lb
(68 kg).
279
Load Carrying
REAR CARGO AREA ANCHOR
POINTS
REAR CARGO AREA ANCHOR
POINT PRECAUTIONS
WARNING:
Always properly secure
cargo to prevent shifting cargo or cargo
falling from the vehicle. Failure to do so
could result in compromised vehicle
stability and serious personal injury to
vehicle occupants or others.
WARNING:
The appropriate
loading capacity of your vehicle can be
limited either by volume capacity (how
much space is available) or by payload
capacity (how much weight the vehicle
should carry). Once you have reached
the maximum payload of your vehicle,
do not add more cargo, even if there is
space available. Overloading or
improperly loading your vehicle can
contribute to loss of vehicle control and
vehicle rollover.
WARNING:
It is extremely
dangerous to ride in a cargo area, inside
or outside of a vehicle. In a crash, people
riding in these areas are more likely to be
seriously injured or killed. Do not allow
people to ride in any area of your vehicle
that is not equipped with seats and
seatbelts. Make sure everyone in your
vehicle is in a seat and properly using a
seatbelt. Failure to follow this warning
could result in serious personal injury or
death.
LOCATING THE REAR CARGO
AREA ANCHOR POINTS
E324512
REAR CARGO AREA ANCHOR
POINT LOAD CAPACITIES
Maximum Load Value
2,000 lb (907 kg)
280
Rear Cargo Area
CONNECTING A TRAILER
PRECAUTIONS
Do not tow a trailer until you drive your
vehicle at least 1,000 mi (1,600 km).
Consult your local motor vehicle laws for
towing a trailer.
See the instructions included with towing
accessories for the proper installation and
adjustment specifications.
Service your vehicle more frequently if you
tow a trailer. See
If you use a rental trailer, follow the
instructions the rental agency gives you.
When attaching the trailer wiring connector
to your vehicle, only use a proper fitting
connector that works with the vehicle and
trailer functions.
Account for the trailer coupler weight as
part of your vehicle load when calculating
the total vehicle weight.
Do not exceed the load limits. See
CONNECTING A TRAILER
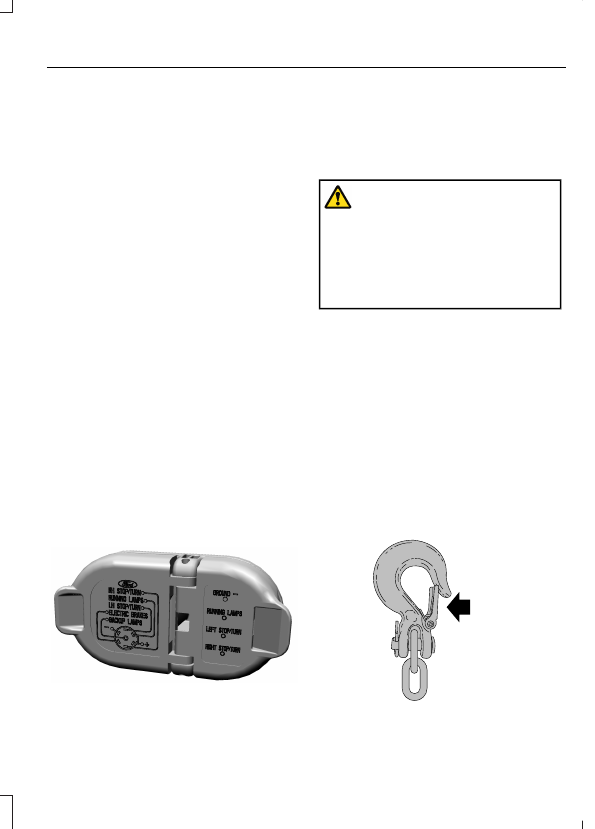
Trailer Towing Connector
(If Equipped)
E163167
When attaching the trailer wiring connector
to your vehicle, only use a proper fitting
connector that works with the vehicle and
trailer functions.
Trailer Lamps
WARNING:
Never connect any
trailer lamp wiring to the vehicle's tail
lamp wiring; this may damage the
electrical system resulting in fire. Contact
your authorized dealer as soon as
possible for assistance in proper trailer
tow wiring installation. Additional
electrical equipment may be required.
Most towed vehicles require trailer lamps.
Make sure all running lights, brake lights,
turn signals and hazard lights are working.
Safety Chains
Install trailer safety chains to the trailer
hitch as recommended by the
manufacturer. Cross the chains under the
trailer coupler and allow enough slack for
turning tight corners. Do not allow the
chains to drag on the ground.
Note:
Do not attach safety chains to the
bumper. Always connect the safety chains
to the frame or hook retainers of your trailer
hitch.
E265060
281
Connecting a Trailer
If the trailer safety chain hook has a latch,
make sure to fully close the latch.
CONNECTING A TRAILER – TROUBLESHOOTING
CONNECTING A TRAILER – INFORMATION MESSAGES
Description
Message
The system senses a trailer connection
disconnecting, either intentionally or unin-
tentionally, during a given ignition cycle.
Trailer Disconnected
282
Connecting a Trailer
TOWING A TRAILER
PRECAUTIONS
WARNING:
Do not exceed
the GVWR or the GAWR
specified on the certification
label.
WARNING:
Towing trailers
beyond the maximum
recommended gross trailer
weight exceeds the limit of your
vehicle and could result in engine
damage, transmission damage,
structural damage, loss of
vehicle control, vehicle rollover
and personal injury.
WARNING:
Do not exceed
the lowest rating capacity for
your vehicle or trailer hitch.
Overloading your vehicle or
trailer hitch can impair your
vehicle stability and handling.
Failure to follow this instruction
could result in the loss of control
of your vehicle, personal injury or
death.
WARNING:
Make sure that
the vertical load on the tow ball
is between the minimum and
maximum recommended weight
at all times. Failure to follow this
instruction could result in the
loss of control of your vehicle,
personal injury or death.
WARNING:
Do not cut,
drill, weld or modify the trailer
hitch. Modifying the trailer hitch
could reduce the hitch rating.
WARNING:
The anti-lock
brake system does not control
the trailer brakes.
TRAILER BRAKE
PRECAUTIONS
WARNING:
Do not connect a
trailer's hydraulic brake system directly
to your vehicle's brake system. Your
vehicle may not have enough braking
power and your chances of having a
collision greatly increase.
WARNING:
Do not tow a trailer
fitted with electric trailer brakes unless
your vehicle is fitted with a compatible
aftermarket electronic trailer brake
controller. Failure to follow this
instruction could result in the loss of
control of your vehicle, personal injury or
death. For additional information and
assistance, we recommend that you
contact an authorized dealer.
Electric brakes and manual, automatic or
surge-type trailer brakes are safe if you
install them properly and adjust them to
the manufacturer's specifications. The
trailer brakes must meet local and federal
regulations.
The rating for the tow vehicle's braking
system operation is at the gross vehicle
weight rating, not the gross combined
weight rating.
283
Towing a Trailer
Certain states require functioning trailer
brakes for trailers over a specified weight.
Be sure to check state regulations for this
specified weight.
Ford Motor Company recommends
separate functioning brake systems for
trailers weighing more than 1,500 lb
(680 kg) when loaded.
TOWING A TRAILER
LIMITATIONS
The vehicle's load capacity
designation is by weight, not by
volume, so you cannot necessarily
use all available space when
loading a vehicle or trailer.
Note:
Your vehicle could have
reduced performance when
operating at high altitudes and
when heavily loaded or towing a
trailer. When driving at elevation,
to match driving performance as
perceived at sea level, reduce gross
vehicle weight and gross
combination weight by 2% per
1,000 ft (300 m) elevation.
LOADING YOUR TRAILER
To help minimize how trailer
movement affects your vehicle
when driving:
•
Load the heaviest items closest
to the trailer floor.
•
Load the heaviest items
centered between the left and
right side trailer tires.
•
Load the heaviest items above
the trailer axles or just slightly
forward toward the trailer
tongue. Do not allow the final
trailer tongue weight to go
above or below 10-15% of the
loaded trailer weight. The
trailer tongue weight should
never exceed 10% of the
maximum towing capacity.
•
Select a ball mount with the
correct rise or drop. When both
the loaded vehicle and trailer
are connected, the trailer frame
should be level, or slightly
angled down toward your
vehicle, when viewed from the
side.
TRAILER TOWING HINTS -
MANUAL TRANSMISSION
Towing a trailer places an extra load on
your vehicle's engine, transmission, axle,
brakes, tires and suspension. Periodically
inspect these components during and after
any towing operation.
When driving with a trailer or payload, a
slight takeoff vibration or shudder may be
felt due to the increased payload weight.
Your vehicle may have a temporary or
conventional spare tire. A temporary spare
tire is different in diameter or width, tread
type, or from a different manufacturer than
the road tires on your vehicle. Consult
information on the tire label or Safety
Compliance label for limitations when
using.
284
Towing a Trailer
When towing a trailer:
•
Obey country specific regulations for
towing a trailer.
•
Do not drive faster than 70 mph
(113 km/h) during the first 500 mi
(800 km).
•
Do not make full-throttle starts.
•
Check your hitch, electrical connections
and trailer wheel lug nuts thoroughly
after you have traveled 50 mi (80 km).
•
Place the transmission in neutral (N)
when stopped in congested or heavy
traffic during hot weather. This will aid
in engine and transmission cooling and
to help A/C performance.
•
Turn off the speed control with heavy
loads or in hilly terrain. The speed
control may turn off when you are
towing on long, steep slopes.
•
Shift to a lower gear when driving down
a long or steep hill. Do not continuously
apply the brakes, as they may overheat
and become less effective.
•
If your transmission has Grade Assist
or Tow/Haul, use this feature when
towing. This provides engine braking
and helps eliminate excessive
transmission shifting for optimum fuel
economy and transmission cooling.
•
Your vehicle has AdvanceTrac with roll
stability control. When towing a trailer,
additional loads could cause the
AdvanceTrac system to engage during
cornering maneuvers. Reduce cornering
speeds to make sure that you can
maintain control of the vehicle and
trailer if the AdvanceTrac system
engages.
•
Allow more distance for stopping with
a trailer attached. Anticipate stops and
gradually brake.
•
Avoid parking on a slope. However, if
you must park on a slope. Turn the
steering wheel to point your vehicle
tires away from traffic flow. Set your
vehicle parking brake. Place the
transmission in a low gear. Place wheel
chocks in front and back of the trailer
wheels.
Note:
Chocks are not included with your
vehicle.
TRAILER TOWING HINTS -
AUTOMATIC TRANSMISSION
Towing a trailer places an extra load on
your vehicle's engine, transmission, axle,
brakes, tires and suspension. Periodically
inspect these components during and after
any towing operation.
When driving with a trailer or payload, a
slight takeoff vibration or shudder may be
present due to the increased payload
weight.
Your vehicle may have a temporary or
conventional spare tire. A temporary spare
tire is different in diameter or width,
tread-type, or is from a different
manufacturer than the road tires on your
vehicle. Consult information on the tire
label or Safety Compliance label for
limitations when using.
When towing a trailer:
•
Obey country specific regulations for
towing a trailer.
•
Do not drive faster than 70 mph
(113 km/h) during the first 500 mi
(800 km).
•
Do not make full-throttle starts.
•
Check your hitch, electrical connections
and trailer wheel lug nuts thoroughly
after you have traveled 50 mi (80 km).
285
Towing a Trailer
•
When stopped in congested or heavy
traffic during hot weather, place the
transmission in park (P) to aid engine
and transmission cooling and to help
A/C performance.
•
Turn off the speed control with heavy
loads or in hilly terrain. The speed
control may turn off when you are
towing on long, steep slopes.
•
Shift to a lower gear when driving down
a long or steep hill. Do not continuously
apply the brakes, as they may overheat
and become less effective.
•
If your transmission has Grade Assist
or Tow/Haul, use this feature when
towing. This provides engine braking
and helps eliminate excessive
transmission shifting for optimum fuel
economy and transmission cooling.
•
Your vehicle has AdvanceTrac with roll
stability control. When towing a trailer,
additional loads could cause the
AdvanceTrac system to engage during
cornering maneuvers. Reduce cornering
speeds to make sure that you can
maintain control of the vehicle and
trailer if the AdvanceTrac system
engages.
•
Allow more distance for stopping with
a trailer attached. Anticipate stops and
gradually brake.
•
Avoid parking on a slope. However, if
you must park on a slope, turn the
steering wheel to point your vehicle
tires away from traffic flow, set the
parking brake, place the transmission
in park (P) and place wheel chocks in
front and back of the trailer wheels.
Note:
Chocks are not included with your
vehicle.
LAUNCHING OR RETRIEVING
A BOAT OR PERSONAL
WATERCRAFT
When backing down a ramp during boat
launching or retrieval:
•
Do not allow the static water level to
rise above the bottom edge of the rear
bumper.
•
Do not allow waves to break higher
than 6 in (15 cm) above the bottom
edge of the rear bumper.
Exceeding 6 in (15 cm) could allow water
to enter vehicle components, causing
internal damage to the components and
affecting driveability, emissions and
reliability.
Note:
Replace the rear axle lubricant
anytime the rear axle has been submerged
in water.
Note:
Disconnect the trailer wiring
connector before backing the trailer into the
water.
Note:
Reconnect the trailer wiring
connector after removing the trailer from
the water.
286
Towing a Trailer
TOWING WEIGHTS AND DIMENSIONS
RECOMMENDED TOWING WEIGHTS
Website
Market
United States of America
https://www.fleet.ford.ca/towing-
Canada
287
Towing a Trailer
WHAT IS THE MAXIMUM LOADED
TRAILER WEIGHT
The maximum loaded trailer
weight is the highest possible
weight of a fully loaded trailer the
vehicle can tow.
CALCULATING THE MAXIMUM
LOADED TRAILER WEIGHT FOR
YOUR VEHICLE
1. Start with the gross combined
weight rating for your vehicle
model and axle ratio.
2. Subtract all of the following
that apply to your vehicle:
•
Vehicle curb weight.
•
Hitch hardware weight, for
example a draw bar, ball, locks
or weight distributing hardware.
•
Driver weight.
•
Passenger weight.
•
Payload, cargo and luggage
weight.
•
Aftermarket equipment weight.
This equals the maximum loaded
trailer weight for this combination.
Note:
The trailer tongue load is
considered part of the payload for
your vehicle. Reduce the total
payload by the final trailer tongue
weight.
Note:
Consult an authorized dealer
to determine the maximum trailer
weight allowed for your vehicle if
you are not sure.
TOWING A TRAILER – TROUBLESHOOTING
TOWING A TRAILER – INFORMATION MESSAGES
Details
Message
The trailer sway control detects trailer
sway. Reduce the vehicle's speed.
Trailer Sway Reduce Speed
Verify the trailer brake connections are
secure and that the aftermarket trailer
brake controller device is correctly installed.
Perform a trailer brake and trailer light
check if possible. If the message persists,
have your vehicle checked as soon as
possible.
Trailer brake system fault See manual
Perform a trailer brake and trailer light
check if possible. If the message persists,
have your vehicle checked as soon as
possible.
Trailer brake module fault
288
Towing a Trailer
HOW DOES TRAILER SWAY
CONTROL WORK
The system applies the brakes to the
individual wheels and reduces engine
torque to aid vehicle stability.
If the trailer begins to sway, the stability
control lamp flashes and the message
Trailer Sway Reduce Speed
appears in
the information display.
Stop your vehicle as soon as it is safe to
do so. Check the vertical weight on the
tow ball and trailer load distribution.
TRAILER SWAY CONTROL
PRECAUTIONS
WARNING:
Turning off trailer sway
control increases the risk of loss of
vehicle control, serious injury or death.
Ford does not recommend disabling this
feature except in situations where speed
reduction may be detrimental (such as
hill climbing), the driver has significant
trailer towing experience, and can control
trailer sway and maintain safe operation.
Note:
This feature only activates when
significant trailer sway occurs.
Note:
This feature does not prevent trailer
sway, but reduces it once it begins.
Note:
This feature cannot stop all trailers
from swaying.
Note:
In some cases, if vehicle speed is too
high, the system may activate multiple
times, gradually reducing vehicle speed.
SWITCHING TRAILER SWAY
CONTROL ON AND OFF
1.
Press
Features
on the touchscreen.
2. Press
Towing
.
3. Switch
Trailer Sway Control
on or off.
The system turns on each time you start
your vehicle.
289
Trailer Sway Control
OFF-ROAD DRIVING
WHAT IS OFF-ROAD DRIVING
Off-road driving is driving your vehicle on
unsurfaced roads or trails, made from dirt,
rocks, sand and mud.
Your vehicle has been designed and
equipped to explore those places where
the road cannot take you, whether you
choose a forest trail or the open desert.
OFF-ROAD DRIVING
PRECAUTIONS
WARNING:
If you continue to drive
your vehicle when the engine is
overheating, the engine could stop
without warning. Failure to follow this
instruction could result in the loss of
control of your vehicle.
Before going off-road, consult with your
local governmental agencies to determine
designated off-road trails and recreation
areas. Also, be sure to understand any
off-road vehicle registration requirements
for the area in which you plan on driving.
Tread Lightly is an educational program
designed to increase public awareness of
land-use regulations and responsibilities
in our nation’s wilderness areas. The U.S.
Forest Service and Bureau of Land
Management is encouraging you to help
preserve our national forest and other
public and private lands by treading lightly.
Before taking your vehicle off-road,
perform a basic vehicle inspection to make
sure the vehicle is in top working condition.
Before you venture off road, have a clear
mental picture of the underside of your
vehicle. Learn the location of any low
hanging items and any skid plates that may
be on the vehicle. You can avoid snagging
them on rocks and other obstacles if you
know where they are.
Memorizing some basic dimensions helps
you confidently deal with off-road
obstacles. Get to know your vehicle’s
height and width, its lowest point, its
wading depth and angles. Familiarize
yourself with your vehicle’s on-board
technology features.
We recommend driving at least two
vehicles when driving off-road. The buddy
system helps make sure that help is close
at hand should a vehicle become stuck or
damaged.
We recommend taking supplies such as a
first aid kit, supply of water, tow strap and
cell or satellite phone with you any time
you plan an off-road excursion.
Note:
Remove the front license plate before
off-road driving to achieve optimal
performance.
BASIC OFF-ROAD DRIVING
TECHNIQUES
Grip the steering wheel with your thumbs
on the outside of the rim. This reduces the
risk of injury due to abrupt steering wheel
motions that occur when negotiating rough
terrain.
Control your throttle, brake and steering
inputs in a smooth manner. Sudden inputs
to the controls can cause a loss of traction
for the vehicle, especially when on sloped
terrain or crossing obstacles such as rocks
or logs.
290
Driving Hints
Look ahead on your route noting upcoming
obstacles, surface texture or color changes
or any other factors which may indicate a
change in available traction. Adjust the
vehicle speed and route to avoid a loss in
traction. Conditions can change causing
the course to vary day to day. Mark
obstacles with GPS markers to avoid
potential vehicle damage. Where
necessary, get out of your vehicle and
check the terrain.
When driving off-road, if the front or rear
suspension is bottoming-out or excessive
contact with the skid-plates is happening,
reduce the vehicle's speed to avoid
potential damage to your vehicle.
If you are driving in a dusty area, be sure to
leave ample distance between your vehicle
and any other vehicles to allow for
adequate vision.
When driving off-road verify that your
wipers and washers are working properly
and reduce your speed for better visibility.
When driving in desert conditions, we
recommend driving with your headlamps
on to help other drivers easily see you.
When convoying with other vehicles, we
recommend that communication is used,
and the lead vehicle notify other vehicles
of upcoming obstacles.
Keep available ground clearance in mind
and pick a route that minimizes the risk of
catching the underside of the vehicle on
an obstacle.
When negotiating low speed obstacles,
applying light brake pressure in conjunction
with the throttle allows you to negotiate
the obstacle in a more controlled manner.
Driving off-road requires a high amount of
concentration. Even if your local law does
not prohibit drinking alcohol when driving
off-road we do not recommend it.
DRIVING OFF-ROAD
Driving In Snow and Ice
WARNING:
If you are driving in
slippery conditions that require tire
chains or cables, then it is critical that
you drive cautiously. Keep speeds down,
allow for longer stopping distances and
avoid aggressive steering to reduce the
chances of a loss of vehicle control
which can lead to serious injury or death.
If the rear end of your vehicle slides while
cornering, steer in the direction of the
slide until you regain control of your
vehicle.
Four-wheel drive vehicles have advantages
over two-wheel drive vehicles in snow and
ice but can skid like any other vehicle. If
your vehicle slides when driving on snowy
or icy roads, turn the steering wheel in the
direction of the slide until you regain
control. Avoid sudden applications of
power and quick changes of direction on
snow and ice. Slowly and steadily apply
the accelerator when starting from a full
stop. Avoid sudden braking.
WARNING:
Do not become
overconfident in the ability of four-wheel
drive vehicles. Although a four-wheel
drive vehicle may accelerate better than
a two-wheel drive vehicle in low traction
situations, it won't stop any faster than
two-wheel drive vehicles. Always drive
at a safe speed.
Make sure you allow sufficient distance
between your vehicle and other vehicles
for stopping.
In emergency stopping situations, do not
pump the brake pedal, apply the brake
firmly.
291
Driving Hints
Нет комментариевНе стесняйтесь поделиться с нами вашим ценным мнением.
Текст