Volvo XC90 Recharge Plug-in Hybrid (2021 year). Manual in english — page 24
ELECTRIC MOTOR AND CHARGING
}}
407
Never detach the charging cable from the
120/240 V outlet (AC, alternating current)
while charging is in progress – the
120/240 V outlet could be damaged in
such circumstances. Always interrupt
charging first and then disconnect the
charging cable – first from the vehicle's
charging socket and then from the
120/240 V outlet.
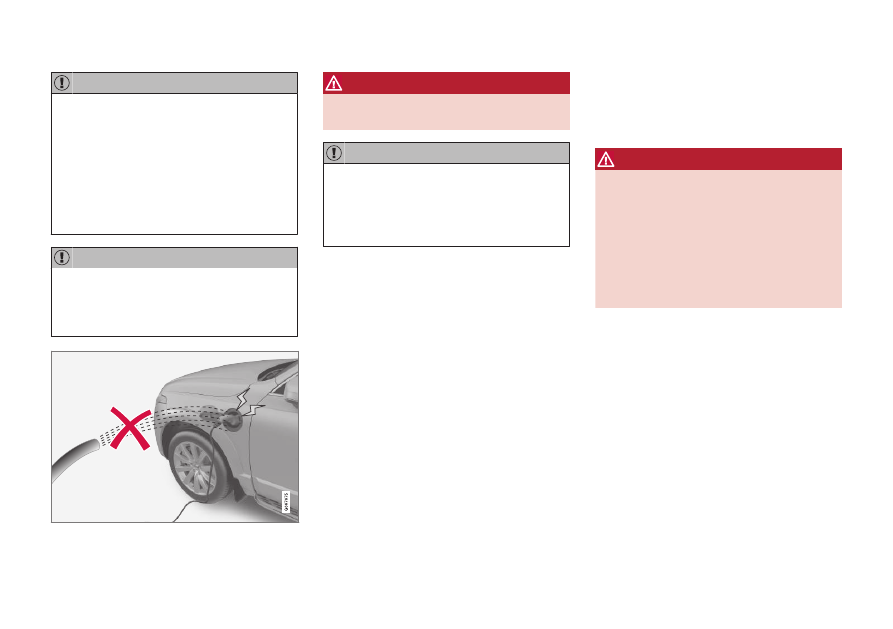
Wipe the charging cable with a clean cloth
lightly moistened with water or a mild
detergent. Do not use chemicals or sol-
vents.
WARNING
The charging cable and its components
must not be rinsed or immersed in water.
Avoid exposing the charging module and
its plug to direct sunlight. In such cases,
the overheating protection in the plug
could reduce or cut off charging of the
hybrid battery.
Related information
•
Charging status in the charging cable's
control module (p. 413)
•
Charging cable residual current device
(p. 407)
•
Charging cable temperature monitoring
(p. 409)
•
Charging the hybrid battery (p. 403)
Charging cable residual current
device
The charging cable has a circuit breaker that
helps protect against current overloads and
thermal overheating.
WARNING
Charging the hybrid battery may only be
done from approved, grounded 120/240 V
outlets (AC, alternating current). If the elec-
trical circuit or electrical socket's capacity
is not known, let a licensed electrician
inspect the electrical circuit's capacity.
Using a charge level that exceeds the elec-
trical circuit's or electrical outlet's capacity
may start a fire or damage the electrical cir-
cuit.
-------------------------------------------------------------------------------------------------------------------------------------------------------------
||
ELECTRIC MOTOR AND CHARGING
408
WARNING
•
The charging cable's residual current
breaker helps protect the vehicle's
charging system but cannot ensure
that an current overload will never
occur.
•
Never use visibly worn or damaged
electrical outlets. Doing so could lead
to fires or serious injury.
•
Never connect the charging cable to an
extension cord.
•
Maintenance or replacement of the
hybrid battery may only be performed
by a trained and qualified Volvo service
technician.
•
Do not use any charging cable other
than the recommended one.
•
Do not use an external timer between
the charging cable and the electrical
outlet.
•
Do not use any adapters between the
charging cable and the electrical outlet.
Control module's LED
2
indicator.
LED indicator
If the charging cable's residual current device
is triggered, the LED indicator will light up red.
Have the outlet checked by a licensed electri-
cian or try using another wall outlet.
•
Check the capacity of the socket.
•
Other electronic equipment connected
on the same fuse circuit must be dis-
connected if the total load is exceeded.
•
Do not connect the charging cable if
the socket is damaged.
Related information
•
•
Charging status in the charging cable's
control module (p. 413)
2
LED (Light Emitting Diode)
-------------------------------------------------------------------------------------------------------------------------------------------------------------
ELECTRIC MOTOR AND CHARGING
409
Charging cable temperature
monitoring
To help ensure the vehicle's hybrid battery is
reliably charged each time it is connected,
charging is stopped if the temperature in the
charging cable becomes too high and rea-
ches a critical limit.
If charging is often inadvertently interrup-
ted, have the charging cable and the vehi-
cle's charging system inspected by a
trained and qualified Volvo service techni-
cian.
Related information
•
•
Charging status in the charging cable's
control module (p. 413)
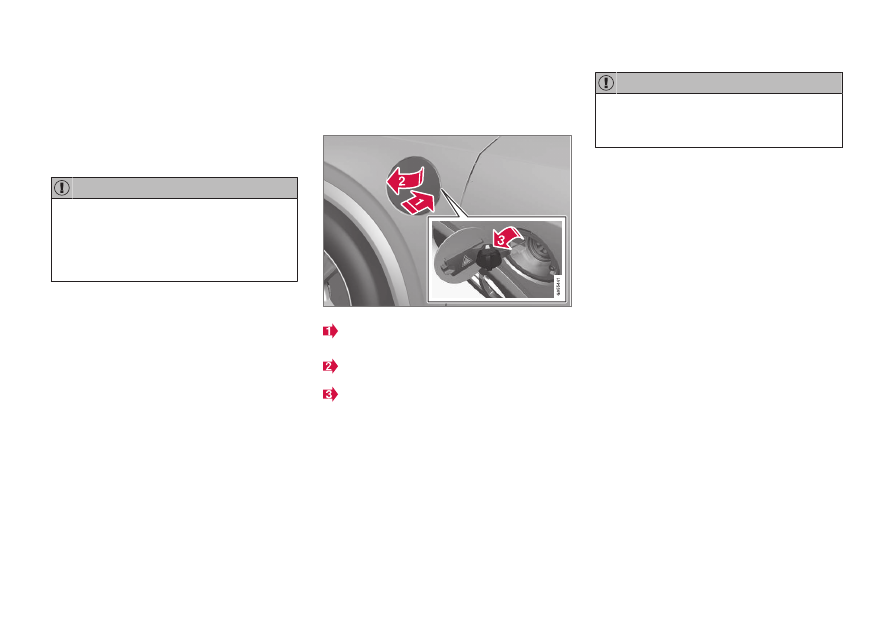
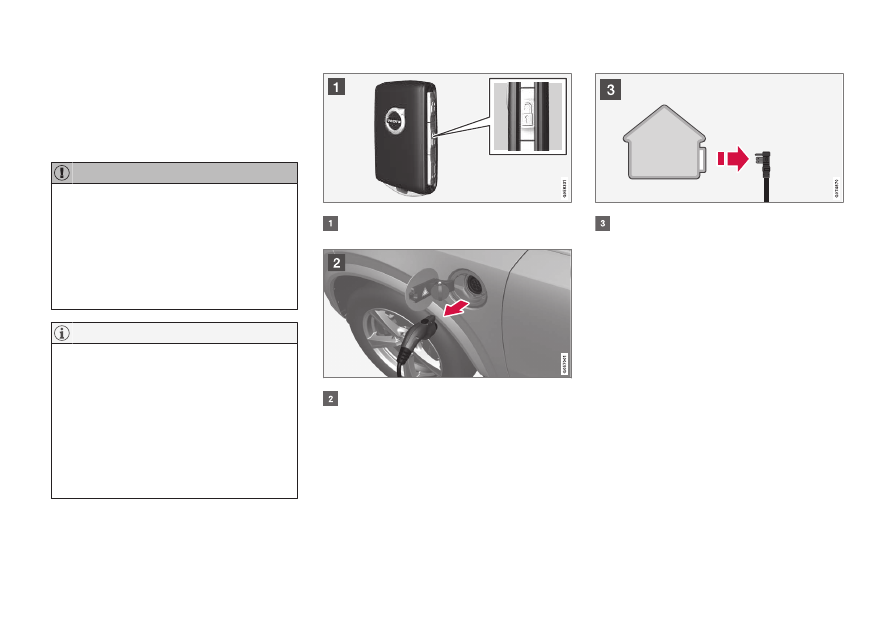
Opening and closing the charging
socket cover
The cover for the hybrid battery's charging
socket opens manually.
Press in the rear edge of the charger door
and release.
Open the door.
Remove the charging socket's protective
cover and secure it in the holder on the
inside of the charger door. Make sure the
cover's rubber stopper is bent downward
to prevent the cover from falling out of the
holder.
Make sure the charging socket's protective
cover is positioned so it does not damage
the paint (in e.g., windy conditions).
Perform the following steps in reverse to close
the charger door.
Related information
•
Initiating hybrid battery charging (p. 410)
•
Stopping hybrid battery charging (p. 418)
•
-------------------------------------------------------------------------------------------------------------------------------------------------------------
ELECTRIC MOTOR AND CHARGING
410
Initiating hybrid battery charging
The hybrid battery is charged by connecting a
charging cable between the vehicle and a
120/240 V outlet (alternating current).
Only use the charging cable supplied with the
car or a replacement cable recommended by
Volvo.
Never connect the charging cable if there
is a risk of a thunderstorm or there is light-
ning.
WARNING
•
The charging cable must be grounded
when in use. It is equipped with a cord
with a grounding conductor and a
grounding plug. The plug must be
inserted into an appropriate outlet that
is properly installed and grounded in
accordance with all local codes and
ordinances and is not damaged in any
way.
•
Children should be supervised when in
the vicinity of the charging cable when
it is plugged in.
•
High voltage is present in your electric
meter housing and power distribution
service panel. Contact with high volt-
age can cause death or serious per-
sonal injury.
•
Do not use the charging cable if it is
damaged in any way. A damaged or
malfunctioning charging cable may
only be repaired by a workshop – an
authorized Volvo workshop is recom-
mended.
•
Always position the charging cable so
that it will not be driven over, stepped
on, tripped over or otherwise damaged,
or cause personal injury.
•
Disconnect the charger from the wall
outlet before cleaning it.
•
Never connect the charging cable to an
extension cord or a multiple plug
socket.
•
Do not use one or more adapters
between the charging cable and the
electric outlet.
•
Do not use an external timer between
the charging cable and the electrical
outlet.
Also, refer to the manufacturer's instruc-
tions for using the charging cable and its
components.
Make sure that the 120/240 V outlet (AC,
alternating current) has a power capacity
sufficient for charging electric vehicles. If
you are uncertain of the capacity, have the
outlet checked by a licensed electrician.
Note that the engine must be turned off
before beginning charging.
-------------------------------------------------------------------------------------------------------------------------------------------------------------
ELECTRIC MOTOR AND CHARGING
411
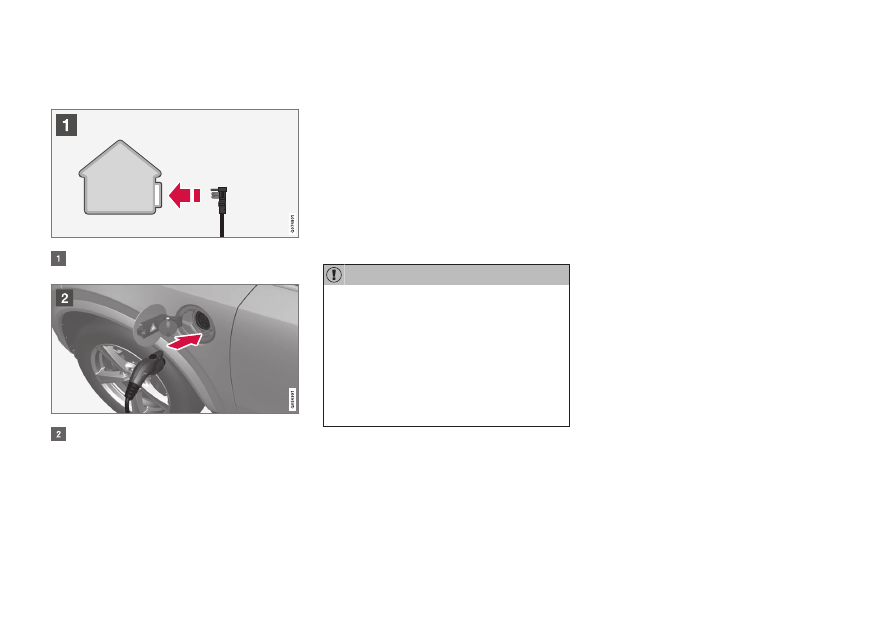
Take out the charging cable from the storage
compartment under the cargo area.
Plug the charging cable into a 120/240 V
outlet. Never use an extension cord.
Open the charger door and remove the
charging socket's protective cover. Push
the charging handle all the way into the
vehicle's socket.
2. The charging cable handle will lock into
place and charging will begin within
5 seconds. When charging starts, the
green LED light in the charging socket will
begin to flash. The approximate remaining
charging time or the charging status will
be displayed in the instrument panel.
Charging may be temporarily interrupted if
the vehicle is unlocked. If the charging
cable remains plugged into the charging
socket, charging will resume after a
moment.
Never detach the charging cable from the
120/240 V outlet (AC, alternating current)
while charging is in progress – the
120/240 V outlet could be damaged in
such circumstances. Always interrupt
charging first and then disconnect the
charging cable – first from the vehicle's
charging socket and then from the
120/240 V outlet.
During charging, condensation from the air
conditioning may form under the vehicle. This
is normal and is caused by the hybrid battery
cooling.
Related information
•
Charging the hybrid battery (p. 403)
•
Opening and closing the charging socket
cover (p. 409)
•
Charging status in the vehicle's charging
socket (p. 412)
•
Charging status in the instrument panel
(p. 416)
•
Charging status in the charging cable's
control module (p. 413)
•
-------------------------------------------------------------------------------------------------------------------------------------------------------------
ELECTRIC MOTOR AND CHARGING
412
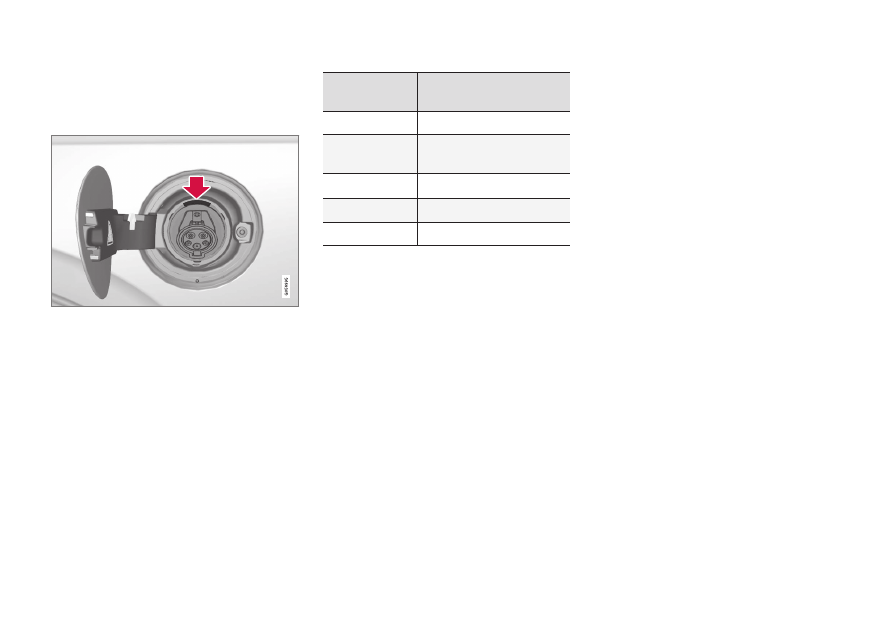
Charging status in the vehicle's
charging socket
The charging status is indicated by an LED
light in the charging socket.
Location of the LED indicator light in the vehicle's
charging socket.
The LED indicator light shows the current
charge status during charging. If the LED indi-
cator light is not illuminated, check to make
sure the cable is securely connected in the
wall outlet and in the outlet in the vehicle. A
white, red or yellow light illuminates when the
passenger compartment lighting is activated
and will remain illuminated for a short time
after the passenger compartment lighting has
gone out.
LED indicator
light's color
Meaning
White
Courtesy light
Yellow
Wait mode
A
– waiting for
charging to start.
Flashing green
Charging is in progress
B
.
Green
Charging completed
C
Red
Malfunction.
A
E.g. after a door has been opened or if the charging cable
handle is not locked in place.
B
The more slowly the light flashes, the closer the battery is to
being fully charged.
C
The light will go out after a short time.
Related information
•
Charging the hybrid battery (p. 403)
•
Charging status in the instrument panel
(p. 416)
•
Charging status in the charging cable's
control module (p. 413)
•
-------------------------------------------------------------------------------------------------------------------------------------------------------------
ELECTRIC MOTOR AND CHARGING
}}
413
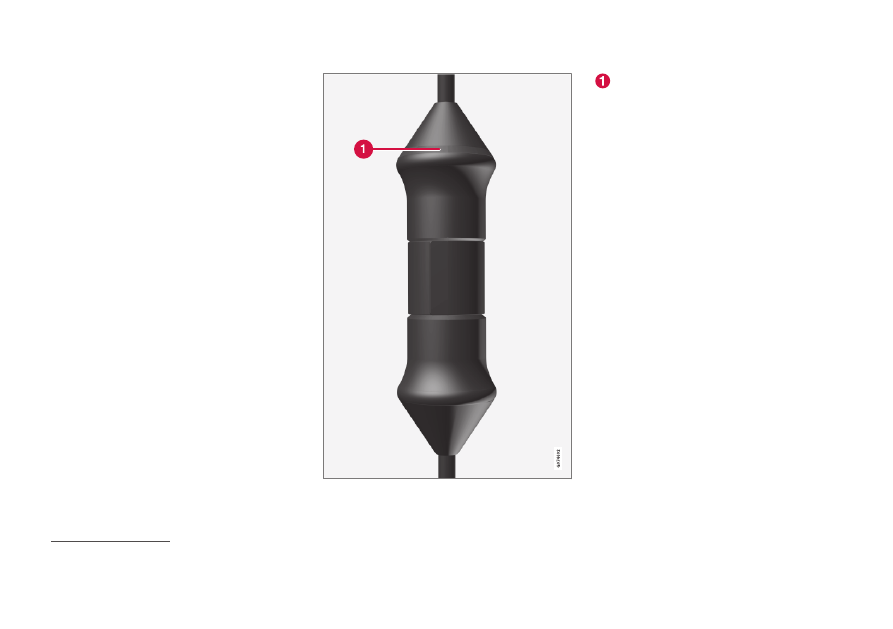
Charging status in the charging
cable's control module
The indicator on the charging cable's control
module shows the status of charging in pro-
gress and completed charging.
Control module's LED
3
indicator.
LED indicator
3
LED (Light Emitting Diode)
-------------------------------------------------------------------------------------------------------------------------------------------------------------

||
ELECTRIC MOTOR AND CHARGING
414
LED
Status
Meaning
Recommended action
Off
Charging is not
possible.
No power supply to the
charging cable.
1. Unplug the charging cable from the outlet.
2. Plug the charging cable back into the outlet or use another outlet.
3. If the problem persists, contact Volvo Support.
White light
Charging possi-
ble.
The charging cable is
ready to be plugged
into the vehicle.
If the LED indicator is white but charging is not possible:
1. Unplug the charging cable from the charging socket.
2. Plug the charging cable back into the charging socket.
3. If the indicator does not begin flashing white within about 10 seconds, first unplug
the charging cable from the charging socket and then unplug it from the wall out-
let. Plug the charging cable back into the charging socket and the outlet.
4. If the problem persists, contact Volvo Support.
Flashing
white
Charging is in
progress.
The vehicle's electronic
system has initiated
charging
Charging is in progress.
Wait until the batteries are fully charged.
Steady red
light
Charging is not
possible.
Temporary error.
1. Unplug the charging cable from the charging socket.
2. Wait a few seconds.
3. Plug the charging cable back into the charging socket.
4. If the problem persists, contact Volvo Support.
Flashing
red light
Charging is not
possible.
Serious error.
First unplug the charging cable from the charging socket and then from the electrical
outlet. If the problem persists, contact Volvo Support.
-------------------------------------------------------------------------------------------------------------------------------------------------------------
ELECTRIC MOTOR AND CHARGING
415
Related information
•
Charging the hybrid battery (p. 403)
•
Charging status in the vehicle's charging
socket (p. 412)
•
Charging status in the instrument panel
(p. 416)
•
-------------------------------------------------------------------------------------------------------------------------------------------------------------
ELECTRIC MOTOR AND CHARGING
416
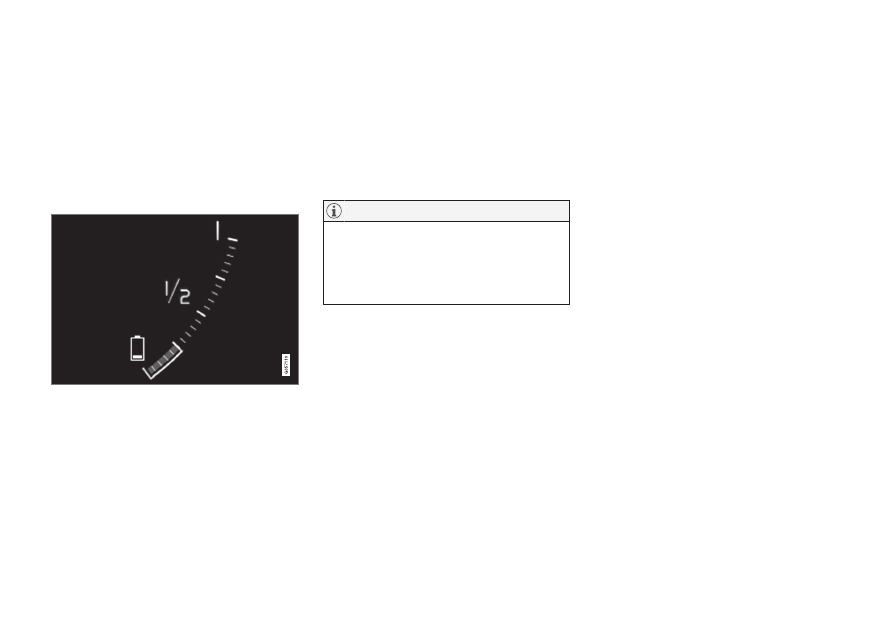
Charging status in the instrument
panel
Charging status is indicated in the instrument
panel using both graphics and messages.
This information is displayed as long as the
instrument panel is active.
Graphic
Message
Meaning
Fully charged at:
[Time]
displayed along with an animated blue
pulsing light through the charging cable.
Charging is in progress and the approximate time at which
the battery will be fully charged is displayed.
Charging complete
is displayed. An image will be superimposed
over the graphic of the vehicle with a green LED indicator light in
the socket.
The battery is fully charged.
Charging error
will be displayed. The LED indicator light in the
charging socket will be red.
Malfunction. Make sure the charging cable is correctly con-
nected to the vehicle's charging socket and to the
120/240 V outlet (alternating current).
-------------------------------------------------------------------------------------------------------------------------------------------------------------

ELECTRIC MOTOR AND CHARGING
417
If the instrument panel is not used, it will
go dark after a period of time. To reactivate
the display:
•
depress the brake pedal,
•
open one of the doors, or
•
put the ignition in mode
I
by turning
the
START
knob clockwise and then
releasing.
Related information
•
Charging the hybrid battery (p. 403)
•
Hybrid symbols and messages in the
instrument panel (p. 419)
•
Charging status in the vehicle's charging
socket (p. 412)
•
Charging status in the charging cable's
control module (p. 413)
•
-------------------------------------------------------------------------------------------------------------------------------------------------------------
ELECTRIC MOTOR AND CHARGING
* Option/accessory.
418
Stopping hybrid battery charging
To stop charging of the hybrid battery, unlock
the vehicle, unplug the charging cable from
the vehicle's charging socket and then
unplug the cable from the 120/240 V outlet
(alternating current).
Before the charging cable is removed from
the vehicle's charging socket, the vehicle
must be unlocked using the unlock button
on the remote key. This must be done even
if the vehicle's doors are already unlocked.
If the vehicle is not unlocked using the
unlock button, the charging cable or sys-
tem may be damaged.
Always unlock the vehicle so that charging
is cut off before the connection to the
120/240 V outlet (AC, alternating current)
is disconnected. Note that the charging
cable must be disconnected from the vehi-
cle's charging socket before it is discon-
nected from the 120/240 V outlet, partly
to prevent damage to the system and party
to prevent unintentional interruption of
charging.
Unlock the vehicle with the remote key.
Charging will stop.
Press the lock button on the charging
cable's handle. The handle will be
released/unlocked. Remove the cable
from the vehicle's charging socket, put the
socket's cover back in place and close the
charger door.
Unplug the cable from the 120/240 V out-
let.
Stow the charging cable in the storage
compartment under the cargo area floor.
Charging cable automatically locks
If the charging cable cannot be removed from
the charging socket, it will automatically lock
into place again after unlocking to maximize
charging and range and to enable precondi-
tioning before driving. The charging cable can
be removed again if the vehicle is unlocked
using the remote key. For vehicles with
Passive Entry
*
, the handle can be used to lock
and unlock.
Related information
•
Opening and closing the charging socket
cover (p. 409)
•
•
Charging the hybrid battery (p. 403)
•
-------------------------------------------------------------------------------------------------------------------------------------------------------------
ELECTRIC MOTOR AND CHARGING
}}
419
Hybrid symbols and messages in
the instrument panel
A number of symbols and messages relating
to the Recharge may be displayed in the
instrument panel. They may also appear in
combination with general indicator and warn-
ing symbols and disappear when the neces-
sary action has been taken.
Symbol Message
Meaning
12 V Battery
Charging fault, service urgent. Drive
to workshop
Battery fault. Contact a workshop
A
to have the battery checked as soon as possible.
12 V Battery
Charging fault Stop safely
Battery fault. Stop the vehicle as soon as possible and contact a workshop
A
to have the bat-
tery checked.
12 V Battery
Fuse failure Service required
Battery fault. Contact a workshop
A
to have the system checked as soon as possible.
HV battery
Overheated, stop safely
The hybrid battery's temperature seems to be rising at an abnormal rate. Stop the vehicle and
turn off the engine. Wait at least 5 minutes before driving. Call a workshop
A
or inspect the
vehicle to make sure everything seems normal before continuing to drive.
Reduced performance
Max vehicle speed limited
The hybrid battery's charge level is too low for driving at high speeds. Charge the battery as
soon as possible.
Propulsion system
Harsh behavior at low speed, vehicle
ok to use
The hybrid system is not functioning properly. Contact a workshop
A
to have the system
checked as soon as possible.
-------------------------------------------------------------------------------------------------------------------------------------------------------------
||
ELECTRIC MOTOR AND CHARGING
420
Symbol Message
Meaning
Hybrid system failure
Service required
The hybrid system is not functioning. Contact a workshop
A
to have the system checked as
soon as possible.
Charge cable
Remove before start
Displayed when the driver attempts to start the vehicle with the charging cable still con-
nected. Remove the charging cable and close the charger cover.
A
An authorized Volvo workshop is recommended.
Related information
•
Initiating hybrid battery charging (p. 410)
•
Stopping hybrid battery charging (p. 418)
•
Charging the hybrid battery (p. 403)
•
Indicator and warning symbols (p. 99)
•
•
-------------------------------------------------------------------------------------------------------------------------------------------------------------
ELECTRIC MOTOR AND CHARGING
421
Long-term storage of vehicles with
hybrid batteries
To help minimize degradation of the hybrid
battery if the vehicle is not driven for a pro-
longed period (longer than 1 month) the
hybrid battery charge level should be kept at
approx. 25% according to the gauge in the
instrument panel.
Do as follows:
1. If the hybrid battery charge level is high,
drive the vehicle until the charge level is
approximately 25%. If the charge level is
low, charge the battery until the level rea-
ches approximately 25%.
2. If the vehicle is not driven for more than 6
months or the hybrid battery's charge
level is noticeably below the 25% mark,
charge the battery to about 25% to help
compensate for the natural battery dis-
charge that occurs in long-term storage.
Regularly check the charge level using the
gauge in the instrument display.
Store the vehicle in as cool a location as
possible to minimize battery aging during
long-term storage. In the summer, park the
vehicle indoors or in a shady location,
whichever is cooler.
Related information
•
Initiating hybrid battery charging (p. 410)
•
•
-------------------------------------------------------------------------------------------------------------------------------------------------------------
STARTING AND DRIVING
* Option/accessory.
424
Starting the vehicle
The vehicle can be started using the start
knob in the tunnel console when the remote
key is in the passenger compartment.
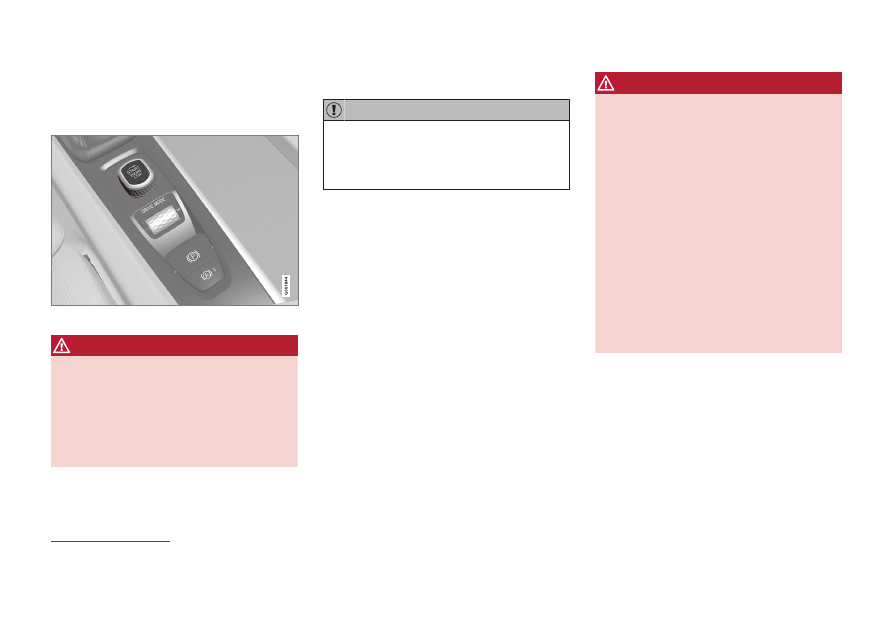
Start knob in the tunnel console.
WARNING
Before starting:
•
Buckle your seat belt.
•
Adjust the seat, steering wheel and
mirrors.
•
Make sure you can fully depress the
brake pedal.
The remote key is not physically used to start
the ignition because the vehicle is equipped
with the keyless Passive Start system.
To start the vehicle:
The vehicle cannot be started if the charg-
ing cable is still plugged in. Make sure to
pull out the charging cable from the charg-
ing socket before starting the vehicle.
1. The remote key must be inside the vehicle.
For vehicles with Passive Start, the key
must be in the front section of the passen-
ger compartment. With the optional key-
less locking/unlocking function
*
, the key
can be anywhere in the vehicle.
2. Press and hold down the brake pedal
1
as
far as possible.
3. Turn the start knob clockwise and release.
The control will automatically return to the
original position.
WARNING
•
Never use more than one inlay mat at a
time on the driver's floor. If any other
type of floor mat is used, remove the
original mat from the driver's seat floor
before driving. All types of mats must
be securely anchored in the attach-
ment points in the floor. Make sure the
floor mat does not impede the move-
ment of the brake pedal or accelerator
pedal in any way, as this could be a
serious safety hazard.
•
Volvo's floor mats are specially manu-
factured for your vehicle. They must be
properly secured in the attachment
points in the floor to help ensure they
cannot slide and become trapped
under the pedals.
The starter motor will crank until the engine
starts or until overheating protection is trig-
gered.
During normal start conditions, the vehicle's
electric motor will be prioritized and the gaso-
line engine will remain off. This means that
once the start knob is turned clockwise, the
electric motor has been "started" and the vehi-
cle is ready to be driven. The warning and
information symbols in the instrument panel
1
If the vehicle is moving, it is only necessary to turn the start knob clockwise to start the engine.
-------------------------------------------------------------------------------------------------------------------------------------------------------------
Нет комментариевНе стесняйтесь поделиться с нами вашим ценным мнением.
Текст