Volvo S90 Recharge Plug-in Hybrid (2021 year). Manual in english — page 35

||
MAINTENANCE AND SERVICE
* Option/accessory.
602
Data download may affect other services
that transmit data, e.g. Internet radio. If the
effect on other services is experienced as
disruptive then the download can be inter-
rupted. Alternatively, it may be appropriate
to switch off or interrupt other services.
An update can be interrupted when the
ignition is switched off and the car is left.
However, the update does not have to be
completed before the car is left, this is
because the update is resumed the next
time the car is used.
Update all system software
–
Select
Install all
at the bottom of the list.
If no list is desired, then the
Install all
option
can be selected at
System updates
.
Update individual system software
programs
–
Select
Install
for the software required.
Cancelling software download
–
Tap on X in the activity indicator that has
replaced
Install
at the start of the down-
load.
Note that only the download can be cancelled,
when the installation phase has started, this
cannot be cancelled.
Deactivating the background search
for software update
Automatic search for software updates is acti-
vated when the car is delivered from the fac-
tory, but this function can be deactivated.
1. Tap on
Settings
in the centre display's
top view.
2. Press
System
Download Centre
.
3. Deselect
Auto Software Update
.
Related information
•
•
•
Navigating in the centre display's views
(p. 113)
Car status
The general status of the car can be shown in
the centre display.
The
Car Status
app is started
from app view in the centre
display and has four tabs:
•
Messages
- status messages
•
Status
- checking engine oil level and
AdBlue level
3
•
TPMS
- checking the tyre pressure
•
Appointments
- appointment information
and car information
4
Related information
•
Handling a message saved from the driver
display (p. 105)
•
Checking and filling with engine oil
(p. 613)
•
Tyre pressure monitoring system
•
Book service and repair (p. 603)
•
Sending car information to a workshop
(p. 604)
•
-------------------------------------------------------------------------------------------------------------------------------------------------------------
MAINTENANCE AND SERVICE
}}
* Option/accessory.
603
Book service and repair
5
This service provides a way to send a booking
request for service and workshop visit
directly in the car.
When it is time for service, and in some cases
when the car is in need of repair, a message
will appear in the driver display and at the top
of the centre display. The service date is deter-
mined by how much time has passed, hours
that the engine has been running, or distance
driven since the last service.
Before the service can be used
•
Create a Volvo ID and register it to the car.
•
To send and receive booking information,
the car must be connected to the Inter-
net
6
.
Book a service
Fill in a booking request when so required or
when a message indicating that the car needs
a service or repair is shown.
1. Open the
Car Status
app from the app
view in the centre display.
2. Press
Appointments
.
3. Press
Request appointment
.
4. Make sure that the correct
Volvo ID
is
filled in.
5. Make sure that the desired
Workshop
information
is filled in.
6. Fill in the field
Tap to write information
to the workshop
if there is anything you
would like done during the workshop visit
or any other important information to your
workshop.
7. Press
Send appointment request
.
> You will receive an appointment sug-
gestion via e-mail within a couple of
days
7
.
In certain markets, once you have sent
the appointment request, the message
that the car needs service is extin-
guished in the driver display.
8. Tap on
Cancel request
to cancel your
request.
The booking enquiry sent from the car
includes car information that facilitates work-
shop planning.
The retailer comes back with a digital booking
proposal. Information about your dealer is also
available in the car so that you can contact
your workshop.
Accept the appointment suggestion
When the car has received an appointment
suggestion, a message will be shown at the
top of the centre display.
1. Tap the message.
2. If the suggested booking is acceptable,
tap on
Accept
. Otherwise, tap on
Send
new proposal
or
Decline
.
For certain markets, the system reminds you
of a scheduled appointment time as it
approaches and the navigation system
8
can
also guide you to the workshop when the time
comes.
If you experience problems with this serv-
ice – contact your Volvo dealer.
3
AdBlue Applies to cars with diesel engines.
4
Applies to certain markets.
5
Applies to certain markets.
6
Data is transferred (data traffic) when using the Internet, and this may involve a cost.
7
This time frame may vary depending on market.
8
Applies to Sensus Navigation
*
.
-------------------------------------------------------------------------------------------------------------------------------------------------------------

||
MAINTENANCE AND SERVICE
* Option/accessory.
604
Related information
•
•
Sending car information to a workshop
(p. 604)
•
Navigating in the centre display's views
(p. 113)
•
•
Sending car information to a
workshop
9
It is possible to send information for the car
at any time, e.g. if you book a workshop
appointment and want to help your workshop
by providing them with better data so that
your visit can be planned. Sending car infor-
mation is not the same as booking a service
appointment.
1. Open the
Car Status
app from the app
view in the centre display.
2. Press
Appointments
.
3. Press
Send car data
.
> A message that vehicle data are being
sent is shown at the top of the centre
display. You can cancel data transmis-
sion by tapping the X in the activity
indicator.
The information is sent via the car's
Internet connection
10
.
This car information can be accessed by any
retailer if they have the car's identification
number (VIN
11
).
Car information content
The data sent is the last information saved (the
last time the car was running) and includes
information in the following areas:
•
service requirement
•
time since last service
•
function status
•
fluid levels
•
meter reading
•
the car's vehicle identification number
(VIN
11
)
•
the car's software version
•
the car's diagnostics data.
Related information
•
Book service and repair (p. 603)
•
•
Navigating in the centre display's views
(p. 113)
•
9
Applies to certain markets.
10
Data is transferred (data traffic) when using the Internet, and this may involve a cost.
11
Vehicle Identification Number.
-------------------------------------------------------------------------------------------------------------------------------------------------------------
MAINTENANCE AND SERVICE
}}
* Option/accessory.
605
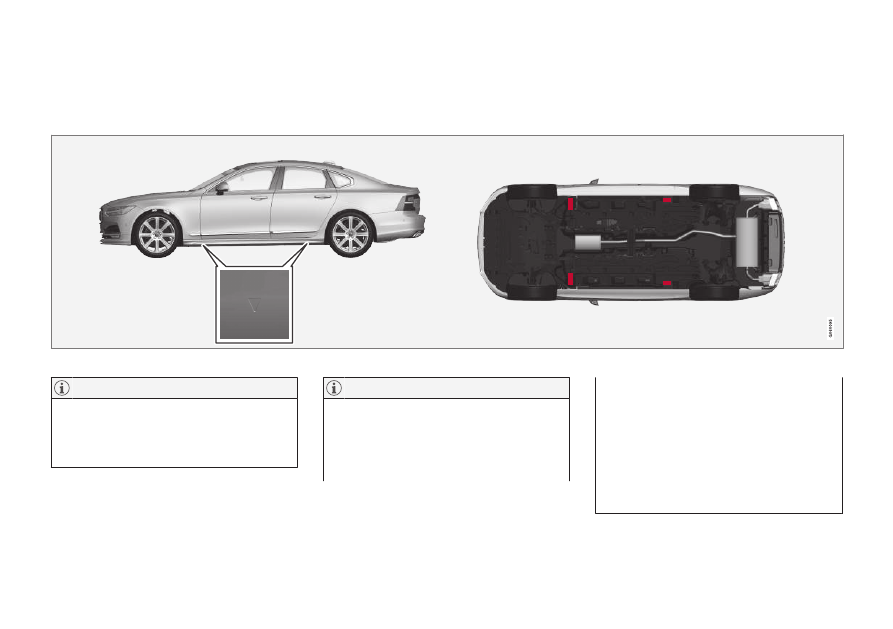
Raise the car
When raising the car, it is important that the
jack is fitted in the intended points on the
car's underbody.
The triangles in the plastic cover indicate the locations of the lifting points (marked in red).
Applies to cars with
Leveling Control
*
: If
the car is equipped with air suspension,
this must be disabled before the car is
raised.
Volvo recommends only using the jack that
belongs to the car model in question. If a
jack is selected other than the one recom-
mended by Volvo, follow the instructions
supplied with the equipment.
The normal car jack is only designed for
occasional, short-term use, such as when
changing a wheel after a puncture. If the
car is to be jacked up more often, or for a
longer time than is required just to change
a wheel, use of a garage jack is recom-
mended. In this instance, follow the
instructions for use that come with the
equipment.
-------------------------------------------------------------------------------------------------------------------------------------------------------------
||
MAINTENANCE AND SERVICE
* Option/accessory.
606
WARNING
•
Apply the parking brake and set the
gear selector in Park position (
P
).
•
Chock the wheels standing on the
ground using solid wood blocks or
large stones.
•
Check that the jack is not damaged,
that the threads are thoroughly lubri-
cated and that it is free from dirt.
•
Check that the jack is resting on a firm,
level surface that is not slippery and is
not slanted.
•
The jack must be correctly attached in
the jack's bracket.
•
Never position anything between the
ground and the jack, nor between the
jack and the car's jacking point.
•
Passengers must leave the car when it
is raised on the jack.
•
If a wheel must be changed in a traf-
ficked environment, passengers must
stand in a safe place.
•
Use a jack designed for the car when
changing tyres. Use supports to secure
the car for all other work.
•
Never crawl under the car or reach
under with a part of your body when it
is raised on a jack.
WARNING
If the car is raised using a workshop jack,
this must be placed beneath one of the
four jacking points. Take care to position
the workshop jack so that the car cannot
slip off. Make sure that the jack plate is fit-
ted with a rubber guard so that the car
remains stable and is not damaged. Always
use axle stands or similar.
When not in use, the jack
*
should be stored in
its stowage space under the cargo area floor.
Read through all instructions before begin-
ning. Take out the tools needed before jacking
up the car.
1. Set up the warning triangle and activate
the hazard warning lights if, for example, a
tyre is being changed in a trafficked loca-
tion.
2. Apply the parking brake and engage gear
position
P
, or engage first gear if the car
has a manual gearbox.
If the car is equipped with
Leveling
Control
*
, this must be disabled before the
car is raised.
3. Chock in front of and behind the wheels
that remain on the ground. Use, for exam-
ple, heavy wooden blocks or large stones.
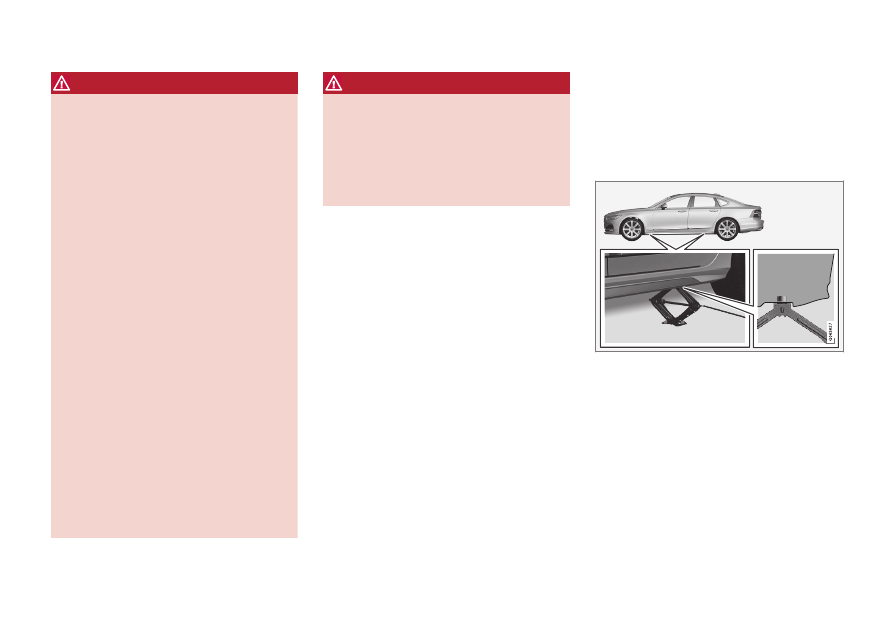
4. Position the jack or the lift arms at the
designated spots of the car's undercar-
riage. The triangle markings in the plastic
cover indicate the locations of the jacking/
lifting points. There are two jacking points
on each side of the car. There is a recess
for the jack at each point.
5. Position the jack on level, firm and non-
slippery ground under the jacking point
that will be used.
6. Crank up until it is correctly aligned and so
that it makes contact with the car's jack-
ing point. Check that the head of the jack
(or lifting arms at a workshop) is correctly
positioned in the jacking point so that the
bump in the centre of the head fits into the
jacking point hole, and check that the
base of the jack is positioned vertically
below the jacking point.
-------------------------------------------------------------------------------------------------------------------------------------------------------------

MAINTENANCE AND SERVICE
* Option/accessory.
607
7. Turn the jack so that the crank is as far
away from the side of the car as possible,
at which point the jack's arms are perpen-
dicular to the direction of the car.
8. Raise the car high enough to perform the
intended measure.
Related information
•
•
•
•
-------------------------------------------------------------------------------------------------------------------------------------------------------------
MAINTENANCE AND SERVICE
* Option/accessory.
608
Servicing the climate control
system
The air conditioning system must only be
serviced and repaired by an authorised work-
shop.
Troubleshooting and repair
The air conditioning system contains fluores-
cent tracing agents. Ultraviolet light must be
used during leak detection.
Volvo recommends that an authorised Volvo
workshop is contacted.
The car's climate control system uses a freon-
free refrigerant either R1234yf or R134a
depending on market. Information about
which refrigerant the car's climate control sys-
tem uses is printed on a decal located on the
inside of the bonnet.
WARNING
The air conditioning system contains pres-
surised refrigerant R134a. This system
must only be serviced and repaired by an
authorised workshop.
WARNING
The air conditioning system contains pres-
surised refrigerant R1234yf. In accordance
with SAE J2845 (Technician Training for
Safe Service and Containment of Refriger-
ants Used in Mobile A/C System), service
and repair of the refrigerant system must
only be performed by trained and certified
technicians in order to ensure the safety of
the system.
Related information
•
Volvo service programme (p. 600)
Head up display when replacing
the windscreen
*
Cars with head-up display are equipped with
a special type of windscreen that meets the
requirements for displaying the projected
image.
Volvo recommends that you contact an
authorised Volvo workshop when replacing
the windscreen. The correct version of the
windscreen must be fitted in order that the
head-up display's graphics shall be displayed
correctly.
Related information
•
•
-------------------------------------------------------------------------------------------------------------------------------------------------------------
MAINTENANCE AND SERVICE
}}
609
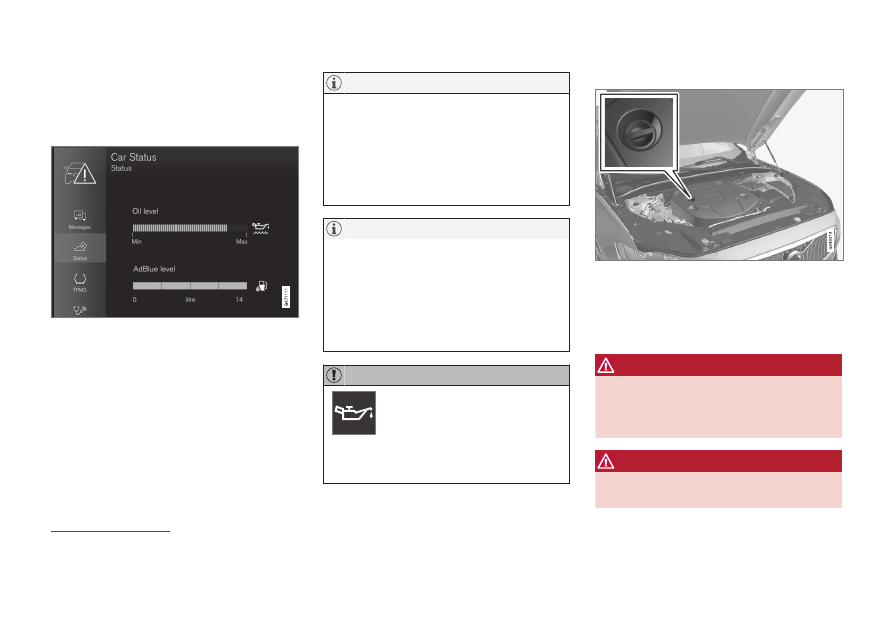
Opening and closing the bonnet
The bonnet can be opened using the handle
in the passenger compartment and a handle
under the bonnet.
Open the bonnet
Pull the handle on the left of the brake
pedal in order to release the bonnet from
fully closed position.
Turn the handle under the bonnet anti-
clockwise to release the bonnet from the
lock catches and lift the bonnet.
Warning - bonnet not closed
When the bonnet is released, a
warning symbol and graphics in the
driver display will light up and an
acoustic reminder will sound. If the
car starts rolling, an acoustic warning signal
will repeat.
If the warning symbol is lit or the warning
signal is heard despite the bonnet being
closed properly, contact an authorised
Volvo workshop.
Close the bonnet
1. Push the bonnet down until it starts to fall
from its own weight.
2. When the bonnet stops against the lock
catch, push the bonnet to close it com-
pletely.
WARNING
Risk of crushing! Ensure that the closing
path under the bonnet is not obstructed,
otherwise there is a risk of personal injury.
WARNING
Check that the bonnet locks properly when
closed. The bonnet must engage at both
sides audibly.
Bonnet not completely closed.
-------------------------------------------------------------------------------------------------------------------------------------------------------------
||
MAINTENANCE AND SERVICE
610
Bonnet completely closed.
WARNING
Never drive with an open
bonnet!
If this symbol is visible –
or something else indi-
cates that the bonnet is
not fully closed while driv-
ing – stop immediately
and close it properly.
Related information
•
Engine compartment overview (p. 610)
•
Door and seatbelt reminder (p. 53)
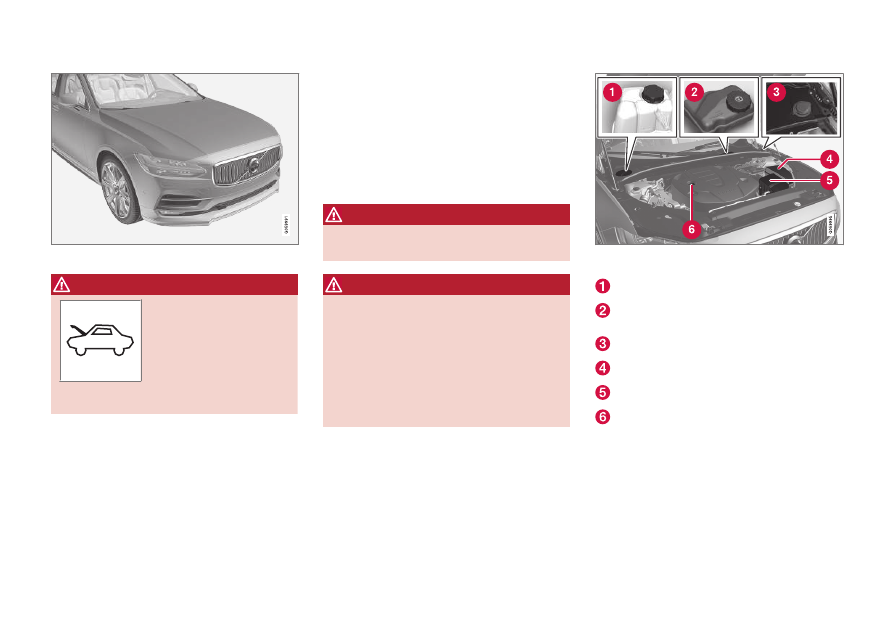
Engine compartment overview
The overview shows some service-related
components.
Some of the components included in the car's
electric drive system are located under the
bonnet. Exercise caution in this area and only
touch anything that is related to normal main-
tenance.
WARNING
Orange-coloured cables must only be han-
dled by qualified personnel.
WARNING
Several components in the car work with
high-voltage current that could be danger-
ous in the event of incorrect intervention.
•
Do not touch anything that is not
clearly described in the owner's man-
ual.
•
Exercise caution when checking/refill-
ing fluids in the engine compartment.
The appearance of the engine compartment may dif-
fer depending on model and engine variant.
Coolant expansion tank
Reservoir for brake fluid (located on the
driver's side)
Washer fluid filler pipe
Central electrical unit
Air filter
Engine oil filler pipe
-------------------------------------------------------------------------------------------------------------------------------------------------------------
MAINTENANCE AND SERVICE
}}
611
Location of warning decal for the engine compart-
ment. The appearance of the engine compartment
may differ depending on model and engine variant.
It is not intended that the decals illustrated
in the owner's manual should be exact rep-
licas of those in the car. They are included
to show their approximate appearance and
locations in the car. The information that
applies to your particular car can be found
on the decal on the car.
WARNING
Remember that the radiator fan (located at
the front of the engine compartment,
behind the radiator) may start or continue
to operate automatically for up to approx.
6 minutes after the engine has been
switched off.
Always have the engine cleaned by a work-
shop - an authorised Volvo workshop is
recommended. There is a risk of fire if the
engine is hot.
WARNING
The ignition system works at a very high
and hazardous voltage. The car's electrical
system must always be in ignition position
0
when work is being performed in the
engine compartment.
Do not touch the spark plugs or ignition
coil when the car's electrical system is in
ignition position
II
or when the engine is
hot.
Related information
•
Opening and closing the bonnet (p. 609)
•
•
•
Fuses in engine compartment (p. 622)
•
Checking and filling with engine oil
(p. 613)
•
Engine oil
An approved engine oil must be used in order
that the recommended service intervals and
warranty can be applied.
Location of warning decal for the engine compart-
ment. The appearance of the engine compartment
may differ depending on model and engine variant.
Volvo recommends:
-------------------------------------------------------------------------------------------------------------------------------------------------------------
||
MAINTENANCE AND SERVICE
612
If the engine oil cannot be checked on a regu-
lar basis and the level falls too low, there is a
risk that this will cause serious damage to the
engine.
It is not intended that the decals illustrated
in the owner's manual should be exact rep-
licas of those in the car. They are included
to show their approximate appearance and
locations in the car. The information that
applies to your particular car can be found
on the decal on the car.
In order to fulfil the requirements for the
engine's service intervals all engines are
filled with a specially adapted synthetic
engine oil at the factory. The choice of oil
has been made very carefully with regard
to service life, starting characteristics, fuel
consumption and environmental impact.
An approved engine oil must be used in
order that the recommended service inter-
vals can be applied. Only use a prescribed
grade of oil for both filling and oil change,
otherwise there is a risk of the service life,
starting characteristics, fuel consumption
and environmental impact of the car being
affected.
If engine oil of the prescribed grade and
viscosity is not used, engine related com-
ponents may become damaged. Volvo dis-
claims any liability for any such damage.
Volvo recommends that oil changes are
carried out at an authorised Volvo work-
shop.
Symbols for low oil level
Volvo uses different systems to warn about
the oil level if it is too low/high, or in the event
of low oil pressure. The driver display's warn-
ing symbol for low oil pressure is used for the
oil pressure sensor
. For oil level sensor,
the driver is informed via the driver display's
warning symbol
and display texts. Cer-
tain variants have both systems. Contact a
Volvo dealer for more information.
Change the engine oil and oil filter in accord-
ance with the intervals specified in the Service
and Warranty Booklet. Using oil of a higher
than specified grade is permitted. If the car is
driven in adverse conditions, Volvo recom-
mends using an oil of a higher grade than the
one specified.
Related information
•
Checking and filling with engine oil
(p. 613)
•
Engine oil — specifications (p. 667)
•
Adverse driving conditions for engine oil
(p. 668)
•
-------------------------------------------------------------------------------------------------------------------------------------------------------------
MAINTENANCE AND SERVICE
}}
613
Checking and filling with engine oil
The oil level is detected with the electronic oil
level sensor.
See oil level in the centre display
Example of graphic for oil level in the centre display
The oil level is visualised using the electronic
oil level gauge in the centre display when the
car has been started. The oil level should be
checked regularly.
1. Open the
Car Status
app from the app
view in the centre display.
2. Press
Status
to show the oil level.
The system cannot directly detect changes
when the oil is filled or drained. The car
must have been driven approx. 30 km
(approx. 20 miles) and have been station-
ary for 5 minutes with the engine switched
off and on level ground before the oil level
indication is correct.
If the right conditions for measuring the oil
level (time after engine shutdown, the car's
inclination, outside temperature, etc.) are
not met, then the message
No value
available
will be shown in the centre dis-
play. This does
not
mean that there is
something wrong in the car's systems.
If this symbol is shown then the
oil pressure may be too low. Stop
the car as quickly as possible and
have the car recovered to a work-
shop – an authorised Volvo workshop is
recommended.
Fill the engine oil
Filler pipe
12
,
13
In some cases, oil may need to be topped up
between service intervals. No action with
regard to engine oil level needs to be taken
until a message is shown in the driver display.
WARNING
If the
Engine oil level
Service required
message is shown, visit a workshop – an
authorised Volvo workshop is recom-
mended. The oil level may be too high.
WARNING
Do not spill oil onto the hot exhaust mani-
fold due to the risk of fire.
12
Engines with electronic oil level sensor do not have a dipstick.
13
The appearance of the engine compartment may differ depending on model and engine variant.
-------------------------------------------------------------------------------------------------------------------------------------------------------------

||
MAINTENANCE AND SERVICE
614
If the
Engine oil level low
Refill 1 litre
message is shown, fill only with the speci-
fied volume, e.g. 1 litre (1 quart).
Related information
•
•
Adverse driving conditions for engine oil
(p. 668)
•
Engine oil — specifications (p. 667)
•
•
Coolant
The coolant ensures that surplus heat is dis-
tributed in the circuit, e.g. in order to heat the
starter battery or provide heat for the passen-
ger compartment.
Only coolant approved by Volvo should be
used in order to prevent impairment of the
cooling system, engine problems, etc.
Prescribed grade:
Ready-mixed coolant
approved by Volvo. If concentrated coolant is
used, mix with 50% water (of approved water
quality, not salt water, etc.). Consult a Volvo
dealer if unsure.
Only coolant approved by Volvo should be
used in order to prevent impairment of the
cooling system, engine problems, etc.
WARNING
Swallowing coolant is hazardous, it may
cause damage to organs (kidneys). The
product contains ethylene glycol, inhibitor,
water, etc.
Related information
•
Topping up coolant
When topping up the coolant, follow the
instructions on the packaging. Never top up
with water only. The risk of freezing increases
with both too little and too much coolant con-
centrate.
If there is coolant under the car, if there is
coolant smoke, or if more than 2 litres (approx.
2 quarts) have been filled, always call for
recovery to avoid the risk of engine damage
due to a defective cooling system when
attempting to start the car.
WARNING
The coolant may be very hot. Never open
the cap when the coolant is hot. If a top-up
is required, unscrew the expansion tank
cap slowly to allow any overpressure to
disappear.
-------------------------------------------------------------------------------------------------------------------------------------------------------------

MAINTENANCE AND SERVICE
}}
615
Coolant expansion tank, left-hand drive car
Screw off the cap in the plastic cover.
Screw off the cap and top up with coolant
if necessary. The coolant level must not
exceed the yellow
MAX
mark inside the
expansion tank.
Reinstall the parts in reverse order.
Coolant expansion tank, right-hand drive car
Grip the hatch's handle and lift/jiggle the
hatch from the plastic cover.
Screw off the cap and top up with coolant
if necessary. The coolant level must not
exceed the yellow
MAX
mark inside the
expansion tank.
Reinstall the parts in reverse order.
-------------------------------------------------------------------------------------------------------------------------------------------------------------

||
MAINTENANCE AND SERVICE
616
•
Harmful if ingested. May cause organ
(kidney) damage.
•
Use ready-mixed coolant as recom-
mended by Volvo. If concentrated liq-
uid is used, make sure that the ratio is
50 % coolant to 50 % water of an
approved quality.
•
Do not mix different coolants.
•
Only new coolant should be used
when replacing major cooling system
components to ensure the system has
sufficient corrosion protection.
•
The engine must only be run with a
well-filled cooling system. Otherwise,
temperatures that are too high may
occur resulting in the risk of damage
(cracks) in the cylinder head.
•
A high content of chlorine, chlorides
and other salts may cause corrosion in
the cooling system.
Related information
•
Engine compartment overview (p. 610)
•
-------------------------------------------------------------------------------------------------------------------------------------------------------------
MAINTENANCE AND SERVICE
}}
617
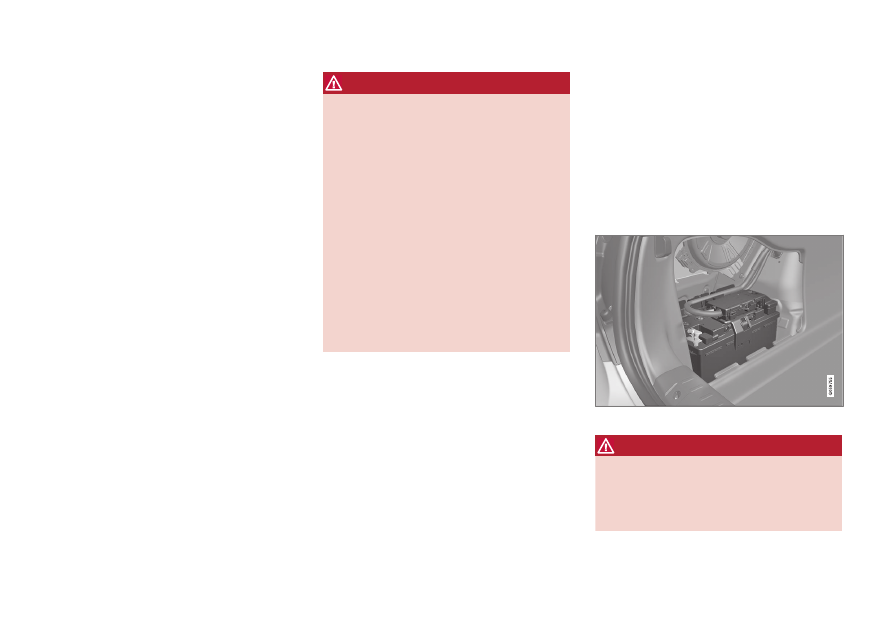
Starter battery
The starter battery is used to start up the
electrical system and drive electrical equip-
ment in the car. The hybrid battery is used
when the internal combustion engine is
started.
The electrical system is single-pole and uses
the chassis and engine casing as a conductor.
The starter battery is a 12 V AGM battery
(Absorbed Glass Mat), designed for regenera-
tive charging, and to support the functionality
of the car's different systems.
The service life and function of the starter bat-
tery is influenced by factors such as the num-
ber of starts, discharging, driving style, driving
conditions, climatic conditions etc.
•
Never disconnect the starter battery when
the engine is running.
•
Check that the cables to the starter bat-
tery are correctly connected and properly
tightened.
WARNING
•
The battery can generate oxyhydrogen
gas, which is highly explosive. A spark
can be formed if a jump lead is con-
nected incorrectly, and this can be
enough for the battery to explode.
•
Do not connect the jump leads to any
fuel system component or any moving
part. Be careful of hot engine parts.
•
The battery contains sulphuric acid,
which can cause serious burns.
•
If sulphuric acid comes into contact
with eyes, skin or clothing, flush with
large quantities of water. If acid
splashes into the eyes - seek medical
attention immediately.
•
Never smoke near the battery.
The service life and capacity of the
starter battery
The service life of the battery is affected by
several factors, including factors such as the
number of starts, discharging, driving style,
driving conditions, climatic conditions, etc.
Battery starting capacity decreases gradually
with time and therefore needs to be recharged
if the car is not used for a long time or when it
is only driven short distances. Extreme cold
further limits starting capacity. If the starter
battery is discharged a large number of times,
it will negatively affect the service life.
In order to maintain the starter battery in good
condition, it is recommended that there is at
least 15 minutes driving/week or that the bat-
tery is connected to a battery charger with
automatic trickle charging. A starter battery
that is kept fully charged has a maximum serv-
ice life.
Location
The starter battery is located in the cargo area.
WARNING
If the starter battery is disconnected, the
automatic opening and closing function
must be reset to work properly. A reset
must take place for pinch protection to
work.
-------------------------------------------------------------------------------------------------------------------------------------------------------------
Нет комментариевНе стесняйтесь поделиться с нами вашим ценным мнением.
Текст