Toyota Sequoia (2005). Manual — part 872
BE264–03
–
BODY ELECTRICAL
POWER WINDOW CONTROL SYSTEM
BE–73
3477
ADJUSTMENT
HOW TO RESET POWER WINDOW MOTOR (LIMIT SWITCH)
NOTICE:
If the jam protection function is not functioning properly, perform the following procedures.
HINT:
It is necessary to reset the power window motor (in initial position for the limit switch) when separating the
window regulator from the power window motor or operating the window regulator with the door glass not
installed.
(a)
Remove the power window motor.
HINT:
Place matchmarks on the power window motor and window regulator gear.
(b)
Connect the power window motor and power window switch to the wire harness of the vehicle.
(c)
Turn the ignition switch ON.
(d)
Press the power window UP switch until the motor completes 6 to 10 rotations (4 seconds of rotation
or more).
(e)
Assemble the power window motor and regulator.
HINT:
Install the motor when the regulator arm is below the middle point.
Align the matchmarks on the power window motor and window regulator gear when installing the pow-
er window motor.
(f)
Assemble the power window regulator and door glass.
HINT:
Never rotate the motor downward until the completion of the window glass installation.
(g)
Connect the power window switch to the wire harness and turn the ignition switch ON.
(h)
Repeat UP and DOWN operation several times manually.
(i)
Check that AUTO UP
→
AUTO DOWN automatic operation is normal.
NOTICE:
The jam protection function does not operate immediately after performing reset.
If the jam protection function is triggered and the window lowers after the window has been fully
closed by AUTO UP operation (step i), reset the power window motor again.
(j)
Check the power window function.
BE073–07
I28413
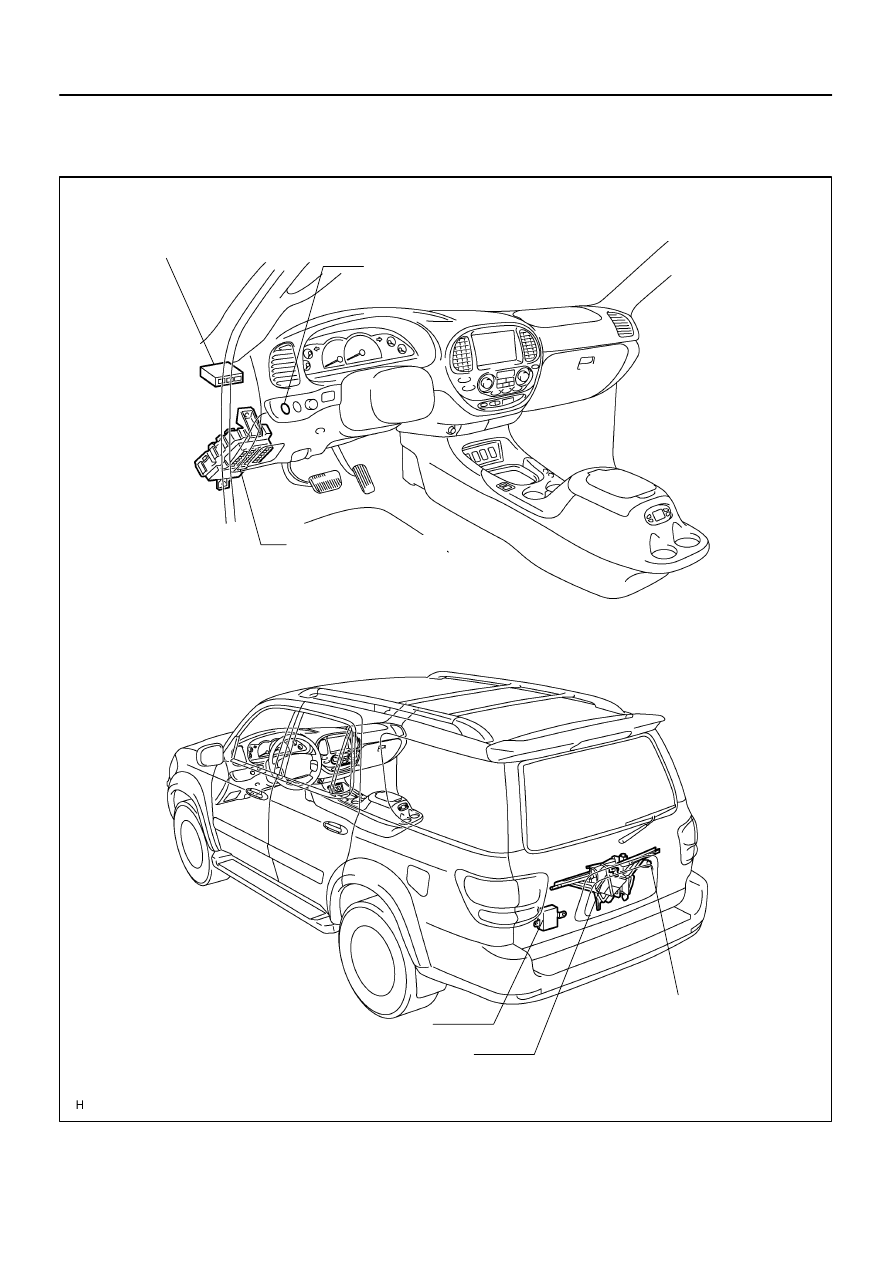
Back Door Power
Window Switch
Instrument Panel J/B
Back Door Key Lock
and Unlock Switch
Back Door Control Switch
Back Door Power Window Regulator
Assembly
Back Door Power Window Motor
Body ECU
(Located behind the
Instrument Panel)
Back Door ECU
(Located inside of the back door trim board)
BE–74
–
BODY ELECTRICAL
BACK DOOR POWER WINDOW CONTROL SYSTEM
3478
BACK DOOR POWER WINDOW CONTROL SYSTEM
LOCATION
BE2MM–01
I18616
I18690
2
3
1
DOWN
UP
I27714
I27715
–
BODY ELECTRICAL
BACK DOOR POWER WINDOW CONTROL SYSTEM
BE–75
3479
INSPECTION
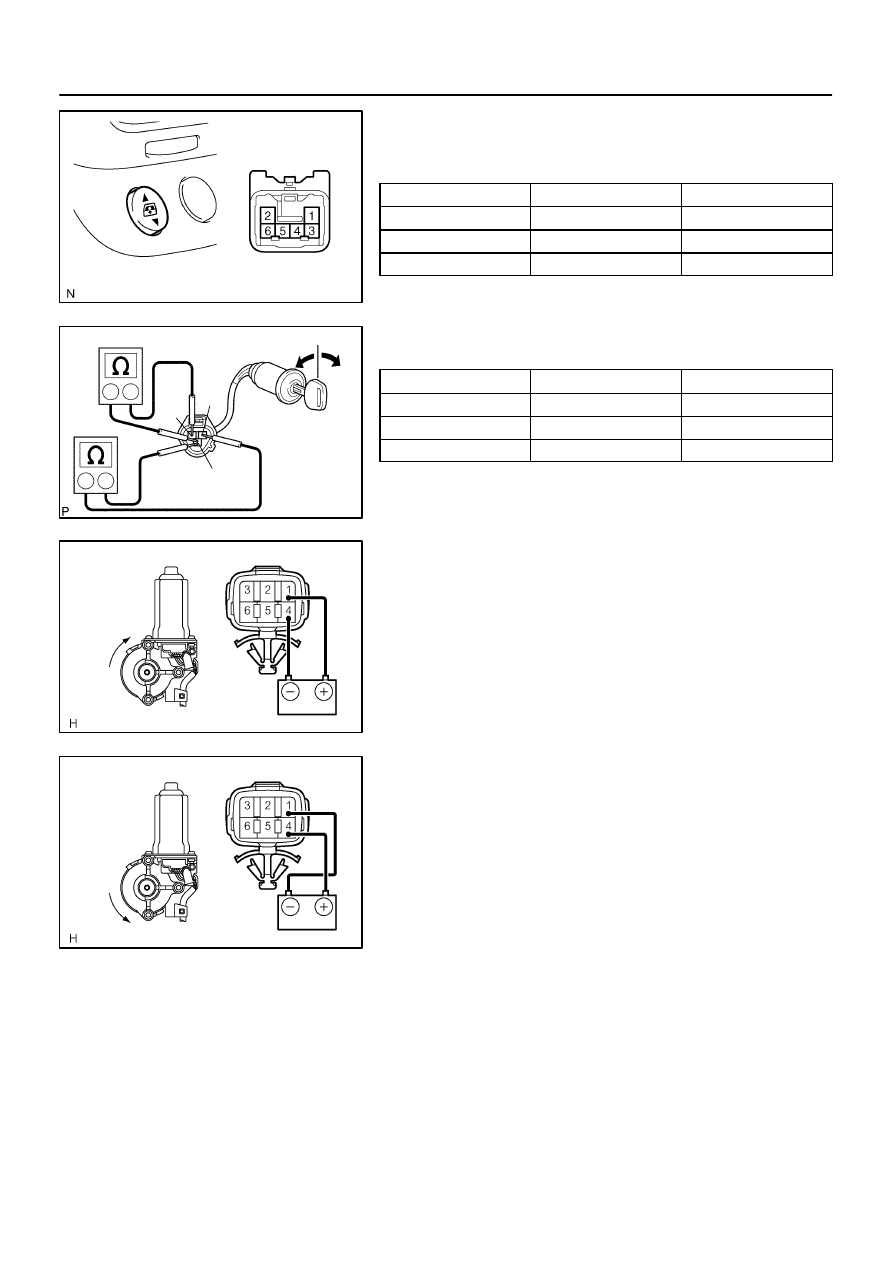
1.
INSPECT BACK DOOR POWER WINDOW SWITCH
CONTINUITY
Switch position
Tester connection
Specified condition
UP
3 – 6
Continuity
OFF
–
No continuity
DOWN
3 – 5
Continuity
If continuity is not as specified, replace the switch.
2.
INSPECT BACK DOOR KEY LOCK AND UNLOCK
SWITCH CONTINUITY (Back Door Control Switch)
Switch position
Tester connection
Specified condition
UP
1 – 3
Continuity
OFF
–
No continuity
DOWN
2 – 3
Continuity
If continuity is not as specified, replace the switch.
3.
INSPECT BACK DOOR POWER WINDOW MOTOR OP-
ERATION
(a)
Connect the positive (+) lead from the battery to terminal
1 and the negative (–) lead to terminal 4 and check that
the motor turns clockwise.
(b)
Connect the positive (+) lead from the battery to terminal
4 and the negative (–) lead to terminal 1 and check that
the motor turns counterclockwise.
If operation is not as specified, replace the back door power
window motor.
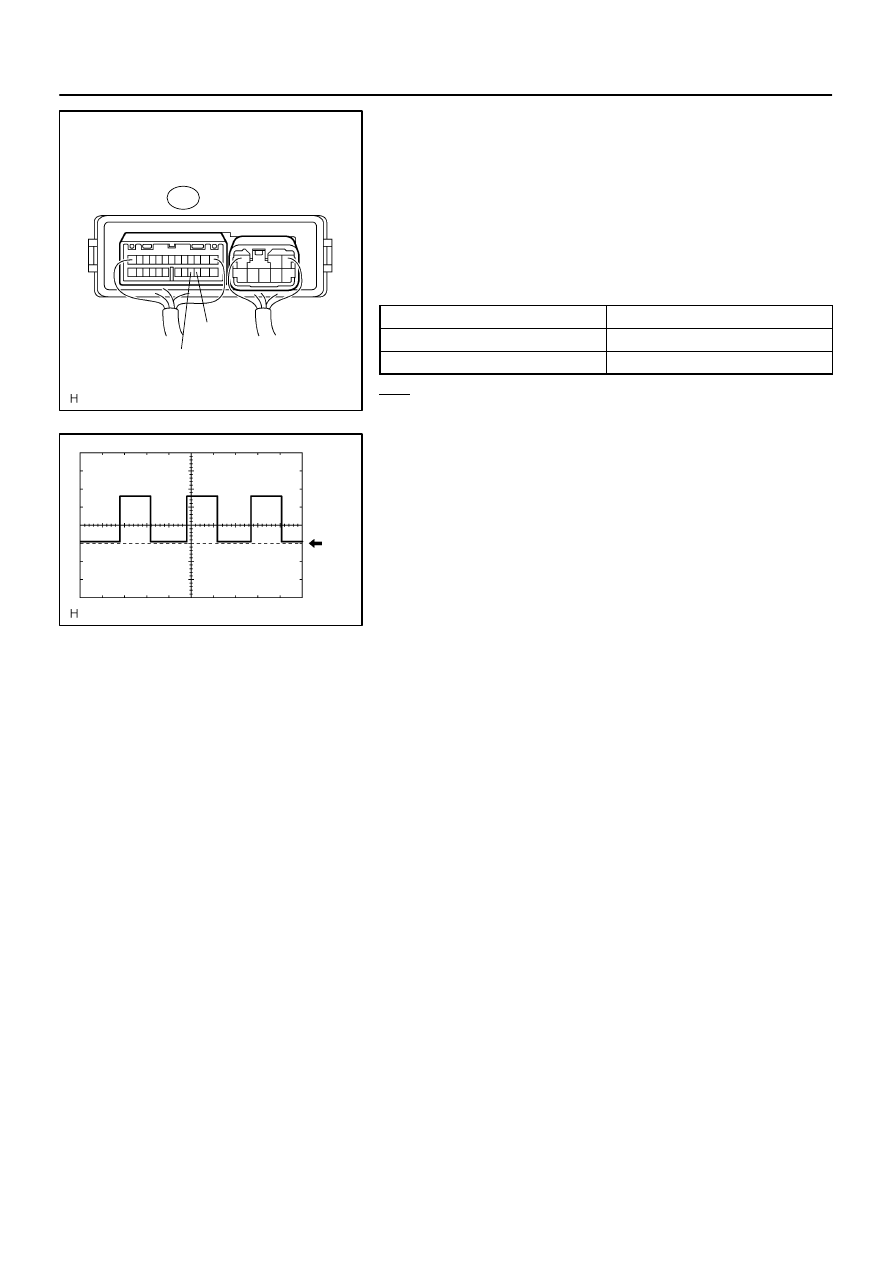
I28582
Back Door ECU:
A
17
16
I28583
GND
BE–76
–
BODY ELECTRICAL
BACK DOOR POWER WINDOW CONTROL SYSTEM
3480
4.
INSPECT BACK DOOR POWER WINDOW PULSE
SENSOR (Using oscilloscope)
(a)
Remove the back door ECU with the connectors still con-
nected.
(b)
Connect the oscilloscope to terminals A–16 and A–17
and body ground.
(c)
Operate the back door power window switch.
(d)
Check the signal waveform according to the condition (s)
in the table below.
Item
Condition
Tool setting
5V/DIV, 10 ms/DIV
Vehicle condition
Ignition switch ON
OK:
As shown in the illustration
5.
INSPECT JAM PROTECTION FUNCTION
NOTICE:
Be careful not to get any part of your body caught when
checking.
HINT:
When performing resetting of the limit switch, do checking after
repeating up and down of the glass with automatic operation.
(a)
Confirmation of AUTO up operation:
Confirm that the window will close fully with AUTO up op-
eration.
(b)
Checking operation of the jam protection function:
(1)
Raise the window with AUTO up operation and
check that the window goes down when it touches
the inserted handle of the hammer.
(2)
Confirm that the window will then stop going down
after about 200 mm (7.87 in).
HINT:
When removing the glass, glass guide, regulator, etc. be sure
to perform a check of the jam protection function.
If the jam protection is not functioning properly, adjust the power
window motor switch and pulse switch.
Нет комментариевНе стесняйтесь поделиться с нами вашим ценным мнением.
Текст