Toyota Corolla Hybrid (2022 year). Manual in english — page 15
241
4-6. Driving tips
4
Dr
iv
ing
4-6.Driving tips
When using Eco drive mode, the
torque corresponding to the
accelerator pedal depression
amount can be generated more
smoothly than it is in normal
conditions. In addition, the oper-
ation of the air conditioning sys-
tem (heating/cooling) will be
minimized, improving the fuel
economy. (
The Eco-friendly driving is pos-
sible by keeping the indicate of
Hybrid System Indicator within
Eco area. (
Shift the shift lever to D when
stopped at a traffic light, or driv-
ing in heavy traffic etc. Shift the
shift lever to P when parking.
When using the N, there is no
positive effect on fuel consump-
tion. In the N, the gasoline
engine operates but electricity
cannot be generated. Also,
when using the air conditioning
system, etc., the hybrid battery
(traction battery) power is con-
sumed.
Drive your vehicle smoothly.
Avoid abrupt acceleration and
deceleration. Gradual accel-
eration and deceleration will
make more effective use of
the electric motor (traction
motor) without having to use
gasoline engine power.
Avoid repeated acceleration.
Repeated acceleration con-
sumes hybrid battery (trac-
tion battery) power, resulting
in poor fuel consumption. Bat-
tery power can be restored by
driving with the accelerator
pedal slightly released.
Make sure to operate the brakes
gently and in a timely manner. A
greater amount of electrical
energy can be regenerated
when slowing down.
Repeated acceleration and
deceleration, as well as long
waits at traffic lights, will lead to
bad fuel economy. Check traffic
reports before leaving and avoid
delays as much as possible.
Hybrid vehicle driving
tips
For economical and ecolog-
ical driving, pay attention to
the following points:
Using Eco drive mode
Use of Hybrid System
Indicator
Shift lever operation
Accelerator pedal/brake
pedal operation
When braking
Delays
242
4-6. Driving tips
When driving in a traffic jam,
gently release the brake pedal
to allow the vehicle to move for-
ward slightly while avoiding
overuse of the accelerator
pedal. Doing so can help control
excessive gasoline consump-
tion.
Control and maintain the vehicle
at a constant speed. Before
stopping at a toll booth or simi-
lar, allow plenty of time to
release the accelerator and gen-
tly apply the brakes. A greater
amount of electrical energy can
be regenerated when slowing
down.
Use the air conditioning only
when necessary. Doing so can
help reduce excessive gasoline
consumption.
In summer: When the ambient
temperature is high, use the
recirculated air mode. Doing so
will help to reduce the burden on
the air conditioning system and
reduce fuel consumption as
well.
In winter: Because the gasoline
engine will not automatically cut
out until it and the interior of the
vehicle are warm, it will con-
sume fuel. Also, fuel consump-
tion can be improved by
avoiding overuse of the heater.
Make sure to check the tire infla-
tion pressure frequently.
Improper tire inflation pressure
can cause poor fuel economy.
Also, as snow tires can cause
large amounts of friction, their
use on dry roads can lead to
poor fuel economy. Use tires
that are appropriate for the sea-
son.
Carrying heavy luggage will lead
to poor fuel economy. Avoid car-
rying unnecessary luggage.
Installing a large roof rack will
also cause poor fuel economy.
Since the gasoline engine starts
up and cuts out automatically
when cold, warming up the
engine is unnecessary. More-
over, frequently driving short
distances will cause the engine
to repeatedly warm up, which
can lead to excess fuel con-
sumption.
Highway driving
Air conditioning
Checking tire inflation
pressure
Luggage
Warming up before driv-
ing
243
4-6. Driving tips
4
Dr
iv
ing
Use fluids that are appropriate
to the prevailing outside tem-
peratures.
• Engine oil
• Engine/power control unit coolant
• Washer fluid
Have a service technician
inspect the condition of the
12-volt battery.
Have the vehicle fitted with
four snow tires or purchase a
set of tire chains for the front
tires.
Ensure that all tires are the same
size and brand, and that chains
match the size of the tires.
Perform the following according
Winter driving tips
Carry out the necessary
preparations and inspec-
tions before driving the
vehicle in winter. Always
drive the vehicle in a man-
ner appropriate to the pre-
vailing weather conditions.
Pre-winter preparations
WARNING
■
Driving with snow tires
Observe the following precautions
to reduce the risk of accidents.
Failure to do so may result in a
loss of vehicle control and cause
death or serious injury.
●
Use tires of the size specified.
●
Maintain the recommended
level of air pressure.
●
Do not drive in excess of 75
mph (120 km/h), regardless of
the type of snow tires being
used.
●
Use snow tires on all, not just
some wheels.
■
Driving with tire chains
Observe the following precautions
to reduce the risk of accidents.
Failure to do so may result in the
vehicle being unable to be driven
safely, and may cause death or
serious injury.
●
Do not drive in excess of the
speed limit specified for the tire
chains being used, or 30 mph
(50 km/h), whichever is lower.
●
Avoid driving on bumpy road
surfaces or over potholes.
●
Avoid sudden acceleration,
abrupt steering, sudden brak-
ing and shifting operations that
cause sudden engine braking.
●
Slow down sufficiently before
entering a curve to ensure that
vehicle control is maintained.
●
Do not use LTA (Lane Tracing
Assist) system.
NOTICE
■
Repairing or replacing snow
tires (vehicles with a tire pres-
sure warning system)
Request repairs or replacement of
snow tires from Toyota dealers or
legitimate tire retailers.
This is because the removal and
attachment of snow tires affects
the operation of the tire pressure
warning valves and transmitters.
Before driving the vehicle

244
4-6. Driving tips
to the driving conditions:
Do not try to forcibly open a
window or move a wiper that
is frozen. Pour warm water
over the frozen area to melt
the ice. Wipe away the water
immediately to prevent it from
freezing.
To ensure proper operation of
the climate control system
fan, remove any snow that
has accumulated on the air
inlet vents in front of the wind-
shield.
Check for and remove any
excess ice or snow that may
have accumulated on the
exterior lights, vehicle’s roof,
chassis, around the tires or on
the brakes.
Remove any snow or mud
from the bottom of your shoes
before getting in the vehicle.
Accelerate the vehicle slowly,
keep a safe distance between
you and the vehicle ahead, and
drive at a reduced speed suit-
able to road conditions.
Park the vehicle and shift the
shift lever to P without setting
the parking brake. The park-
ing brake may freeze up, pre-
venting it from being released.
If the vehicle is parked without
setting the parking brake,
make sure to block the
wheels.
Failure to do so may be dan-
gerous because it may cause
the vehicle to move unexpect-
edly, possibly leading to an
accident.
If the vehicle is parked without
setting the parking brake,
confirm that the shift lever
cannot be moved out of P
*
.
*
: The shift lever will be locked if it is
attempted to be shifted from P to
any other position without
depressing the brake pedal. If the
shift lever can be shifted from P,
there may be a problem with the
shift lock system. Have the vehi-
cle inspected by your Toyota
dealer immediately.
Use the correct tire chain size
when mounting the tire chains.
Chain size is regulated for each
tire size.
Side chain (0.12 in. [3 mm] in
diameter)
When driving the vehicle
When parking the vehicle
Selecting tire chains
245
4-6. Driving tips
4
Dr
iv
ing
Side chain (0.39 in. [10 mm]
in width)
Side chain (1.18 in. [30 mm]
in length)
Cross chain (0.16 in. [4 mm]
in diameter)
Cross chain (0.55 in. [14 mm]
in width)
Cross chain (0.98 in. [25 mm]
in length)
Regulations regarding the use
of tire chains vary depending on
location and type of road.
Always check local regulations
before installing chains.
■
Tire chain installation
Observe the following precautions
when installing and removing
chains:
●
Install and remove tire chains in a
safe location.
●
Install tire chains on the front tires
only. Do not install tire chains on
the rear tires.
●
Install tire chains on the front tires
as tightly as possible. Retighten
chains after driving 1/4
1/2 mile
(0.5
1.0 km).
●
Install tire chains following the
instructions provided with the tire
chains.
Regulations on the use of
tire chains
NOTICE
■
Fitting tire chains (vehicles
with a tire pressure warning
system)
The tire pressure warning valves
and transmitters may not function
correctly when tire chains are fit-
ted.
247
5
5
Audio
Audio
.
5-1. Basic function
Buttons overview. . .
Menu screen . . . ...
Status icon . . . . ..
“Setup” screen . . .
5-2. Basic information before
operation
Initial screen. . . .
Touch screen. . . ...
Home screen. . . ...
Entering letters and num-
bers/list screen operation
. . . . . . . . ..
Screen adjustment . ..
Linking multi-information
display and the system
. . . . . . . . ..
5-3. Connectivity settings
Registering/Connecting a
Bluetooth
®
device . .
Setting Bluetooth
®
details
. . . . . . . . ..
Wi-Fi
®
Hotspot . . .
Apple CarPlay/
Android Auto. . . ..
5-4. Other settings
General settings. . ..
Voice settings. . . ..
Vehicle settings . . ...
5-5. Using the audio/visual
system
Quick reference. . ...
Some basics. . . .
5-6. Radio operation
AM radio/FM radio/Siri-
usXM
®
Satellite
Radio(SXM). . . ...
Internet radio . . . ...
5-7. Media operation
USB memory. . . ...
iPod/iPhone (Apple Car-
Play) . . . . . . ..
Android Auto. . . .
Bluetooth
®
audio . . .
5-8. Audio/visual remote con-
trols
Steering switches . .
5-9. Audio settings
Setup. . . . . . ...
5-10.Tips for operating the
audio/visual system
Operating information..
5-11.Voice command system
operation
Voice command system
. . . . . . . . ..
Command list . . . ..
5-12.Mobile Assistant opera-
tion
Mobile Assistant . . ..
248
5-13.Phone operation
(Hands-free system for
cellular phones)
Quick reference. . ...
Some basics . . . ...
Placing a call using the
Bluetooth
®
hands-free sys-
tem . . . . . . .
Receiving a call using the
Bluetooth
®
hands-free sys-
tem . . . . . . .
Talking on the Bluetooth
®
hands-free system. .
Bluetooth
®
phone message
function. . . . . ..
5-14.Phone settings
Setup. . . . . . ...
5-15.What to do if... (Blue-
tooth
®
)
Troubleshooting . . ..
5-16.Connected Services Over-
view
Functional overview .
Type A: Function achieved
by using a smart phone or
DCM. . . . . . ..
Type B: Function achieved
by using DCM and the sys-
tem . . . . . . .
Type C: Function achieved
by using DCM. . .
Type D: Function achieved
by using DCM and a
smartphone . . . ...
5-17.Connected Services
Operation
Toyota apps. . . . .
5-18.Toyota apps settings
Setup. . . . . . ...
5
Audio
249
5-1. Basic function
5
Audio
5-1.Basic function
*
: If equipped
Audio Plus
Owners of this system should refer to the “NAVIGATION AND MUL-
TIMEDIA SYSTEM OWNER’S MANUAL”.
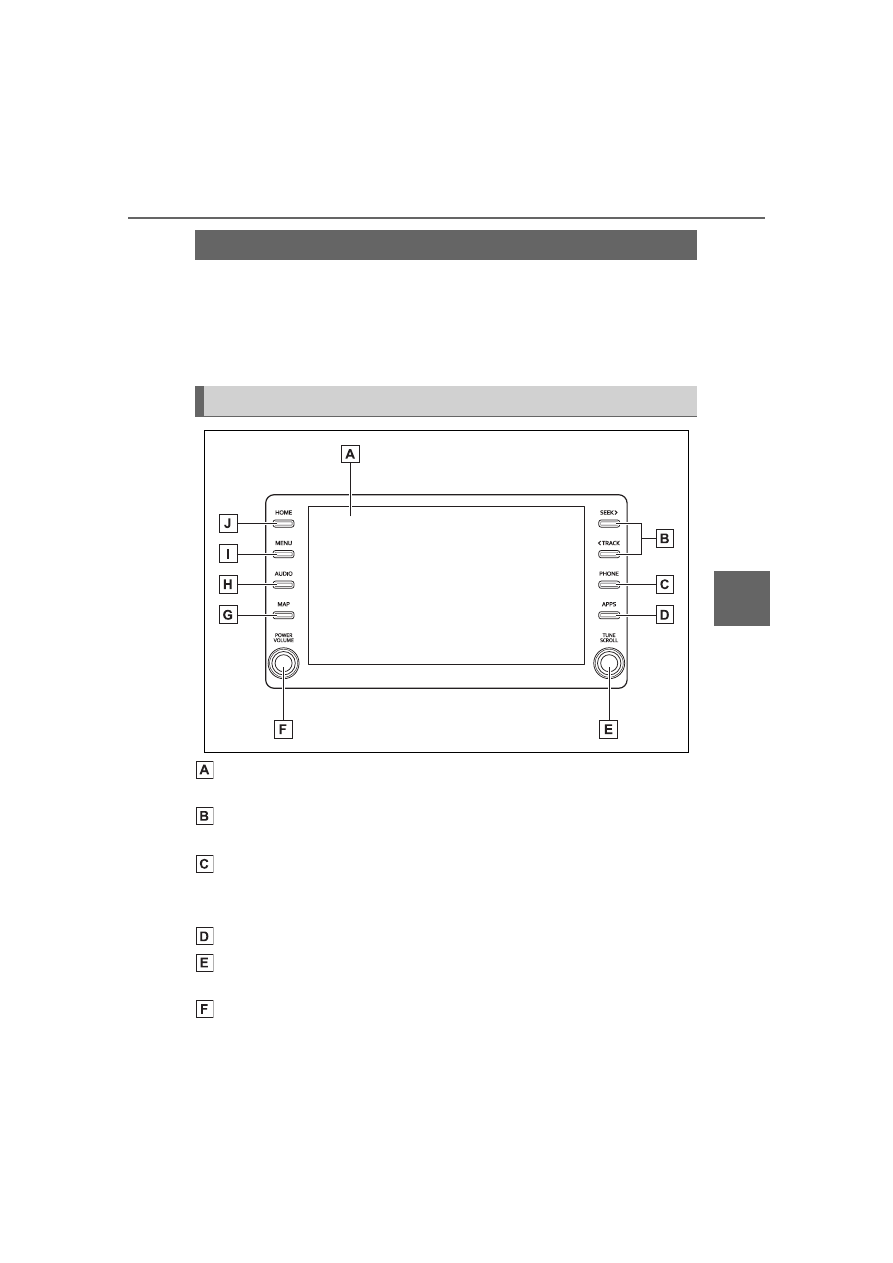
By touching the screen with your finger, you can control the
selected functions. (
Press to seek up or down for a radio station or to access a
desired track/file. (
Press to access the Bluetooth
®
hands-free system. (
When an Apple CarPlay connection is established, press to dis-
play the Phone app screen.
*1, 2
Press to display the Toyota apps screen.
*2, 3
(
Turn to change the radio station or skip to the next or previous
track/file. (
Press to turn the audio/visual system on and off, and turn it to
adjust the volume. Press and hold to restart the system. (
Buttons overview
*
Operations of each part
250
5-1. Basic function
295)
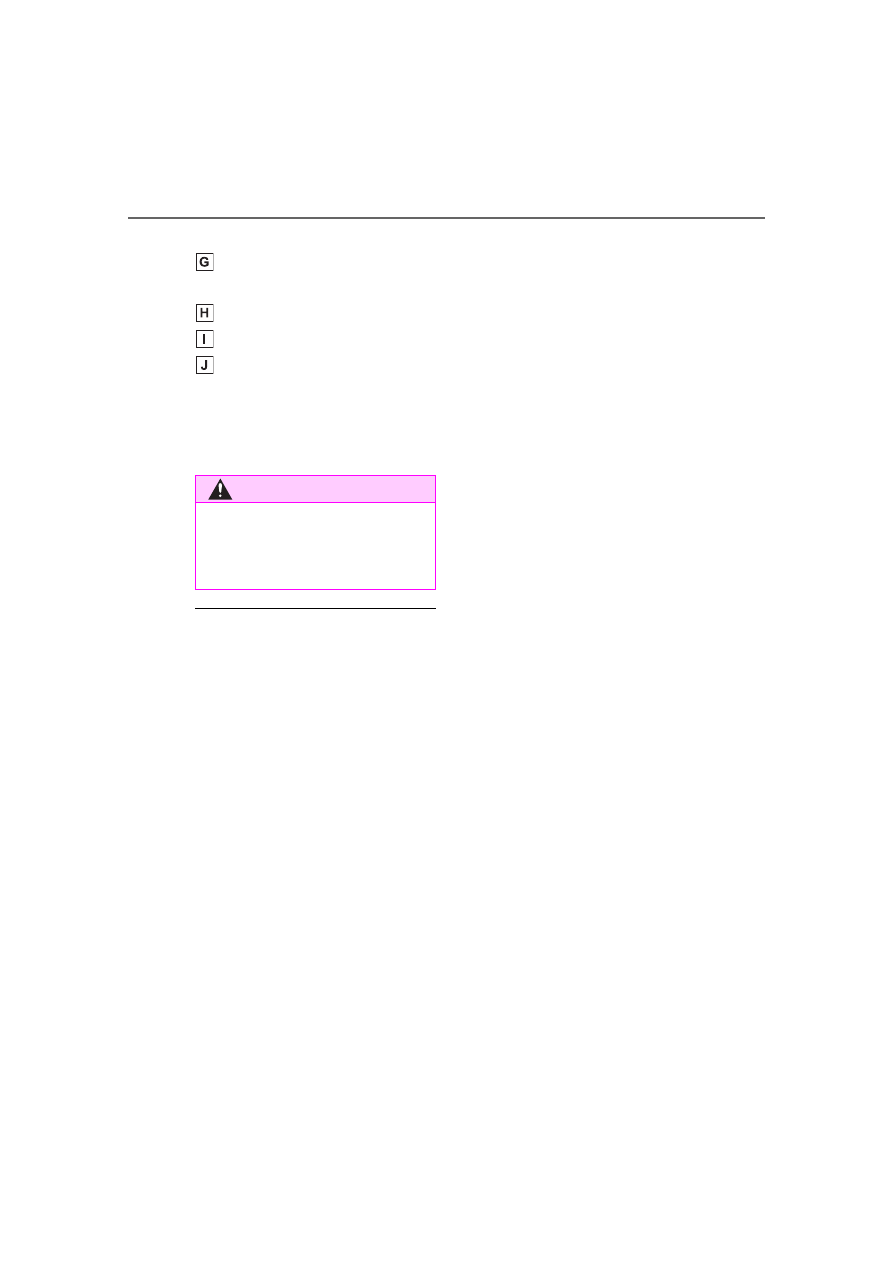
When an Apple CarPlay/Android Auto connection is established,
press to display the Maps app screen.
*1, 2
Press to display the audio/visual system screen. (
Press to display the “Menu” screen. (
Press to display the home screen. (
*1
:For details about Apple CarPlay/Android Auto:
*2
:This function is not made available in some countries or areas.
*3
:When an Apple CarPlay/Android Auto connection is established, this
function will be unavailable.
The screen shots in this document
and the actual screens of the sys-
tem differ depending on whether the
functions and/or a contract existed.
WARNING
For safety, the driver should not
operate the system while he/she
is driving. Insufficient attention to
the road and traffic may cause an
accident.
251
5-1. Basic function
5
Audio
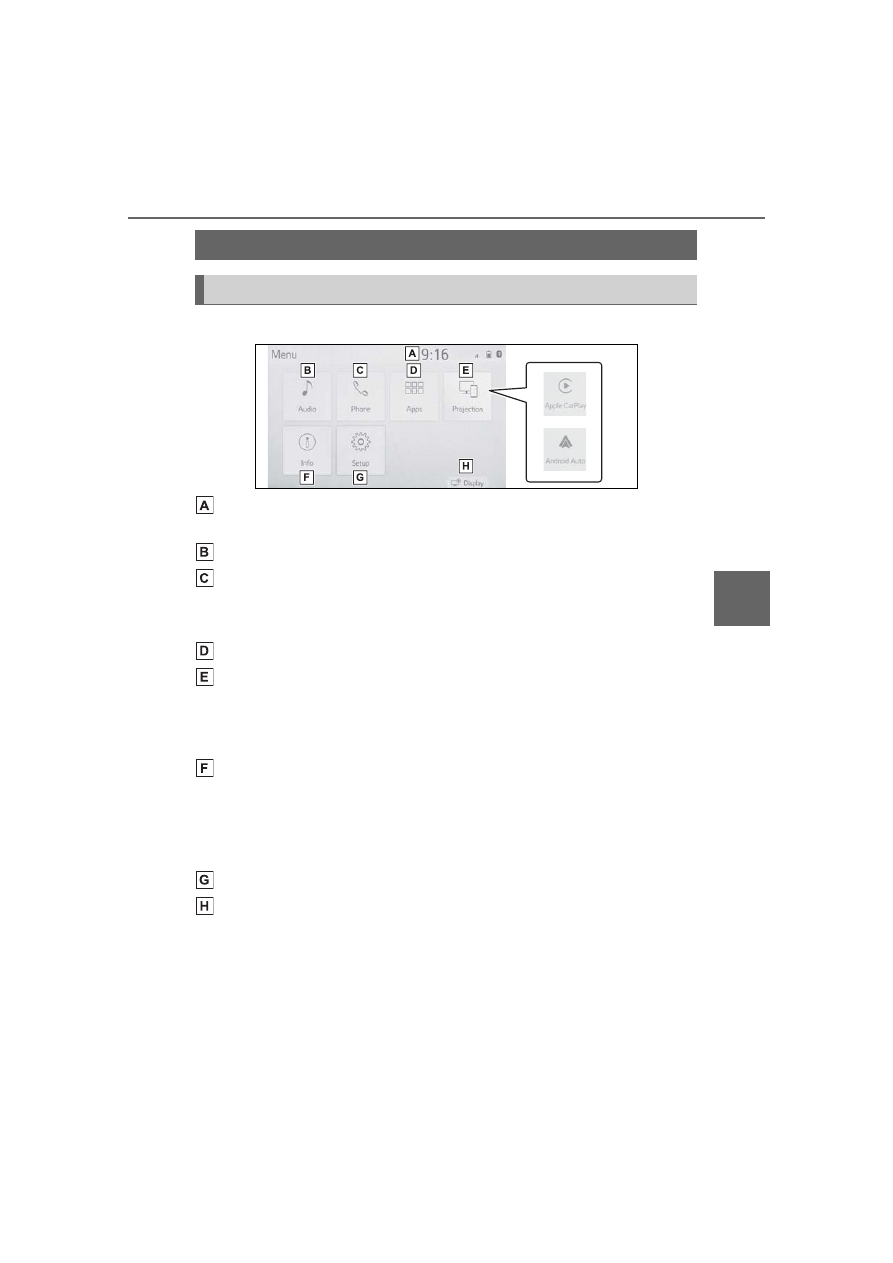
Press the “MENU” button to display the “Menu” screen.
Displays the clock. Select to display the clock settings screen.
(
Select to display the audio control screen. (
Select to display the hands-free operation screen. (
When an Apple CarPlay connection is established, select to dis-
play the Phone app screen.
*1
Select to display the application screen.
*1, 2
(
When an Apple CarPlay/Android Auto connection is established
and this button displays “Apple CarPlay”/“Android Auto”, select to
display the home screen of Apple CarPlay/Android Auto.
*1
(
Vehicles without DCM: Select to display the fuel consumption
screen. (
Vehicles with DCM: Select to display the information screen.
Select “ECO” to display the fuel consumption screen. (
The “Vehicle Alert History” shown on the information screen.
*1
Select to display the “Setup” screen. (
Select to adjust the contrast, brightness, etc. of the display.
(
*1
:This function is not made available in some countries or areas.
*2
:When an Apple CarPlay/Android Auto connection is established, this
function will be unavailable.
Menu screen
Menu screen operation
252
5-1. Basic function
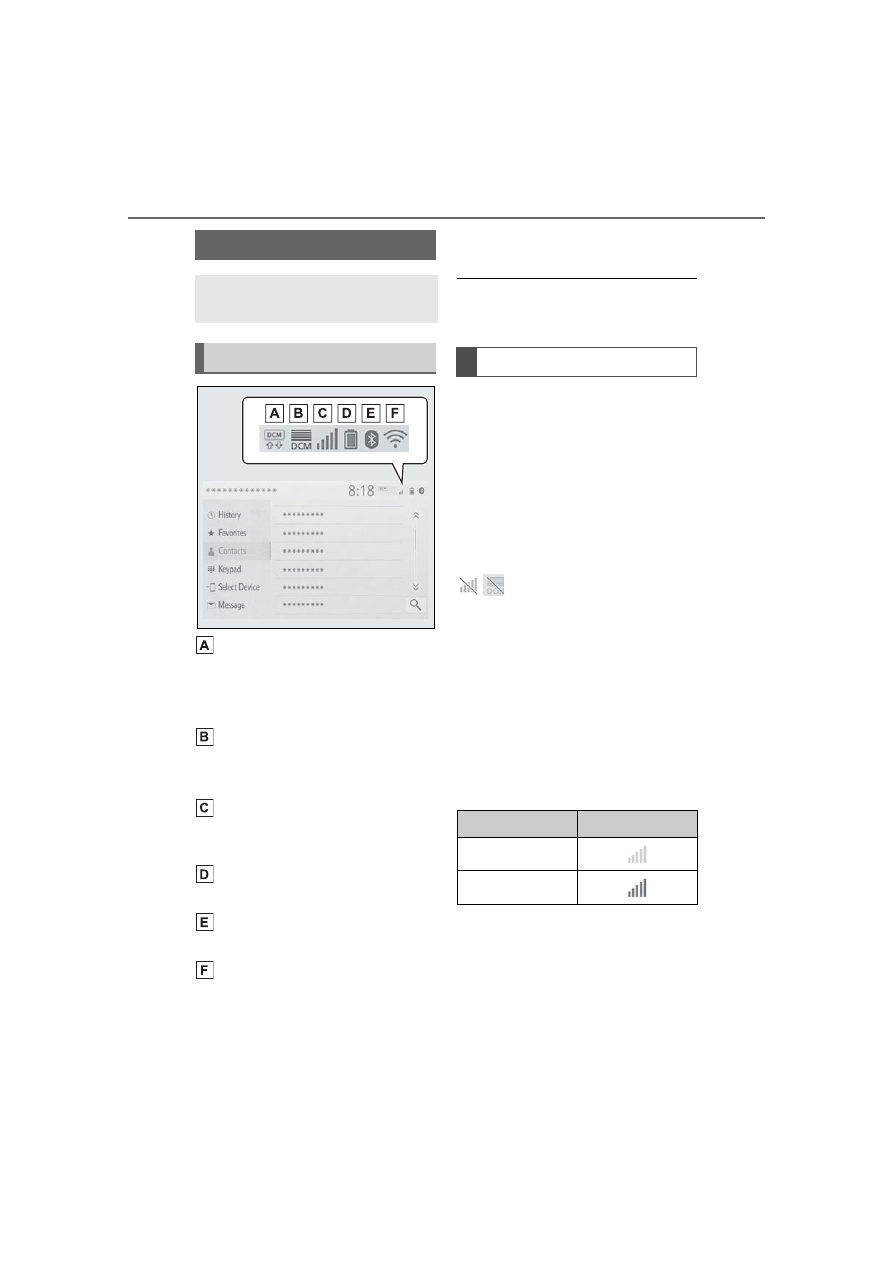
Indicate during data commu-
nication performed via Data
Communication Module
(DCM)
*1
The reception level of Data
Communication Module
(DCM) display
*1
(
The reception level of the
connected phone display
(
Remaining battery charge
display (
Bluetooth
®
phone connection
condition display (
Wi-Fi
®
connection condition
display
*1, 2
(
*1
:Vehicles with DCM
*2
:This function is not made avail-
able in some countries or areas.
The number of status icons that can
be displayed differs depending on
the displayed screen.
The level of reception does not
always correspond with the level
displayed on the cellular phone.
The level of reception may not
be displayed depending on the
phone you have.
When the cellular phone is out
of the service area or in a place
inaccessible by radio waves,
/
is displayed.
“Rm” is displayed when receiv-
ing in a roaming area. While
roaming, display “Rm” top-left
on the icon.
The receiving area may not be
displayed depending on the type
of Bluetooth
®
phone you have.
While connected with cellular
phone
Status icon
Status icons are displayed
at the top of the screen.
Status icon explanation
Reception level display
Reception Level
Indicators
Poor
Excellent

253
5-1. Basic function
5
Audio
While using Data Communi-
cation Module (DCM)
While using Wi-Fi
®
Hotspot
When Wi-Fi
®
Hotspot is off, no item
is displayed.
The amount displayed does not
always correspond with the
amount displayed on the Blue-
tooth
®
device.
The amount of battery charge
left may not be displayed
depending on the type of the
Bluetooth
®
device connected.
This system does not have a
charging function.
An antenna for the Bluetooth
®
connection is built into the
instrument panel.
The condition of the Bluetooth
®
connection may deteriorate and
the system may not function
when a Bluetooth
®
phone is
used in the following conditions
and/or places:
The cellular phone is obstructed
by certain objects (such as
when it is behind the seat or in
the glove box or console box).
The cellular phone is touching or
is covered with metal materials.
Leave the Bluetooth
®
phone in a
place where the condition of the
Bluetooth
®
connection is good.
Reception Level
Indicators
Poor
Excellent
Reception Level
Indicators
No connection
Connected
Remaining battery charge
display
Remaining
charge
Indicators
Empty
Full
Bluetooth
®
connection
condition display
Indicators
Conditions
(Blue)
Indicates that the con-
dition of the Blue-
tooth
®
connection is
good.
(Gray)
While in this condition,
sound quality during
phone calls may dete-
riorate.
Indicates that the cel-
lular phone is not con-
nected via Bluetooth
®
.
254
5-1. Basic function
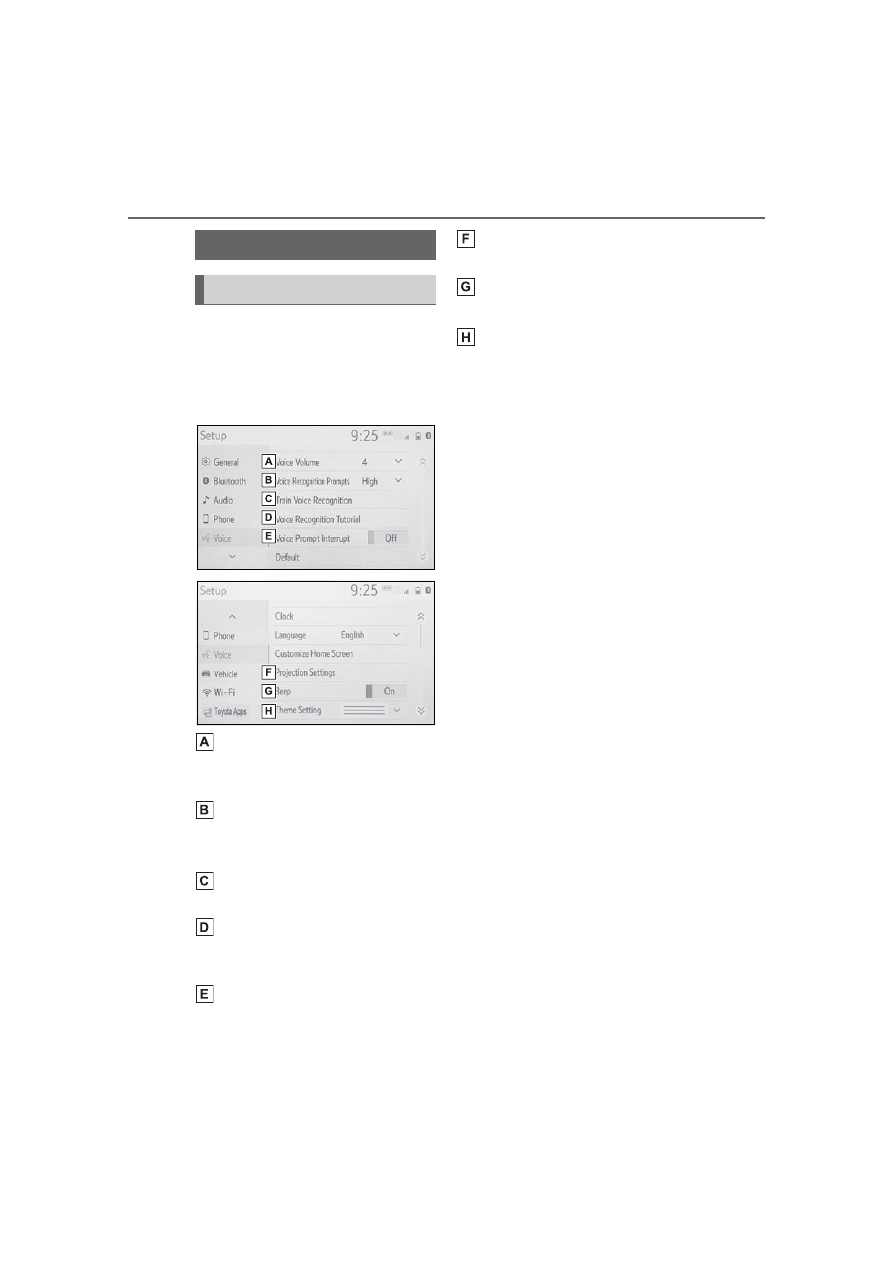
Press the “MENU” button, then
select “Setup” to display the
“Setup” screen. The items
shown on the “Setup” screen
can be set.
Select to change the selected
language, operation sound
settings, etc. (
Select to set Bluetooth
®
device and Bluetooth
®
sys-
tem settings. (
Select to set audio settings.
(
Select to set the phone
sound, contacts, message
settings, etc. (
Select to set the voice set-
tings. (
Select to set vehicle informa-
tion. (
Select to set Wi-Fi
®
connec-
tion settings.
*1, 2
(
Select to set Toyota apps set-
tings.
*2
(
*1
:Vehicles with DCM
*2
:This function is not made avail-
able in some countries or areas.
“Setup” screen
“Setup” screen

255
5-2. Basic information before operation
5
A
ud
io
5-2.Basic information before operation
After a few seconds, the caution
screen will be displayed.
After about 5 seconds or select-
ing “Continue”, the caution
screen automatically switches to
the next screen.
When system response is
extremely slow, the system can
be restarted.
Press and hold the “POWER
VOLUME” knob for 3 seconds or
more.
Initial screen
When the power switch is
turned to ACC or ON, the
initial screen will be dis-
played and the system will
begin operating.
Caution screen
WARNING
When the vehicle is stopped with
the engine running, always apply
the parking brake for safety.
Restarting the system
256
5-2. Basic information before operation
Operations are performed by touching the touch screen directly with
your finger.
*
: The above operations may not be performed on all screens.
Flick operations may not be performed smoothly at high altitudes.
This system is operated mainly
by the buttons on the screen.
(Referred to as screen buttons
in this manual.)
When a screen button is
touched, a beep sounds. (To set
the beep sound:
●
If the system does not respond to
touching a screen button, move
your finger away from the screen
and then touch it again.
●
Dimmed screen buttons cannot be
Touch screen
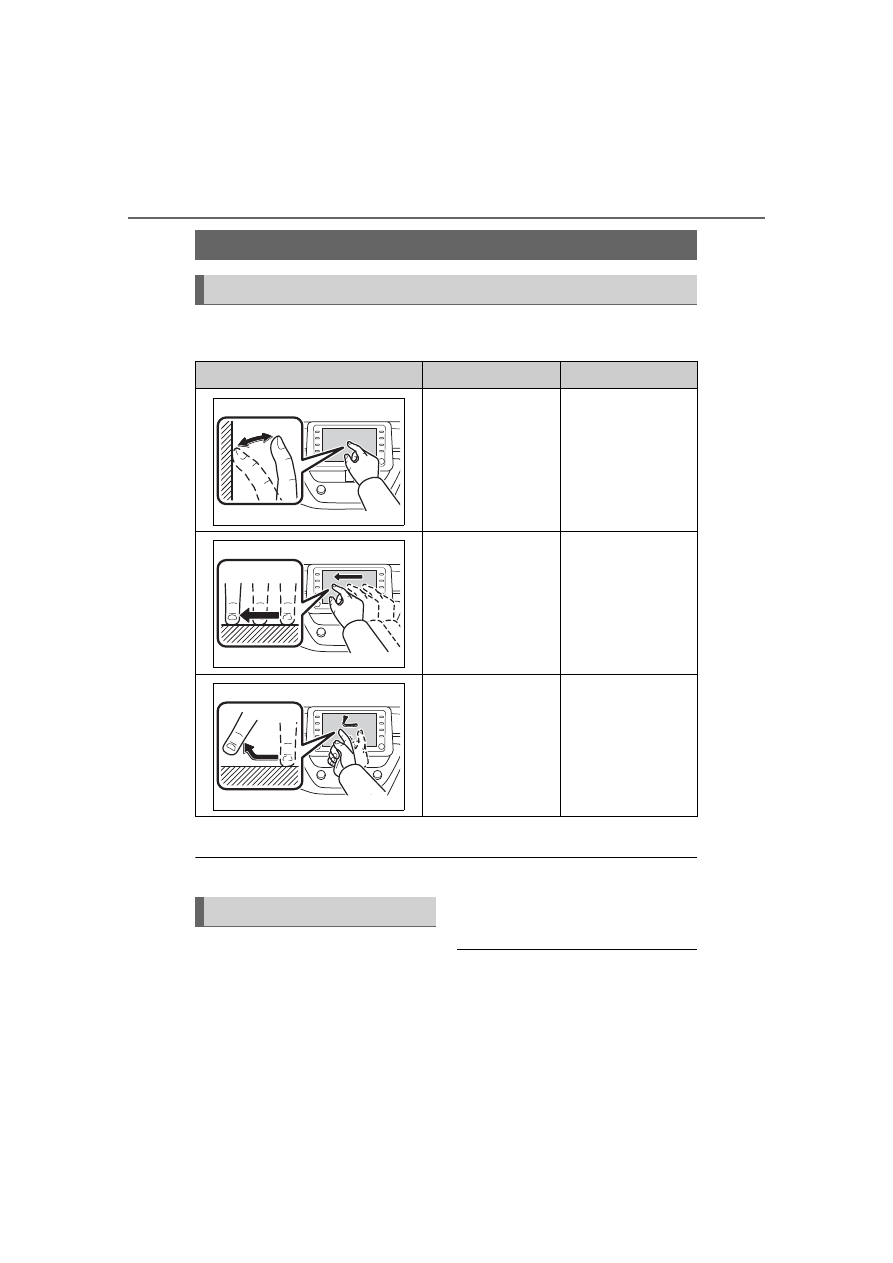
Touch screen gestures
Operation method
Outline
Main use
Touch
Quickly touch and
release once.
Selecting an item
on the screen
Drag
*
Touch the screen
with your finger,
and move the
screen to the
desired position.
Scrolling the lists
Flick
*
Quickly move the
screen by flicking
with your finger.
Scrolling the main
screen page
Touch screen operation
257
5-2. Basic information before operation
5
A
ud
io
operated.
●
The displayed image may become
darker and moving images may
be slightly distorted when the
screen is cold.
●
In extremely cold conditions, the
screen may not be displayed and
the data input by a user may be
deleted. Also, the screen buttons
may be harder than usual to
depress.
●
When you look at the screen
through polarized material such as
polarized sunglasses, the screen
may be dark and hard to see. If
so, look at the screen from differ-
ent angles, adjust the screen set-
tings on the display settings
screen or take off your sun-
glasses.
●
When
is displayed on the
screen, select
to return to the
previous screen.
The operable areas of the
capacitive touch screen buttons
use capacitive touch sensors
and may not operate properly in
the following situations:
If the screen is dirty or wet
If a source of strong electro-
magnetic waves is brought
near the screen
If a glove is worn during oper-
ation
If the screen is touched by a
fingernail
If a stylus is used to operate
the buttons
If your palm touches the oper-
able area of another button
during operation
If a button is touched quickly
If the operable part of a
capacitive touch screen but-
ton is touched by or covered
with a metal object, such as
the following, it may not oper-
ate properly:
• Magnetic isolation cards
• Metallic foil, such as the inner
packaging of a cigarette box
• Metallic wallets or bags
• Coins
• Discs, such as a CD or DVD
If the operable part of a
capacitive touch screen but-
ton is wiped, it may operate
unintentionally.
If the capacitive touch screen
button is being touched when
the power switch is changed
to ACC or ON, the button may
not operate properly. In this
case, remove anything touch-
ing the button, turn the power
switch off and then turn it to
NOTICE
●
To prevent damaging the
screen, lightly touch the screen
buttons with your finger.
●
Do not use objects other than
your finger to touch the screen.
●
Wipe off fingerprints using a
glass cleaning cloth. Do not use
chemical cleaners to clean the
screen, as they may damage
the touch screen.
Capacitive touch screen
buttons
Нет комментариевНе стесняйтесь поделиться с нами вашим ценным мнением.
Текст