Toyota Corolla (2020 year). Owner's manual — part 8
118
3-3. Adjusting the seats
3-3.Adjusting the seats
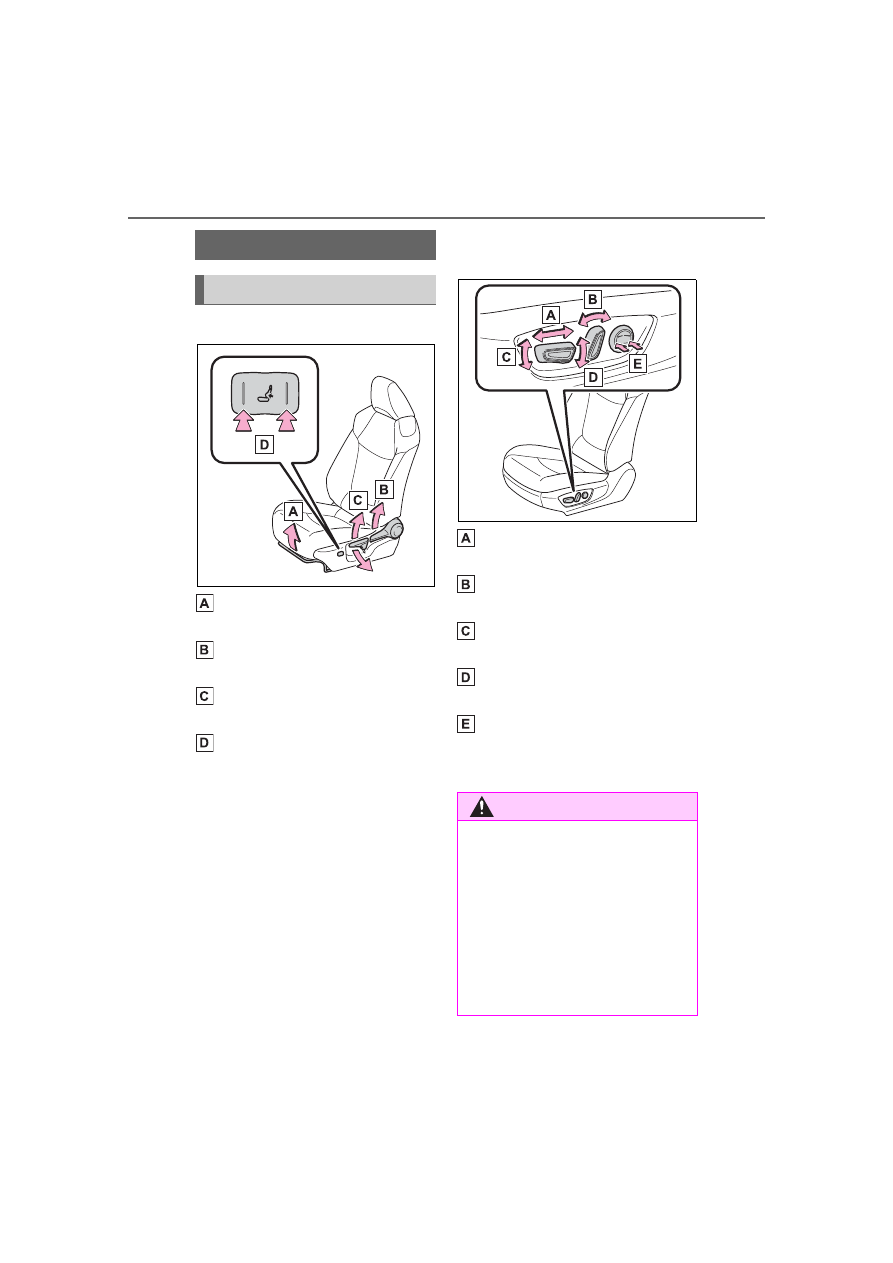
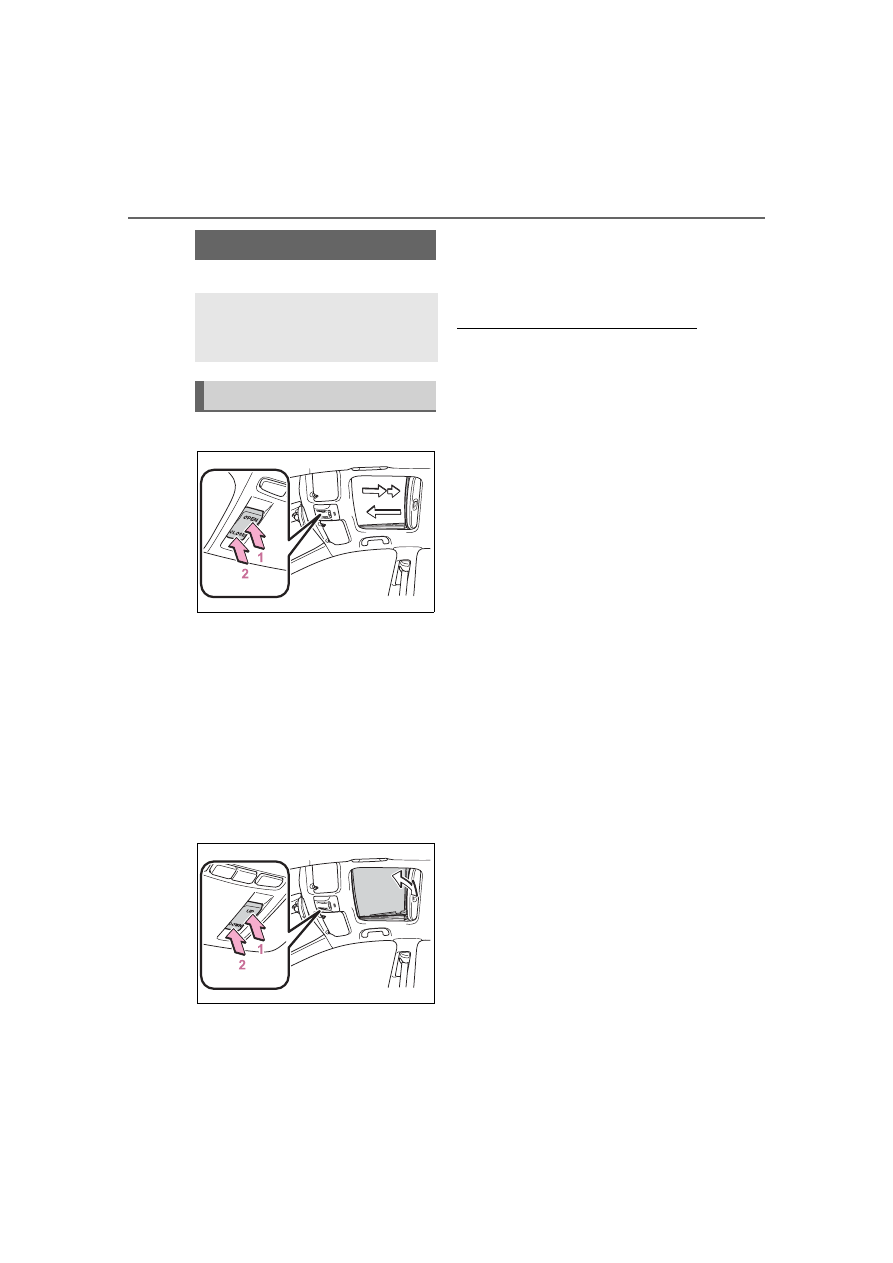
Manual seat
Seat position adjustment
lever
Seatback angle adjustment
lever
Vertical height adjustment
lever (driver’s side only)
Lumbar support adjustment
switch
*
(driver’s side only)
*
: If equipped
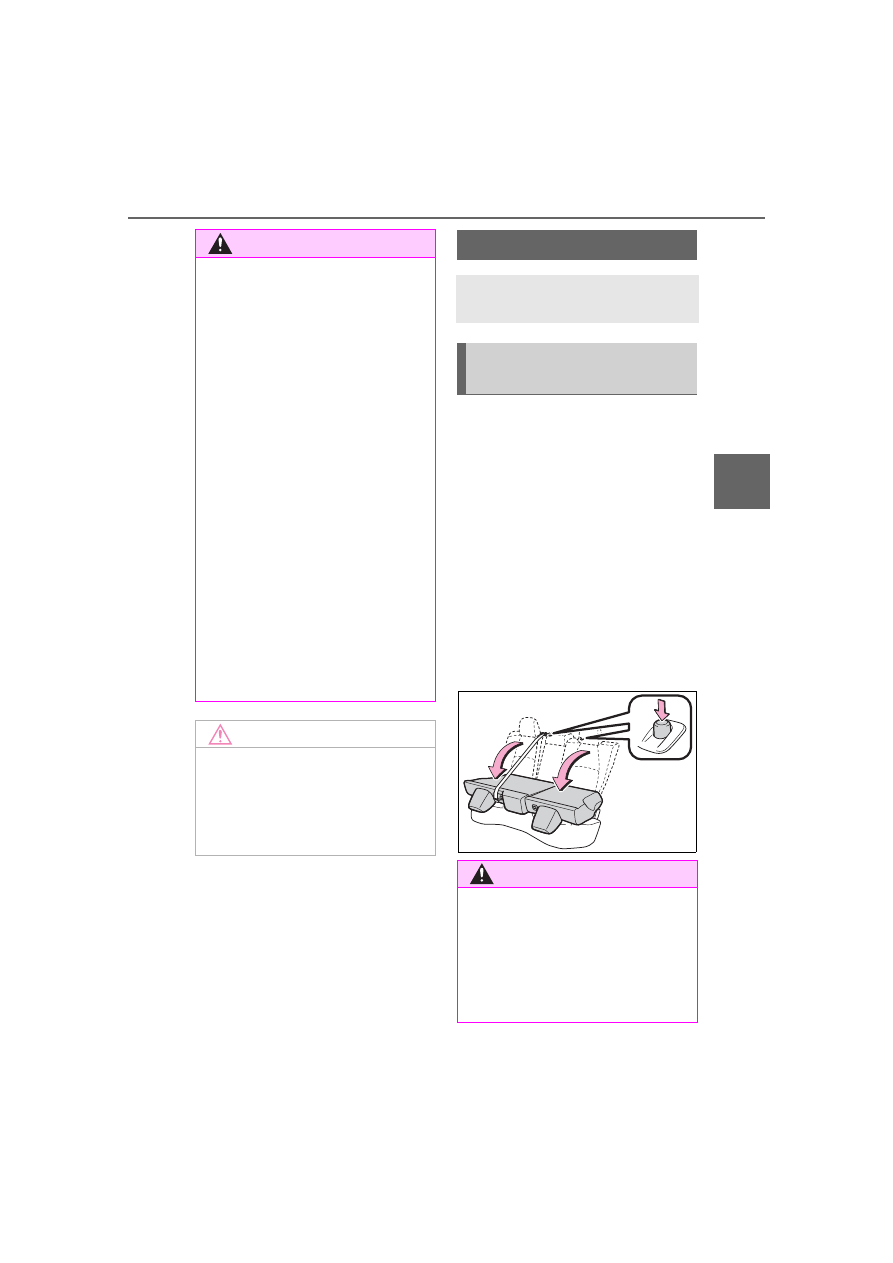
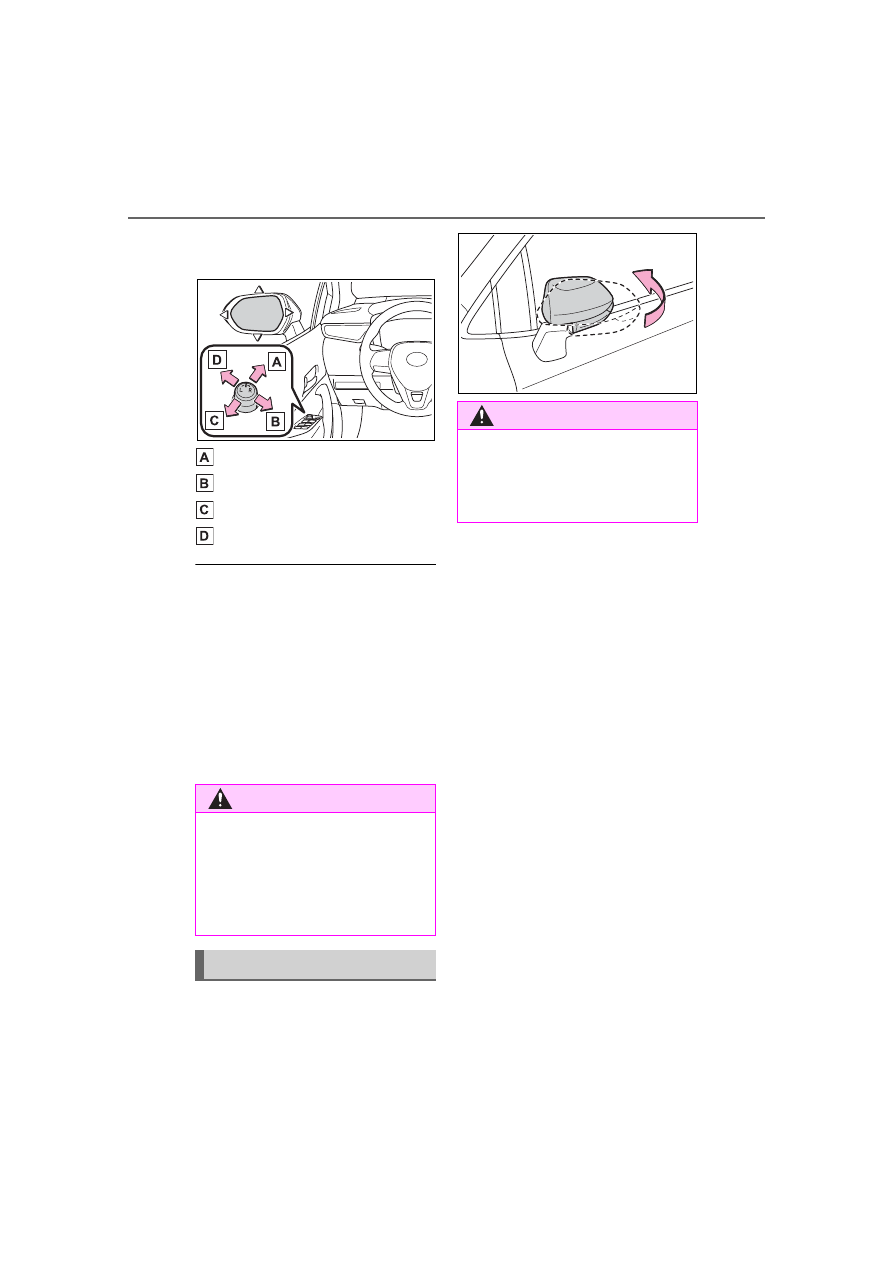
Power seat (driver’s side
only)
Seat position adjustment
switch
Seatback angle adjustment
switch
Seat cushion (front) angle
adjustment switch
Vertical height adjustment
switch
Lumbar support adjustment
switch
*
*
: If equipped
Front seats
Adjustment procedure
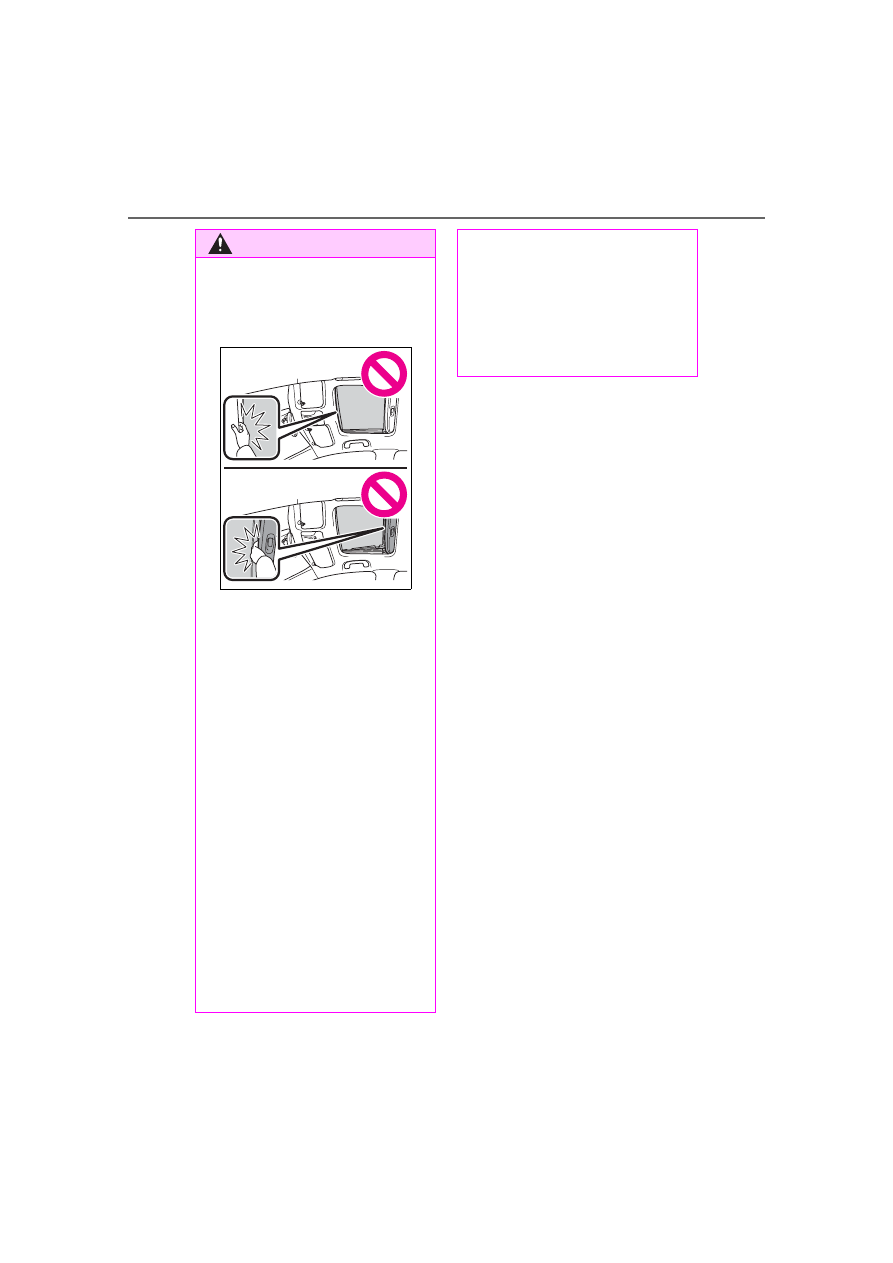
WARNING
■
When adjusting the seat posi-
tion
●
Take care when adjusting the
seat position to ensure that
other passengers are not
injured by the moving seat.
●
Do not put your hands under the
seat or near the moving parts to
avoid injury.
Fingers or hands may become
jammed in the seat mechanism.
-------------------------------------------------------------------------------------------------------------------------------------------------------------
119
3-3. Adjusting the seats
3
Before driv
ing
1
Move the front seats forward.
(P.118)
2
Stow the rear armrest. (if
equipped) (P.413)
3
Seats with an adjustable type
head restraint: Lower the
head restraints to the lowest
position. (P.121)
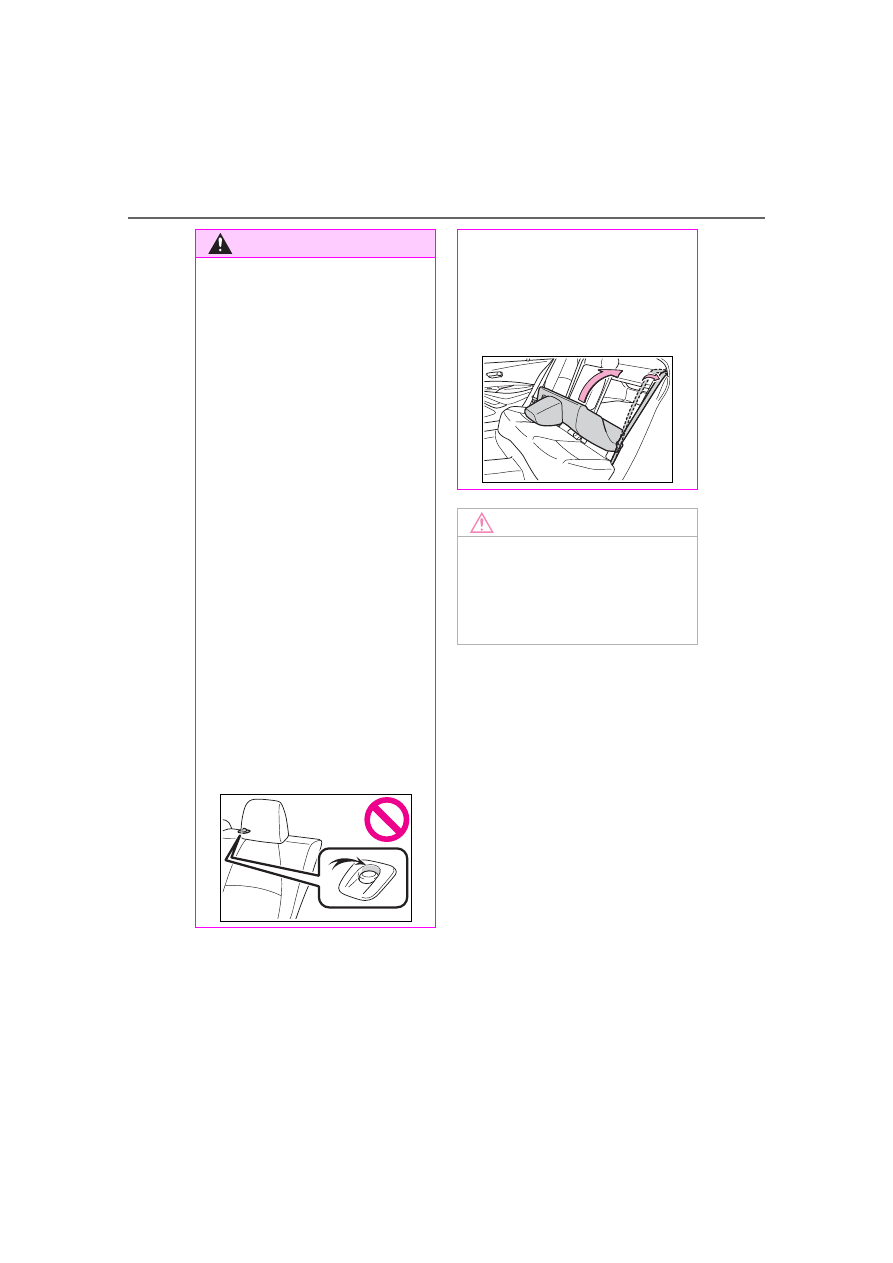
4
Fold the seatback down while
pushing the seatback lock
release button.
Each seatback may be folded sep-
arately.
WARNING
●
Make sure to leave enough
space around the feet so they
do not get stuck.
■
Seat adjustment
●
Be careful that the seat does
not hit passengers or luggage.
●
To reduce the risk of sliding
under the lap belt during a colli-
sion, do not recline the seat
more than necessary.
If the seat is too reclined, the lap
belt may slide past the hips and
apply restraint forces directly to
the abdomen, or your neck may
contact the shoulder belt,
increasing the risk of death or
serious injury in the event of an
accident.
Adjustments should not be
made while driving as the seat
may unexpectedly move and
cause the driver to lose control
of the vehicle.
●
Manual seat only: After adjust-
ing the seat, make sure that the
seat is locked in position.
NOTICE
■
When adjusting a front seat
When adjusting a front seat, make
sure that the head restraint does
not contact the headliner. Other-
wise, the head restraint and head-
liner may be damaged.
Rear seats
The seatbacks of the rear
seats can be folded down.
Folding down the rear
seatbacks
WARNING
Observe the following precau-
tions. Failure to do so may result
in death or serious injury.
■
When folding the rear seat-
backs down
●
Do not fold the seatbacks down
while driving.
-------------------------------------------------------------------------------------------------------------------------------------------------------------
120
3-3. Adjusting the seats
WARNING
●
Stop the vehicle on level
ground, set the parking brake
and shift the shift lever to P
(continuously variable transmis-
sion) or N (manual transmis-
sion).
●
Do not allow anyone to sit on a
folded seatback or in the trunk
while driving.
●
Do not allow children to enter
the trunk.
●
Be careful not to get your hand
caught when folding the rear
seatbacks.
●
Adjust the position of the front
seats before folding down the
rear seatbacks so that the front
seats do not interfere with the
rear seatbacks when folding
down the rear seatbacks.
■
After returning the rear seat-
back to the upright position
●
Make sure that the seatback is
securely locked in position by
lightly pushing it back and forth.
If the seatback is not securely
locked, the red marking will be
visible on the seatback lock
release button. Make sure that the
red marking is not visible.
●
Check that the seat belts are
not twisted or caught in the
seatback.
If the seat belt gets caught
between the seatback’s securing
hook and latch, it may damage
the seat belt.
NOTICE
■
When the right seatback is
folded down
Make sure the luggage loaded in
the enlarged trunk will not dam-
age the webbing of the rear cen-
ter seat belt.
-------------------------------------------------------------------------------------------------------------------------------------------------------------
121
3-3. Adjusting the seats
3
Before driv
ing
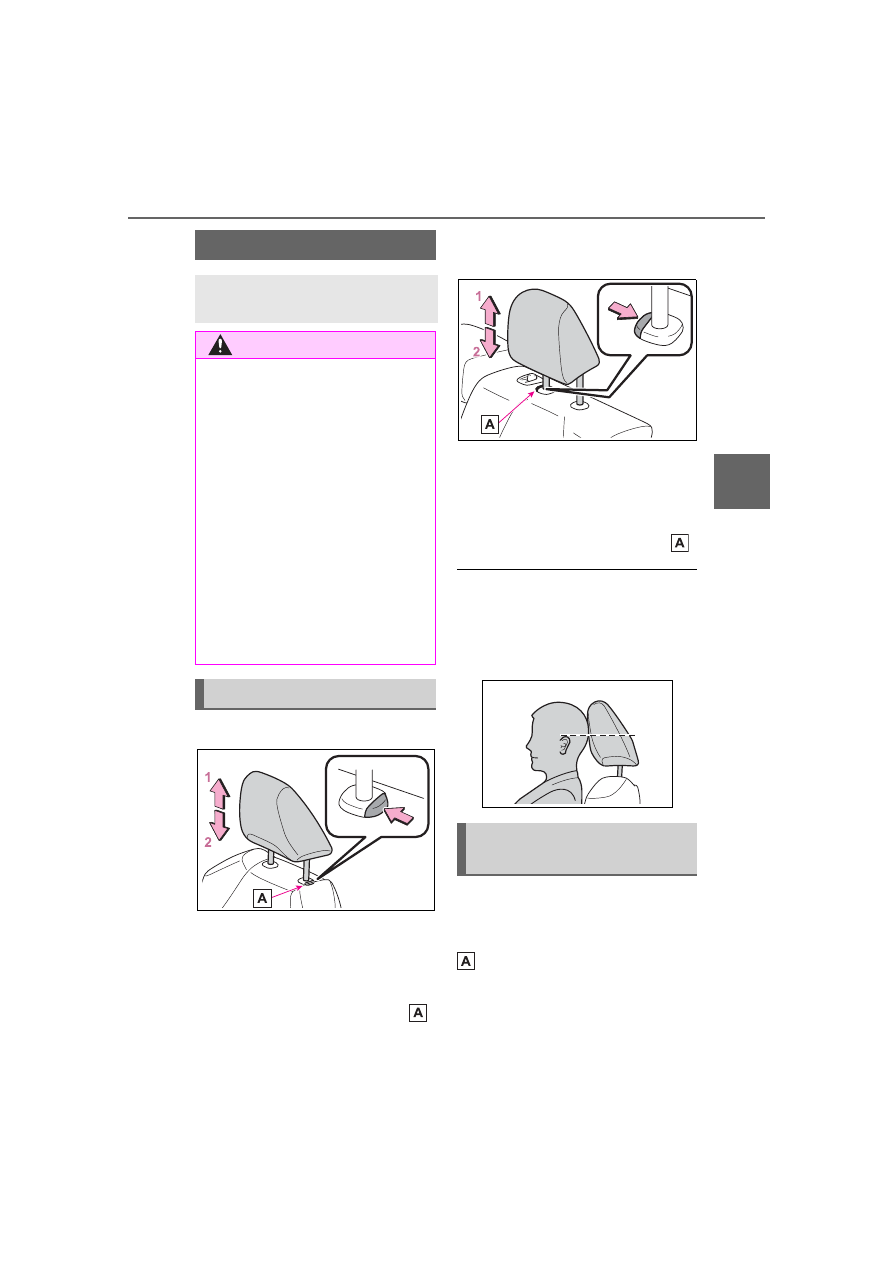
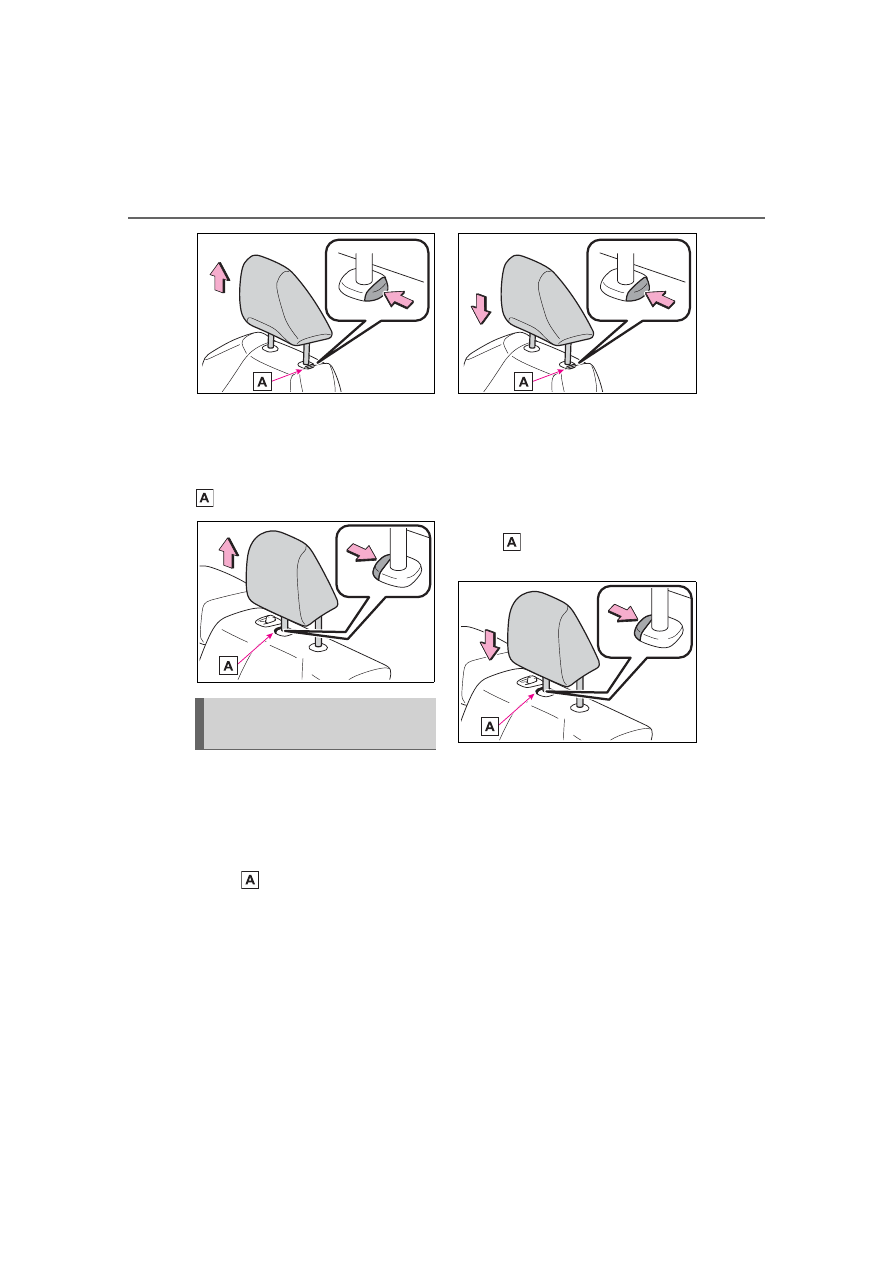
■
Front seats
1
Up
Pull the head restraints up.
2
Down
Push the head restraint down while
pressing the lock release button
.
■
Rear outside seats (adjust-
able type)
1
Up
Pull the head restraints up.
2
Down
Push the head restraint down while
pressing the lock release button
.
■
Adjusting the height of the head
restraints (front seats)
Make sure that the head restraints
are adjusted so that the center of
the head restraint is closest to the
top of your ears.
■
Front seats
Pull the head restraint up while
pressing the lock release button
.
Head restraints
Head restraints are provided
for all seats.
WARNING
■
Head restraint precautions
Observe the following precautions
regarding the head restraints.
Failure to do so may result in
death or serious injury.
●
Use the head restraints
designed for each respective
seat.
●
Adjust the head restraints to the
correct position at all times.
●
After adjusting the head
restraints, push down on them
and make sure they are locked
in position.
●
Do not drive with the head
restraints removed.
Adjusting a head restraint
Removing the head
restraints
-------------------------------------------------------------------------------------------------------------------------------------------------------------
122
3-3. Adjusting the seats
■
Rear outside seats (adjust-
able type)
Pull the head restraint up while
pressing the lock release button
.
■
Front seats
Align the head restraint with the
installation holes and push it
down to the lock position.
Press and hold the lock release
button
when lowering the head
restraint.
■
Rear outside seats (adjust-
able type)
Align the head restraint with the
installation holes and push it
down to the lock position.
Press and hold the lock release
button
when lowering the head
restraint.
Installing the head
restraints
-------------------------------------------------------------------------------------------------------------------------------------------------------------
123
3-4. Adjusting the steering wheel and mirrors
3
Before driv
ing
3-4.Adjusting the steering wheel and mirrors
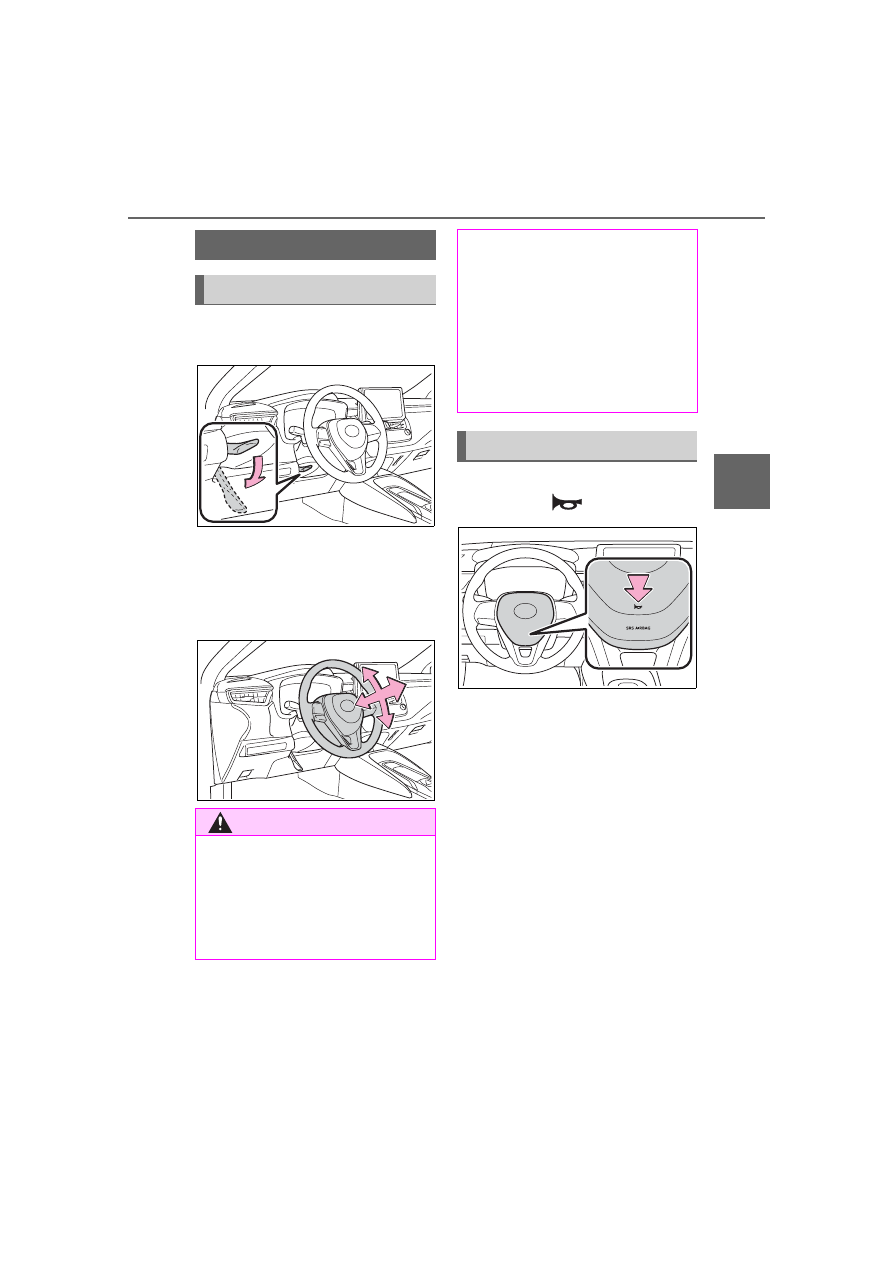
1
Hold the steering wheel and
push the lever down.
2
Adjust to the ideal position by
moving the steering wheel
horizontally and vertically.
After adjustment, pull the lever up
to secure the steering wheel.
To sound the horn, press on or
close to the
mark.
Steering wheel
Adjustment procedure
WARNING
■
Caution while driving
Do not adjust the steering wheel
while driving.
Doing so may cause the driver to
mishandle the vehicle and cause
an accident, resulting in death or
serious injury.
■
After adjusting the steering
wheel
Make sure that the steering wheel
is securely locked.
Otherwise, the steering wheel
may move suddenly, possibly
causing an accident, and resulting
in death or serious injury. Also,
the horn may not sound if the
steering wheel is not securely
locked.
Horn
-------------------------------------------------------------------------------------------------------------------------------------------------------------
124
3-4. Adjusting the steering wheel and mirrors
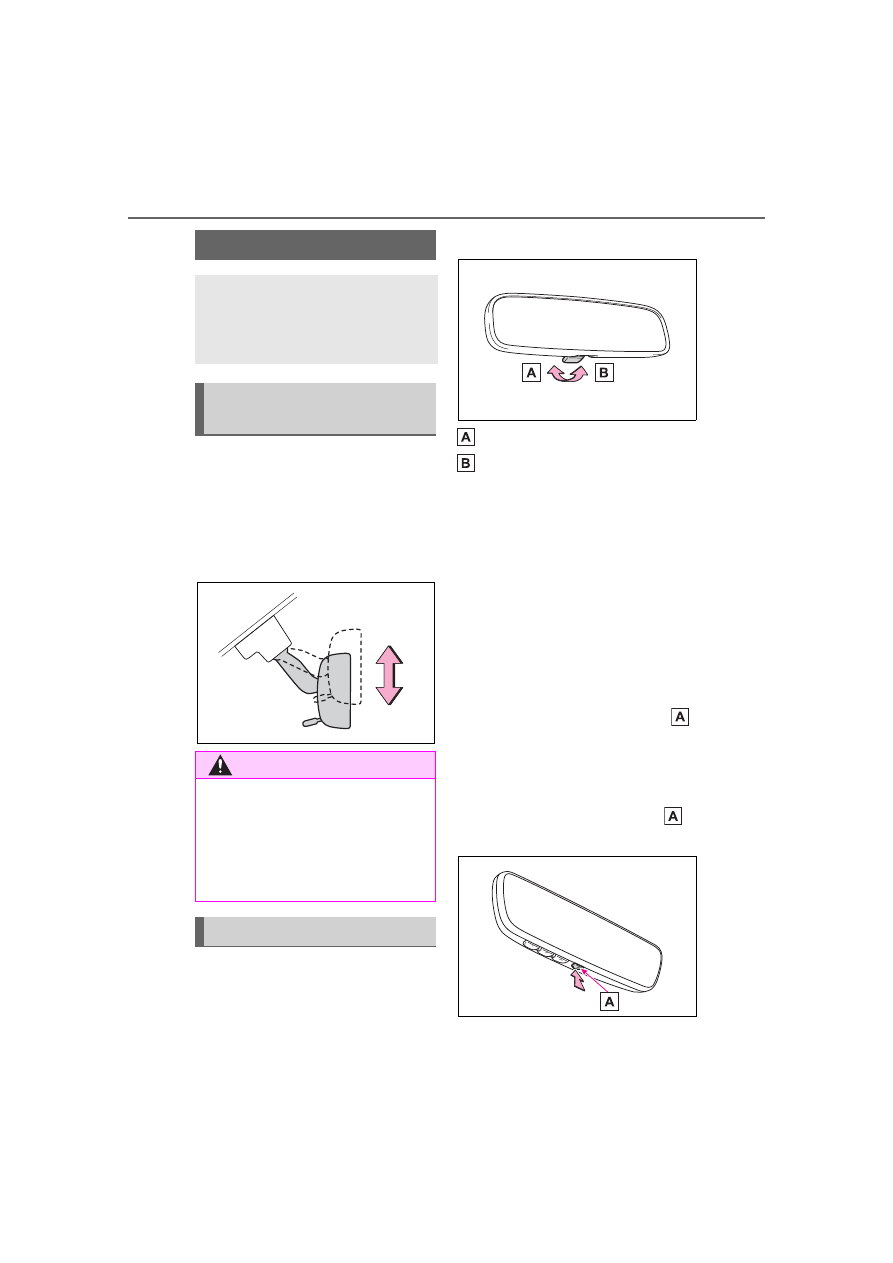
The height of the rear view mir-
ror can be adjusted to suit your
driving posture.
Adjust the height of the rear
view mirror by moving it up and
down.
Manual anti-glare inside rear
view mirror
Reflected light from the head-
lights of vehicles behind can be
reduced by operating the lever.
Normal position
Anti-glare position
Auto anti-glare inside rear
view mirror
Responding to the level of
brightness of the headlights of
vehicles behind, the reflected
light is automatically reduced.
Changing automatic anti-glare
function mode
On/off
When the automatic anti-glare func-
tion is in ON mode, the indicator
illuminates. The function will set to
ON mode each time the engine
switch is turned to ON.
Pressing the button turns the func-
tion to off mode. (The indicator
also turns off.)
Inside rear view mirror
The rear view mirror’s posi-
tion can be adjusted to
enable sufficient confirma-
tion of the rear view.
Adjusting the height of
rear view mirror
WARNING
■
Caution while driving
Do not adjust the position of the
mirror while driving.
Doing so may lead to mishandling
of the vehicle and cause an acci-
dent, resulting in death or serious
injury.
Anti-glare function
-------------------------------------------------------------------------------------------------------------------------------------------------------------
125
3-4. Adjusting the steering wheel and mirrors
3
Before driv
ing
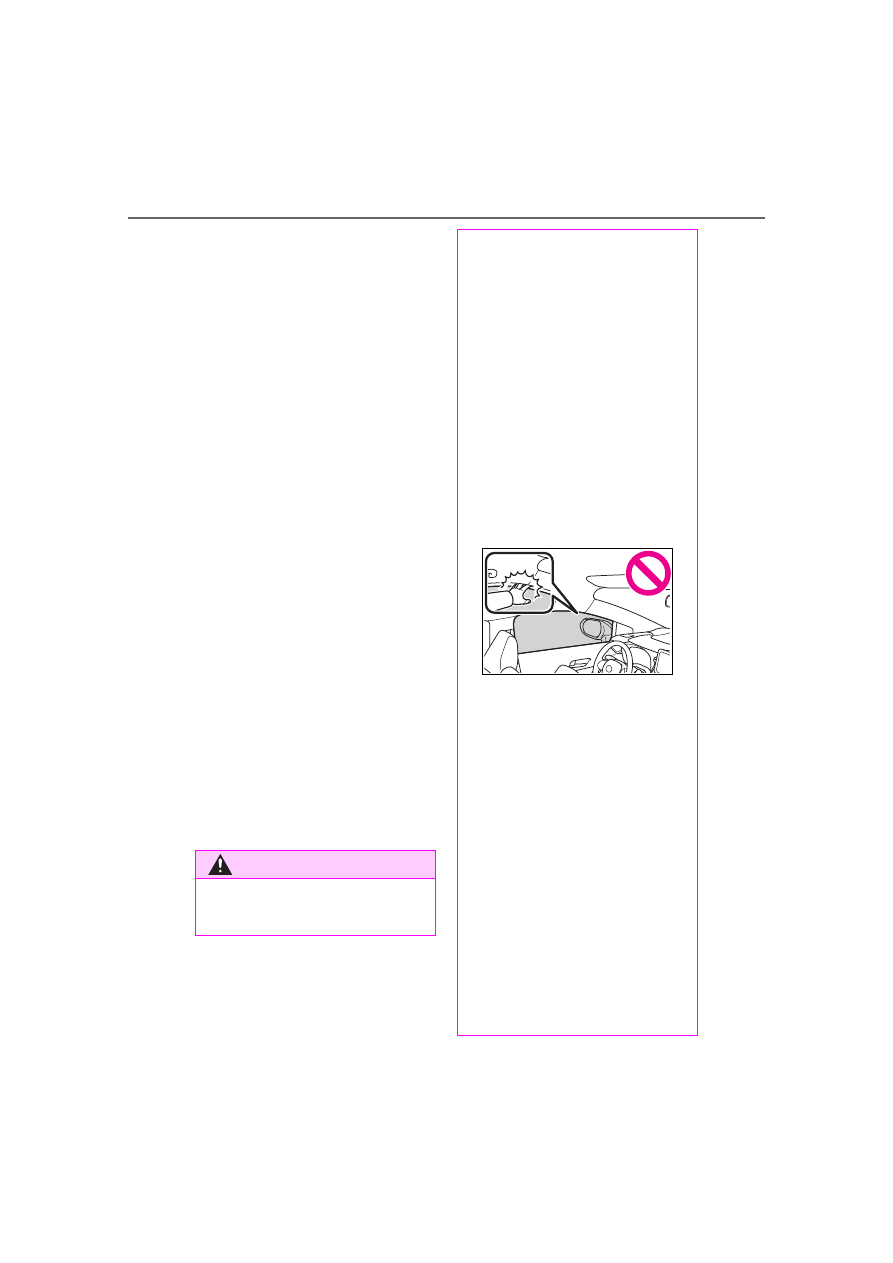
■
To prevent sensor error (vehi-
cles with an auto anti-glare
inside rear view mirror)
To ensure that the sensors operate
properly, do not touch or cover
them.
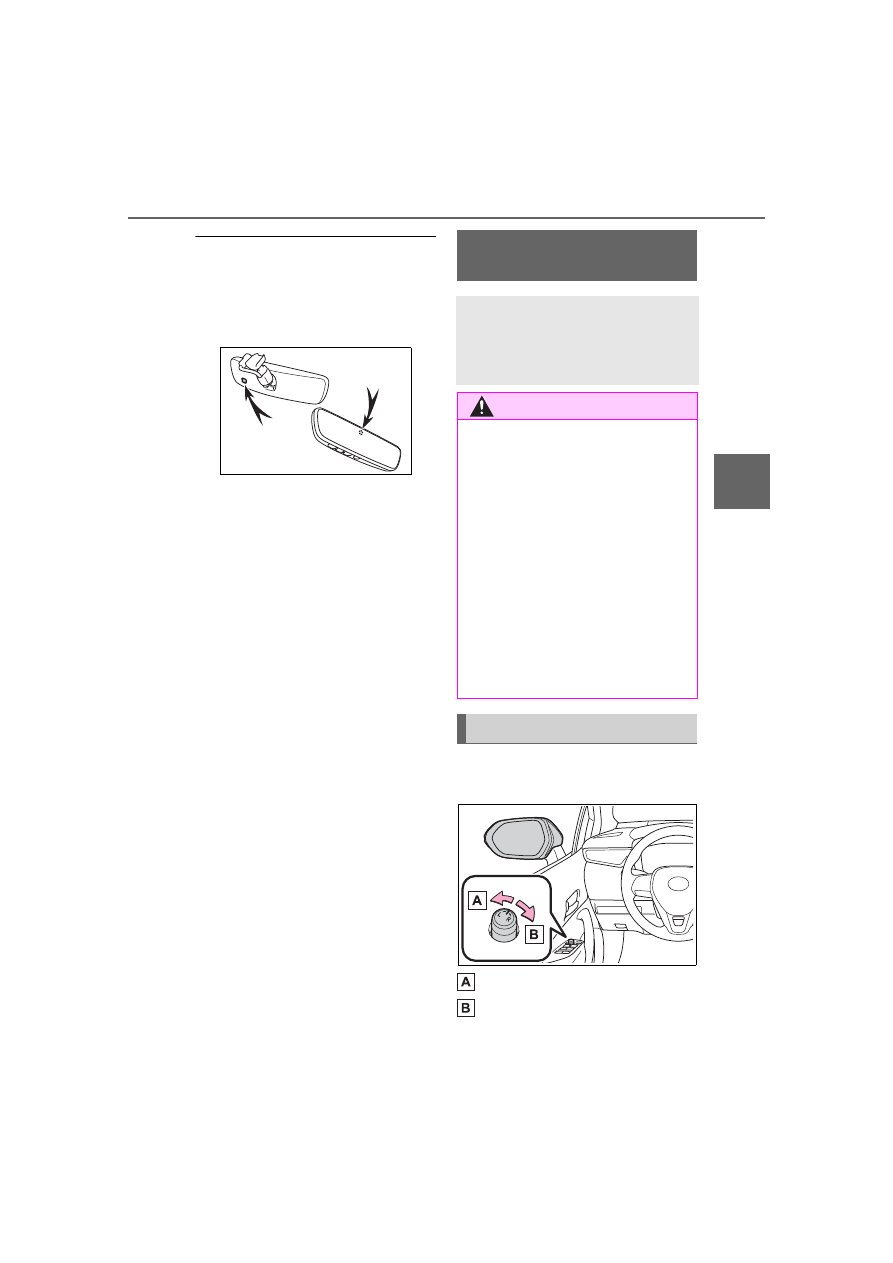
1
To select a mirror to adjust,
turn the switch.
Left
Right
Outside rear view mir-
rors
The rear view mirror’s posi-
tion can be adjusted to
enable sufficient confirma-
tion of the rear view.
WARNING
■
Important points while driving
Observe the following precautions
while driving.
Failure to do so may result in loss
of control of the vehicle and cause
an accident, resulting in death or
serious injury.
●
Do not adjust the mirrors while
driving.
●
Do not drive with the mirrors
folded.
●
Both the driver and passenger
side mirrors must be extended
and properly adjusted before
driving.
Adjustment procedure
-------------------------------------------------------------------------------------------------------------------------------------------------------------
126
3-4. Adjusting the steering wheel and mirrors
2
To adjust the mirror, operate
the switch.
Up
Right
Down
Left
■
Mirror angle can be adjusted
when
The engine switch is in ACC or ON.
■
When the mirrors are fogged up
(vehicles with outside rear view
mirror defoggers)
The outside rear view mirrors can
be cleared using the mirror defog-
gers. Turn on the rear window
defogger to turn on the outside rear
view mirror defoggers. (P.388,
Push the mirror back in the
direction of the vehicle’s rear.
WARNING
■
When the mirror defoggers
are operating (vehicles with
outside rear view mirror
defoggers)
Do not touch the rear view mirror
surfaces, as they can become
very hot and burn you.
Folding the mirrors
WARNING
■
When a mirror is moving
To avoid personal injury and mir-
ror malfunction, be careful not to
get your hand caught by the mov-
ing mirror.
-------------------------------------------------------------------------------------------------------------------------------------------------------------
127
3-5. Opening and closing the windows
3
Before driv
ing
3-5.Opening and closing the windows
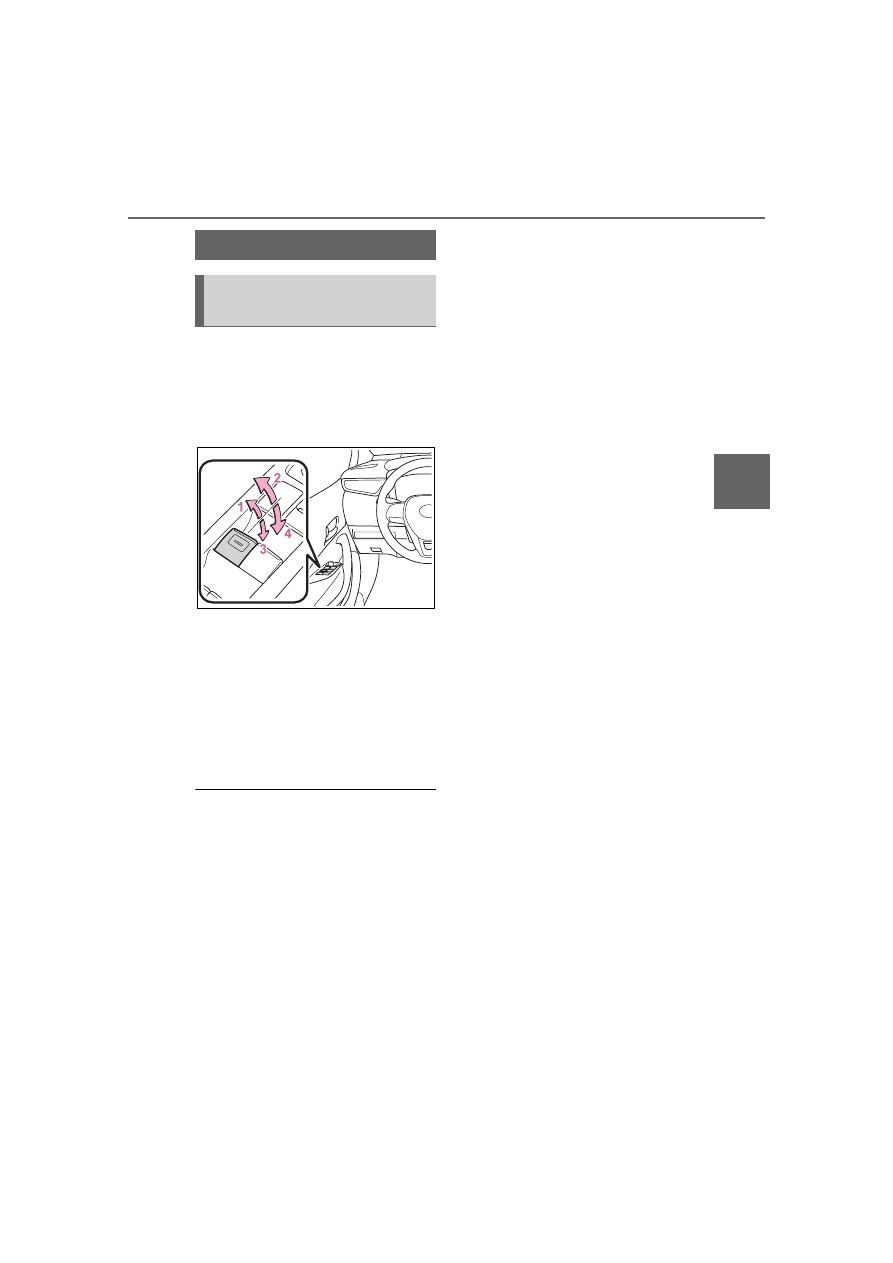
The power windows can be
opened and closed using the
switches.
Operating the switch moves the
windows as follows:
1
Closing
2
One-touch closing
*
3
Opening
4
One-touch opening
*
*
: To stop the window partway,
operate the switch in the opposite
direction.
■
The power windows can be
operated when
The engine switch is in ON.
■
Operating the power windows
after turning the engine off
The power windows can be oper-
ated for approximately 45 seconds
after the engine switch is turned to
ACC or OFF. They cannot, however,
be operated once either front door is
opened.
■
Jam protection function
If an object becomes jammed
between the window and the win-
dow frame while the window is clos-
ing, window movement is stopped
and the window is opened slightly.
■
Catch protection function
If an object becomes caught
between the door and window while
the window is opening, window
movement is stopped.
■
When the window cannot be
opened or closed
When the jam protection function or
catch protection function operates
unusually and the door window can-
not be opened or closed, perform
the following operations with the
power window switch of that door.
●
Stop the vehicle. With the engine
switch in ON, within 4 seconds of
the jam protection function or
catch protection function activat-
ing, continuously operate the
power window switch in the
one-touch closing direction or
one-touch opening direction so
that the door window can be
opened and closed.
●
If the door window cannot be
opened and closed even when
performing the above operations,
perform the following procedure
for function initialization.
1
Turn the engine switch to ON.
2
Pull and hold the power window
switch in the one-touch closing
direction and completely close
the door window.
3
Release the power window
switch for a moment, resume
pulling the switch in the
one-touch closing direction, and
hold it there for approximately 6
seconds or more.
4
Press and hold the power win-
dow switch in the one-touch
opening direction. After the door
window is completely opened,
continue holding the switch for
an additional 1 second or more.
5
Release the power window
switch for a moment, resume
Power windows
Opening and closing the
power windows
-------------------------------------------------------------------------------------------------------------------------------------------------------------
128
3-5. Opening and closing the windows
pushing the switch in the
one-touch opening direction, and
hold it there for approximately 4
seconds or more.
6
Pull and hold the power window
switch in the one-touch closing
direction again. After the door
window is completely closed,
continue holding the switch for a
further 1 second or more.
If you release the switch while the
window is moving, start again from
the beginning.
If the window reverses and cannot
be fully closed or opened, have the
vehicle inspected by your Toyota
dealer.
■
Door lock linked window opera-
tion
●
Vehicles without a smart key sys-
tem: The power windows can be
opened and closed using the key.
*
Vehicles with a smart key system:
The power windows can be
opened and closed using the
mechanical key.
*
●
The power windows can be
opened using the wireless remote
control.
*
(with a wireless remote
control function) (P.103)
*
: These settings must be custom-
ized at your Toyota dealer.
■
Customization
Some functions can be customized.
WARNING
Observe the following precau-
tions. Failure to do so may result
in death or serious injury.
■
Closing the windows
●
The driver is responsible for all
the power window operations,
including the operation for the
passengers. In order to prevent
accidental operation, especially
by a child, do not let a child
operate the power windows. It is
possible for children and other
passengers to have body parts
caught in the power window.
Also, when riding with a child, it
is recommended to use the win-
dow lock switch. (
●
Check to make sure that all pas-
sengers do not have any part of
their body in a position where it
could be caught when a window
is being operated.
●
When using the wireless remote
control (if equipped), key or
mechanical key and operating
the power windows, operate the
power window after checking to
make sure that there is no pos-
sibility of any passenger having
any of their body parts caught in
the window. Also do not let a
child operate window by the
wireless remote control (if
equipped), key or mechanical
key. It is possible for children
and other passengers to get
caught in the power window.
●
When exiting the vehicle, turn
the engine switch off, carry the
key and exit the vehicle along
with the child. There may be
accidental operation, due to
mischief, etc., that may possibly
lead to an accident.
-------------------------------------------------------------------------------------------------------------------------------------------------------------
129
3-5. Opening and closing the windows
3
Before driv
ing
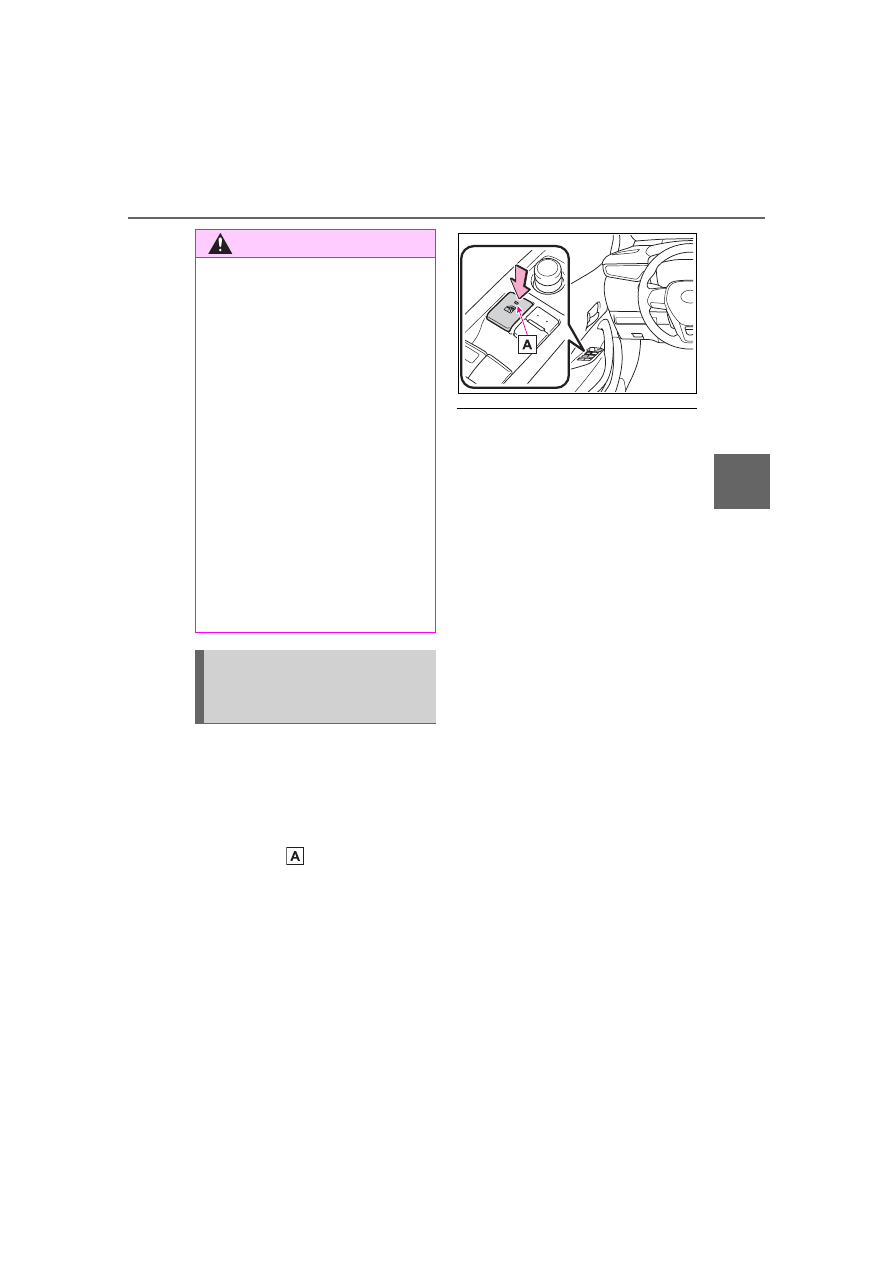
This function can be used to
prevent children from acciden-
tally opening or closing a pas-
senger window.
Press the switch.
The indicator
will come on and
the passenger windows will be
locked.
The passenger windows can still be
opened and closed using the
driver’s switch even if the lock
switch is on.
■
The power windows can be
operated when
The engine switch is in ON.
■
When the battery is discon-
nected
The window lock switch is disabled.
If necessary, press the window lock
switch after reconnecting the bat-
tery.
WARNING
■
Jam protection function
●
Never use any part of your body
to intentionally activate the jam
protection function.
●
The jam protection function may
not work if something gets
jammed just before the window
is fully closed. Be careful not to
get any part of your body
jammed in the window.
■
Catch protection function
●
Never use any part of your body
or clothing to intentionally acti-
vate the catch protection func-
tion.
●
The catch protection function
may not work if something gets
caught just before the window is
fully opened. Be careful not to
get any part of your body or
clothing caught in the window.
Preventing accidental
operation (window lock
switch)
-------------------------------------------------------------------------------------------------------------------------------------------------------------
130
3-5. Opening and closing the windows
*
: If equipped
■
Opening and closing
1
Opens the moon roof
*
The moon roof stops slightly before
the fully open position to reduce
wind noise. Press the switch again
to fully open the moon roof.
2
Closes the moon roof
*
*
: Lightly press either side of the
moon roof switch to stop the
moon roof partway.
■
Tilting up and down
1
Tilts the moon roof up
*
2
Tilts the moon roof down
*
*
: Lightly press either side of the
moon roof switch to stop the
moon roof partway.
■
The moon roof can be operated
when
The engine switch is in ON.
■
Operating the moon roof after
turning the engine off
The moon roof can be operated for
approximately 45 seconds after the
engine switch is turned to ACC or
OFF. It cannot, however, be oper-
ated once either front door is
opened.
■
Jam protection function
If an object is detected between the
moon roof and the frame while the
moon roof is closing or tilting down,
travel is stopped and the moon roof
opens slightly.
■
Sunshade
The sunshade can be opened and
closed manually. However, the sun-
shade will open automatically when
the moon roof is opened.
■
Door lock linked moon roof
operation
●
Vehicles without a smart key sys-
tem: The moon roof can be
opened and closed using the key.
*
(P.104)
Vehicles with a smart key system:
The moon roof can be opened
and closed using the mechanical
key.
*
(P.514)
●
The moon roof can be opened
using the wireless remote control.
*
(P.103)
*
: These settings must be custom-
ized at your Toyota dealer.
■
When the moon roof does not
close normally
Perform the following procedure:
Moon roof
*
Use the overhead switches
to open and close the moon
roof and tilt it up and down.
Operating the moon roof
-------------------------------------------------------------------------------------------------------------------------------------------------------------
131
3-5. Opening and closing the windows
3
Before driv
ing
●
If the moon roof closes but then
re-opens slightly
1
Stop the vehicle.
2
Press and hold the “CLOSE”
switch.
*1
The moon roof will close, reopen
and pause for approximately 10 sec-
onds.
*2
Then it will close again, tilt
up and pause for approximately 1
second. Finally, it will tilt down, open
and close.
3
Check to make sure that the
moon roof is completely closed
and then release the switch.
●
If the moon roof tilts down but then
tilts back up
1
Stop the vehicle.
2
Press and hold the “UP” switch
*1
until the moon roof moves into
the tilt up position and stops.
3
Release the “UP” switch once
and then press and hold the “UP”
switch again.
*1
The moon roof will pause for
approximately 10 seconds in the tilt
up position.
*2
Then it will adjust
slightly and pause for approximately
1 second. Finally, it will tilt down,
open and close.
4
Check to make sure that the
moon roof is completely closed
and then release the switch.
*1
:If the switch is released at the
incorrect time, the procedure will
have to be performed again from
the beginning.
*2
:If the switch is released after the
above mentioned 10 second
pause, automatic operation will
be disabled. In that case, press
and hold the “CLOSE” or “UP”
switch, and the moon roof will tilt
up and pause for approximately 1
second. Then it will tilt down,
open and close. Check to make
sure that the moon roof is com-
pletely closed and then release
the switch.
If the moon roof does not fully close
even after performing the above
procedure correctly, have the vehi-
cle inspected by your Toyota dealer.
■
Customization
Some functions can be customized.
(P.548)
WARNING
Observe the following precau-
tions.
Failure to do so may cause death
or serious injury.
■
Opening the moon roof
●
Do not allow any passengers to
put their hands or heads outside
the vehicle while it is moving.
●
Do not sit on top of the moon
roof.
■
Opening and closing the
moon roof
●
The driver is responsible for
moon roof opening and closing
operations.
In order to prevent accidental
operation, especially by a child,
do not let a child operate the
moon roof. It is possible for chil-
dren and other passengers to
have body parts caught in the
moon roof.
-------------------------------------------------------------------------------------------------------------------------------------------------------------
132
3-5. Opening and closing the windows
WARNING
●
Check to make sure that all pas-
sengers do not have any part of
their body in a position where it
could be caught when the moon
roof is being operated.
●
When using the wireless remote
control, key or mechanical key
and operating the moon roof,
operate the moon roof after
checking to make sure that
there is no possibility of any
passenger having any of their
body parts caught in the moon
roof. Also, do not let a child
operate moon roof by the wire-
less remote control, key or
mechanical key. It is possible for
children and other passengers
to get caught in the moon roof.
●
When exiting the vehicle, turn
the engine switch off, carry the
key and exit the vehicle along
with the child. There may be
accidental operation, due to
mischief, etc., that may possibly
lead to an accident.
■
Jam protection function
●
Never use any part of your body
to intentionally activate the jam
protection function.
●
The jam protection function may
not work if something gets
caught just before the moon
roof is fully closed. Also, the jam
protection function is not
designed to operate while the
moon roof switch is being
pressed. Take care so that your
fingers, etc. do not get caught.
-------------------------------------------------------------------------------------------------------------------------------------------------------------
133
4
4
Dr
iv
ing
Driving
.
4-1. Before driving
Driving the vehicle. ...
Cargo and luggage . .
Vehicle load limits . ...
Trailer towing. . . ...
Dinghy towing . . . .
4-2. Driving procedures
Engine (ignition) switch
(vehicles without a smart
key system) . . . ...
Engine (ignition) switch
(vehicles with a smart key
system). . . . . ..
Continuously variable trans-
mission (vehicles without
paddle shift switches)
. . . . . . . . ..
Continuously variable trans-
mission (vehicles with pad-
dle shift switches). ..
Manual transmission ...
Turn signal lever. . ..
Parking brake. . . ..
Electric parking brake .
Brake Hold . . . . ..
4-3. Operating the lights and
wipers
Headlight switch. . ..
Automatic High Beam .
Windshield wipers and
washer. . . . . ...
4-4. Refueling
Opening the fuel tank cap
. . . . . . . . ..
4-5. Using the driving support
systems
Toyota Safety Sense 2.0
. . . . . . . . ..
PCS (Pre-Collision System)
. . . . . . . . ..
LTA (Lane Tracing Assist)
. . . . . . . . ..
LDA (Lane Departure Alert
with steering control) .
Dynamic radar cruise con-
trol with full-speed range
. . . . . . . . ..
Dynamic radar cruise con-
trol . . . . . . . .
RSA (Road Sign Assist)
. . . . . . . . ..
BSM (Blind Spot Monitor)
. . . . . . . . ..
Rear view monitor system
. . . . . . . . ..
Driving mode select switch
. . . . . . . . ..
Driving assist systems
. . . . . . . . ..
4-6. Driving tips
Winter driving tips. .
-------------------------------------------------------------------------------------------------------------------------------------------------------------
Нет комментариевНе стесняйтесь поделиться с нами вашим ценным мнением.
Текст