Toyota Matrix (2014 year). Instruction — part 8

118
2-1. Driving procedures
MATRIX_U
Engine (ignition) switch
■
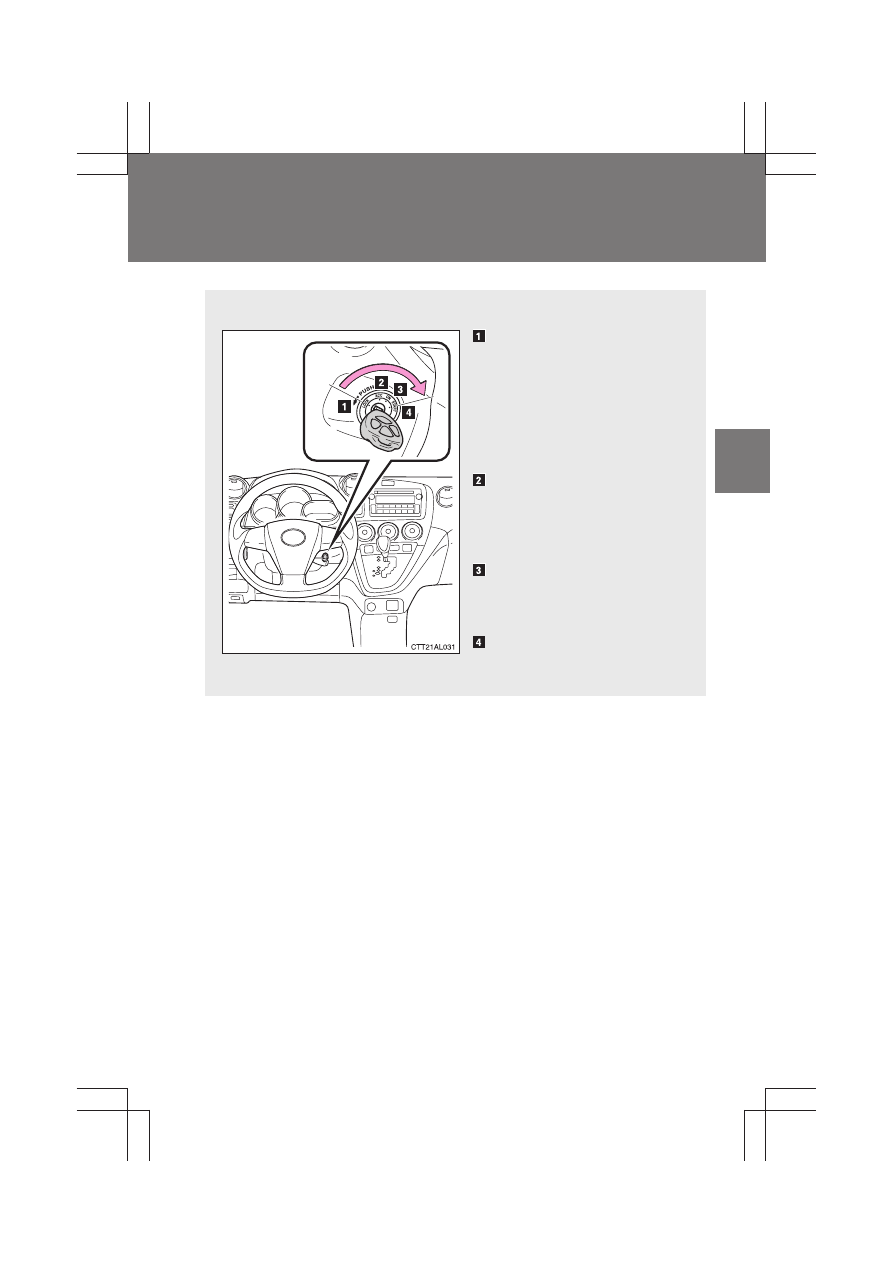
Starting the engine
Automatic transmission
Check that the parking brake is set.
Check that the shift lever is set in P.
Sit in the driver’s seat and firmly depress the brake pedal.
Turn the engine switch to the “START” position and start
the engine.
1.8 L 4-cylinder (2ZR-FE) engine: The engine will crank until it
starts or for up to 25 seconds, whichever is less. If you turn the
engine switch, the engine will keep cranking for about 30 seconds
maximum.
Continue depressing the brake pedal until the engine is com-
pletely started.
Manual transmission
Check that the parking brake is set.
Check that the shift lever is set in N.
Firmly depress the clutch pedal.
Turn the engine switch to the “START” position and start
the engine.
1.8 L 4-cylinder (2ZR-FE) engine: The engine will crank until it
starts or for up to 25 seconds, whichever is less. If you turn the
engine switch, the engine will keep cranking for about 30 seconds
maximum.
Continue depressing the brake pedal until the engine is com-
pletely started.
STEP
1
STEP
2
STEP
3
STEP
4
STEP
1
STEP
2
STEP
3
STEP
4
119
2-1. Driving procedures
2
Wh
en driv
in
g
MATRIX_U
■
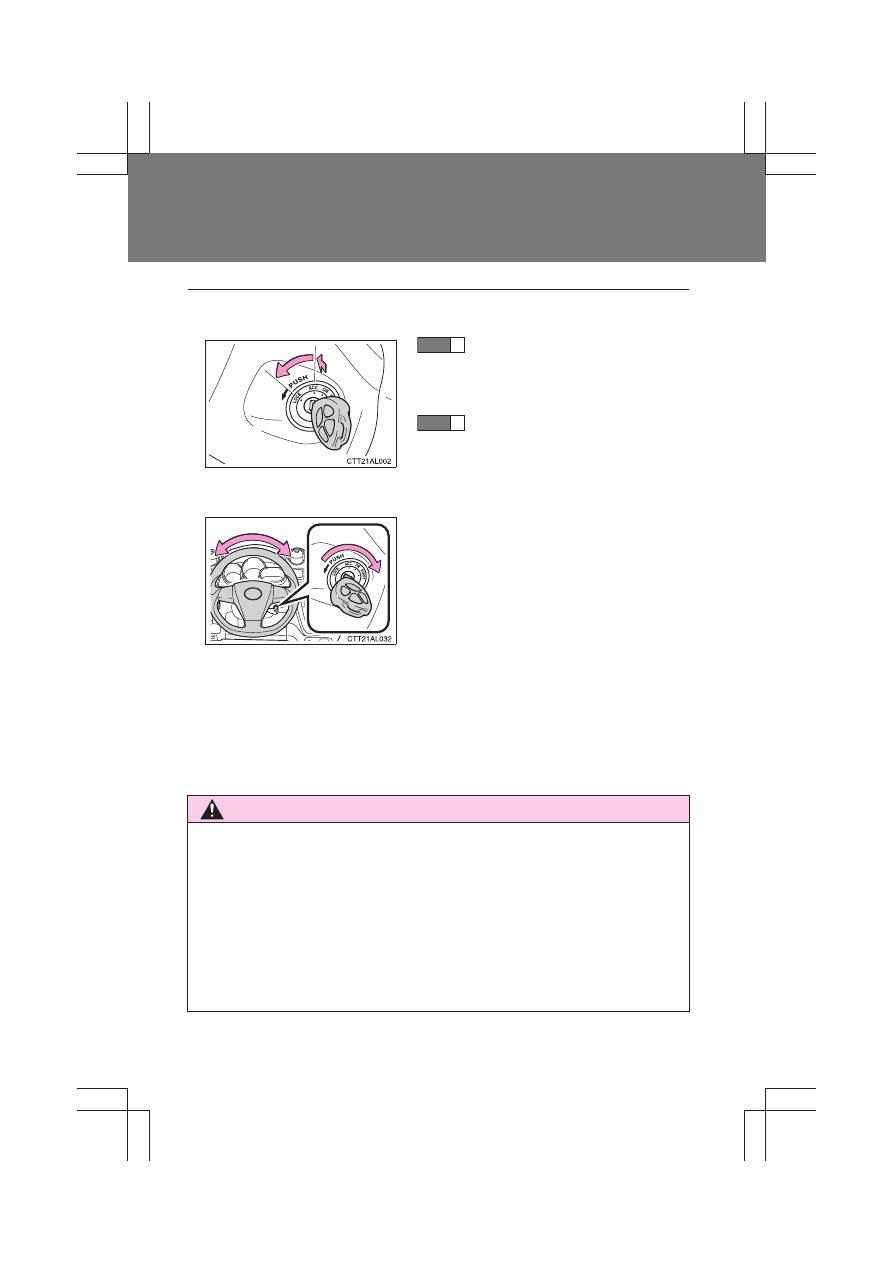
Changing engine switch position
“LOCK”
The steering wheel is locked
and the key can be removed.
(Vehicles with an automatic
transmission: The key can be
removed only when the shift
lever is in P.)
“ACC”
Some electrical components
such as the audio system can
be used.
“ON”
All electrical components can
be used.
“START”
For starting the engine.
120
2-1. Driving procedures
MATRIX_U
■
Turning the engine switch from “ACC” to “LOCK”
■
Steering lock release
■
If the engine does not start
The engine immobilizer system may not have been deactivated. (
→P. 68)
■
Key reminder buzzer
A buzzer sounds if the driver’s door is opened while the engine switch is in
the “ACC” or “LOCK” position to remind you to remove the key.
CAUTION
■
When starting the engine
Always start the engine while sitting in the driver's seat. Do not depress the
accelerator while starting the engine under any circumstances.
Doing so may cause an accident resulting in death or serious injury.
■
Caution when driving
Do not turn the engine switch to the “LOCK” position while driving. If, in an
emergency, you must turn the engine off while the vehicle is moving, turn the
engine switch only to the “ACC” position.
Shift the shift lever to P (auto-
matic transmission) or N (man-
ual transmission).
(
→P. 122, 127)
Push in the key and turn to the
“LOCK” position.
STEP
1
STEP
2
When starting the engine, the engine
switch may seem stuck in the “LOCK”
position. To free it, turn the key while turn-
ing the steering wheel slightly in either
direction.
121
2-1. Driving procedures
2
Wh
en driv
in
g
MATRIX_U
NOTICE
■
To prevent battery discharge
Do not leave the key in the “ACC” or “ON” position for long periods if the
engine is not running.
■
When starting the engine
●
2.4 L 4-cylinder (2AZ-FE) engine
Do not crank for more than 30 sec-
onds at a time. This may overheat the starter and wiring systems.
●
Do not race a cold engine.
●
If the engine becomes difficult to start or stalls frequently, have the engine
checked immediately.
122
2-1. Driving procedures
MATRIX_U
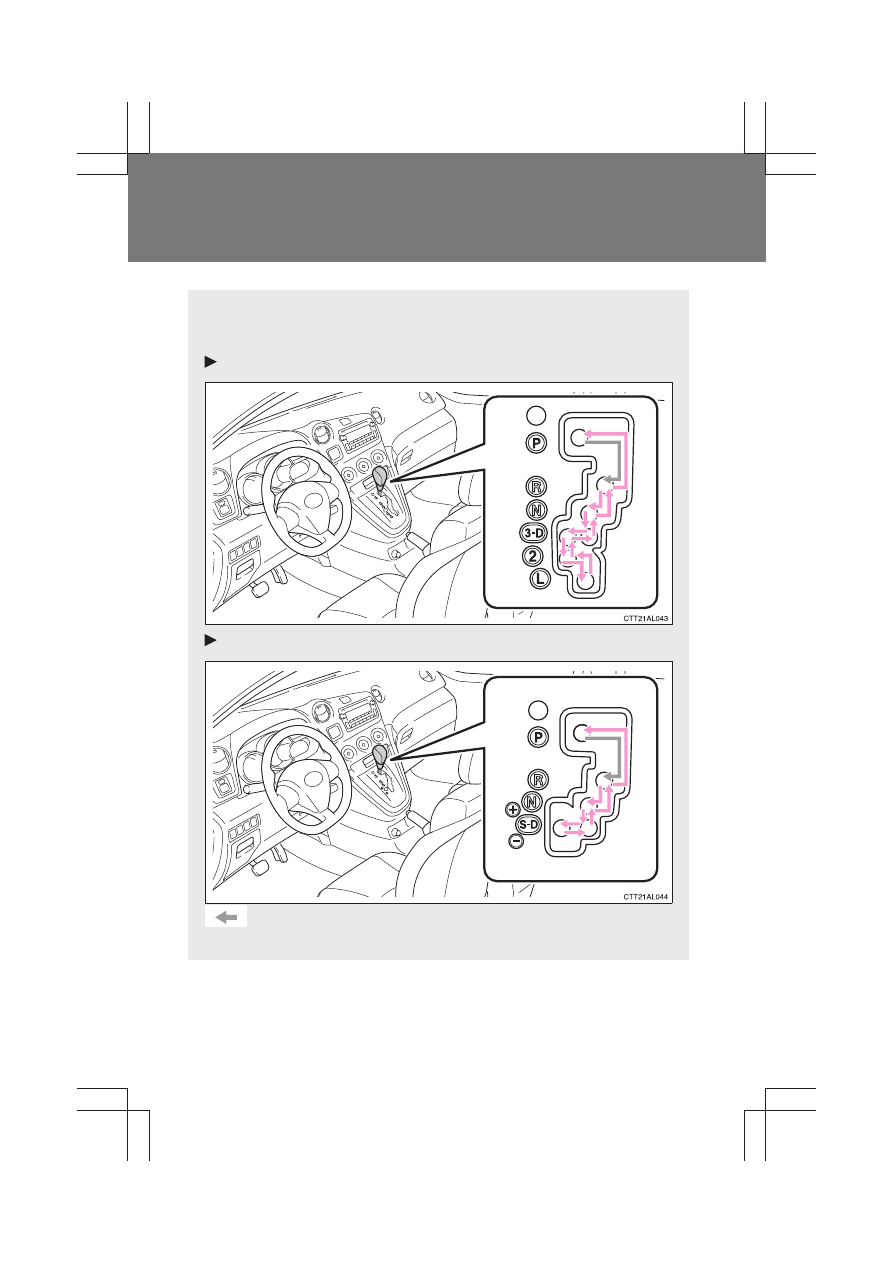
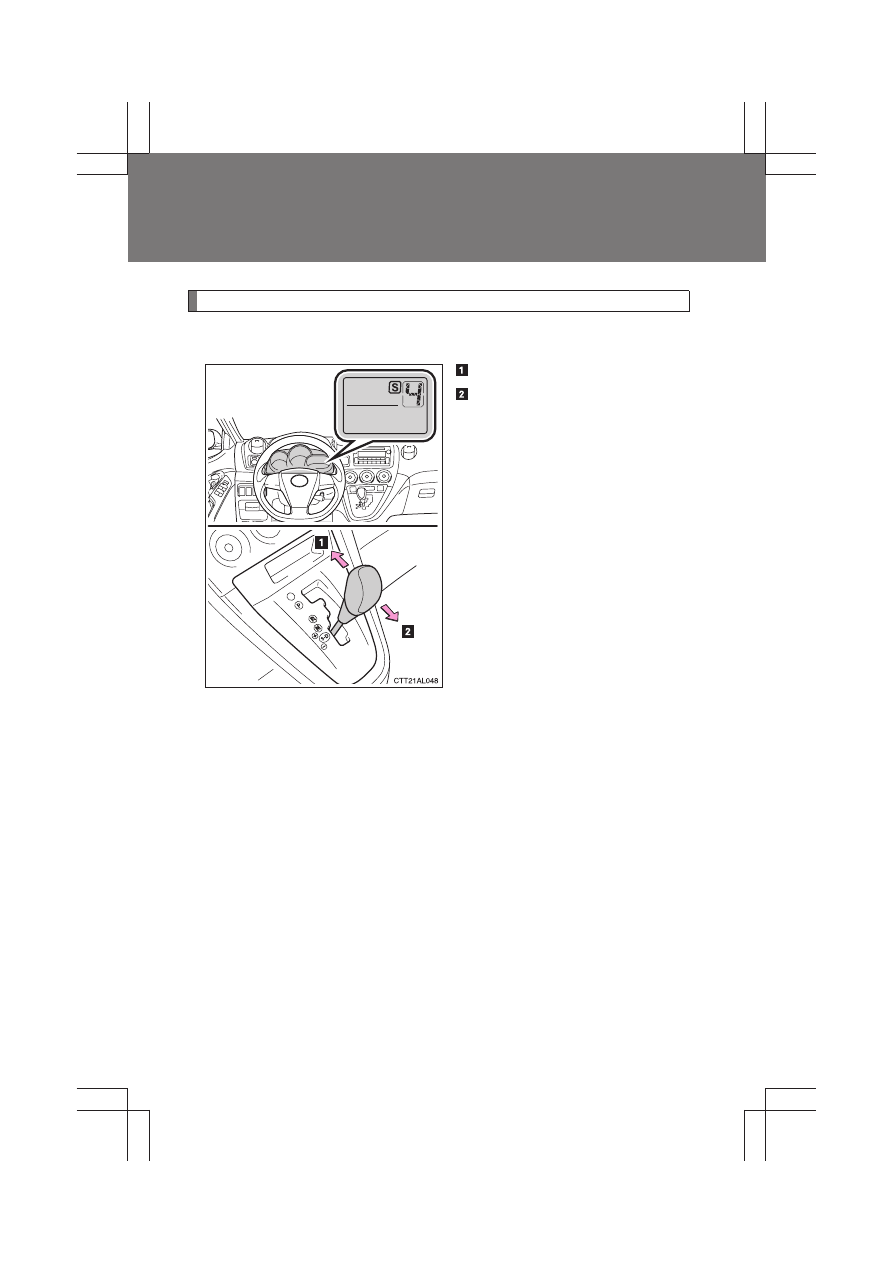
Automatic transmission
∗
Select a shift position appropriate for the driving conditions.
■
Shifting the shift lever
Standard type
Multi-mode type
While the engine switch is in the “ON” position, depress the
brake pedal and move the shift lever.
∗
: If equipped
123
2-1. Driving procedures
2
Wh
en driv
in
g
MATRIX_U
■
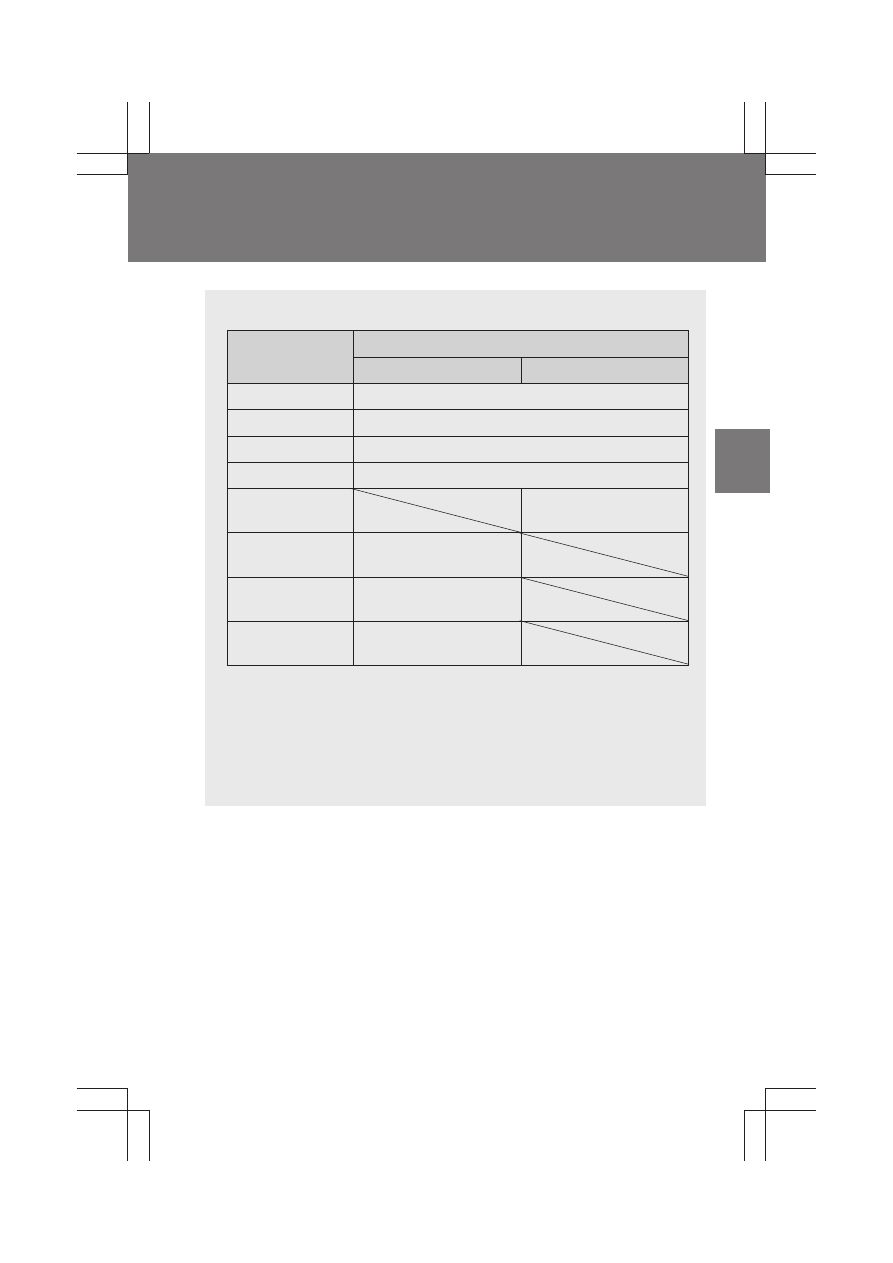
Shift position uses
*
1
: Shifting to the D position allows the system to select a gear suitable
for driving conditions. Setting the shift lever to the D position is recom-
mended for normal driving.
*
2
: Selecting shift ranges using S mode restricts the upper limit of the
possible gear ranges, controls engine braking forces, and prevents
unnecessary upshifting.
Shift position
Function
Standard type
Multi-mode type
P
Parking the vehicle or starting the engine
R
Reversing
N
Neutral
D
Normal driving
*
1
S
S mode driving
*
2
(
→P. 124)
3
Position for engine
braking
2
Position for more
powerful engine braking
L
Position for maximum
engine braking
124
2-1. Driving procedures
MATRIX_U
Changing shift ranges in S mode (multi-mode type)
Shift the shift lever to the S position and operate the shift lever.
Upshifting
Downshifting
The initial shift range in S mode is automatically set to 4 or 5. How-
ever, the initial shift range may be set to 3 if AI-SHIFT has operated
while the shift lever was in the D position. (
→P. 126)
When the shift range is 4 or lower, holding the shift lever toward “+”
sets the shift range to 5.
To protect the automatic transmission, a function is adopted that
automatically selects a higher shift range when the fluid temperature
is high.
125
2-1. Driving procedures
2
Wh
en driv
in
g
MATRIX_U
■
Shift ranges and their functions
A lower shift range will provide greater engine braking forces than a
higher shift range.
■
Downshifting restrictions (standard type)
The shift lever cannot be downshifted if the following speeds are exceeded.
2.4 L 4-cylinder (2AZ-FE) engine
mph (km/h)
1.8 L 4-cylinder (2ZR-FE) engine
mph (km/h)
Shift range
Function
5
A gear between 1 and 5 is automatically selected
according to vehicle speed and driving conditions.
4
A gear between 1 and 4 is automatically selected
according to vehicle speed and driving conditions.
3
A gear between 1 and 3 is automatically selected
according to vehicle speed and driving conditions.
2
A gear between 1 and 2 is automatically selected
according to vehicle speed and driving conditions.
1
Setting the gear at 1.
Downshifting
Maximum speed
3
→2
64 (104)
2
→L
32 (52)
Downshifting
Maximum speed
3
→2
57 (92)
2
→L
27 (44)

126
2-1. Driving procedures
MATRIX_U
■
Downshifting restrictions warning buzzer (multi-mode type
S mode)
To help ensure safety and driving performance, downshifting operation may
sometimes be restricted. In some circumstances, downshifting may not be
possible even when the shift lever is operated. (The warning buzzer will
sound twice.)
■
When driving with the cruise control system (if equipped)
Standard type
Engine braking will not operate, even when downshifting to 3. (
→P. 148)
Multi-mode type
Engine braking will not operate in the S mode, even when downshifting to 4.
(
→P. 148)
■
If the shift lever cannot be shifted from P
→P. 423
■
If the “S” indicator does not come on even after shifting the shift lever
to S (multi-mode type)
This may indicate a malfunction in the automatic transmission system. Have
the vehicle inspected by your Toyota dealer immediately.
(In this situation, the vehicle will operate as if the shift lever is in D.)
■
AI-SHIFT
AI-SHIFT automatically selects the suitable gear according to driver perfor-
mance and driving conditions.
Standard type
AI-SHIFT automatically operates when the shift lever is in the D position.
Multi-mode type
AI-SHIFT automatically operates when the shift lever is in the D position.
(Shifting the shift lever to the S position cancels the function.)
127
2-1. Driving procedures
2
Wh
en driv
in
g
MATRIX_U
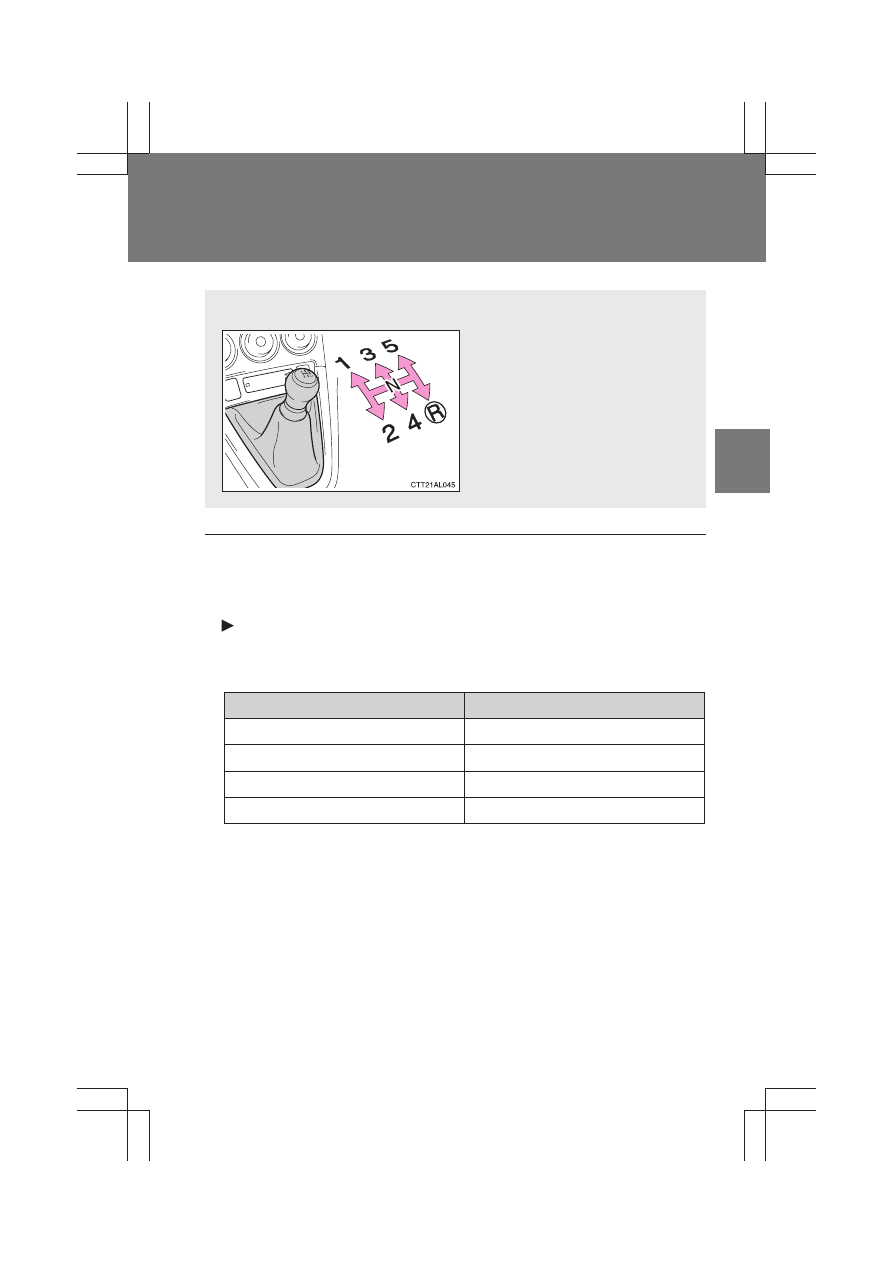
Manual transmission
∗
■
Maximum allowable speeds
Observe the following maximum allowable speeds in each gear when maxi-
mum acceleration is necessary.
2.4 L 4-cylinder (2AZ-FE) engine (without double wishbone rear suspen-
sion)
mph (km/h)
■
Shifting the shift lever
Fully depress the clutch pedal
before operating the shift
lever, and then release the
clutch pedal slowly.
∗
: If equipped
Shift position
Maximum speed
1
31 (50)
2
53 (86)
3
82 (132)
4
112 (181)
128
2-1. Driving procedures
MATRIX_U
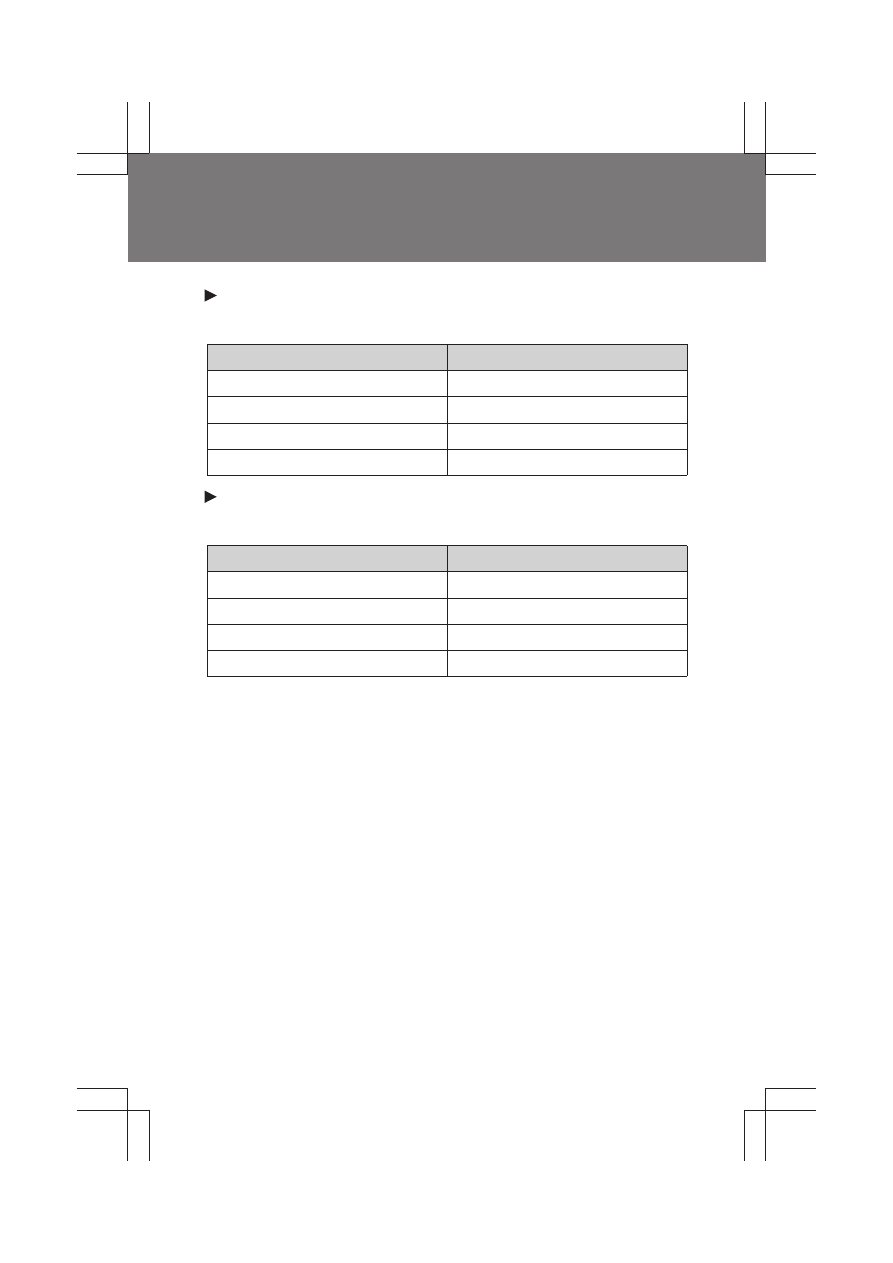
2.4 L 4-cylinder (2AZ-FE) engine (with double wishbone rear suspension)
mph (km/h)
1.8 L 4-cylinder (2ZR-FE) engine
mph (km/h)
Shift position
Maximum speed
1
31 (50)
2
54 (87)
3
83 (134)
4
113 (183)
Shift position
Maximum speed
1
34 (55)
2
56 (91)
3
82 (132)
4
121 (195)
129
2-1. Driving procedures
2
Wh
en driv
in
g
MATRIX_U
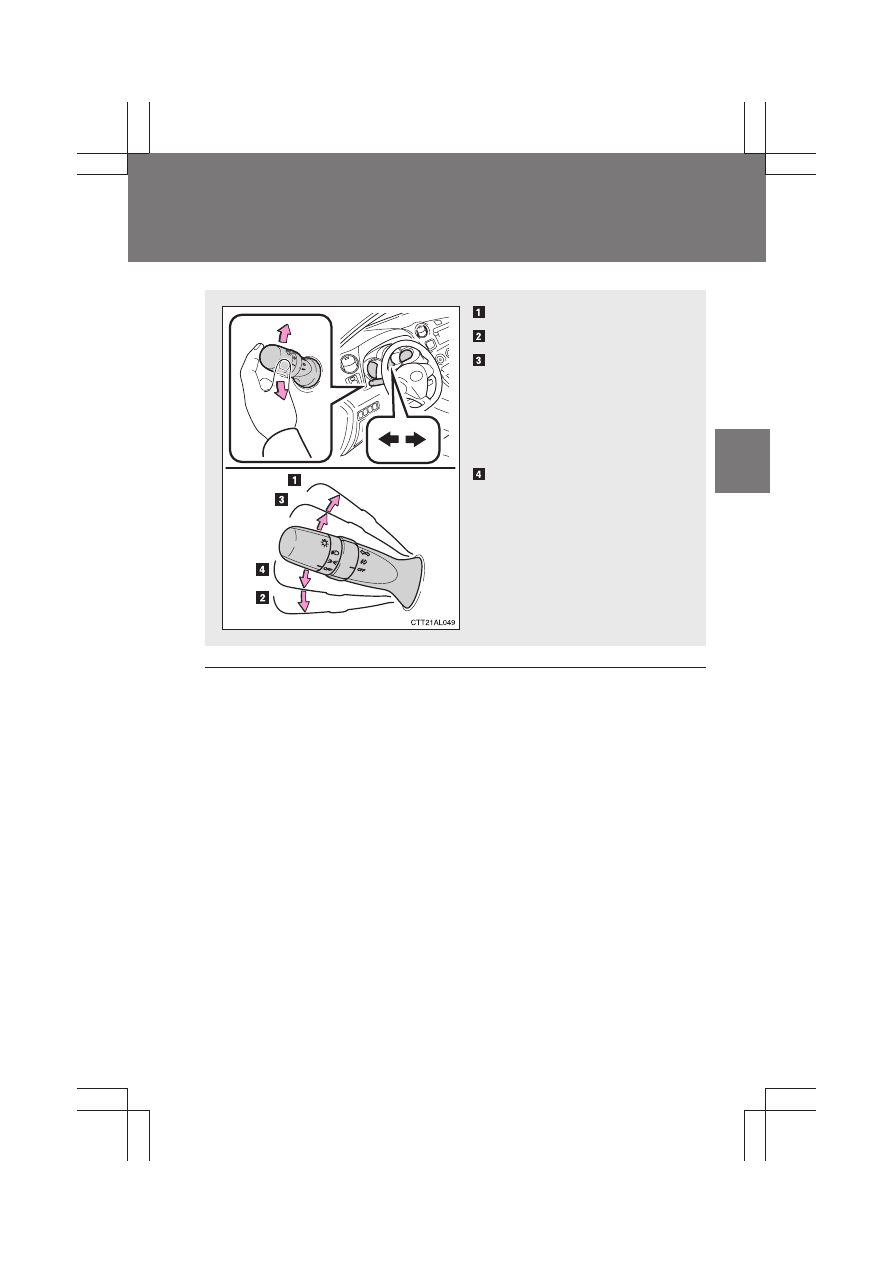
Turn signal lever
■
Turn signals can be operated when
The engine switch is in the “ON” position.
■
If the indicators flash faster than usual
Check that a light bulb in the front or rear turn signal lights has not burned
out.
Right turn
Left turn
Move and hold the lever
partway to signal a lane
change.
The right hand signal will flash
until you release the lever.
Move and hold the lever
partway to signal a lane
change.
The left hand signal will flash
until you release the lever.
130
2-1. Driving procedures
MATRIX_U
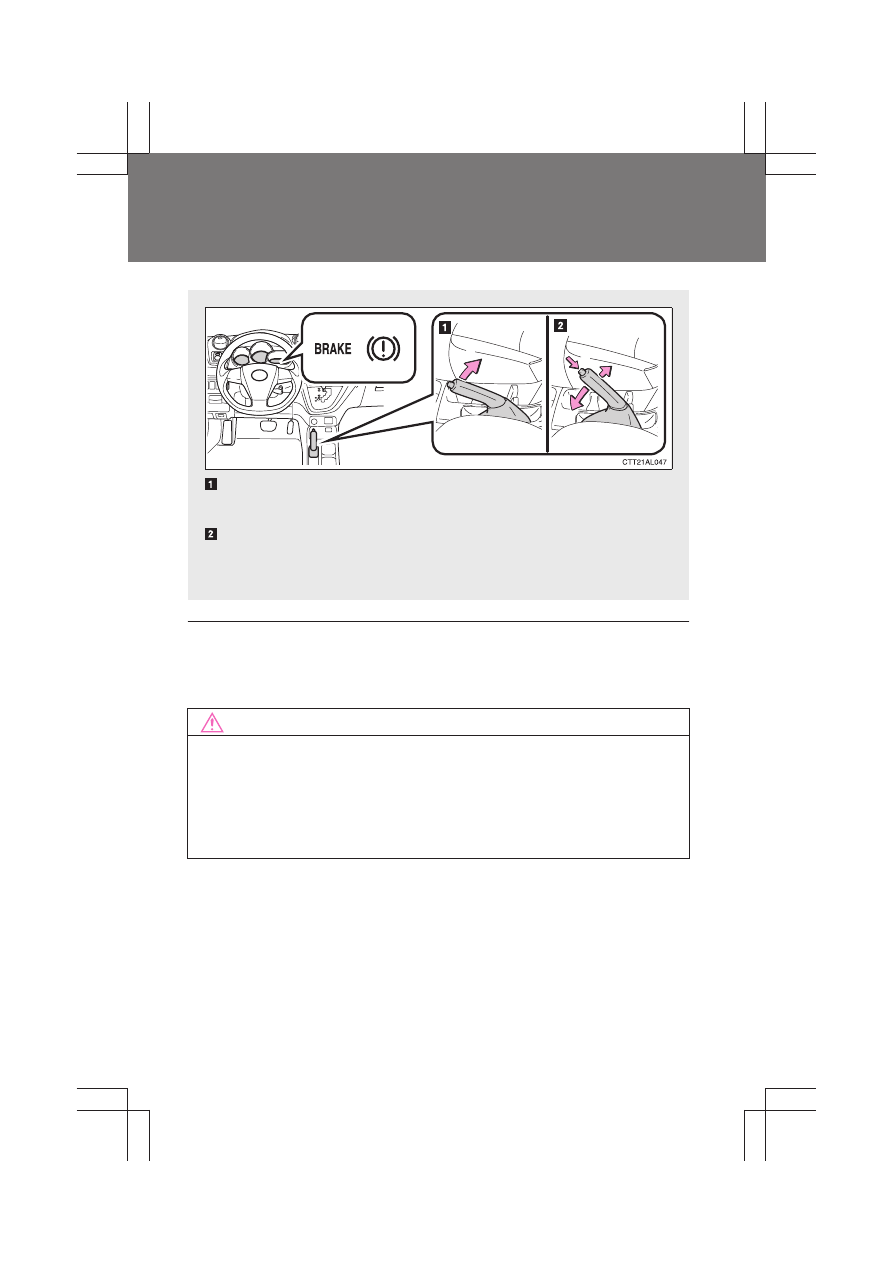
Parking brake
■
Usage in winter time
See “Winter driving tips” for parking brake usage in winter time. (
→P. 162)
NOTICE
■
Before driving
Fully release the parking brake.
Driving the vehicle with the parking brake set will lead to brake components
overheating, which may affect braking performance and increase brake
wear.
Sets the parking brake
Fully set the parking brake while depressing the brake pedal.
Releases the parking brake
Slightly raise the lever and lower it completely while pressing the but-
ton.
U.S.A. Canada
131
2-1. Driving procedures
2
Wh
en driv
in
g
MATRIX_U
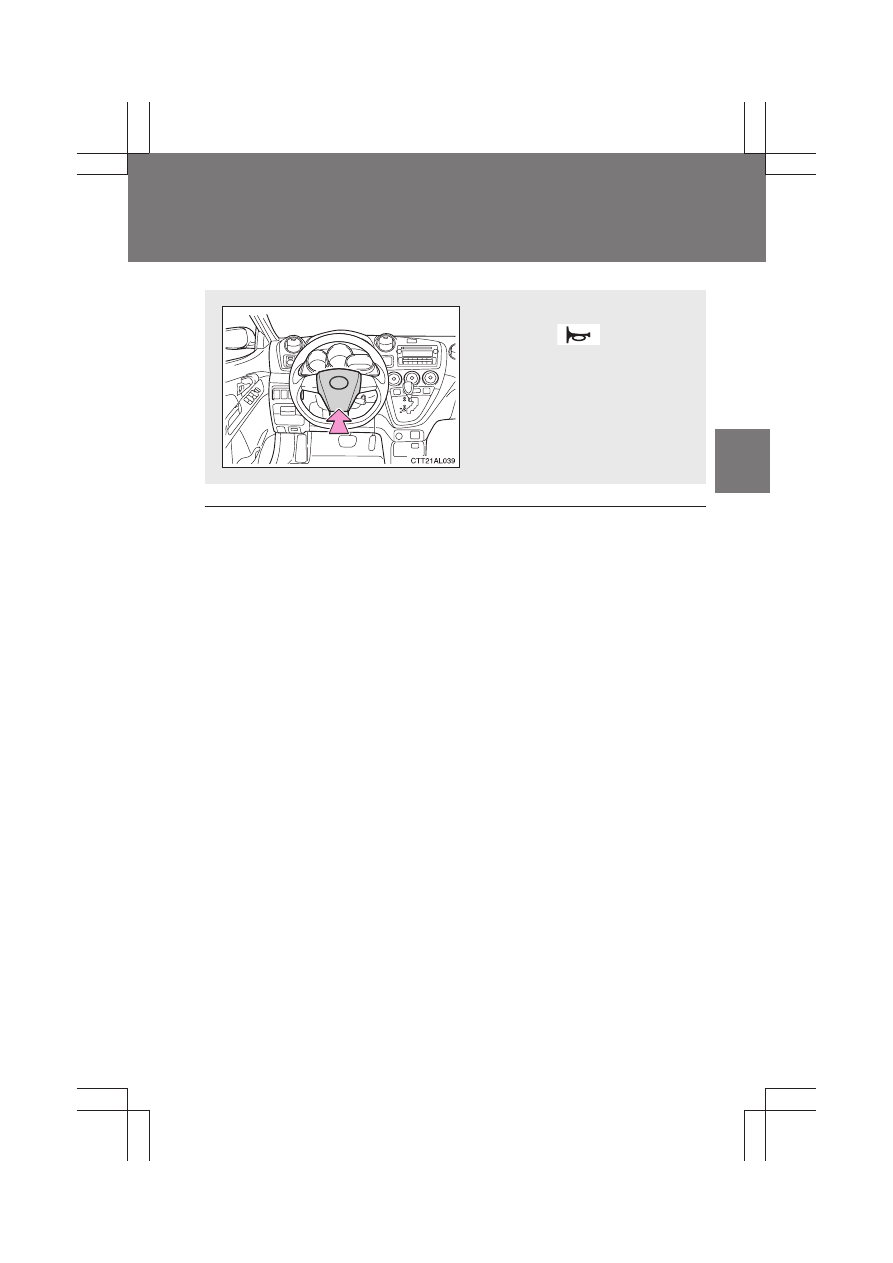
Horn
■
After adjusting the steering wheel
Make sure that the steering wheel is securely locked.
The horn may not sound if the steering wheel is not securely locked.
(
→P. 54)
To sound the horn, press on or
close to the
mark.

132
MATRIX_U
2-2. Instrument cluster
Gauges and meters
The following gauges, meters and displays illuminate when the
engine switch is in the “ON” position.
Tachometer
Displays the engine speed in revolutions per minute.
Speedometer
Displays the vehicle speed.
Fuel gauge
Displays the quantity of fuel remaining in the tank.
Outside temperature display
Displays the outside air temperature.
The temperature range that can be displayed is from -40
°F (-40°C) to
122
°F (50°C).
Odometer/trip meter/instrument panel light control and trip meter
reset button
Switches between odometer and trip meter displays. Pressing and
holding the button will reset the trip meter when the trip meter is being
displayed.
To adjust the brightness of the instrument panel light, turn the button.
(
→P. 134)

133
2-2. Instrument cluster
2
Wh
en driv
in
g
MATRIX_U
Engine coolant temperature gauge
Displays the engine coolant temperature.
Automatic transmission shift position indicator lights (if
equipped)
→P. 122
Odometer and trip meter
Odometer: Displays the total distance the vehicle has been driven.
Trip meter: Displays the distance the vehicle has been driven since the
meter was last reset. Trip meters A and B can be used to record and
display different distances independently.
Low fuel level warning light
→P. 400
Нет комментариевНе стесняйтесь поделиться с нами вашим ценным мнением.
Текст