Toyota Matrix (2014 year). Instruction — part 9
134
2-2. Instrument cluster
MATRIX_U
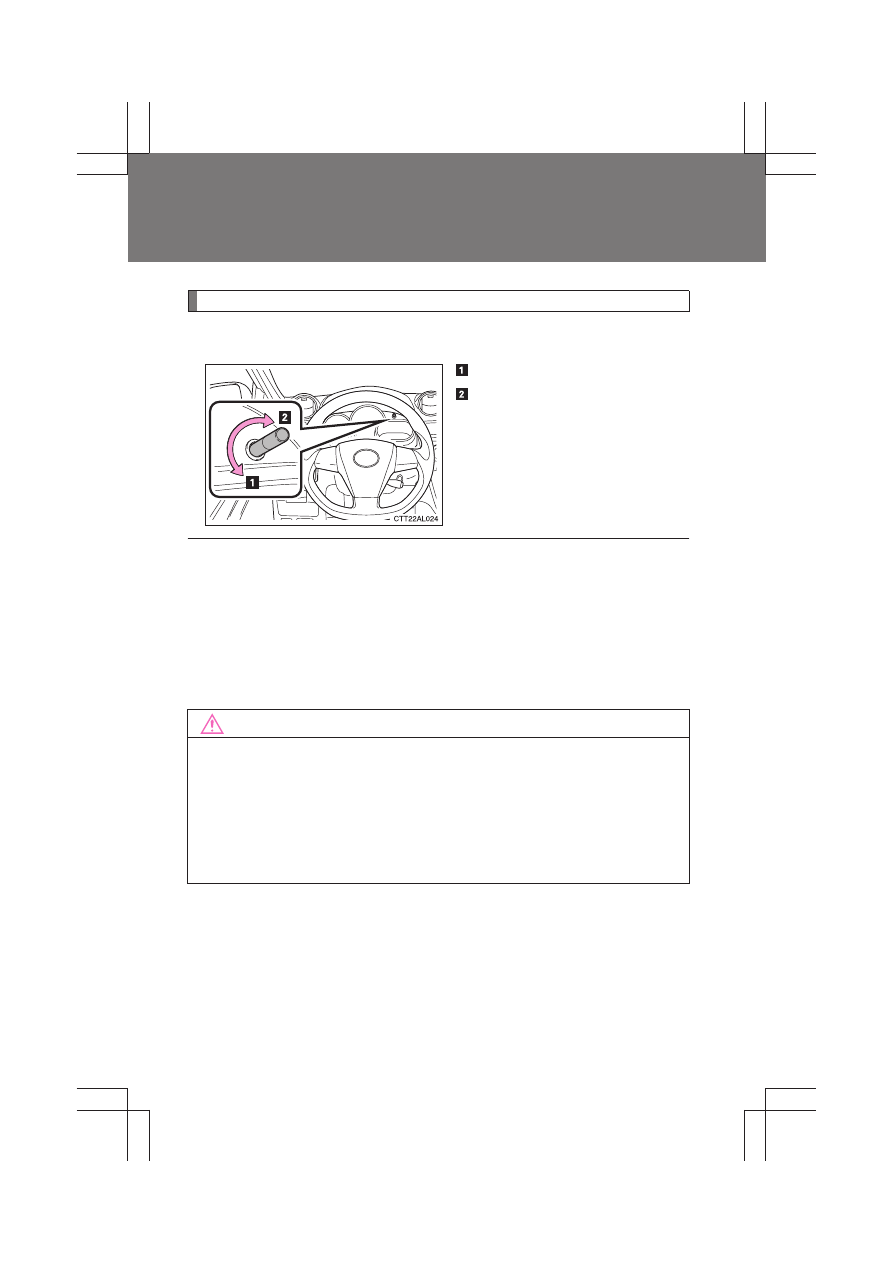
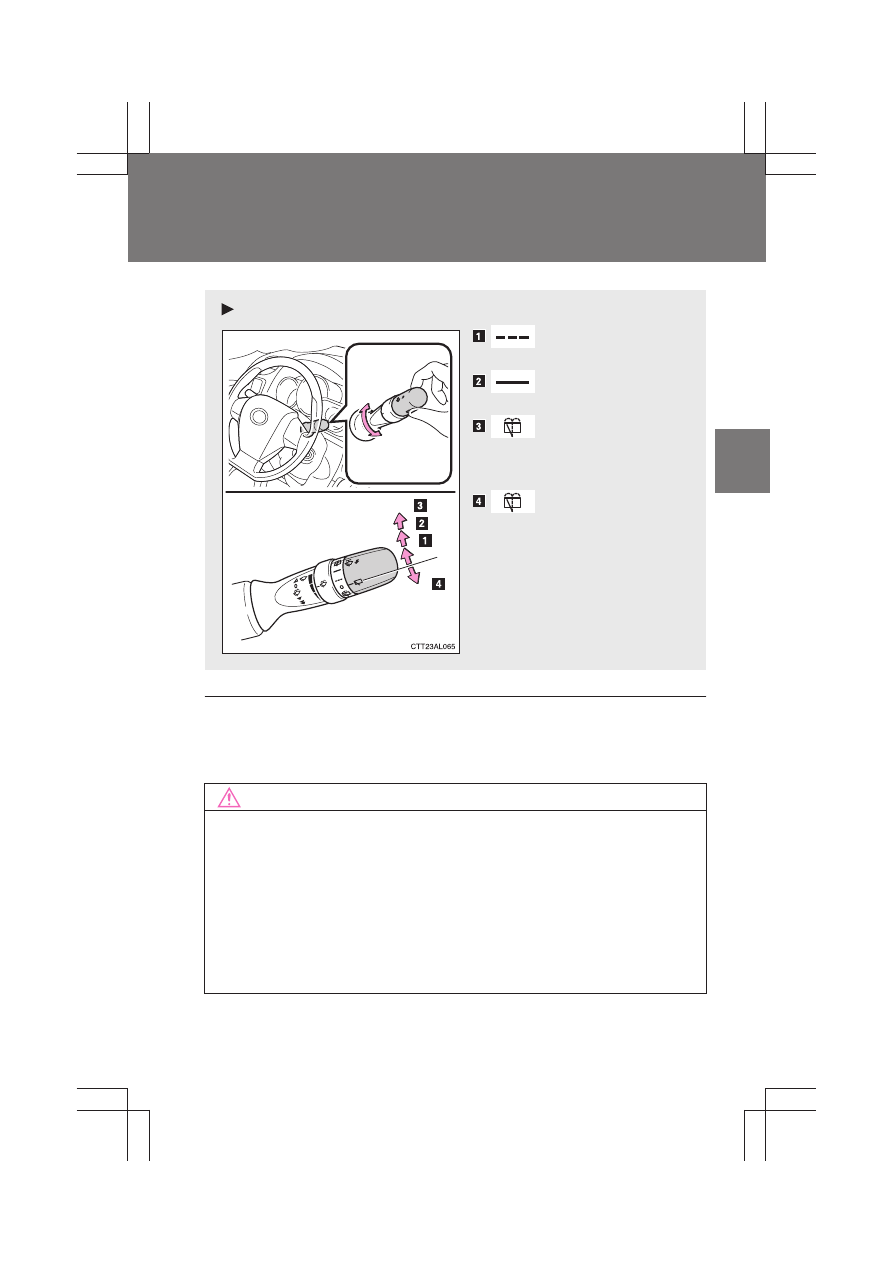
Instrument panel light control
The brightness of the instrument panel lights can be adjusted.
Darker
Brighter
When the headlight switch is
turned on, the brightness will be
reduced slightly unless the con-
trol button is turned fully clock-
wise.
■
Display
In the following situations, the correct outside temperature may not be dis-
played, or the display may take longer than normal to change.
●
When stopped, or driving at low speeds (less than 12 mph [20 km/h])
●
When the outside temperature has changed suddenly (at the entrance/
exit of a garage, tunnel, etc.)
NOTICE
■
To prevent damage to the engine and its components
●
Do not let the indicator needle of the tachometer enter the red zone, which
indicates the maximum engine speed.
●
The engine may be overheating if the engine coolant temperature gauge is
in the red zone (H). In this case, immediately stop the vehicle in a safe
place, and check the engine after it has cooled completely. (
→
P. 430)
135
2-2. Instrument cluster
2
Wh
en driv
in
g
MATRIX_U
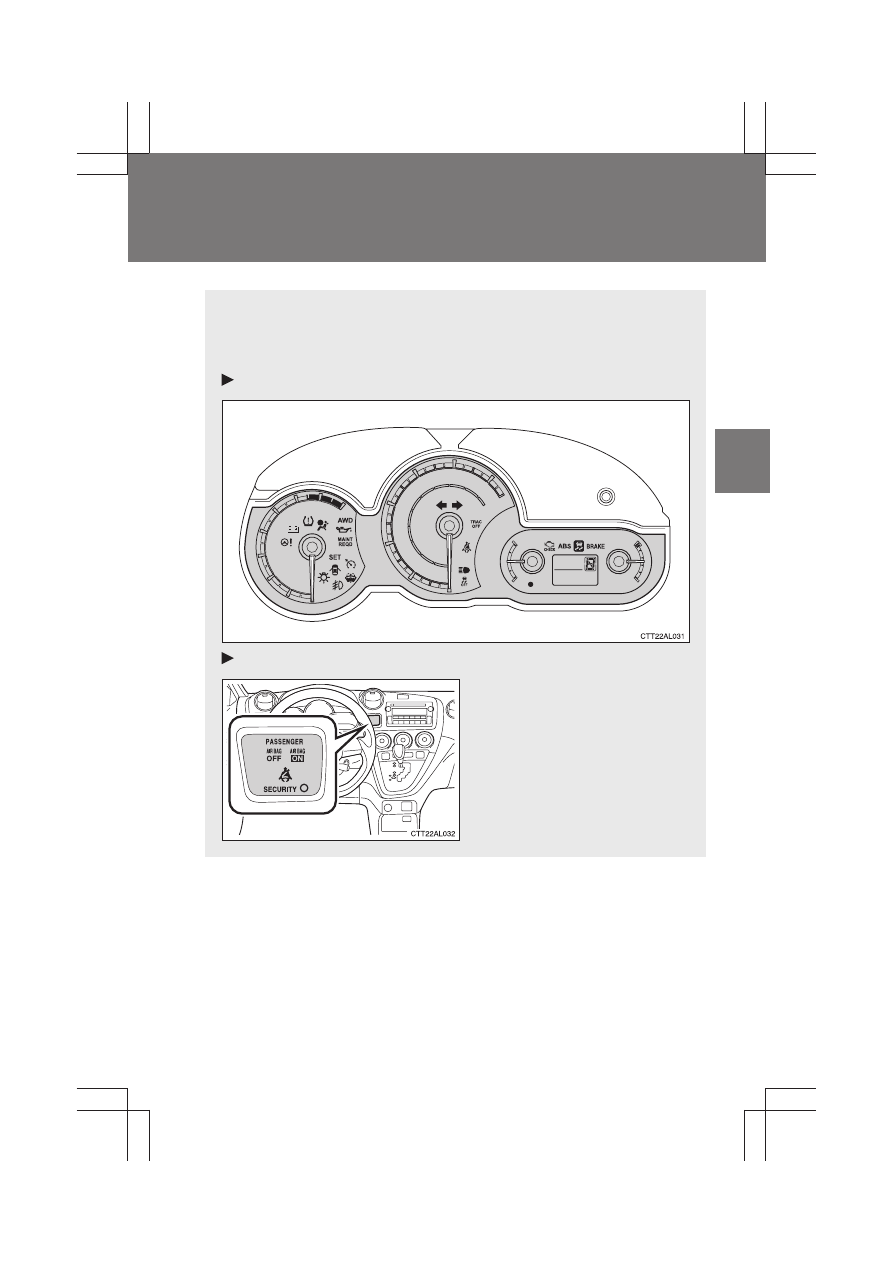
Indicators and warning lights
The indicator and warning lights on the instrument cluster and cen-
ter panel inform the driver of the status of the vehicle’s various sys-
tems.
Instrument cluster
Center panel
136
2-2. Instrument cluster
MATRIX_U
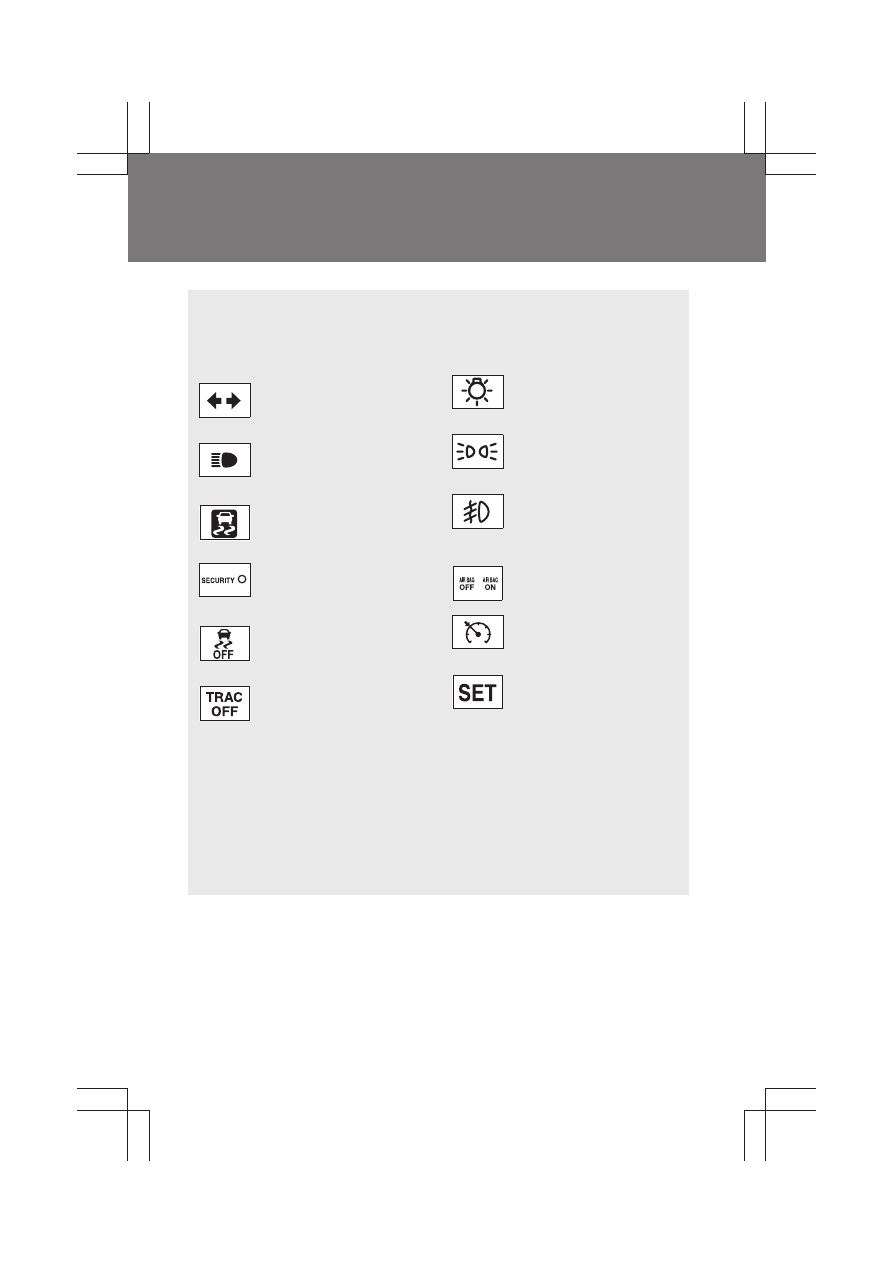
■
Indicators
The indicators inform the driver of the operating state of the
vehicle’s various systems.
*
1
: These lights turn on when the engine switch is turned to the “ON”
position to indicate that a system check is being performed. They
will turn off after the engine is started, or after a few seconds. There
may be a malfunction in a system if a light does not come on, or if
the lights do not turn off. Have the vehicle inspected by your Toyota
dealer for details.
*
2
: The light flashes to indicate that the system is operating.
Turn signal indicator
(
→P. 129)
(U.S.A.)
Headlight indicator
(
→P. 138)
Headlight high beam
indicator (
→P. 139)
(Canada)
Tail light indicator
(
→P. 138)
Slip indicator
(
→P. 153)
(if equipped)
Front fog light indicator
(
→P. 141)
Engine immobilizer sys-
tem indicator (
→P. 68)
“AIR BAG ON” and “AIR
BAG OFF” indicator
(
→P. 85)
VSC off indicator
(
→P. 154)
(if equipped)
Cruise control indicator
(
→P. 148)
“TRAC OFF” indicator
(
→P. 153)
(if equipped)
Cruise control set indi-
cator (
→P. 148)
*
1, 2
*
1
*
1
*
1
137
2-2. Instrument cluster
2
Wh
en driv
in
g
MATRIX_U
CAUTION
■
If a safety system warning light does not come on
Should a safety system light such as the ABS or the SRS airbag warning
light not come on when you start the engine, this could mean that these sys-
tems are not available to help protect you in an accident, which could result
in death or serious injury. Have the vehicle inspected by your Toyota dealer
immediately if this occurs.
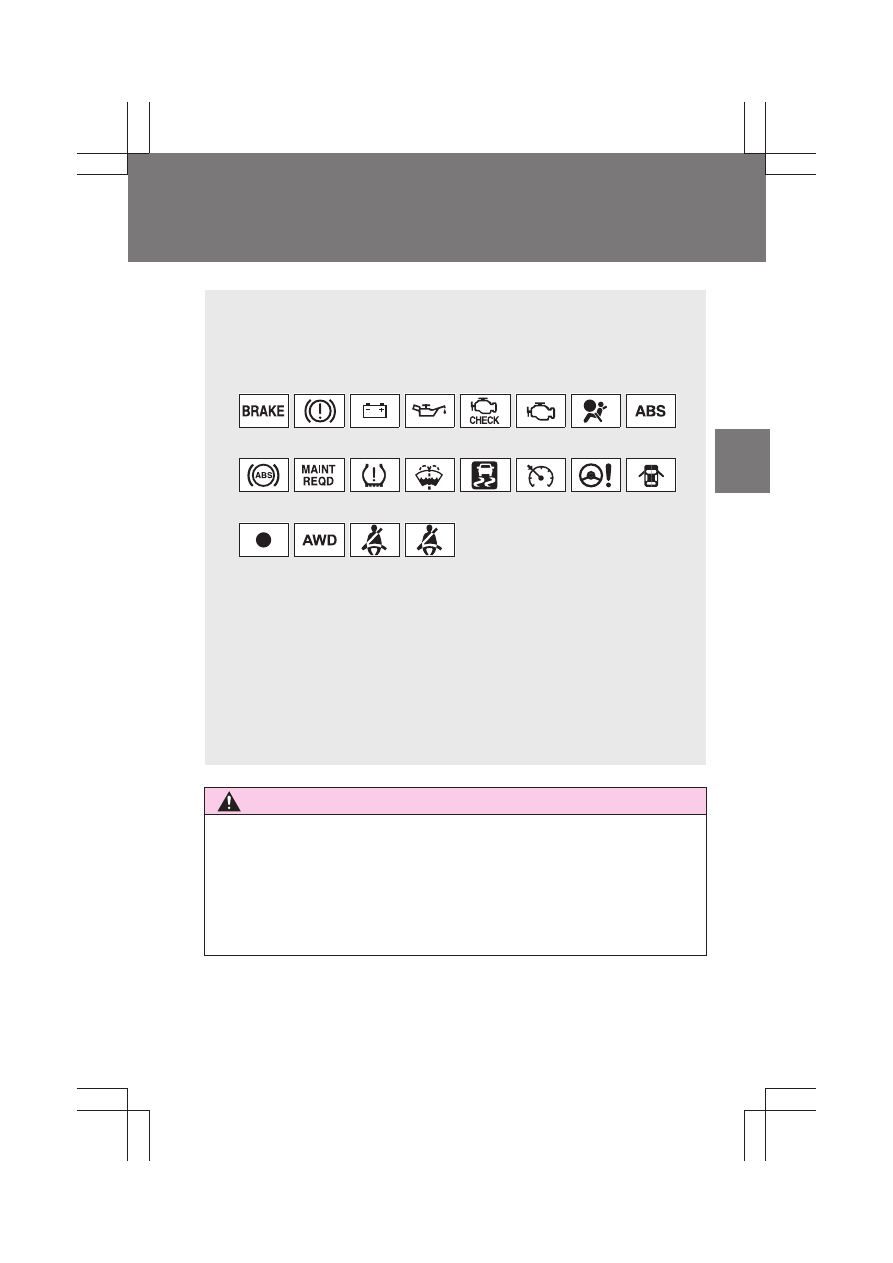
■
Warning lights
Warning lights inform the driver of malfunctions in any of the
vehicle’s systems. (
→P. 397)
*
1
: These lights turn on when the engine switch is turned to the “ON”
position to indicate that a system check is being performed. They
will turn off after the engine is started, or after a few seconds. There
may be a malfunction in a system if a light does not come on, or if
the lights do not turn off. Have the vehicle inspected by your Toyota
dealer for details.
*
2
: The light flashes to indicate a malfunction.
(U.S.A.)
(Canada)
(U.S.A.)
(Canada)
(U.S.A.)
(Canada)
(U.S.A.)
(if equipped) (Canada)
(if equipped)
(if equipped)
(on the
instrument
cluster)
(on the
center
panel)
*
1
*
1
*
1
*
1
*
1
*
1
*
1
*
1
*
1
*
1
*
1
*
1
*
2
*
1
*
1
138
MATRIX_U
2-3. Operating the lights and wipers
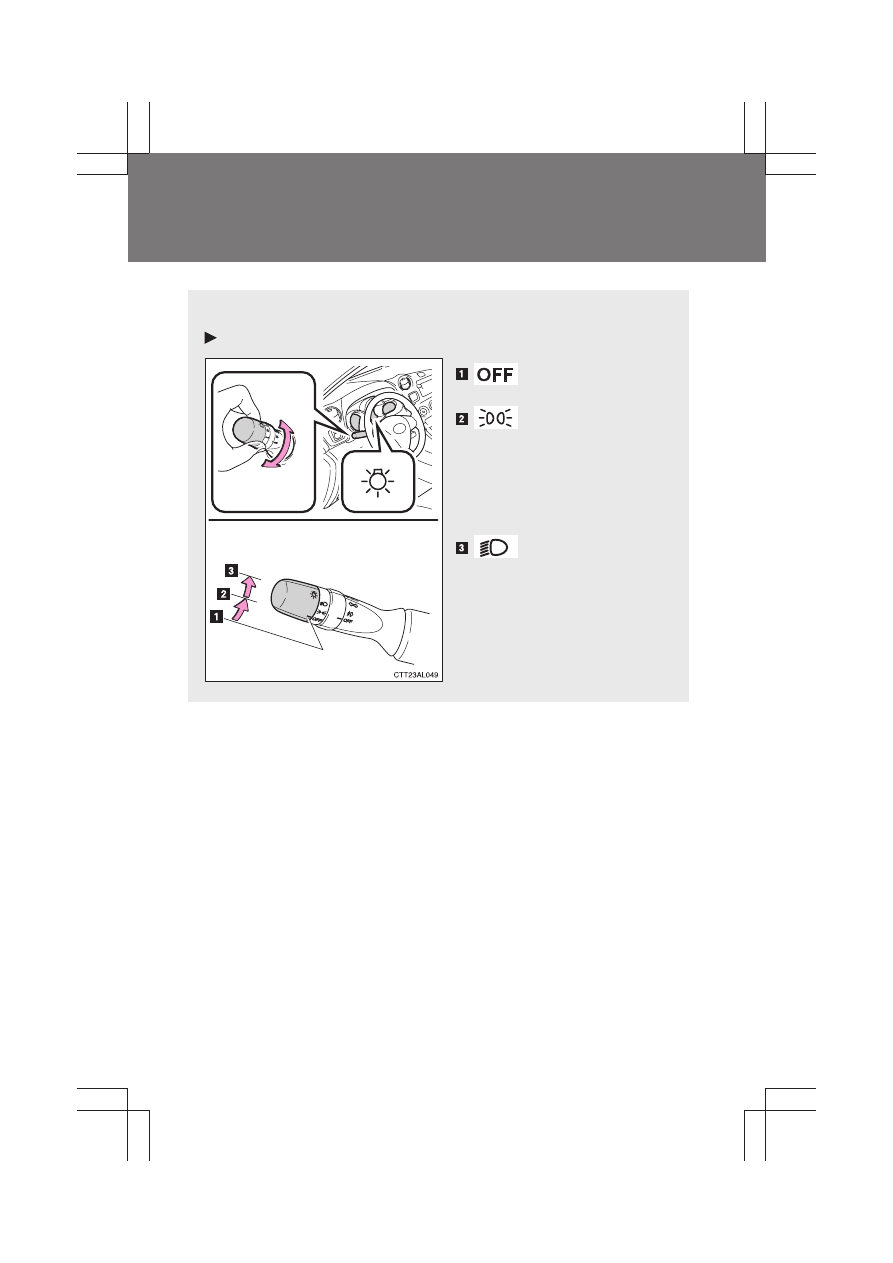
Headlight switch
The headlights can be operated manually.
Type A
The daytime run-
ning lights turn on.
The side marker,
parking, tail, license
plate, daytime run-
ning lights and
instrument panel
lights turn on.
The headlights and
all lights listed above
(except daytime run-
ning lights) turn on.
139
2-3. Operating the lights and wipers
2
Wh
en driv
in
g
MATRIX_U
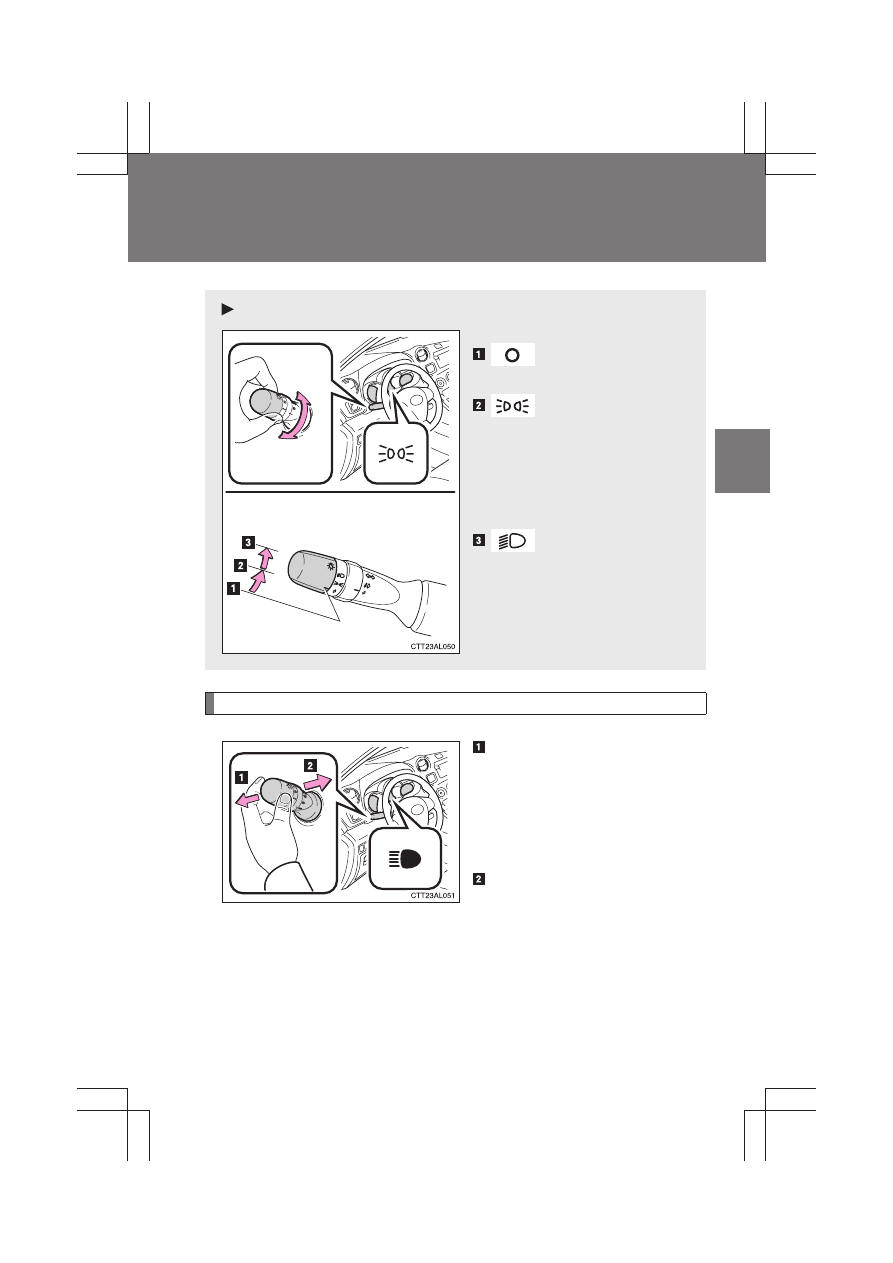
Turning on the high beam headlights
With the headlights on, push
the lever forward to turn on the
high beams.
Pull the lever back to the center
position to turn the high beams
off.
Pull the lever toward you to
turn on the high beams.
Release the lever to turn them off.
You can flash the high beams
with the headlights on or off.
Type B
The daytime run-
ning lights turn on.
The side marker,
parking, tail, license
plate, daytime run-
ning lights and
instrument panel
lights turn on.
The headlights and
all lights listed above
(except daytime run-
ning lights) turn on.
140
2-3. Operating the lights and wipers
MATRIX_U
■
Daytime running light system
●
To make your vehicle more visible to other drivers, the headlights turn on
automatically whenever the engine is started and the parking brake is
released.
●
Compared to turning on the headlights, the daytime running light system
offers greater durability and consumes less electricity, so it can help
improve fuel economy.
■
Light reminder buzzer
A buzzer sounds when the engine switch is turned OFF and the driver's door
is opened with the key removed from the engine switch while the lights are
turned on.
NOTICE
■
To prevent battery discharge
Do not leave the lights on longer than necessary when the engine is not run-
ning.
141
2-3. Operating the lights and wipers
2
Wh
en driv
in
g
MATRIX_U
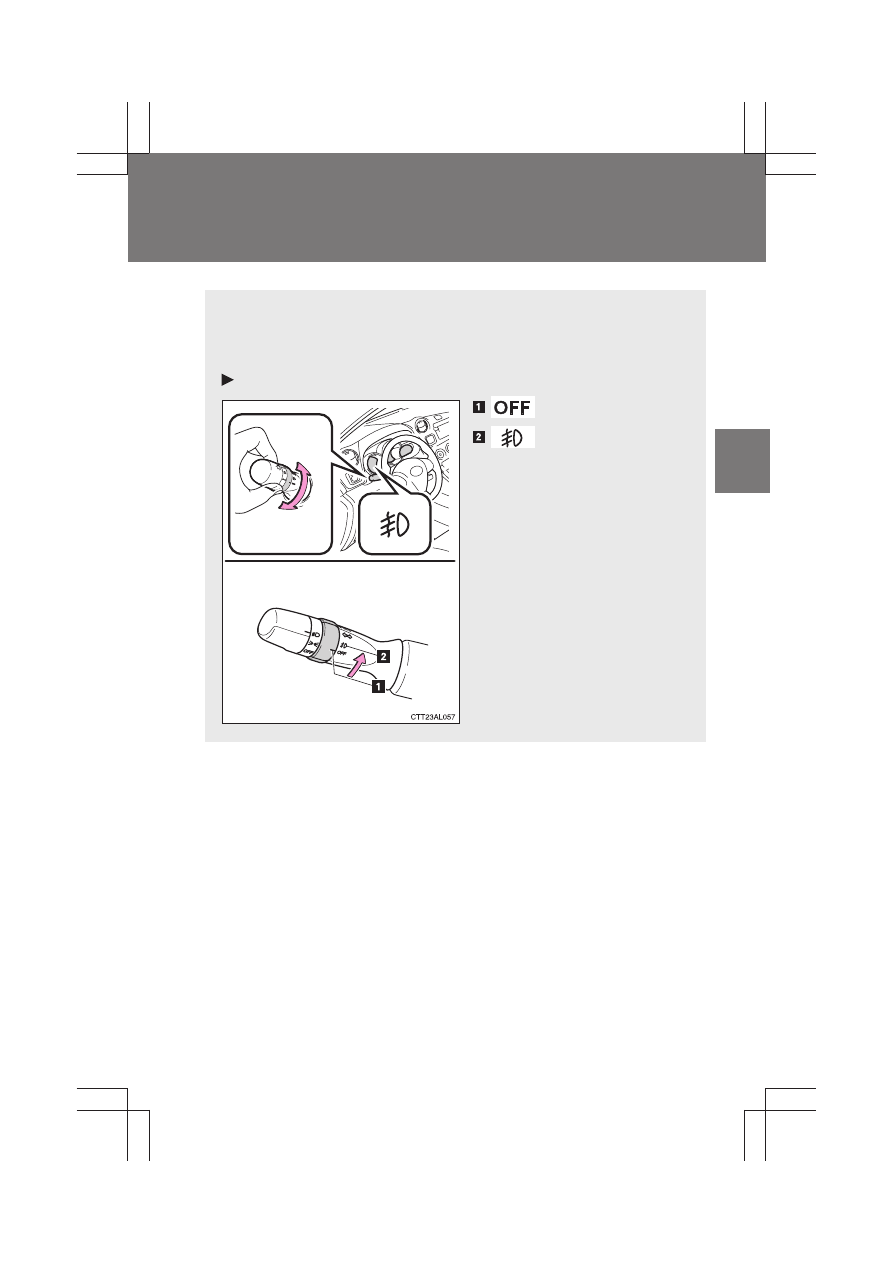
Fog light switch
∗
The fog lights improve visibility in difficult driving conditions, such
as in rain or fog. They can be turned on only when the headlights are
on low beam.
Type A
Off
Front fog lights on
∗
: If equipped
142
2-3. Operating the lights and wipers
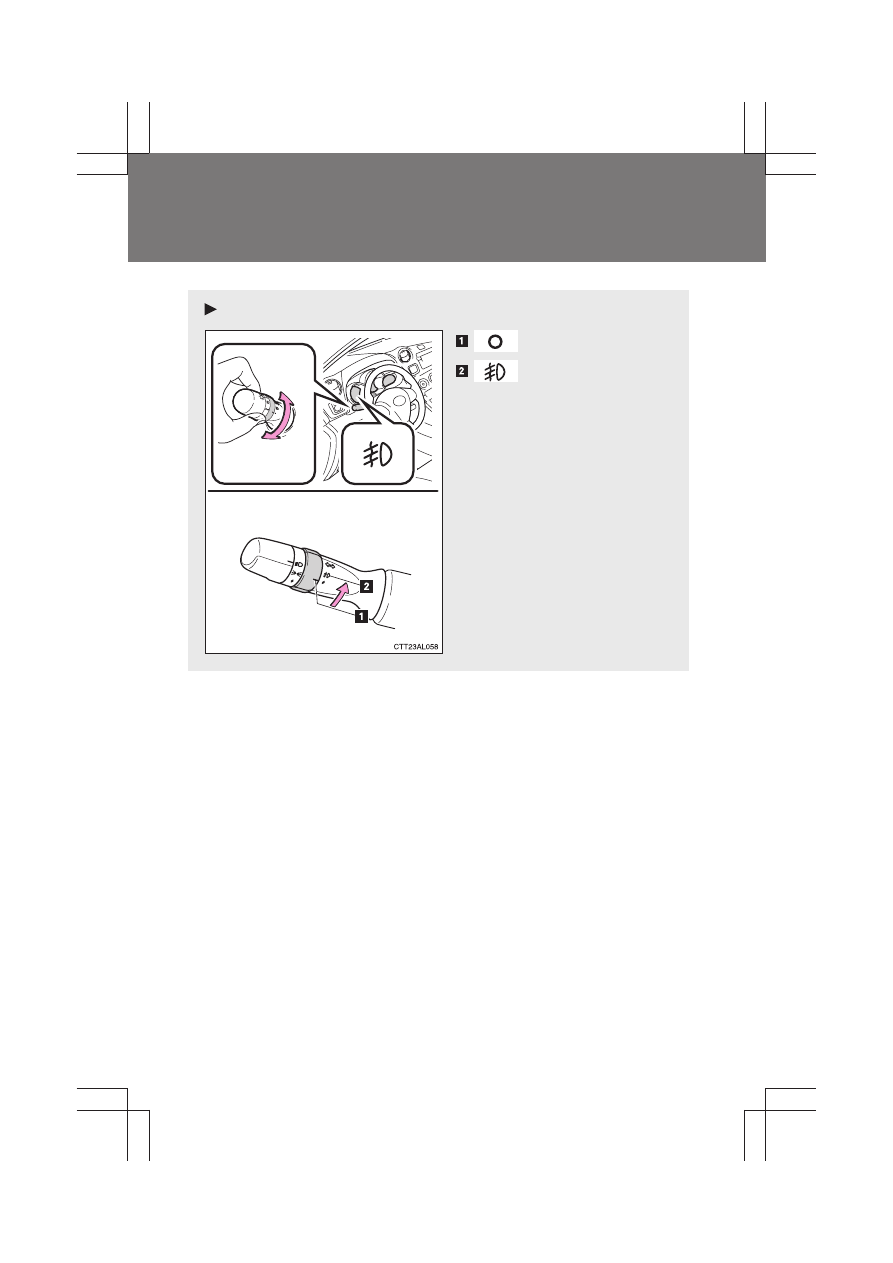
MATRIX_U
Type B
Off
Front fog lights on
143
2-3. Operating the lights and wipers
2
Wh
en driv
in
g
MATRIX_U
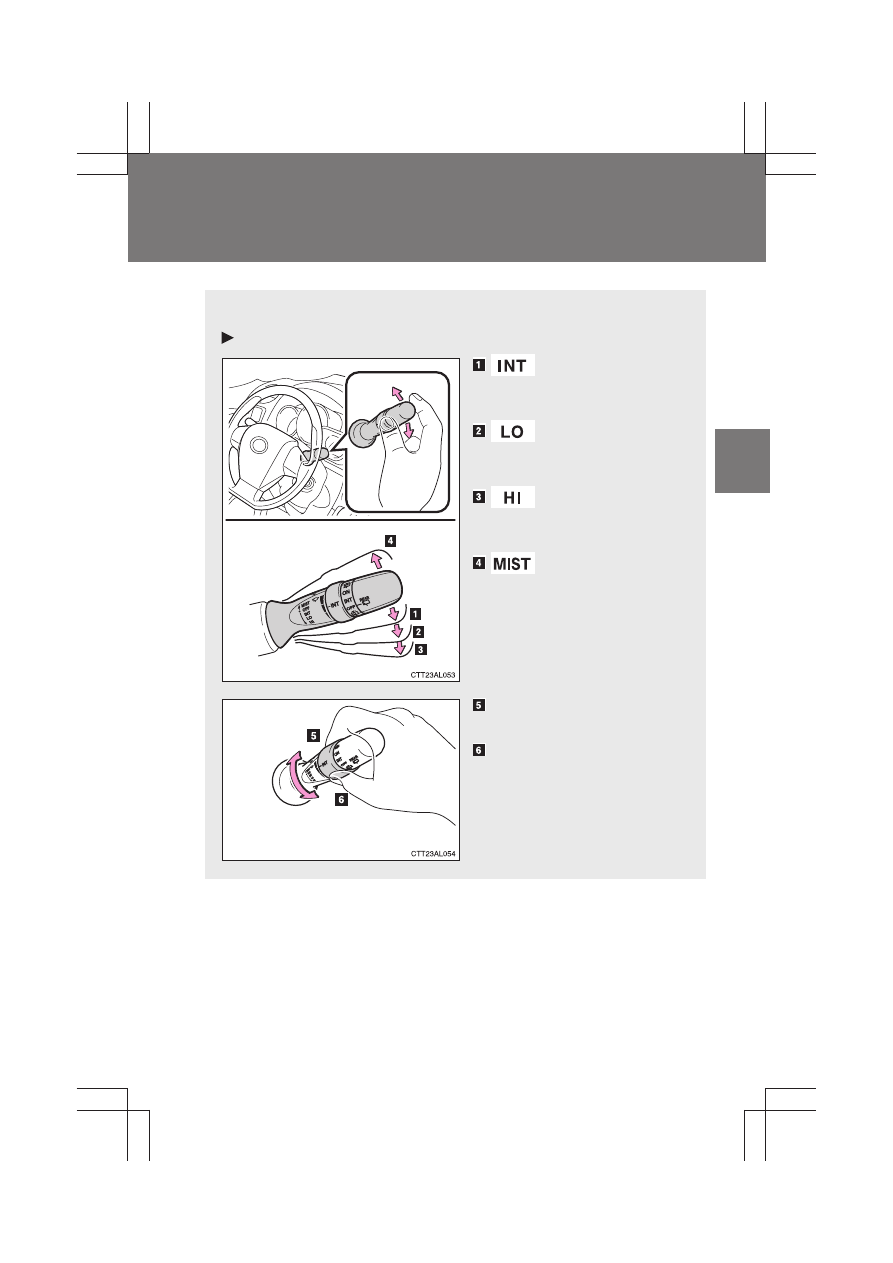
Windshield wipers and washer
Wiper can be operated manually.
Type A
Intermittent wind-
shield wiper opera-
tion
Low speed wind-
shield wiper opera-
tion
High speed wind-
shield wiper opera-
tion
Temporary operation
Increases the intermittent
windshield wiper frequency*
Decreases the intermittent
windshield wiper frequency*
*:
If equipped
144
2-3. Operating the lights and wipers
MATRIX_U
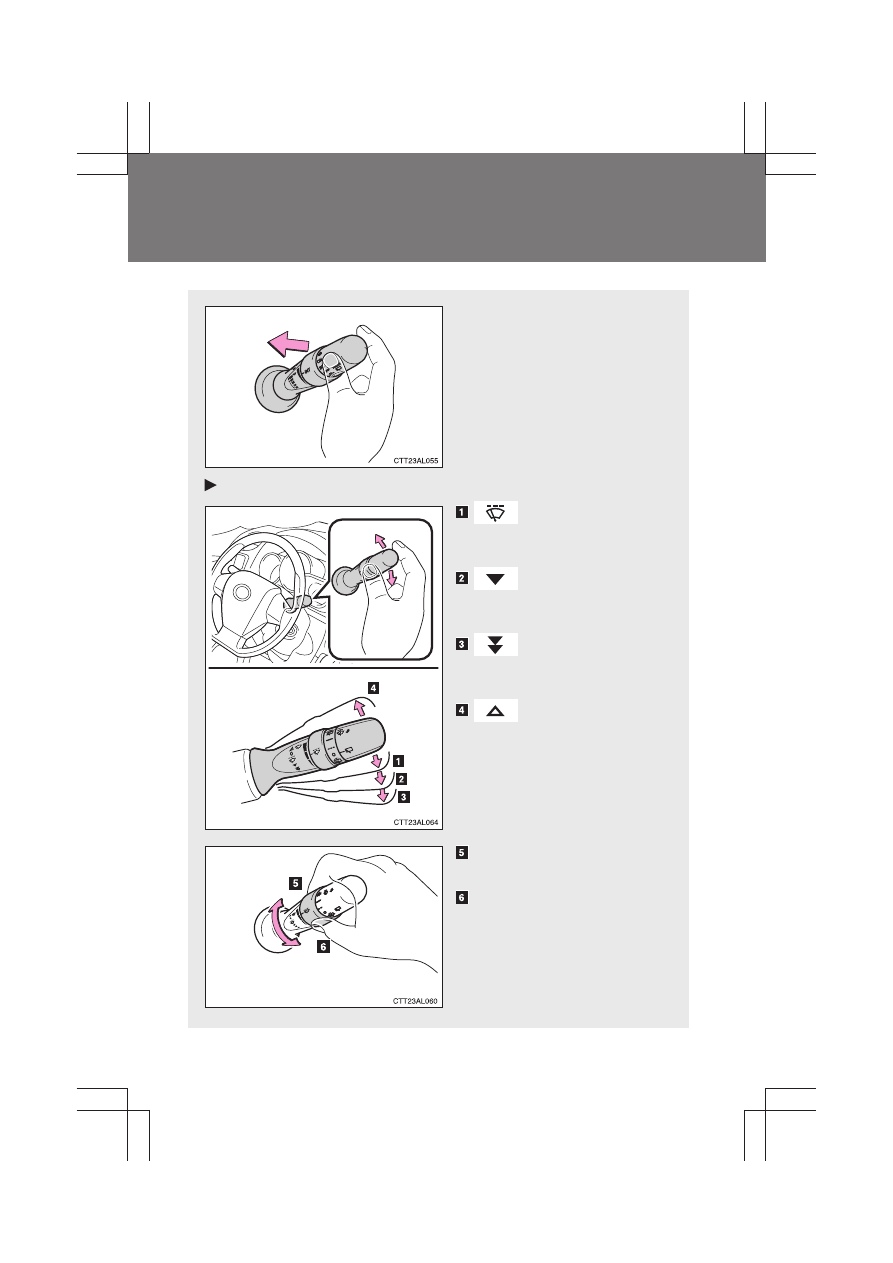
Wash/wipe operation
Wipers operate automatically.
Type B
Intermittent wind-
shield wiper opera-
tion
Low speed wind-
shield wiper opera-
tion
High speed wind-
shield wiper opera-
tion
Temporary operation
Increases the intermittent
windshield wiper frequency*
Decreases the intermittent
windshield wiper frequency*
*:
If equipped
145
2-3. Operating the lights and wipers
2
Wh
en driv
in
g
MATRIX_U
■
The windshield wipers and washers can be operated when
The engine switch is in the “ON” position.
■
If no windshield washer fluid sprays
Check that the washer nozzles are not blocked and if there is washer fluid in
the windshield washer fluid reservoir.
NOTICE
■
When the windshield is dry
Do not use the wipers, as they may damage the windshield.
■
When there is no washer fluid spray from the nozzle
Damage to the washer fluid pump may be caused if the lever is pulled
toward you and held continually.
■
When a nozzle becomes blocked
Do not try to clear it with a pin or other object. The nozzle will be damaged.
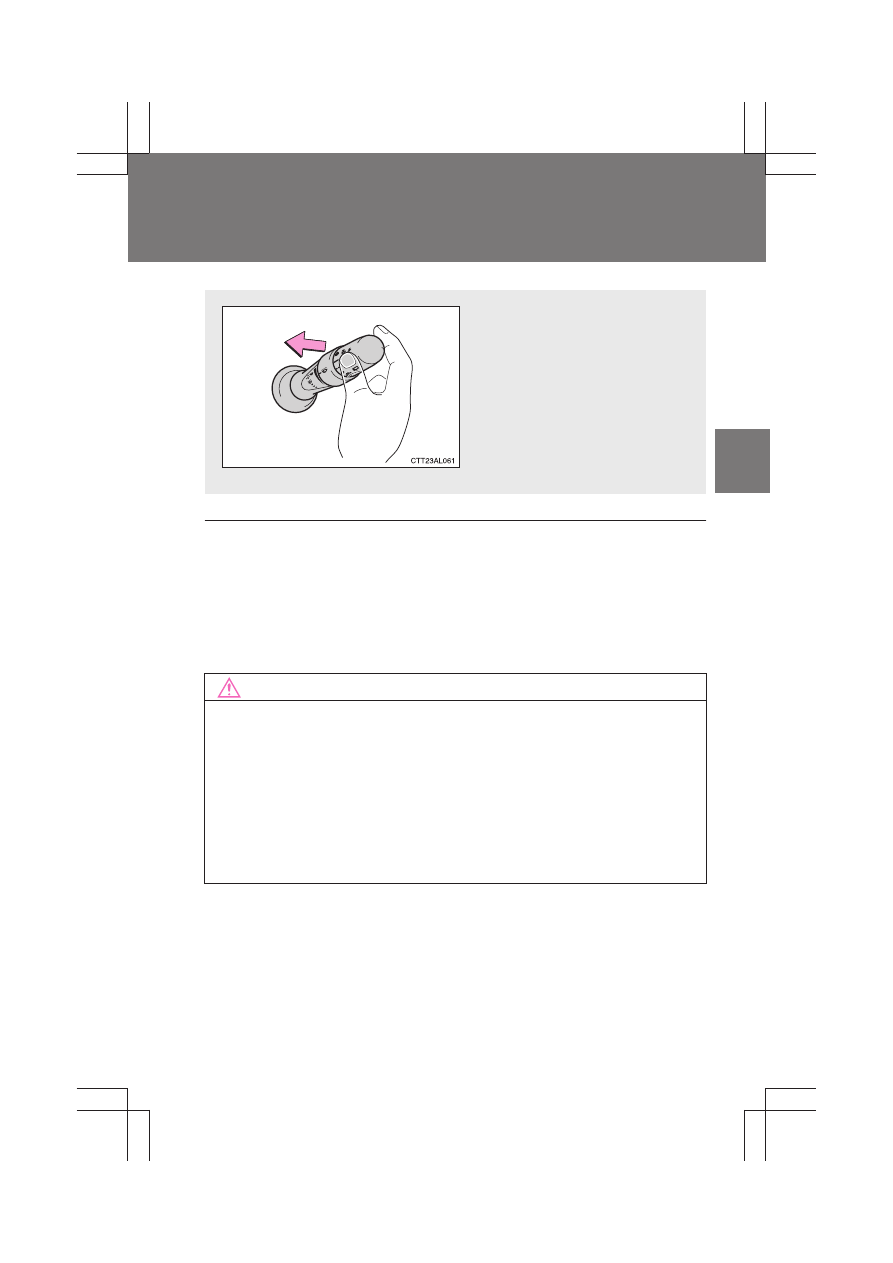
Wash/wipe operation
Wipers operate automatically.
146
2-3. Operating the lights and wipers
MATRIX_U
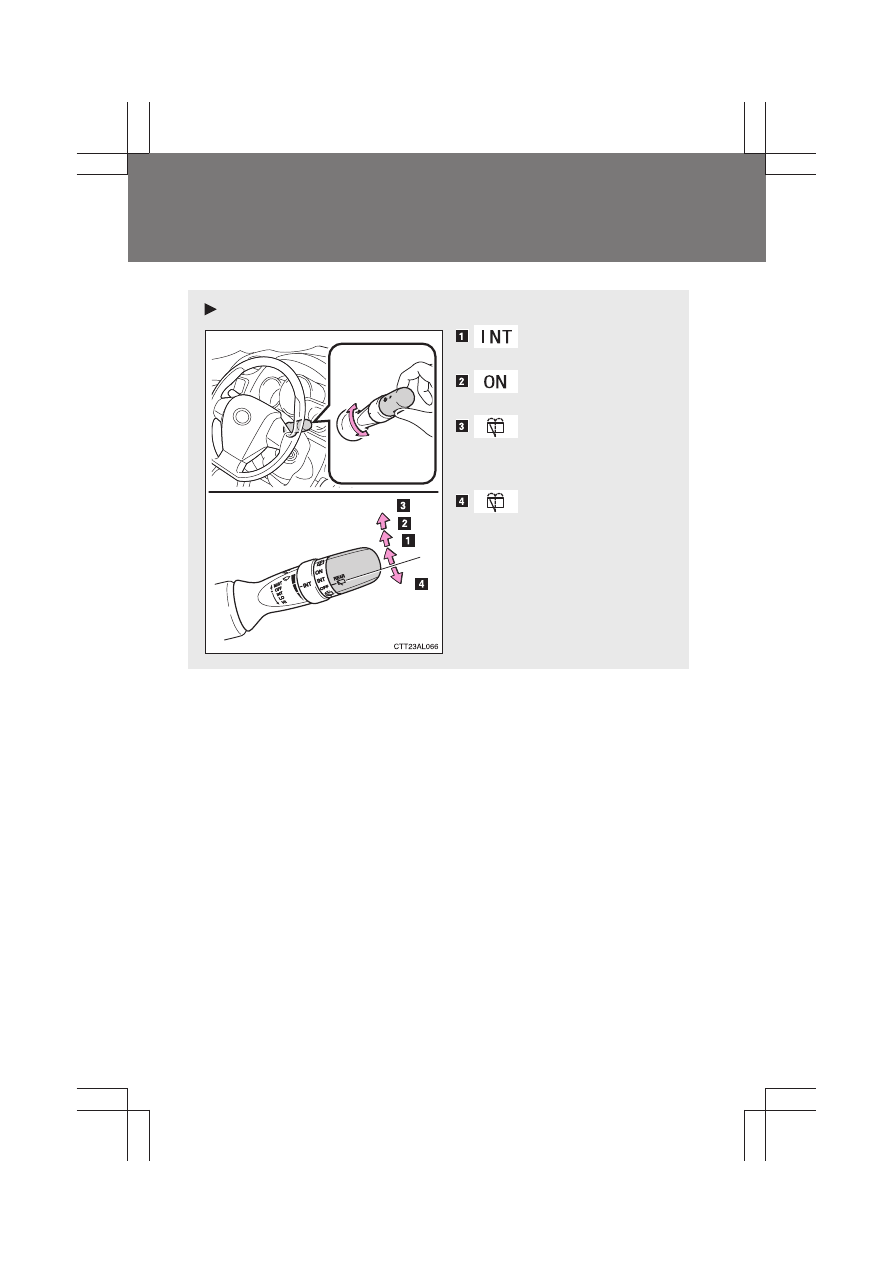
Rear window wiper and washer
∗
∗
: If equipped
Type A
Intermittent window
wiper operation
Normal window
wiper operation
Washer/wiper dual
operation
Wiper operates automatically.
Washer/wiper dual
operation
Wiper operates automatically.
147
2-3. Operating the lights and wipers
2
Wh
en driv
in
g
MATRIX_U
■
The rear window wiper and washer can be operated when
The engine switch is in “ON”.
NOTICE
■
When the rear window is dry
Do not use the wipers, as they may damage the rear window.
■
When there is no washer fluid spray from the nozzle
Damage to the washer fluid pump may be caused if the lever is pulled
toward you and held continually.
■
When a nozzle becomes blocked
Do not try to clear it with a pin or other object. The nozzle will be damaged.
Type B
Intermittent window
wiper operation
Normal window
wiper operation
Washer/wiper dual
operation
Wiper operates automatically.
Washer/wiper dual
operation
Wiper operates automatically.
148
MATRIX_U
2-4. Using other driving systems
Cruise control
∗
Use the cruise control to maintain a set speed without depressing
the accelerator pedal.
Indicators
Cruise control switch
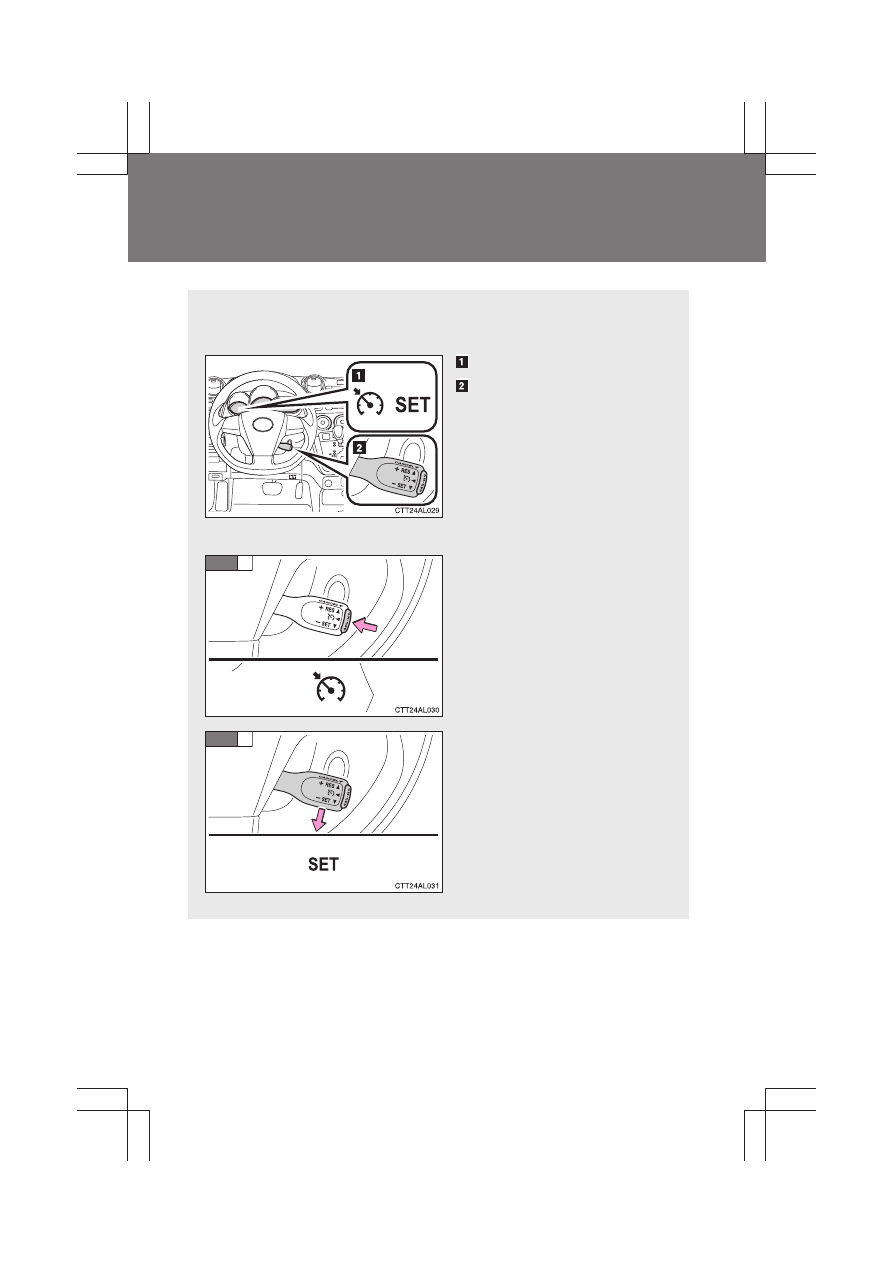
■
Setting the vehicle speed
Press the “ON-OFF” button to
activate the cruise control.
Cruise control indicator will
come on.
Press the button again to
deactivate the cruise control.
Accelerate or decelerate the
vehicle to the desired speed,
and push the lever down to set
the speed.
“SET” indicator will come on.
The vehicle speed at the
moment the lever is released
becomes the set speed.
STEP
1
STEP
2
∗
: If equipped
149
2-4. Using other driving systems
2
Wh
en driv
in
g
MATRIX_U
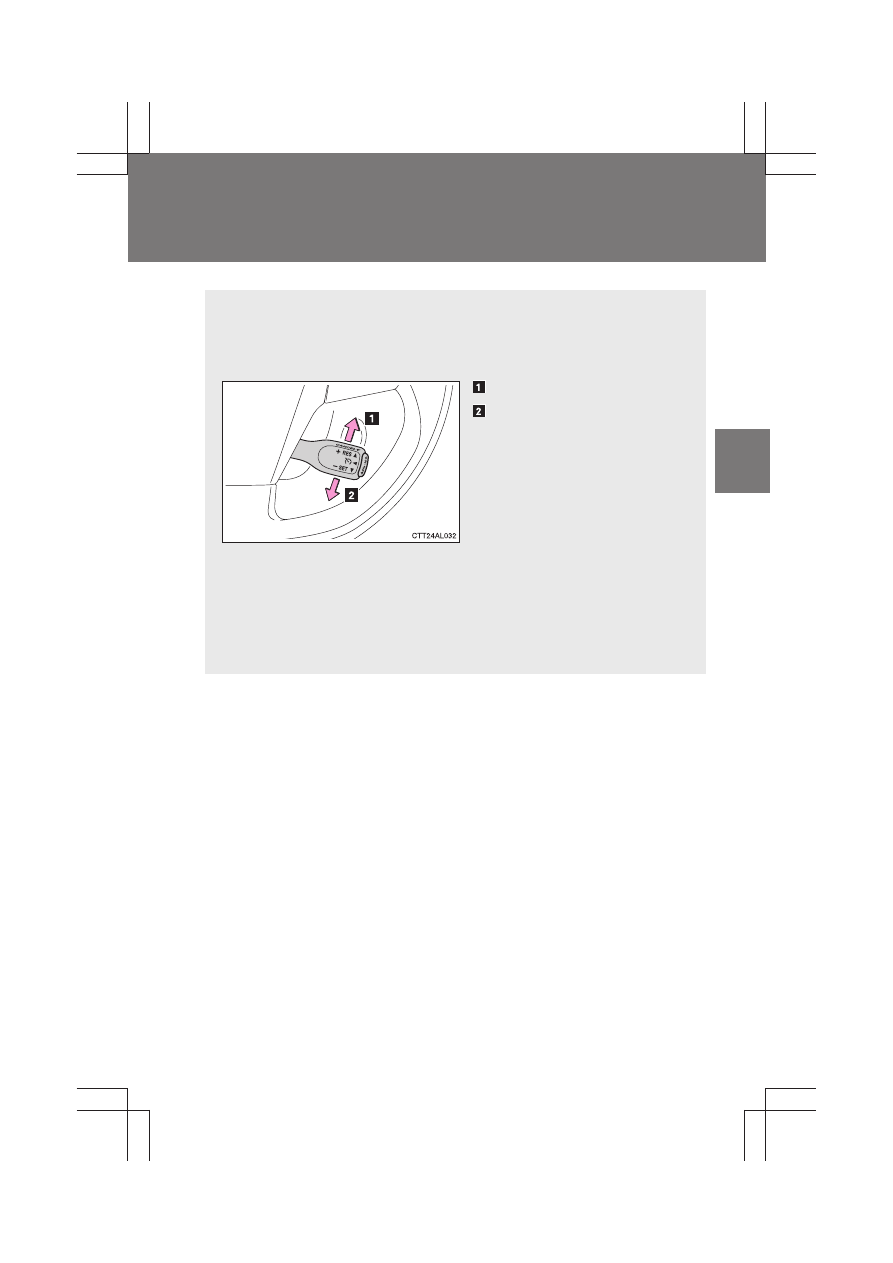
■
Adjusting the speed setting
To change the set speed, operate the lever until the desired set
speed is obtained.
Increases the speed
Decreases the speed
Fine adjustment: Momentarily
move the lever in the desired
direction.
Large adjustment: Hold the
lever in the desired direction.
The set speed will be increased or decreased as follows:
Fine adjustment: By approximately 1 mph (1.6 km/h) each time the
lever is operated.
Large adjustment: The set speed can be increased or decreased con-
tinually until the lever is released.
Нет комментариевНе стесняйтесь поделиться с нами вашим ценным мнением.
Текст