Nissan Qashqai (2022 year). Manual in english — page 8

WAC0177X
Instruments and controls
2-39
-------------------------------------------------------------------------------------------------------------------------------------------------------------
2-40
Instruments and controls
JVI1566X
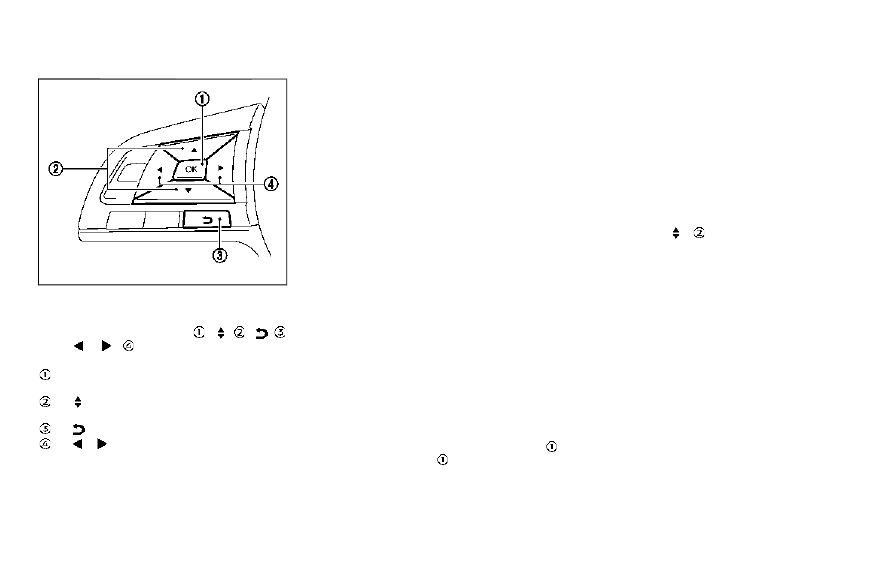
TRIP COMPUTER
The trip computer display can be chan-
ged using the buttons OK ,
,
,
and
located on the steering
wheel.
OK - change or select an item in the
vehicle information display
- navigate through the items in vehi-
cle information display
- go back to the previous menu
- change from one display screen
to the next
1. Safety Shield
The safety shield mode shows the oper-
ating condition for the following systems.
.
Lane Departure Warning (LDW)
.
Intelligent Lane Intervention (I-LI)
.
Blind Spot Warning (BSW)
.
Automatic Emergency Braking (AEB)
with Pedestrian Detection system
For more details, see “Lane Departure
Warning (LDW)” (P.5-35), “Intelligent Lane
Intervention (I-LI)” (P.5-40), “Blind Spot
Warning (BSW)” (P.5-46) or “Automatic
Emergency Braking (AEB) with Pedestrian
Detection system” (P.5-97).
2. Average speed 1 and 2 (MPH or
km/h)
The average speed 1 mode shows the
average vehicle speed since the last reset.
The average speed 2 mode shows the
average vehicle speed since the time the
ignition switch was turned ON. The aver-
age speed 2 is automatically reset each
time the ignition is placed in the OFF
position.
Resetting is done by pushing the OK
button. When the OK
button is pushed,
the following menu items are displayed.
.
Cancel
— Return to the previous screen with-
out resetting.
.
Average Speed
— Reset the average speed.
.
All
— Reset all items of “Average Speed”,
“Elapsed time and trip odometer”
and “Fuel economy.”
Once the “Average speed 1” is displayed,
you can use
buttons to switch
between the “Average speed 1” and “Aver-
age speed 2.”
The display is updated every 30 seconds.
The first 30 seconds after a reset, the
display shows “——”.
3. Elapsed time and trip odometer 1
and 2 (mile or km)
Elapsed time:
The elapsed time mode 1 shows the time
since the last reset. The elapsed time 2
mode shows the time since the ignition
switch was turned ON. (The trip odometer
is also reset at the same time.)
Trip odometer:
The trip odometer 1 mode shows the total
distance the vehicle has been driven since
the last reset. The trip odometer 2 mode
shows the total distance the vehicle has
-------------------------------------------------------------------------------------------------------------------------------------------------------------

been driven since the time the ignition
switch was placed in the ON position. (The
elapsed time is also reset at the same
time.)
The elapsed time and trip odometer 2 is
automatically reset each time the ignition
is placed in the OFF position.
Resetting is done by pushing the OK
button. When the OK
button is pushed,
the following menu items are displayed.
.
Cancel
— Return to the previous screen with-
out resetting.
.
Distance
— Reset the elapsed time and trip
odometer.
.
All
— Reset all items of “Average Speed”,
“Elapsed time and trip odometer”
and “Fuel economy.”
Once the “Elapsed time and trip odometer
1” is displayed, you can use
buttons
to switch between the “Elapsed time and
trip odometer 1” and “Elapsed time and
trip odometer 2.”
4-5. Fuel economy/ECO pedal
guide
Current fuel consumption:
The current fuel consumption mode
shows the current fuel consumption.
Average fuel consumption:
The average fuel consumption 1 mode
shows the average fuel consumption
since the last reset. The average fuel
consumption 2 mode shows the average
fuel consumption since the time the
ignition switch was placed in the ON
position. The average fuel consumption
2 is automatically reset each time the
ignition is placed in the OFF position.
Resetting is done by pushing the OK
button. When the OK
button is pushed,
the following menu items are displayed.
.
Cancel
— Return to the previous screen with-
out resetting.
.
Fuel Economy
— Reset the fuel economy.
.
All
— Reset all items of “Average Speed”,
“Elapsed time and trip odometer”
and “Fuel economy”.
Once the “Fuel economy 1” is displayed,
you can use
buttons to switch
between the “Fuel economy 1” and “Fuel
economy 2”.
The display is updated every 30 seconds.
For about the first 1/3 mile (500 m) after a
reset, the display shows “——”.
6. Audio
The audio mode shows the status of
audio information.
7. Navigation (if so equipped)
When the route guidance is set in the
navigation system, this item shows the
navigation route information.
8. Compass (if so equipped)
This display indicates the heading direc-
tion of the vehicle.
9. Intelligent 4x4 torque distribution
display (if so equipped)
When the Intelligent 4x4 torque distribu-
tion display is selected, you can view the
distribution ratio of the transmission
torque to the front and rear wheels
during driving.
Instruments and controls
2-41
-------------------------------------------------------------------------------------------------------------------------------------------------------------

2-42
Instruments and controls
10. Chassis control
When Intelligent Trace Control, Intelligent
Engine Brake (Continuously Variable
Transmission (CVT) models) or Active Ride
Control system is operated, it shows the
operating condition. It also shows oper-
ating condition of Hill Start Assist. The
operating condition of the automatic
brake hold function (if so equipped) is
also shown. See “Intelligent Trace Control”
(P.5-133), “Intelligent Engine Brake (Con-
tinuously Variable Transmission (CVT)
models)” (P.5-134), “Active Ride Control”
(P.5-135), “Hill Start Assist system” (P.5-136)
or “Automatic brake hold” (P.5-29) for
more details.
11. Tire Pressures
The tire pressure mode shows the pres-
sure of all four tires while the vehicle is
driven.
When the Tire Pressure Low — Add Air
warning appears, the display can be
switched to the tire pressure mode by
pushing the OK
button to reveal addi-
tional details on the displayed warning.
12. Intelligent Driver Alertness (I-DA)
system (if so equipped)
When the “Driver Attention” display is
selected, you can view your attention
level as detected by the system. (See
“Intelligent Driver Alertness (I-DA)” (P.5-
94).)
13. Traffic Sign Recognition (if so
equipped)
The Traffic Sign Recognition (TSR) system
provides the driver with information
about the most recently detected speed
limit. See “Traffic Sign Recognition” (P.2-
43) for more details.
JVI0932X
CLOCK AND OUTSIDE AIR TEM-
PERATURE
The clock
and outside air temperature
are displayed on the upper side of the
vehicle information display.
Clock
For clock adjustment, see “Clock” (P.2-22)
or the separate NissanConnect® Owner’s
Manual (if so equipped).
-------------------------------------------------------------------------------------------------------------------------------------------------------------

Outside air temperature (°F or °C)
The outside air temperature is displayed
in °F or °C in the range of −40 to 140°F (−40
to 60°C).
The outside air temperature mode in-
cludes a low temperature warning fea-
ture. If the outside air temperature is
below 37°F (3°C), the warning
is dis-
played (if so equipped).
The outside temperature sensor is lo-
cated in front of the radiator. The sensor
may be affected by road or engine heat,
wind directions and other driving condi-
tions. The display may differ from the
actual outside temperature or the tem-
perature displayed on various signs or
billboards.
WAC0198X
TRAFFIC SIGN RECOGNITION (if so
equipped)
The Traffic Sign Recognition (TSR) system
provides the driver with information
about the most recently detected speed
limit. The system captures the road sign
information with the multi-sensing front
camera unit
located on the windshield
in front of the inside rearview mirror and
displays the detected signs in the vehicle
information display. For vehicles
equipped with Navigation System, the
speed limit displayed is based on a
combination of Navigation System data
and live camera recognition. TSR informa-
tion is always displayed at the top of the
vehicle information display, and option-
ally in the main central area of the display
screen.
WARNING
The TSR system is only intended to
be a support device to provide the
driver with information. It is not a
replacement for the driver’s atten-
tion to traffic conditions or respon-
sibility to drive safely. It cannot
prevent accidents due to careless-
ness. It is the driver’s responsibility
to stay alert and drive safely at all
times.
System operation
The traffic recognition system displays
the following types of road sign:
Instruments and controls
2-43
-------------------------------------------------------------------------------------------------------------------------------------------------------------

2-44
Instruments and controls
WAC0214X
WAC0215X
Latest detected speed limit
Reduce speed limit caution (orange)
No speed limit information
No-overtaking zone
Reduce speed limit caution (with no
speed limit information) (orange)
CAUTION
.
The Traffic Sign Recognition (TSR)
system is intended as an aid to
careful driving. It is the driver’s
responsibility to stay alert, drive
safely, and observe all road reg-
ulations that currently apply, in-
cluding looking out for road
signs.
.
The Traffic Sign Recognition (TSR)
system may not function prop-
erly under the following condi-
tions:
— When rain, snow or dirt ad-
heres to the windshield in
front of the TSR camera unit.
— When the headlights are not
bright due to dirt on the lens
or if the aiming is not adjusted
properly.
— When strong light enters the
camera unit. (For example, the
light directly shines on the
front of the vehicle at sunrise
or sunset.)
— When a sudden change in
brightness occurs. (For exam-
ple, when the vehicle enters or
exits a tunnel or under a
bridge.)
— In areas not covered by the
Navigation System.
— If there are deviations in rela-
tion to the navigation, for ex-
ample due to changes in the
road routing.
-------------------------------------------------------------------------------------------------------------------------------------------------------------

— When overtaking buses or
trucks with speed stickers.
Turning the TSR system on and off
Turning the TSR system on or off is done
using the "Settings" menu in the vehicle
information display. For details, see “Ve-
hicle information display” (P.2-19).
Perform the following steps to enable or
disable the TSR system:
1. In the "Settings" menu, select the
"Driver Assistance" key.
2. Touch "Speed Limit Sign" to turn the
system ON/OFF.
System temporarily unavailable
If the vehicle is parked in direct sunlight
under high temperature conditions (over
approximately 40°C (104°F)) and then
started, the TSR system may be deacti-
vated automatically. The “Unavailable:
high cabin temperature” warning mes-
sage will appear in the vehicle informa-
tion display.
Action to take:
When the interior temperature is reduced,
the TSR system will resume operating
automatically.
System Malfunction
If the TSR system malfunctions it will be
turned off automatically and the TSR
"Malfunction" warning message will ap-
pear in the vehicle information display.
Action to take:
If the TSR "Malfunction" warning mes-
sage appears, pull off the road at a safe
location and stop the vehicle. Turn the
engine off and restart the engine. If the
TSR "Malfunction" message continues to
appear, have the system checked by a
NISSAN dealer.
Maintenance
The TSR uses the same multi-sensing
front camera unit that is used by the
Lane Departure Warning (LDW) system,
located in front of the interior rearview
mirror. For maintenance of the camera,
see “System maintenance” (P.5-39).
JVI1587X
Your vehicle has two types of security
systems, as follows:
.
Vehicle security system
.
NISSAN Vehicle Immobilizer System
The security condition will be shown by
the security indicator light.
VEHICLE SECURITY SYSTEM
The vehicle security system provides
visual and audio alarm signals if someone
opens the doors, hood (if so equipped)
and liftgate when the system is armed. It
is not, however, a motion detection type
system that activates when a vehicle is
moved or when a vibration occurs.
The system helps deter vehicle theft but
Instruments and controls
2-45
SECURITY SYSTEMS
-------------------------------------------------------------------------------------------------------------------------------------------------------------

2-46
Instruments and controls
cannot prevent it, nor can it prevent the
theft of interior or exterior vehicle com-
ponents in all situations. Always secure
your vehicle even if parking for a brief
period. Never leave your keys in the
vehicle, and always lock it when unat-
tended. Be aware of your surroundings,
and park in secure, well-lit areas when-
ever possible.
Many devices offering additional protec-
tion, such as component locks, identifica-
tion markers, and tracking systems, are
available at auto supply stores and speci-
alty shops. Your NISSAN dealer may also
offer such equipment. Check with your
insurance company to see if you may be
eligible for discounts for various theft
protection features.
SIC2045
How to arm the vehicle security
system
1. Close all windows.
The system can be
armed even if the windows are open.
2. Remove the keys from the vehicle.
3. Close all doors, hood (if so equipped)
and liftgate. Lock all doors. The doors
can be locked with the key fob (if so
equipped), Intelligent Key (if so
equipped), the request switch (if so
equipped), or power door lock switch.
4. Confirm that the security indicator
light stays on for about 30 seconds.
The vehicle security system is now
pre-armed. The vehicle security sys-
tem will automatically shift into the
armed phase. The security light begins
to flash once every three seconds. If
during the pre-armed phase one of
the following occurs, the system will
not arm:
.
Any door is unlocked with the key
fob (if so equipped), the Intelligent
Key (if so equipped), or the request
switch (if so equipped).
.
Ignition switch is placed in the ON
position.
Even when the driver and/or passen-
gers are in the vehicle, the system will
activate with all the doors, hood (if so
equipped) and liftgate locked with the
ignition switch placed in the LOCK posi-
tion. When placing the ignition switch in
the ON position, the system will be
released.
Vehicle security system activation
The vehicle security system will give the
following alarm:
.
The headlights blink and the horn
sounds intermittently.
.
The alarm automatically turns off
after approximately 50 seconds. How-
ever, the alarm reactivates if the
vehicle is tampered with again.
-------------------------------------------------------------------------------------------------------------------------------------------------------------

The alarm is activated by:
.
Opening any doors, the hood (if so
equipped) or liftgate without using the
key or Intelligent Key (even if the door
is unlocked by releasing the door
inside lock knob or using the mechan-
ical key).
How to stop an activated alarm
The alarm stops only by unlocking a door
or the liftgate by pushing the UNLOCK
button on the key fob (if so equipped)
or the Intelligent Key (if so equipped), or
pushing the request switch (if so
equipped) on the driver’s or passenger’s
door in range of the door handle.
If the Intelligent Key battery is dis-
charged:
If the Intelligent Key battery is discharged,
the alarm will not stop by pushing the
UNLOCK
button on the key fob (if so
equipped) or the Intelligent Key (if so
equipped), or pushing the request switch
(if so equipped) on the driver’s or passen-
ger’s door in range of the door handle. In
such a case, unlock the driver’s door
using the mechanical key and touch the
ignition switch with the Intelligent Key to
stop the alarm. (See “Intelligent Key bat-
tery discharge” (P.5-17).)
NISSAN VEHICLE IMMOBILIZER SYS-
TEM
The NISSAN Vehicle Immobilizer System
will not allow the engine to start without
the use of the registered key.
If the engine fails to start using the
registered key, it may be due to inter-
ference caused by another registered key,
an automated toll road device or auto-
mated payment device on the key ring.
Restart the engine using the following
procedures:
1. Leave the ignition switch in the ON
position for approximately 5 seconds.
2. Place the ignition switch in the OFF or
LOCK position and wait approximately
10 seconds.
3. Repeat step 1 and 2 again.
4. Restart the engine while holding the
device (which may have caused the
interference) separate from the regis-
tered key.
If this procedure allows the engine to
start, NISSAN recommends placing the
registered key on a separate key ring
to avoid interference from other de-
vices.
Statement related to section 15 of FCC
rules for NISSAN Vehicle Immobilizer
System (CONT ASSY-BCM. ANT ASSY-
IMMOBILISER)
FCC Notice:
For USA:
This device complies with Part 15 of the
FCC Rules. Operation is subject to the
following two conditions: (1) This device
may not cause harmful interference,
and (2) this device must accept any
interference received, including inter-
ference that may cause undesired op-
eration.
Note: Changes or modifications not
expressly approved by the party re-
sponsible for compliance could void
the user’s authority to operate the
equipment.
For Canada:
This device complies with Industry Ca-
nada licence-exempt RSS standard(s).
Operation is subject to the following
two conditions: (1) this device may not
cause interference, and (2) this device
must accept any interference, including
interference that may cause undesired
operation of the device.
Instruments and controls
2-47
-------------------------------------------------------------------------------------------------------------------------------------------------------------

2-48
Instruments and controls
SIC2045
Security indicator light
The security indicator light blinks when-
ever the ignition switch is placed in the
OFF or LOCK position.
This function indicates the NISSAN Vehi-
cle Immobilizer System is operational.
If the NISSAN Vehicle Immobilizer System
is malfunctioning, the light will remain on
while the ignition switch is placed in the
ON position.
If the light still remains on and/or the
engine will not start, seek service for
the NISSAN Vehicle Immobilizer System
as soon as possible. Please bring all
registered keys that you have. It is
recommended you visit a NISSAN dealer
for this service.
WARNING
In freezing temperatures the washer
solution may freeze on the wind-
shield and obscure your vision which
may lead to an accident. Warm wind-
shield with the defroster before you
wash the windshield.
CAUTION
.
Do not operate the washer con-
tinuously for more than 30 sec-
onds.
.
Do not operate the washer if the
reservoir tank is empty.
.
Do not fill the window washer
reservoir tank with washer fluid
concentrates at full strength.
Some methyl alcohol based
washer fluid concentrates may
permanently stain the grille if
spilled while filling the window
washer reservoir tank.
.
Pre-mix washer fluid concen-
trates with water to the manu-
facturer’s recommended levels
before pouring the fluid into the
window washer reservoir tank. Do
WIPER AND WASHER SWITCH
-------------------------------------------------------------------------------------------------------------------------------------------------------------
not use the window washer re-
servoir tank to mix the washer
fluid concentrate and water.
If the windshield wiper operation is
interrupted by snow or ice, the wiper
may stop moving to protect its motor. If
this occurs, turn the wiper switch to the
OFF position and remove the snow or
ice that is on and around the wiper
arms. In approximately 1 minute, turn
the switch on again to operate the
wiper.
JVI0863X
WINDSHIELD WIPER AND WASHER
OPERATION
The windshield wiper and washer oper-
ates when the ignition switch is in the ON
position.
Push the lever down to operate the wiper
at the following speed:
Intermittent — intermittent operation can
be adjusted by turning the knob toward
(Slower) or
(Faster). Also, the inter-
mittent operation speed varies in accor-
dance with the vehicle speed. (For
example, when the vehicle speed is high,
the intermittent operation speed will be
faster.)
Low — continuous low speed operation
High — continuous high speed operation
Push the lever up
to have one sweep
operation of the wiper.
Pull the lever toward you
to operate the
washer. Then the wiper will also operate
several times.
After a short delay, the drip wipe function
will operate the wiper once more to clear
remaining windshield-washer fluid from
the windshield.
NOTE:
The Speed Dependent feature and Drip
Wipe feature may be disabled. For
additional information, refer to “Vehicle
information display” (P.2-19) in this sec-
tion.
Instruments and controls
2-49
-------------------------------------------------------------------------------------------------------------------------------------------------------------
2-50
Instruments and controls
WARNING
In freezing temperatures the washer
solution may freeze on the rear
window glass and obscure your vi-
sion. Warm the rear window with the
defroster before you wash the rear
window.
CAUTION
.
Do not operate the washer con-
tinuously for more than 30 sec-
onds.
.
Do not operate the washer if the
reservoir tank is empty.
.
Do not fill the window washer
reservoir tank with washer fluid
concentrates at full strength.
Some methyl alcohol based
washer fluid concentrates may
permanently stain the grille if
spilled while filling the window
washer reservoir tank.
.
Pre-mix washer fluid concen-
trates with water to the manu-
facturer’s recommended levels
before pouring the fluid into the
window washer reservoir tank. Do
not use the window washer re-
servoir tank to mix the washer
fluid concentrate and water.
If the rear window wiper operation is
interrupted by snow or ice, the wiper
may stop moving to protect its motor. If
this occurs, turn the wiper switch to the
OFF position and remove the snow or
ice that is on and around the wiper
arms. In approximately 1 minute, turn
the switch on again to operate the
wiper.
JVI0867X
The rear window wiper and washer
operate when the ignition switch is in
the ON position.
Turn the switch clockwise from the OFF
position to operate the wiper.
Intermittent (INT) — intermittent opera-
tion (not adjustable)
Low (ON) — continuous low speed opera-
tion
Push the switch forward
to operate the
washer. Then the wiper will also operate
several times.
REAR WINDOW WIPER AND
WASHER SWITCH
-------------------------------------------------------------------------------------------------------------------------------------------------------------

Reverse Link feature:
When the windshield wiper switch is on,
moving the shift lever to the R (Reverse)
position will operate the rear window
wiper.
NOTE:
The Reverse Link feature may be dis-
abled. For additional information, refer
to “Vehicle information display” (P.2-19).
Wiper drip wipe system:
The wiper will also operate once about 3
seconds after the washer and wiper are
operated. This operation is to wipe
washer fluid that has dripped on the
windshield.
JVI0852X
Type A
JVI0853X
Type B
To defog/defrost the rear window glass
and outside mirrors (if so equipped), start
the engine and push the switch on. The
indicator light
will illuminate. Push the
switch again to turn the defroster off.
It will automatically turn off in approxi-
mately 15 minutes.
CAUTION
When cleaning the inner side of the
rear window, be careful not to
scratch or damage the rear window
defroster.
Instruments and controls
2-51
REAR WINDOW AND OUTSIDE
MIRROR DEFROSTER SWITCH
-------------------------------------------------------------------------------------------------------------------------------------------------------------
2-52
Instruments and controls
JVI1616X
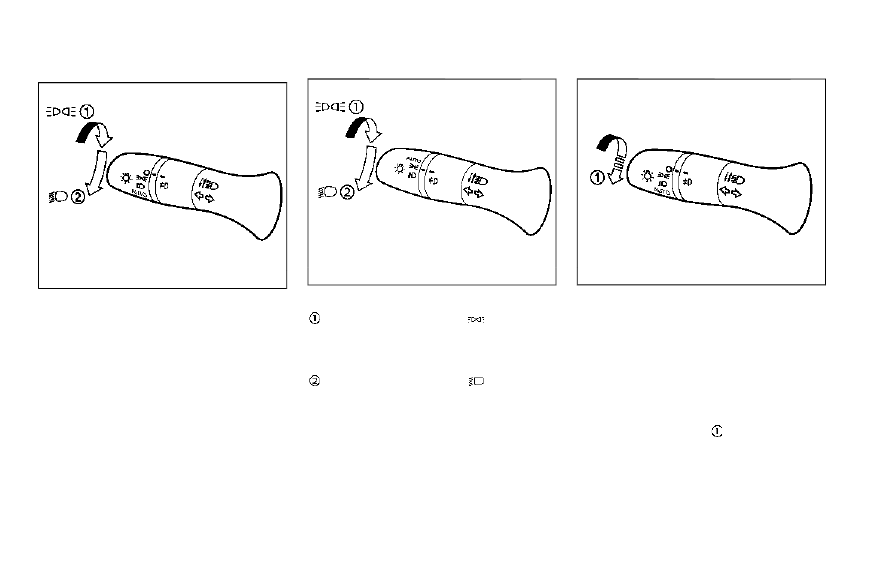
HEADLIGHT SWITCH
Lighting
Type A:
WAC0411X
Type B:
Rotate the switch to the
position, and
the front parking, tail, license plate, and
instrument panel lights will come on. The
Intelligent Auto Headlight system will be
set (Type B).
Rotate the switch to the
position, and
the headlights will come on and all the
other lights remain on.
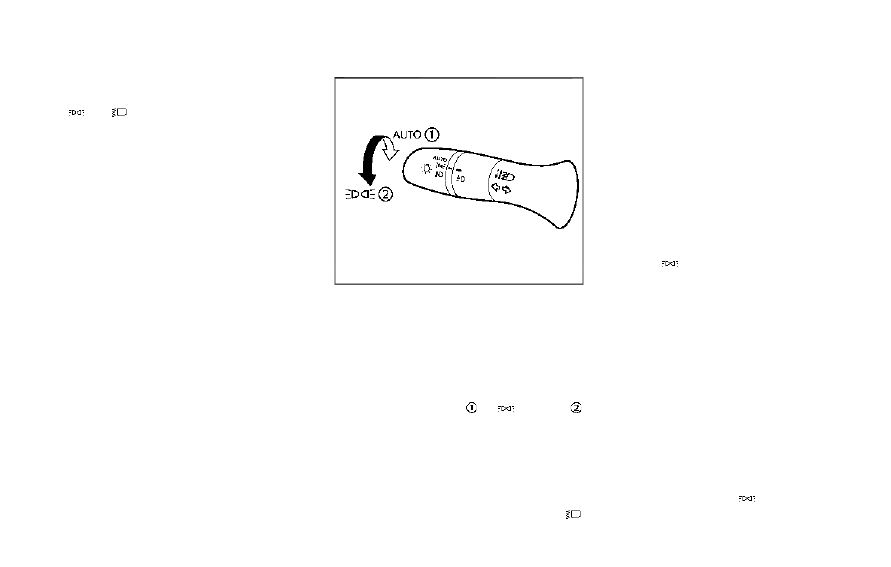
JVI1624X
Intelligent Auto Headlight system
Type A:
The Intelligent Auto Headlight system
allows the headlights to be set so they
turn on and off automatically.
To set the Intelligent Auto Headlight
system:
1. Make sure the headlight switch is in
the AUTO position
.
2. Place the ignition switch in the ON
position.
3. The Intelligent Auto Headlight system
automatically turns the headlights on
and off.
HEADLIGHT AND TURN SIGNAL SWITCH
-------------------------------------------------------------------------------------------------------------------------------------------------------------
To turn the Intelligent Auto Headlight
system off, turn the switch to the OFF,
or
position.
The Intelligent Auto Headlight system can
turn on the headlights automatically
when it is dark and turn off the headlights
when it is light.
The headlights will also be turned on
automatically at twilight or in rainy
weather (when the windshield wiper is
operated continuously).
If the ignition switch is placed in the OFF
position and one of the doors is opened
and this condition is continued, the head-
lights remain on for 5 minutes.
WAC0412X
Type B:
The Intelligent Auto Headlight system
allows the headlights to be set so they
turn on and off automatically.
To set the Intelligent Auto Headlight
system:
1. Make sure the headlight switch is in
the AUTO position
or
position .
2. Place the ignition switch in the ON
position.
3. The Intelligent Auto Headlight system
automatically turns the headlights on
and off.
To turn the Intelligent Auto Headlight
system off, turn the switch to the
position.
The Intelligent Auto Headlight system can
turn on the headlights automatically
when it is dark and turn off the headlights
when it is light.
The headlights will also be turned on
automatically at twilight or in rainy
weather (when the windshield wiper is
operated continuously).
If the ignition switch is turned to the ON
position when the parking brake is ap-
plied, the headlights remain off.
With the
position selected, the head-
lights turn off when the ignition switch is
placed in the OFF position, the shift lever
is in the P (Park) position, or the parking
brake is applied. (The front parking, tail,
license plate, and instrument lights are
on.)
How to turn off all lights:
With the AUTO position selected, all lights
turn off when the engine is restarted after
the parking brake is applied.
NOTE:
When driving at night, the headlights
remain on and cannot be turned off.
When the vehicle is stopped, the head-
lights can be turned off when the head-
light switch is in the
position.
With the AUTO position selected (head-
Instruments and controls
2-53
-------------------------------------------------------------------------------------------------------------------------------------------------------------

2-54
Instruments and controls
lights are on), the headlights will remain
on for 5 minutes when the ignition switch
is placed in the OFF position and one of
the doors is opened.
JVI0510X
Be sure not to put anything on top of
the photo sensor
located on the top
of the instrument panel. The photo
sensor controls the Intelligent Auto
Headlight; if it is covered, the photo
sensor reacts as if it is dark and the
headlights will illuminate.
Automatic headlights off delay:
You can keep the headlights on for up to
180 seconds after you place the ignition
switch in the OFF and open any door then
close all the doors. You can adjust the
period of the automatic headlights off
delay from 0 seconds (OFF) to 180 sec-
onds. The factory default setting is 45
seconds.
For automatic headlights off delay
setting, see “Vehicle Settings” (P.2-23).
-------------------------------------------------------------------------------------------------------------------------------------------------------------
Нет комментариевНе стесняйтесь поделиться с нами вашим ценным мнением.
Текст