
Chrysler Stratus Convertible. Manual — part 124
CONVERTIBLE TOP ADJUSTMENTS
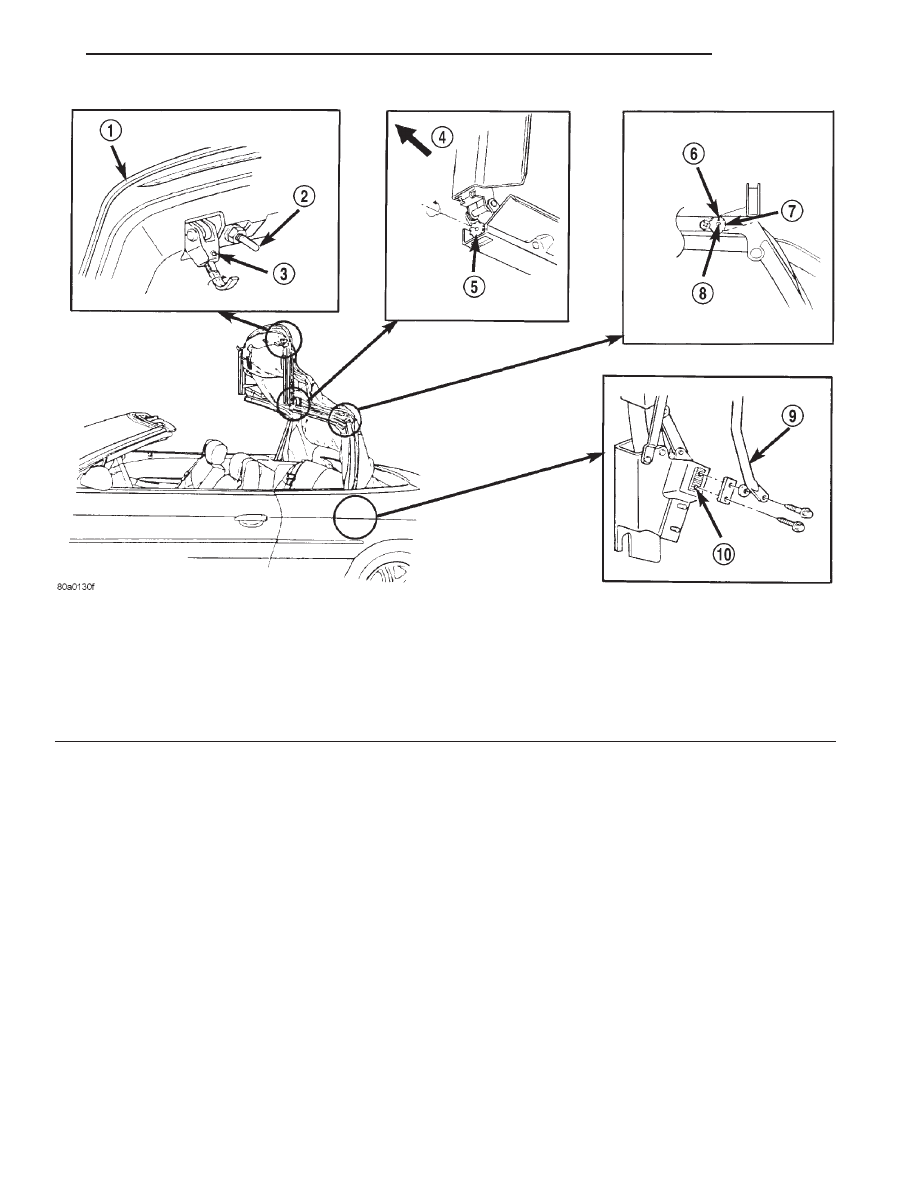
Refer to (Fig. 8) to determine which adjustment is
required. Refer to the appropriate procedure for more
information.
Fig. 8 Adjustment Locations
1 – TOP HEADER
2 – DOWEL PIN
3 – SET SCREW
4 – FRONT
5 – FRONT-TO-CENTER RAIL ADJUSTING SCREW
6 – TURN DART TOWARD REAR (HEADER MOVES FORWARD
AND UP)
7 – CAM
8 – TURN DART TOWARD FRONT (HEADER MOVES
REARWARD AND UP)
9 – BALANCE LINK
10 – SERRATED PLATE
JX
BODY
23 - 29
ADJUSTMENTS (Continued)
DOWEL PIN ADJUSTMENTS
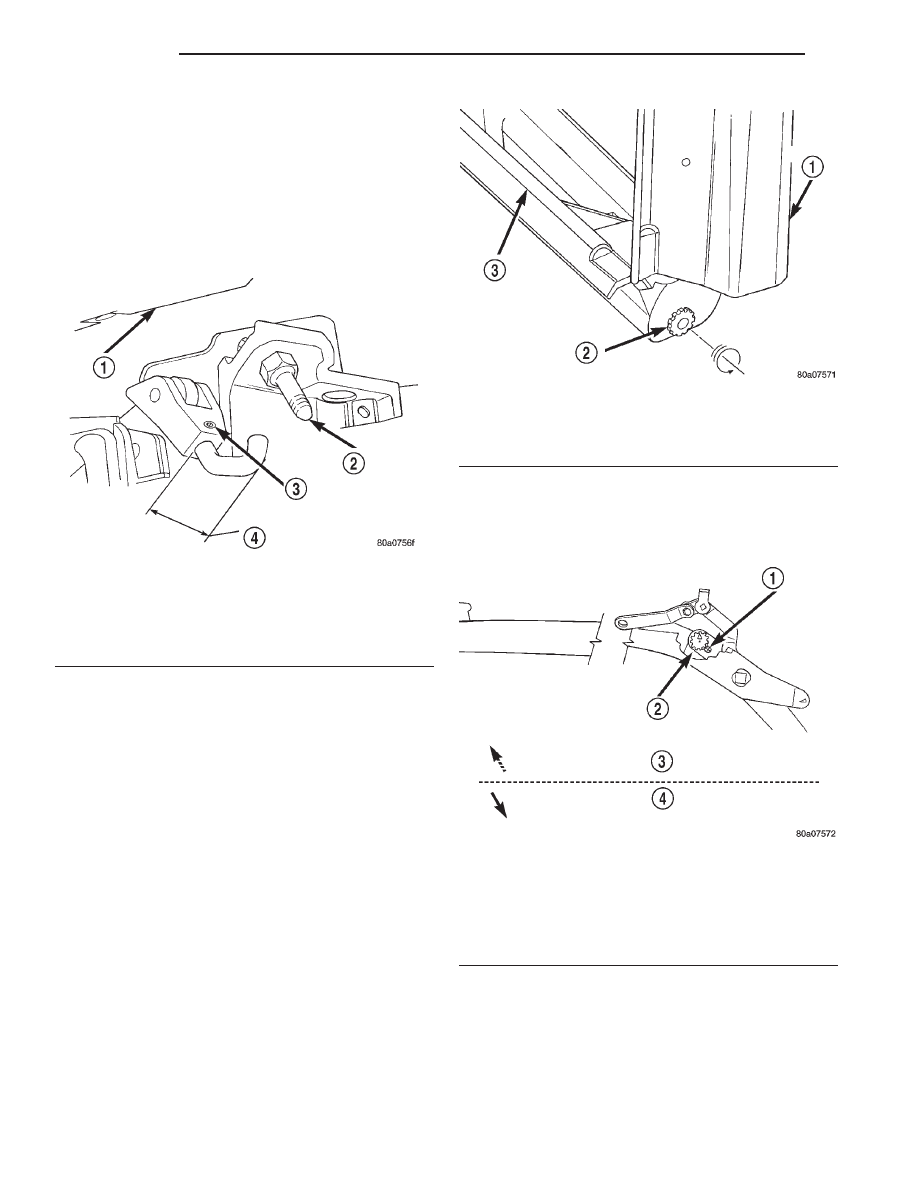
(1) Loosen dowel pins (Fig. 9).
(2) Position dowel pins to the center of the receiver
holes in the windshield header.
(3) Tighten dowel pins and verify adjustment.
NOTE: Refer to Cam Adjustment or Balance Link
Adjustment paragraphs of this section to adjust for-
ward or rearward position of the top header.
LATCH HOOK ADJUSTMENT
If the convertible top latching effort is excessive, it
can be reduced by lengthening the latch hook (Fig.
9). The top header weatherstrip requires enough
compression to prevent air and water leaks. Adjust
latch hook to achieve reasonable latching effort and
proper sealing.
FRONT TO CENTER RAIL ADJUSTMENT
To align the roof rail weatherstrips to the door and
quarter glass contact, adjust the front to center rail
adjusting screw (Fig. 10). To decrease pressure on
door glass turn adjuster inward. To increase pressure
on door glass turn adjuster outward.
TOP FRAME CAM ADJUSTMENT
The top frame cam changes forward or rearward
position of the top header in relation to the wind-
shield header. The cam turns inside the rear side rail
and thrust link (Fig. 11). It may be necessary to
lengthen the balance links 1 or 2 serrations after a
cam adjustment. The position of the cam high side
determines the angle between the center and rear
side rails. When the high side is fully forward, the
angle is at a minimum, and when turned rearward,
the angle is increased. An increased angle increases
the forward movement of the top. The cam high side
is indicated by a arrow on the cam threaded end.
TO ADJUST CAM SETTING
(1) Lower top to half down position to remove all
possible strain from the cam.
(2) Remove torx head screw.
(3) Using appropriate torx bit, rotate cam as nec-
essary and secure set screw.
Fig. 9 Roof Latch and Guide Dowel Pin
1 – HEADER
2 – DOWEL PIN
3 – SET SCREW
4 – 25.4 mm MIN
35.56 mm MAX
Fig. 10 Roof Rail Adjustment
1 – FRONT RAIL
2 – FRONT TO CENTER RAIL ADJUSTING SCREW
3 – CENTER RAIL
Fig. 11 Cam Assembly
1 – TORX SCREW
2 – CAM
3 – TURN DART TOWARDS REAR OF CAR
HEADER MOVES IN THIS DIRECTION
4 – TURN DART TOWARDS FRONT OF CAR
HEADER MOVES IN THIS DIRECTION
23 - 30
BODY
JX
ADJUSTMENTS (Continued)
BALANCE LINK ADJUSTMENT
WARNING: DO NOT PLACE HANDS OVER GAPS IN
MOVABLE CONVERTIBLE TOP COMPONENTS DUR-
ING SERVICING. PERSONAL INJURY CAN RESULT.
(1) Remove convertible top head lining as neces-
sary to gain access to adjusters.
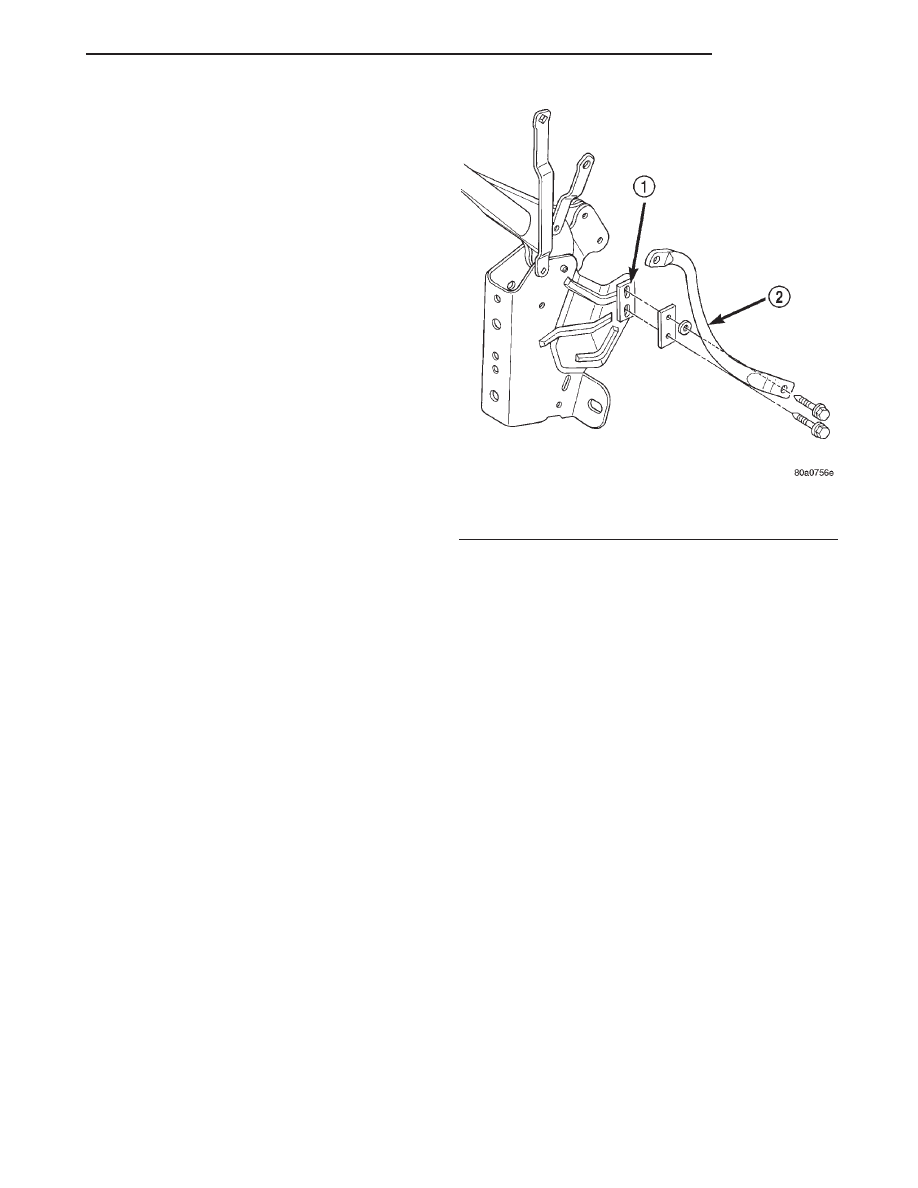
(2) With the top latched in up position, loosen both
bolts just enough to permit moving link up or down
(Fig. 12).
(3) Push upward in the area of the front to center
rail joint. Push rails up by hand as far as possible.
(4) With the balance link adjusting bolts loosened,
allow the balance link to seek proper position.
(5) Tighten bolts while rail is held in position.
SPECIFICATIONS
TORQUE SPECIFICATIONS
DESCRIPTION
TORQUE
Convertible Top
Header Latch Mounting Screw . . . . 5 to 7.3 N·m
(45 to 65 in. lbs.)
Seal Retainer Mounting Screw . . . . 2.8 to 4 N·m
(25 to 35 in. lbs.)
Number 4 bow
Retainer Mounting Screw . . . . . . . 1.1 to 2.3 N·m
(10 to 20 in. lbs.)
Fig. 12 Balance Link Adjustment
1 – SERRATED PLATE
2 – BALANCE LINK
JX
BODY
23 - 31
ADJUSTMENTS (Continued)
BODY COMPONENTS
TABLE OF CONTENTS
page
page
DESCRIPTION AND OPERATION
DIAGNOSIS AND TESTING
WATER LEAKS . . . . . . . . . . . . . . . . . . . . . . . . . . 33
WIND NOISE . . . . . . . . . . . . . . . . . . . . . . . . . . . . 34
SERVICE PROCEDURES
REMOVAL AND INSTALLATION
RADIATOR SUPPORT CROSSMEMBER . . . . . . . 41
GRILLE . . . . . . . . . . . . . . . . . . . . . . . . . . . . . . . . 41
HOOD LATCH . . . . . . . . . . . . . . . . . . . . . . . . . . . 41
HOOD LATCH RELEASE CABLE . . . . . . . . . . . . . 42
HOOD . . . . . . . . . . . . . . . . . . . . . . . . . . . . . . . . . 42
HOOD PROP-ROD . . . . . . . . . . . . . . . . . . . . . . . . 43
HOOD HINGE . . . . . . . . . . . . . . . . . . . . . . . . . . . 43
HOOD ADJUSTER BUMPER . . . . . . . . . . . . . . . . 43
COWL COVER . . . . . . . . . . . . . . . . . . . . . . . . . . . 44
BATTERY SPLASH SHIELD . . . . . . . . . . . . . . . . . 44
LEFT FRONT WHEELHOUSE SPLASH SHIELD . . 44
ACCESSORY DRIVE BELT SPLASH SHIELD . . . . 45
RIGHT FRONT WHEELHOUSE
SPLASH SHIELD. . . . . . . . . . . . . . . . . . . . . . . . 45
DOUBLE SIDED FOAM TAPE . . . . . . . . . . . . . . 46
EXTERIOR BADGEING/TAPE STRIPES
ATTACHED WITH ADHESIVES . . . . . . . . . . . . . 46
DOOR TRIM PANEL . . . . . . . . . . . . . . . . . . . . . . . 47
DOOR WATER DAM. . . . . . . . . . . . . . . . . . . . . . . 47
DOOR OUTSIDE HANDLE . . . . . . . . . . . . . . . . . . 47
DOOR LOCK CYLINDER . . . . . . . . . . . . . . . . . . . 48
LOCK CYLINDERS. . . . . . . . . . . . . . . . . . . . . . . . 48
DOOR LATCH . . . . . . . . . . . . . . . . . . . . . . . . . . . 48
DOOR LATCH STRIKER. . . . . . . . . . . . . . . . . . . . 49
LOCK BUTTON BELL CRANK . . . . . . . . . . . . . . . 50
DOOR CHECK STRAP . . . . . . . . . . . . . . . . . . . . . 50
DOOR . . . . . . . . . . . . . . . . . . . . . . . . . . . . . . . . . 50
DOOR HINGE . . . . . . . . . . . . . . . . . . . . . . . . . . . 51
DOOR OUTER BELT WEATHERSTRIP. . . . . . . . . 51
DOOR OPENING TRIM WELT . . . . . . . . . . . . . . . 52
DOOR INNER BELT WEATHERSTRIP . . . . . . . . . 52
DOOR GLASS . . . . . . . . . . . . . . . . . . . . . . . . . . . 52
DOOR WINDOW REGULATOR. . . . . . . . . . . . . . . 54
DOOR GLASS INNER BELT STABILIZER . . . . . . . 54
REAR VERTICAL GUIDE BAR . . . . . . . . . . . . . . . 54
SIDE VIEW MIRROR . . . . . . . . . . . . . . . . . . . . . . 55
SIDE VIEW MIRROR FLAG/DOOR GLASS
CHANNEL . . . . . . . . . . . . . . . . . . . . . . . . . . . . . 55
BODY SIDE MOLDING . . . . . . . . . . . . . . . . . . . . . 56
DECKLID . . . . . . . . . . . . . . . . . . . . . . . . . . . . . . . 56
DECKLID HINGE AND GAS SUPPORT
CYLINDER . . . . . . . . . . . . . . . . . . . . . . . . . . . . 57
DECKLID LATCH STRIKER . . . . . . . . . . . . . . . . . 57
DECKLID LATCH . . . . . . . . . . . . . . . . . . . . . . . . . 58
DECKLID LOCK CYLINDER . . . . . . . . . . . . . . . . . 58
DECKLID OPENING WEATHERSTRIP . . . . . . . . . 58
A-PILLAR WEATHERSTRIP RETAINER
AND MOLDING . . . . . . . . . . . . . . . . . . . . . . . . . 59
MOLDING . . . . . . . . . . . . . . . . . . . . . . . . . . . . . 59
HEADER/A-PILLAR WEATHERSTRIP . . . . . . . . . . 59
QUARTER PANEL WEATHERSTRIP. . . . . . . . . . . 60
SIDE RAIL WEATHERSTRIPS . . . . . . . . . . . . . . . 61
A-PILLAR TRIM PANEL . . . . . . . . . . . . . . . . . . . . 62
HEADER TRIM PANEL – RIGHT OR LEFT . . . . . . 62
COWL TRIM PANEL . . . . . . . . . . . . . . . . . . . . . . . 62
DOOR SILL TRIM PANEL . . . . . . . . . . . . . . . . . . . 63
FRONT SEAT BELT RETRACTOR . . . . . . . . . . . . 63
FRONT SEAT BELT BUCKLE . . . . . . . . . . . . . . . . 64
FLOOR CONSOLE . . . . . . . . . . . . . . . . . . . . . . . . 64
FORWARD INSTRUMENT PANEL CONSOLE . . . . 65
QUARTER TRIM PANEL. . . . . . . . . . . . . . . . . . . . 65
REAR OUTER SEAT BELT AND RETRACTOR . . . 66
REAR INNER SEAT BELT ASSEMBLY . . . . . . . . . 67
QUARTER WINDOW MODULE. . . . . . . . . . . . . . . 67
CARPET . . . . . . . . . . . . . . . . . . . . . . . . . . . . . . . 68
QUARTER PANEL OUTER BELT
WEATHERSTRIP/MOLDING . . . . . . . . . . . . . . . 68
ADJUSTMENTS
FRONT DOOR GLASS ADJUSTMENT . . . . . . . . . 70
DOOR LATCH ADJUSTMENT . . . . . . . . . . . . . . . . 73
SPECIAL TOOLS
BODY . . . . . . . . . . . . . . . . . . . . . . . . . . . . . . . . . 73
23 - 32
BODY
JX
Нет комментариевНе стесняйтесь поделиться с нами вашим ценным мнением.
Текст