
Chrysler Stratus Convertible. Manual — part 117
BODY
TABLE OF CONTENTS
page
page
PAINT . . . . . . . . . . . . . . . . . . . . . . . . . . . . . . . . . . . 1
STATIONARY GLASS. . . . . . . . . . . . . . . . . . . . . . . . 4
SEATS . . . . . . . . . . . . . . . . . . . . . . . . . . . . . . . . . . 10
CONVERTIBLE TOP. . . . . . . . . . . . . . . . . . . . . . . . 23
BODY COMPONENTS . . . . . . . . . . . . . . . . . . . . . . 32
SPECIFICATIONS . . . . . . . . . . . . . . . . . . . . . . . . . 74
PAINT
TABLE OF CONTENTS
page
page
DESCRIPTION AND OPERATION
POLISHING. . . . . . . . . . . . . . . . . . . . . . . . . . . . . 1
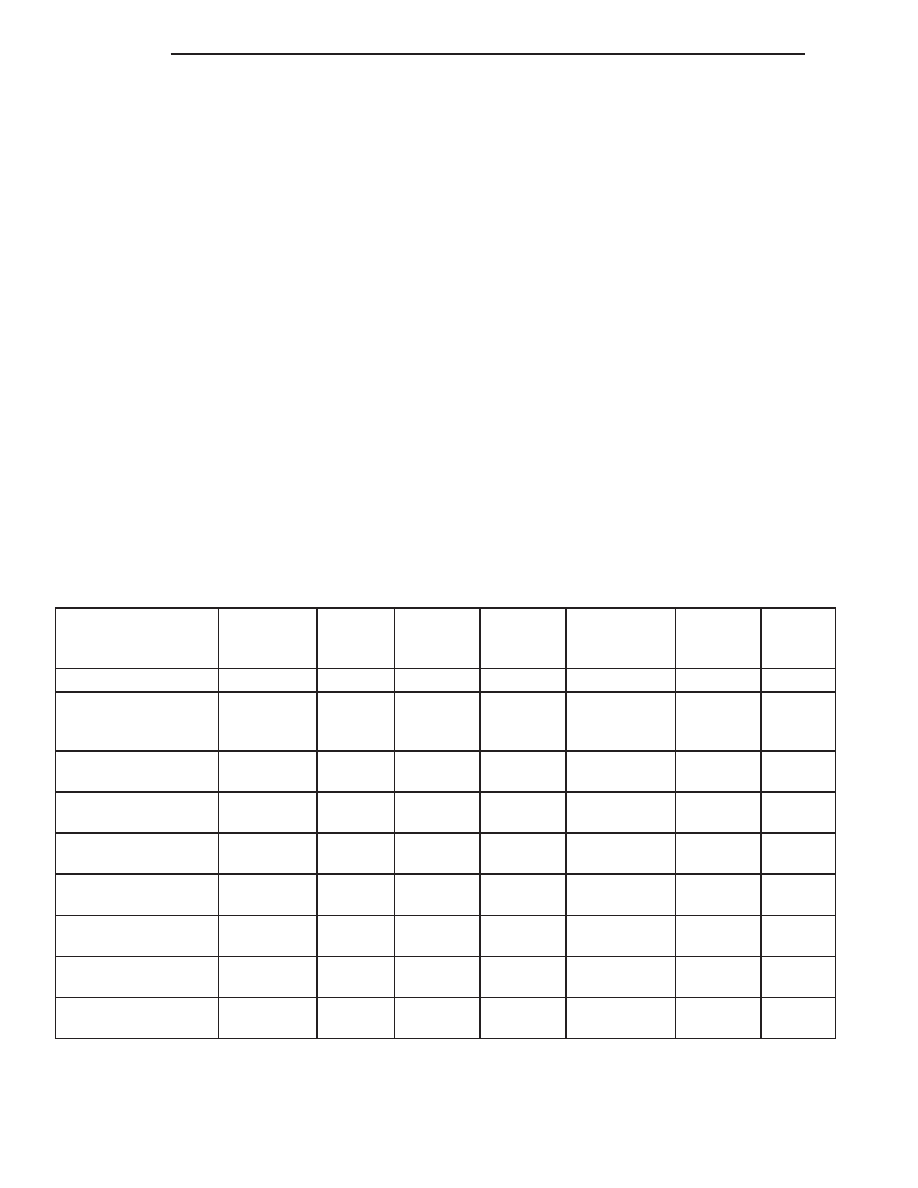
PAINTED SURFACE TOUCH-UP . . . . . . . . . . . . . . 2
AFTERMARKET PAINT REPAIR PRODUCTS . . . . . 2
DESCRIPTION AND OPERATION
PAINT CODE
DESCRIPTION
Exterior vehicle body colors are identified on the
Body Code plate. The plate is located on the in the
engine compartment and attached to the top of the
right frame rail. Refer to the Introduction section at
the front of this manual for body code plate descrip-
tion. The paint code is also identified on the Vehicle
Safety Certification Label which is located on the
drivers door shut face. The first digit of the paint
code listed on the vehicle indicates the sequence of
application, i.e.: P = primary coat, Q = secondary
coat. The codes listed in the Aftermarket Paint
Repair Products chart are used for manufacturing
purposes. The first digit may vary from the Body
Code Plate. The color names provided in the After-
market Paint Repair Products chart are the color
names used on most repair product containers.
BASE COAT/CLEAR COAT FINISH
DESCRIPTION
On most vehicles a two-part paint application (base
coat/clear coat) is used. Color paint that is applied to
primer is called base coat. The clear coat protects the
base coat from ultraviolet light and provides a dura-
ble high-gloss finish.
CAUTION: Do not use abrasive chemicals or com-
pounds on painted surfaces. Damage to finish can
result.
Do not use harsh alkaline based cleaning sol-
vents on painted surfaces. Damage to finish or
color can result.
FINESSE SANDING, BUFFING, AND
POLISHING
DESCRIPTION
Minor acid etching, orange peel, or smudging in
clear coat or single-stage finishes can be reduced
with light finesse sanding, hand buffing, and polish-
ing. If the finish has been finesse sanded in the
past, it cannot be repeated. Finesse sanding
operation should be performed by a trained
automotive paint technician.
CAUTION: Do not remove clear coat finish, if
equipped. Base coat paint must retain clear coat for
durability.
JX
BODY
23 - 1
PAINTED SURFACE TOUCH-UP
DESCRIPTION
When a painted metal surface has been scratched
or chipped, it should be touched-up as soon as possi-
ble to avoid corrosion. For best results, use Mopar
t
Scratch Filler/Primer, Touch-Up Paints and Clear Top
Coat. Refer to Introduction group of this manual for
Body Code Plate information.
WARNING: USE A OSHA APPROVED BREATHING
FILTER WHEN SPRAYING PAINT OR SOLVENTS IN
A
CONFINED
AREA.
PERSONAL
INJURY
CAN
RESULT.
TOUCH-UP PROCEDURE
(1) Scrape loose paint and corrosion from inside
scratch or chip.
(2) Clean affected area with Mopar
t Tar/Road Oil
Remover, and allow to dry.
(3) Fill the inside of the scratch or chip with a coat
of filler/primer. Do not overlap primer onto good sur-
face finish. The applicator brush should be wet
enough to puddle-fill the defect without running. Do
not stroke brush applicator on body surface. Allow
the filler/primer to dry hard.
(4) Cover the filler/primer with color touch-up
paint. Do not overlap touch-up color onto the original
color coat around the scratch or chip. Butt the new
color to the original color, if possible. Do not stroke
applicator brush on body surface. Allow touch-up
paint to dry hard.
(5) On vehicles without clear coat, the touch-up
color can be lightly finesse sanded (1500 grit) and
polished with rubbing compound.
(6) On vehicles with clear coat, apply clear top coat
to touch-up paint with the same technique as
described in Step 4. Allow clear top coat to dry hard.
If desired, Step 5 can be performed on clear top coat.
WARNING: AVOID PROLONGED SKIN CONTACT
WITH PETROLEUM OR ALCOHOL – BASED CLEAN-
ING SOLVENTS. PERSONAL INJURY CAN RESULT.
AVOID
PROLONGED
SKIN
CONTACT
WITH
PETROLEUM OR ALCOHOL – BASED CLEANING
SOLVENTS. PERSONAL INJURY CAN RESULT.
AFTERMARKET PAINT REPAIR PRODUCTS
EXTERIOR COLORS
EXTERIOR COLOR
DAIMLER
CHRYSLER
CODE
PPG
DuPONT
S-W
M-S **
AKZ0/
NOBEL
SIKKENS
SPIES
HECKER
ICI **
Black Clear Coat
DX8
9700
F0204
34858
CHA85:DX8
73328
TC60B
Bright
Silver Metallic Clear
Coat
WS2
5464
F7999
56150
CHA99:WS2
74611
KDP8B
Bright White Clear
Coat
GW7
4037
B8833
37298
CHA88:GW7
11751
TA45B
Champagne Pearl
Metallic Pearl Coat
VTE
5360
B9825
55700
CHA98:VTE
33686
JAF2B
Deep Cranberry
Pearl Coat
VMT
5359
B9842
54119
CHA98:VMT
33686
GJX2B
Inferno Red Tinted
Pearl Coat
WEL
5469
5470
B9843
56090
CHA99:WEL
34461
KDR5B
Light Cypress Green
Pearl Coat
WG2
5471
B9843
56090
CHA99:WG2
65521
KDH3B
Shale Green Metallic
Clear Coat
XGR
5577
F9240
57765
CHA00:XGR
66088
PVJ8B
Taupe Frost Pearl
Coat
TTK
5244
B9750
52567
CHA97:TTK
80595
FNE5B
*BASF, Glasurit, Herberts and Standox use the DaimlerChrysler paint code.
**S-W = Sherwin-Williams, M-S = Martin Senour, ICI = Autocolor
23 - 2
BODY
JX
DESCRIPTION AND OPERATION (Continued)
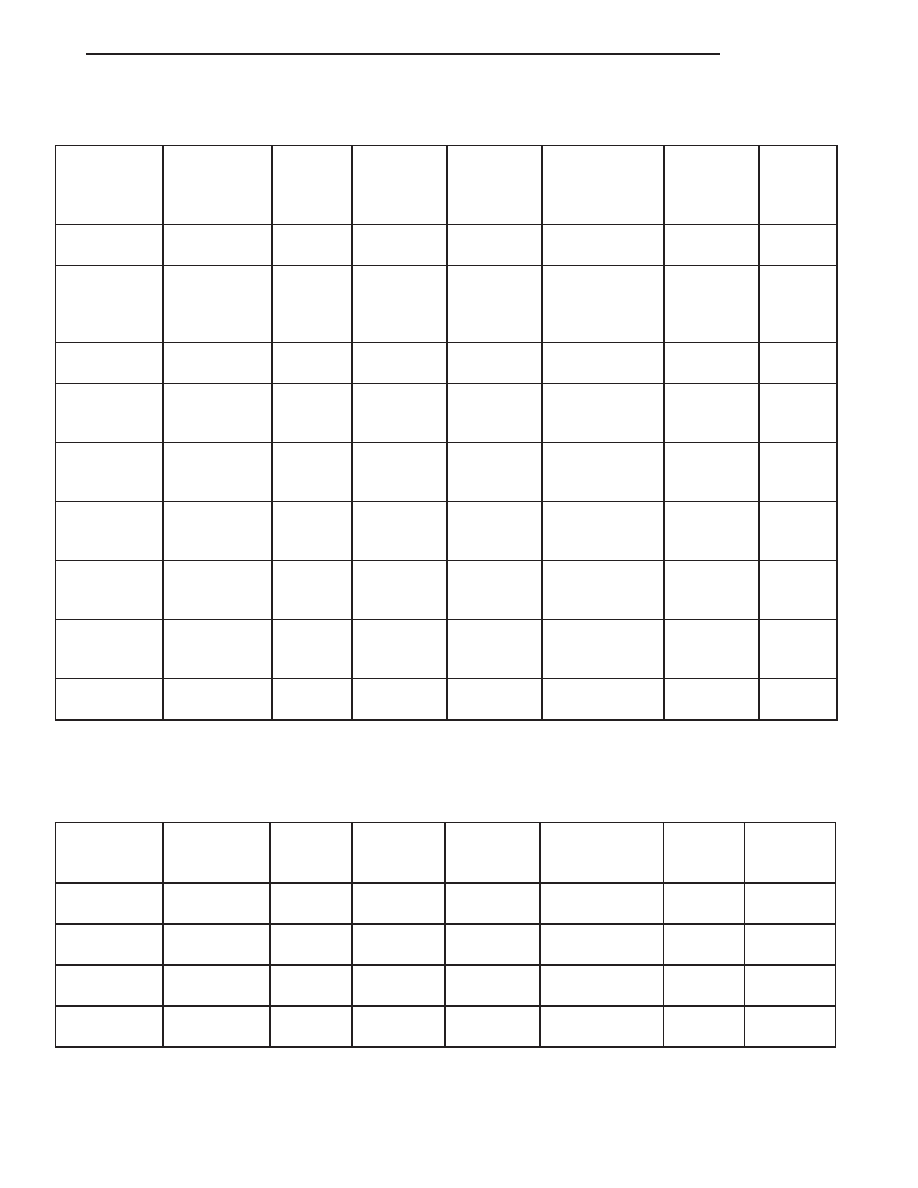
LOWER BODY APPLIQUE COLORS
LOWER
BODY
APPLIQUE
COLORS
DAIMLER
CHRYSLER
CODE
PPG
DuPONT
S-W
M-S **
AKZ0/NOBEL
SIKKENS
SPIES
HECKER
ICI **
Black Clear
Coat
DX8
9700
F0204
34858
CHA85:DX8
73328
TC60B
Bright
Silver
Metallic Clear
Coat
WS2
5464
F7999
56150
CHA99:WS2
74611
KDP8B
Bright White
Clear Coat
GW7
4037
B8833
37298
CHA88:GW7
11751
TA45B
Champagne
Pearl Metallic
Pearl Coat
VTE
5360
B9825
55700
CHA98:VTE
33686
JAF2B
Deep
Cranberry
Pearl Coat
VMT
5359
B9842
54119
CHA98:VMT
33686
GJX2B
Inferno Red
Tinted Pearl
Coat
WEL
5469
5470
B9843
56090
CHA99:WEL
34461
KDR5B
Light Cypress
Green Pearl
Coat
WG2
5471
B9843
56090
CHA99:WG2
65521
KDH3B
Shale Green
Metallic Clear
Coat
XGR
5577
F9240
57765
CHA00:XGR
66088
PVJ8B
Taupe Frost
Pearl Coat
TTK
5244
B9750
52567
CHA97:TTK
80595
FNE5B
INTERIOR COLORS
INTERIOR
COLORS
DAIMLER
CHRYSLER
CODE
PPG
DuPONT
S-W
M-S **
AKZO/NOBEL
SIKKENS
SPIES
HECKER
ICI **
Agate Light
Camel
AK
9856
2-1586
C9208
B8696
45994
60115
CHALAZI
CHARK4I
75016
7WC8
7WC5
Agate
AZ
9856
2-1461
C9208
45994
CHALAZI
75016
7WC8
Camel
K5
27731
2-1584
C9603
51541
CHARK5I
81796
7VX6
Silver Fern
JK
35798
2-1577
C9516
50510
CHARJKI
75061
7WB4
JX
BODY
23 - 3
DESCRIPTION AND OPERATION (Continued)
STATIONARY GLASS
TABLE OF CONTENTS
page
page
DESCRIPTION AND OPERATION
SAFETY PRECAUTIONS . . . . . . . . . . . . . . . . . . . . 4
REMOVAL AND INSTALLATION
WINDSHIELD . . . . . . . . . . . . . . . . . . . . . . . . . . . . . 4
QUARTER GLASS . . . . . . . . . . . . . . . . . . . . . . . . . 6
QUARTER WINDOW MODULE . . . . . . . . . . . . . . . 7
ADJUSTMENTS
QUARTER GLASS ADJUSTMENT . . . . . . . . . . . . . 8
DESCRIPTION AND OPERATION
SAFETY PRECAUTIONS
DESCRIPTION
WARNING: DO
NOT
OPERATE
THE
VEHICLE
WITHIN 24 HOURS OF WINDSHIELD INSTALLATION.
IT TAKES AT LEAST 24 HOURS FOR URETHANE
ADHESIVE TO CURE. IF IT IS NOT CURED, THE
WINDSHIELD MAY NOT PERFORM PROPERLY IN
AN ACCIDENT.
URETHANE ADHESIVES ARE APPLIED AS A SYS-
TEM. USE GLASS CLEANER, GLASS PREP SOL-
VENT, GLASS PRIMER, PVC (VINYL) PRIMER AND
PINCH WELD (FENCE) PRIMER PROVIDED BY THE
ADHESIVE MANUFACTURER. IF NOT, STRUCTURAL
INTEGRITY COULD BE COMPROMISED.
DAIMLERCHRYSLER DOES NOT RECOMMEND
GLASS
ADHESIVE
BY
BRAND.
TECHNICIANS
SHOULD REVIEW PRODUCT LABELS AND TECHNI-
CAL DATA SHEETS, AND USE ONLY ADHESIVES
THAT THEIR MANUFACTURES WARRANT WILL
RESTORE A VEHICLE TO THE REQUIREMENTS OF
FMVSS 212. TECHNICIANS SHOULD ALSO INSURE
THAT PRIMERS AND CLEANERS ARE COMPATIBLE
WITH THE PARTICULAR ADHESIVE USED.
BE SURE TO REFER TO THE URETHANE MANU-
FACTURER’S
DIRECTIONS
FOR
CURING
TIME
SPECIFICATIONS, AND DO NOT USE ADHESIVE
AFTER ITS EXPIRATION DATE.
VAPORS THAT ARE EMITTED FROM THE URE-
THANE ADHESIVE OR PRIMER COULD CAUSE
PERSONAL INJURY. USE THEM IN A WELL-VENTI-
LATED AREA.
SKIN
CONTACT
WITH
URETHANE ADHESIVE
SHOULD BE AVOIDED. PERSONAL INJURY MAY
RESULT.
ALWAYS WEAR EYE AND HAND PROTECTION
WHEN WORKING WITH GLASS.
CAUTION: Protect all painted and trimmed surfaces
from coming in contact with urethane or primers.
Be careful not to damage painted surfaces when
removing moldings or cutting urethane around
windshield.
It is difficult to salvage a windshield during the
removal operation. The windshield is part of the
structural support for the roof. The urethane bonding
used to secure the windshield to the fence is difficult
to cut or clean from any surface. If the moldings are
set in urethane, it would also be unlikely they could
be salvaged. Before removing the windshield, check
the availability of the windshield and moldings from
the parts supplier.
REMOVAL AND INSTALLATION
WINDSHIELD
The urethane adhesive holding the windshield to
the opening pinch weld (fence) can be cut using a
sharp cold knife from the exterior of the vehicle.
Using the cold knife method is effective if the wind-
shield is already broken. If the glass must be sal-
vaged, cutting the urethane adhesive from the
interior of the vehicle using a reciprocating or oscil-
lating power knife is recommended.
WINDSHIELD REMOVAL – EXTERIOR METHOD
(1) Open convertible top.
(2) Remove
header/A-pilllar
weatherstrip
from
weatherstrip retainers.
(3) Remove A-pillar
weatherstrip
retainer
and
molding.
(4) Remove header weatherstrip/molding.
(5) Mark top edge of the windshield glass at three
locations on the header.
(6) Remove windshield wiper arms.
(7) Remove cowl cover.
(8) Place protective covers over instrument panel
and hood.
(9) Using a sharp cold knife, cut urethane adhe-
sive holding the windshield to the A-pillars, header
and cowl pinch weld fences (Fig. 1). A power cutting
device can be used if available.
23 - 4
BODY
JX
Нет комментариевНе стесняйтесь поделиться с нами вашим ценным мнением.
Текст