
Chrysler Stratus Convertible. Manual — part 226
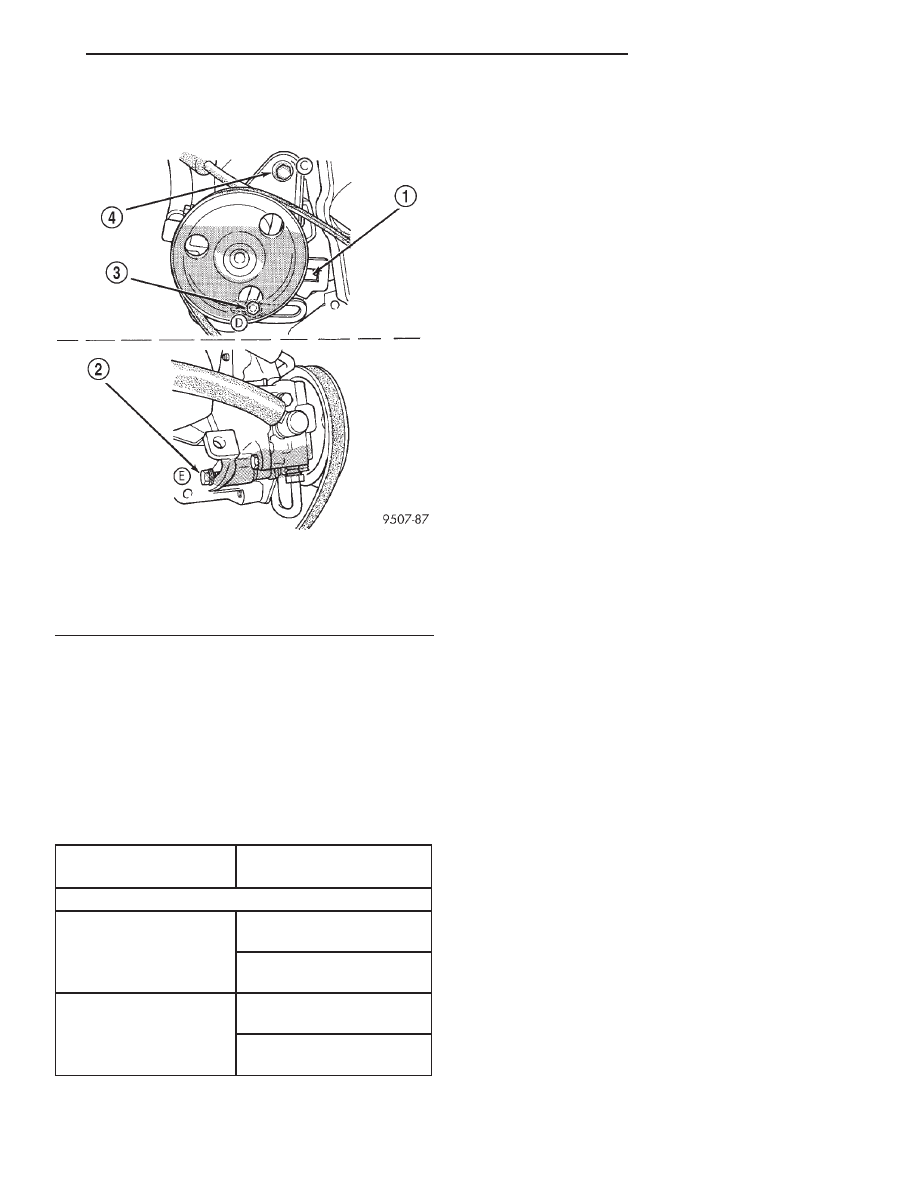
(2) From under the vehicle loosen locking bolts (D)
and (E) (Fig. 27).
(3) Install the belt. Adjust belt tension with 1/2 in.
breaker bar installed in adjusting bracket. See Belt
Tension Chart.
(4) Tighten locking bolt (D) to 54 N·m (40 ft. lbs.)
(Fig. 27).
(5) Tighten locking bolt (E) to 28 N·m (250 in.
lbs.).
(6) Tighten pivot bolt (C) to 54 N·m (40 ft. lbs.).
CLEANING AND INSPECTION
WATER PUMP—2.0L ENGINES
CLEANING
Clean gasket mating surfaces as necessary.
INSPECTION
Replace water pump body assembly if it has any of
these defects:
(1) Cracks or damage on the body.
(2) Coolant leaks from the shaft seal, evident by
coolant traces on the pump body.
(3) Loose or rough turning bearing.
(4) Impeller rubs either the pump body or the
engine block.
(5) Impeller loose or damaged.
(6) Sprocket or sprocket flange loose or damaged.
ACCESSORY DRIVE BELT
CLEANING
Clean all foreign debris from belt pulley grooves.
The belt pulleys must be free of oil, grease, and cool-
ants before installing the drive belt.
INSPECTION
Belt replacement under any or all of the following
conditions is required:
• Excessive wear
• Frayed cords
• Severe glazing
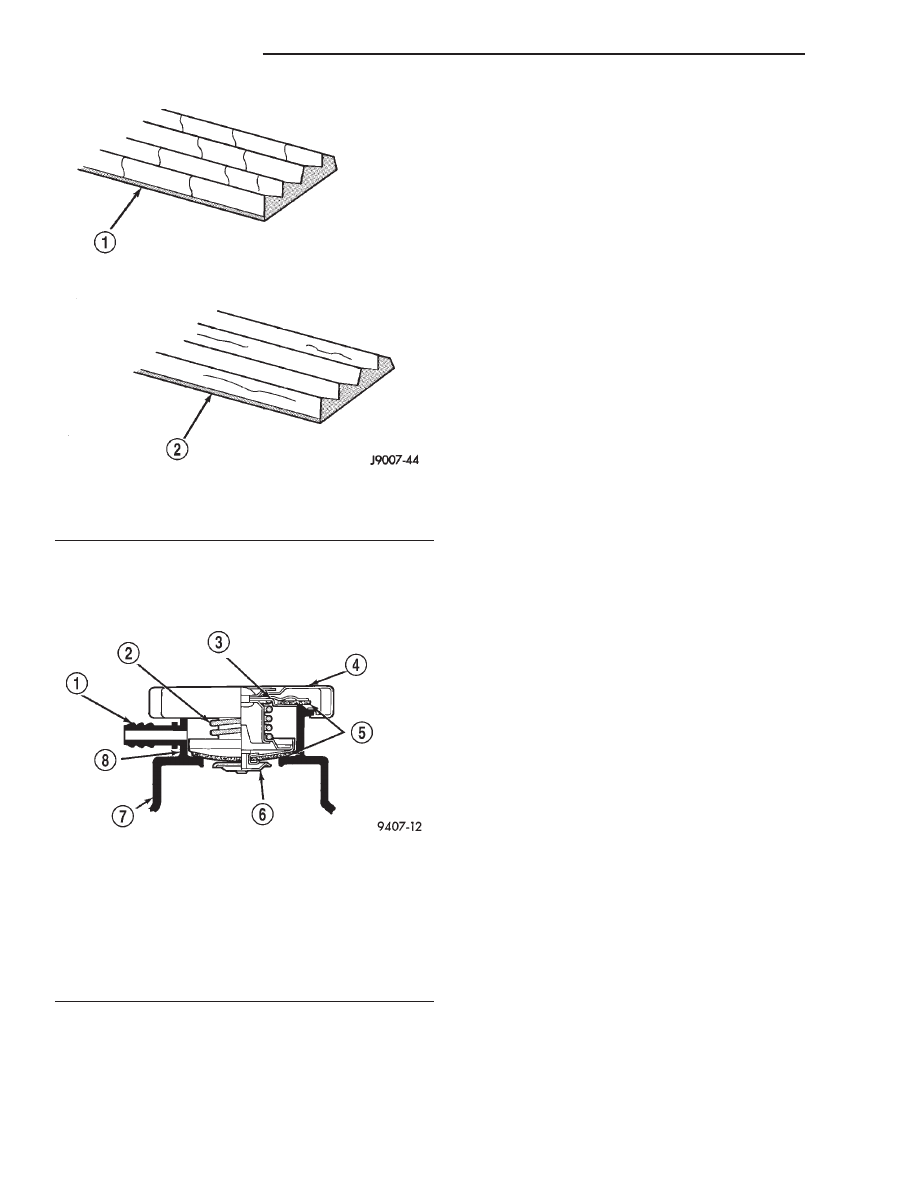
Poly-V Belt system may develop minor cracks
across the ribbed side. These minor cracks are con-
sidered normal and acceptable. Cracks parallel are
not (Fig. 28).
NOTE: Do not use any type of belt dressing or
restorer on Poly-V Belts.
COOLING SYSTEM PRESSURE CAP
CLEANING
Use only a mild soap to clean the pressure cap.
INSPECTION
Hold the cap in your hand, right side up (Fig. 29).
The vent valve at the bottom of the cap should open.
If the rubber gasket has swollen, preventing the
valve from opening, replace the cap.
Hold the cleaned cap in your hand, upside down.
If any light can be seen between vent valve and the
rubber gasket, replace the cap. Do not use a
replacement cap that has a spring to hold the
vent shut.
Fig. 27 Power Steering Belt Adjustment
1 – 1/2 INCH SQUARE OPENING
2 – LOCKING BOLT
3 – LOCKING BOLT
4 – PIVOT BOLT
BELT TENSION CHART
ACCESSORY DRIVE
BELTS
GAUGE
2.0L ENGINES
Air Conditioning
Compressor &
Generator
New
Belt:
667 N (150 lbs.)
Used
Belt:
356 N (80 lbs.)
Power Steering Pump
New
Belt:
578 N (130 lbs.)
Used
Belt:
356 N (80 lbs.)
JX
COOLING SYSTEM
7 - 23
REMOVAL AND INSTALLATION (Continued)
A replacement cap must be of the type designed for
coolant reserve systems. This design ensures coolant
return to the radiator.
RADIATOR
CLEANING
Clean radiator fins are necessary for good heat
transfer. The radiator and air conditioning fins
should be cleaned when an accumulation of debris
has occurred. With the engine cold, apply cold water
and compressed air to the back (engine side) of the
radiator to flush the radiator and/or A/C condenser of
debris.
INSPECTION
Inspect the radiator side tanks for cracks, broken
or missing fittings also inspect the joint where the
tanks seam up to the radiator core for signs of leak-
age and/or deteriorating seals.
Inspect radiator core for corroded, bent or missing
cooling fins. Inspect the core for bent or damaged
cooling tubes.
COOLING SYSTEM
CLEANING
CAUTION: Internal
radiator
pressure
must
not
exceed 138 kPa (20 psi) as damage to radiator may
result.
Reverse flushing of cooling system is the forcing of
water through the cooling system. This is done using
air pressure in the opposite direction of normal cool-
ant flow. It is usually only necessary with very dirty
systems with evidence of partial plugging.
(1) Drain cooling system. Remove thermostat hous-
ing and thermostat. Install thermostat housing.
(2) Connect a suitable cooling system flusher and
follow instructions supplied with flusher.
INSPECTION
After performing a flush procedure, inspect all
hoses, clamps and connections for deterioration and
leaks. Inspect radiator and heater core for leaks.
TRANSAXLE OIL COOLER
CLEANING
For cooler flushing procedure, refer to TRAN-
SAXLE.
Clean debris from cooling fins on external (air-to-
oil) cooler as necessary.
INSPECTION
Inspect all hoses, tubes, clamps and connections for
leaks, cracks, or damage. Replace as necessary. Use
only approved transmission oil cooler hoses that are
molded to fit the space available.
Inspect external coolers for leaks, loose mounts, or
damage. Replace as necessary.
Fig. 28 Drive Belt Wear Pattern
1 – NORMAL CRACKS BELT OK
2 – NOT NORMAL CRACKS REPLACE BELT
Fig. 29 Cooling System Pressure Cap
1 – OVERFLOW NIPPLE
2 – MAIN SPRING
3 – GASKET RETAINER
4 – STAINLESS-STEEL SWIVEL TOP
5 – RUBBER SEALS
6 – VENT VALVE
7 – THERMOSTAT HOUSING/ENGINE OUTLET CONNECTOR
8 – FILLER NECK
7 - 24
COOLING SYSTEM
JX
CLEANING AND INSPECTION (Continued)
ADJUSTMENTS
BELT TENSION GAUGE METHOD
For conventional belts and Poly-V belts, use belt
tensioning gauge Special Tool 7198 to obtain proper
belt tension.
Adjust the belt tension for a New or Used belt as
prescribed in the Belt Tension Chart.
SPECIFICATIONS
COOLING SYSTEM CAPACITY
TORQUE
SPECIAL TOOLS
COOLING SYSTEM
BELT TENSION CHART
ACCESSORY DRIVE
BELTS
GAUGE
2.0L ENGINES
Air Conditioning
Compressor &
Generator
New
Belt:
667 N (150 lbs.)
Used
Belt:
356 N (80 lbs.)
Power Steering Pump
New
Belt:
578 N (130 lbs.)
Used
Belt:
356 N (80 lbs.)
COOLING SYSTEM CAPACITY CHART
Engine
2.0L
COOLANT CAPACITY*
Liters
8.0
U.S. Qts.
8.5
DESCRIPTION
N·m
Ft.
Lbs.
In.
Lbs.
A/C Condenser to Radiator—
Fasteners
5
—
45
Thermostat Housing
2.0L—Bolts
12.5
—
110
Water Pump Mounting
2.0L—Bolts
12
—
105
Water Pump Inlet Tube to
Block—Bolts
12
—
105
Fan Module to Radiator—
Fasteners
7
—
65
Fan Motor to Shroud—
Fasteners
5
—
45
Transmission Oil Cooler
Hose—Clamps
2
—
18
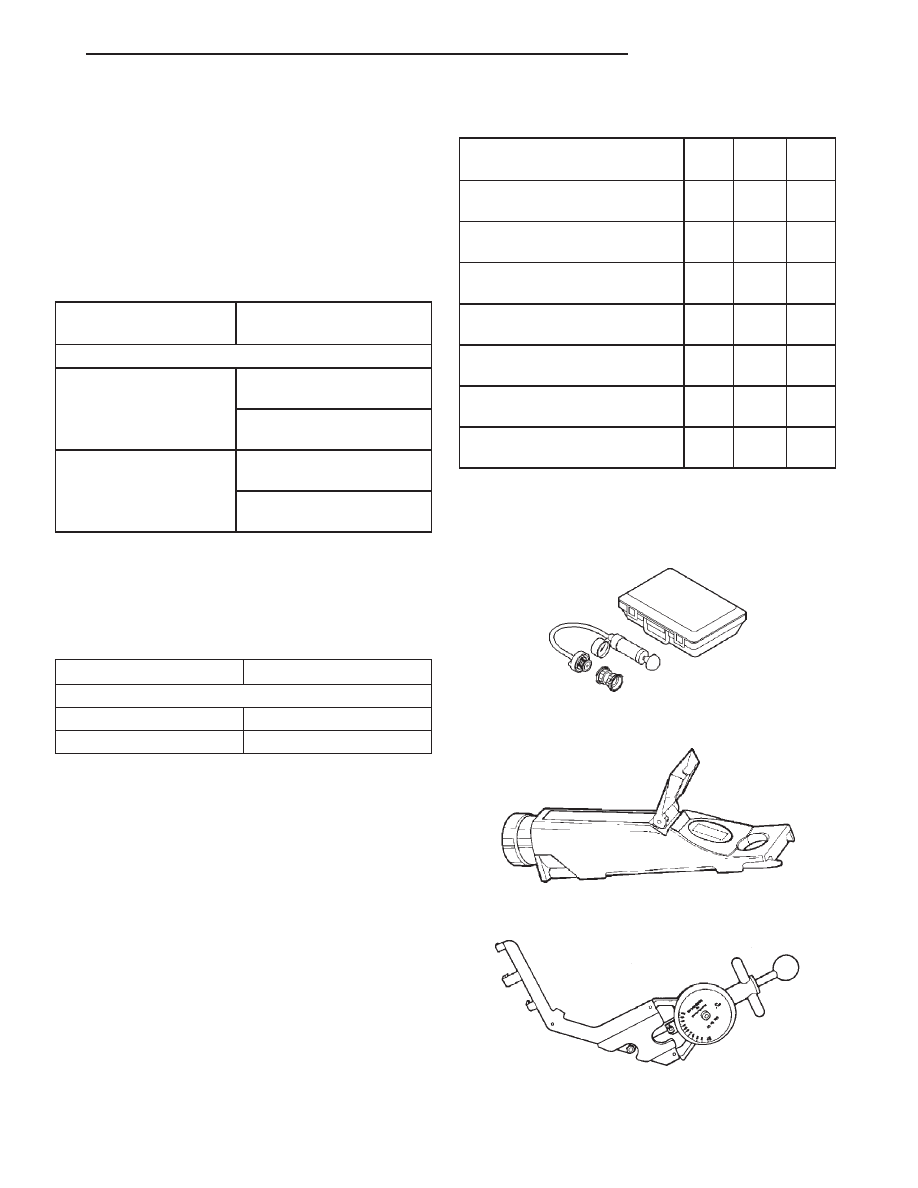
Cooling System Tester 7700
Coolant Refractometer 8286
Fig. 30 Belt Tension Gauge 7198
JX
COOLING SYSTEM
7 - 25
Нет комментариевНе стесняйтесь поделиться с нами вашим ценным мнением.
Текст