Chery Tiggo 5 (T21). Service manual — part 170

15–
15
15
Starter Relay Inspection
1. Remove the starter relay from engine compartment fuse
and relay box.
2. Check starter relay.
a. Using a digital multimeter, measure resistance according to the value(s) in the table below.
Standard Resistance
If result is not as specified, replace the starter relay.
RT21150040
-
+
30
85
86
87
Start relay
ERL Y09
Multimeter Connection
Specified Condition
30 - 87
10 kΩ or more
30 - 87
Below 1 Ω (when battery voltage is applied to
terminals 85 and 86)
15–
16
15
Precautions for Starting System
1. For models with PEPS system, shift the transmission to P or N before starting and firmly depress the clutch
pedal (for MT model) or brake pedal (for CVT model) until engine switch indicator illuminates in green.
2. For models without PEPS system, shift the transmission to neutral and apply parking brake before starting,
and depress the clutch pedal while starting.
3. For models with PEPS system, power supply mode (LOCK, ACC, ON) is always stored in vehicle. When
the battery cable is disconnected and reconnected, the power supply returns to the mode it was in before
the battery cable was disconnected. Be sure to turn engine switch off before disconnecting the cable from
battery terminal. Be careful if the power supply condition before the battery became depleted is not known.
4. Make sure that battery is fully charged to reduce the repeat operating time of starter.
After the battery is disconnected and reconnected, be sure to wait 10 seconds or more before engine start.
The engine may not start immediately after battery is reconnected.
5. Do not start engine for more than 5 seconds each time, the repeat starting time should be not less than
10 - 15 seconds, and the consecutive starting is not allowed more than 3 times.
6. If starter cannot stop, turn off ignition switch immediately, or remove negative battery cable to find the
problem.
7. Check starter circuit frequently to make sure that each wire for starting system is connected securely and
in good insulation.
8. Generally, perform maintainable service for starter when servicing the vehicle. Also, the maintenance
interval can be shortened or extended properly depending on actual conditions.
9. Remove the negative battery cable before removing the starter.
15–
17
15
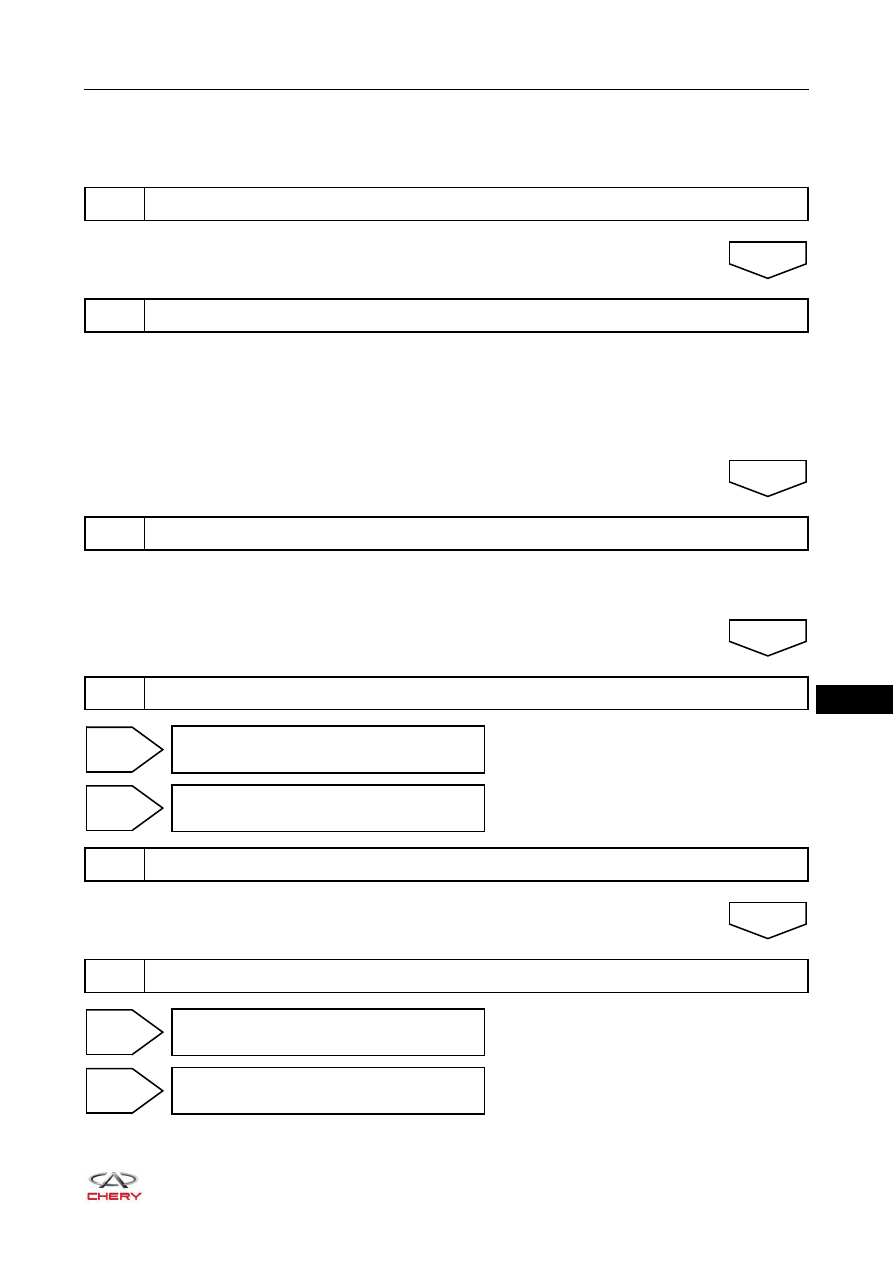
Diagnosis Procedure
HINT:
Perform troubleshooting according to the procedures below.
HINT:
In troubleshooting, confirm that the problem symptoms have been accurately identified. Preconceptions
should be discarded in order to make an accurate judgement. To clearly understand what the problem
symptoms are, it is extremely important to ask the customer about the problem and the conditions at the time
the malfunction occurred.
Standard voltage: 11 to 14 V
If voltage is below 11 V, recharge or replace the battery before proceeding to next step.
1
Vehicle brought to workshop
2
Customer problem analysis check
3
Check battery voltage
4
Read DTCs
NEXT
NEXT
NEXT
go to step 5
go to step 7
DTC
occurs
No
DTC
5
Record DTCs, and clear DTCs
6
Verify and duplicate problem: simulate problem occurring condition, and read DTCs again
NEXT
For current DTC, go to step 8
For history DTC, go to step 9
DTC
occurs
No
DTC
15–
18
15
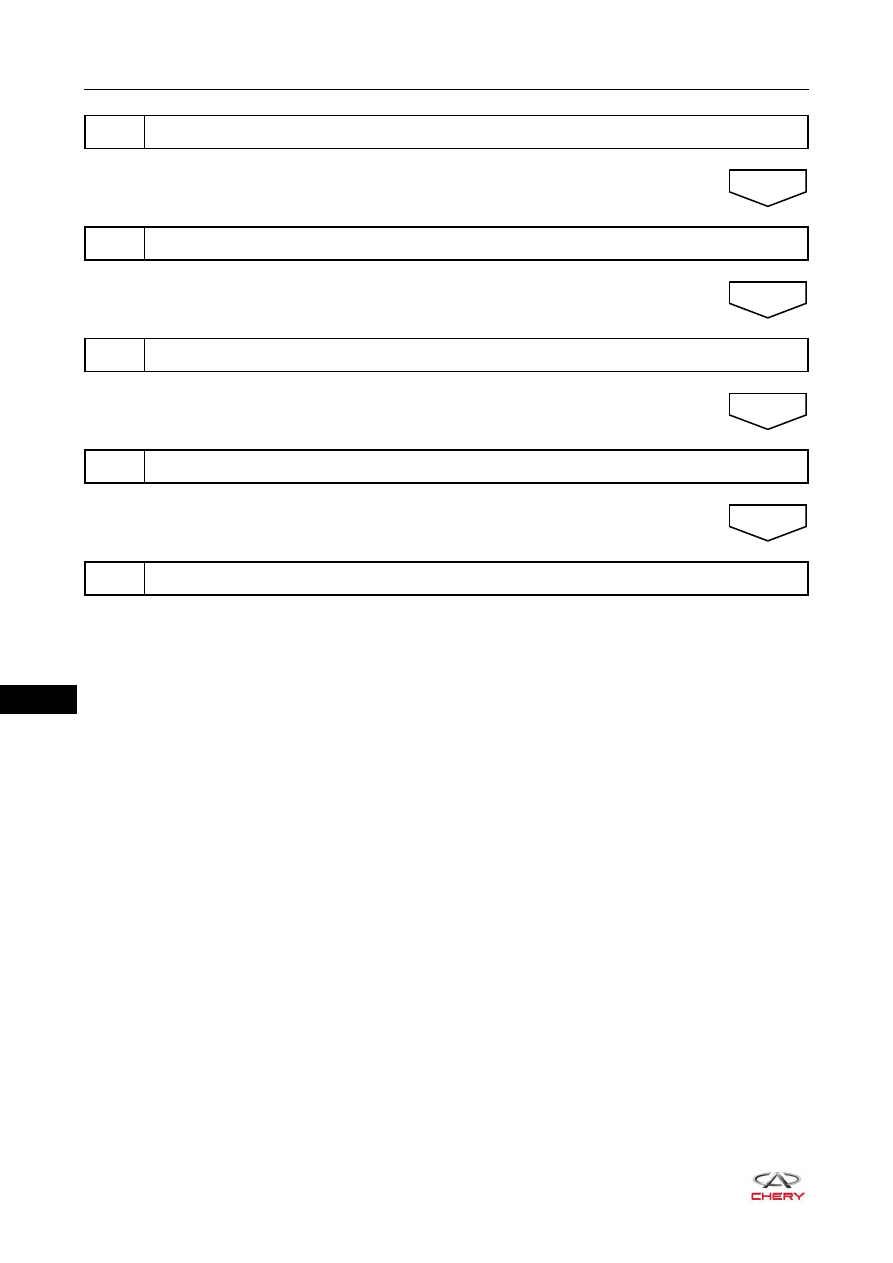
7
Problem repair (no DTC), then go to step 10
8
Troubleshoot according to Diagnostic Trouble Code (DTC) chart, then go to step 10
9
Troubleshoot according to Problem Symptoms Table, then go to step 10
10
Confirm problem is repaired, and perform repair completion inspection
11
End
NEXT
NEXT
NEXT
NEXT
Нет комментариевНе стесняйтесь поделиться с нами вашим ценным мнением.
Текст